Etcher
- Price: free.
- Platforms: Windows, macOS, Linux.
A cross-platform application with a simple and user-friendly interface that will help you deploy the installation image to a memory card or USB flash drive. All you need to do is select the image file, the target drive and click the Flash button. After writing, Etcher can check the readability of the disk and automatically unmount it.
Bootable Windows 7 USB flash drive in Rufus
Rufus is one of the most popular free programs for creating bootable USB drives, entirely in Russian, which, among other things, will help you make a bootable Windows 7 installation flash drive.
The procedure in the program is very simple:
- Select the flash drive and, by clicking the “Select” button, specify the path to the Windows 7 ISO image.
- Select the disk partition scheme (MBR for Legacy and GPT for UEFI).
- In general, the remaining parameters should not be changed; just click the “Start” button to start recording the drive. Existing data from the flash drive will be deleted.
Detailed instructions on using the latest version of the program and where to download it are in the article: Bootable USB flash drive in Rufus.
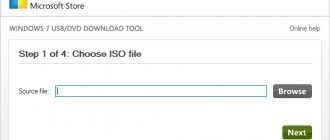
Windows USB/DVD Download Tool
- Price: free.
- Platform: Windows.
A proprietary Microsoft utility that was originally designed to record images of Windows 7. However, it also supports newer versions of this operating system and is still relevant. Thanks to the ascetic interface, it is simply unrealistic to make any mistakes during the work process.
Burning Windows to USB Drive
Using a flash drive to reinstall Windows is not always just a matter of convenience. Often this is a banal necessity and the absence of an alternative. And here, it would seem, what could be simpler - just copy the necessary files from a DVD or downloaded from the Internet directly to a flash drive, and that’s it. But in fact, simply copying files does not make the USB drive an installation drive. To do this, you will have to perform a number of actions that will help you create from any flash drive from 4 GB or more a full-fledged installation disk with any modern version of Windows OS.
Required Devices
There are several ways to create a bootable USB flash drive. Moreover, they all have a fairly similar mechanism of action and take 10-15 minutes. Using any of them, you can easily create a Flash installation drive for any version of Windows. For example, if you know how to create a bootable USB flash drive for Windows 8, then bootable USBs for other versions of this operating system will be created in a similar way. True, first you need to prepare, and for this you need :
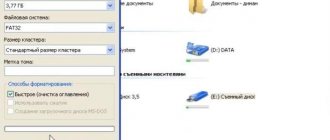
- Directly a USB flash drive of 4 GB or more for Windows versions 7, 8, 10. In the case of XP, you can use a drive of a smaller capacity.
- An image of the required operating system in ISO format. You can create it yourself from the installation disk, or by downloading it from the Internet on the official website or from a torrent.
- One of the utilities that allows you to work with images and flash drives: UltraISO, WinSetupFromUSB, Rufus, winToBootic or another.
- In the computer boot menu, set the priority to boot from a USB drive.
Having all this in place, you can proceed directly to creating an installation flash drive.
Install Disk Creator
- Price: free.
- Platform: macOS.
A very simple utility for burning bootable flash drives with macOS, which even the most inexperienced user can handle. Install Disk Creator automatically recognizes the downloaded installer from the Applications folder, and all that remains to be done is to select the flash drive to which it needs to be deployed.
Burning a bootable ISO image to a USB flash drive using UltraISO
UltraISO is a very powerful solution for working with disk images. With it, you can create disk images from scratch or from real media, edit existing disk images, create virtual disks on your computer, or burn disk images.
In general, UltraISO can do almost anything with disk images. The only drawback of this program is that it is paid. But, you can install it and use it during the free TRIAL period. You can download UltraISO on the official website.
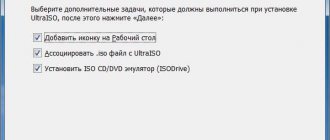
So, if you decide to use UltraISO to burn a bootable ISO image with Windows 7 or Windows 10 to a USB flash drive, then you first need to open this ISO image. To do this, open the “File” menu in UltraISO and select the “Open” option.
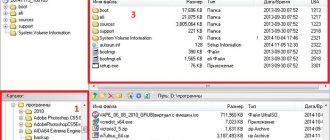
After this, a window will appear to select a file. In this window, you need to find the bootable ISO file with Windows 7 or Windows 10 that you want to burn to the USB flash drive and select it.
After this, the contents of the bootable ISO image will appear in the UltraISO program window.
Now connect the flash drive to the computer, if it is not already connected and without touching anything in the file structure, open the “Boot” menu. Here you need to select the “Burn Hard Disk Image” option.
As a result, a window will appear in front of you to write a bootable ISO image to a USB flash drive. Here almost no action is required from you. Just make sure that in the “Disk Drive” drop-down menu the exact flash drive you want to use to burn the ISO image is selected, and if everything is fine, then click on the “Burn” button.
After clicking on the “Burn” button, a warning will appear stating that as a result of writing the bootable ISO image, all data from the flash drive will be deleted. To continue, click on the “Yes” button.
After receiving confirmation, UltraISO will begin the process of writing a bootable ISO image to the USB flash drive. After this process is completed, you can disconnect the flash drive and begin installing Windows 7 or Windows 10 using the resulting bootable flash drive.
Installation flash drive Windows 7 64 bit Maximum 2020 Russian
Minimum Installation Requirements
2 GB of RAM. Processor frequency 1 GHz or higher. Video card supporting WDDM 1.0 and DirectX9 driver. Free space on your computer’s local storage is 20 GB.
Screenshots:
List of disabled components
Since the image of Windows 7 64 bit Ultimate 2020 for the flash drive is positioned as a gaming one, it does not contain Defender and all its components. This native antivirus not only reduces system performance by trying to control every process, but also does not allow the use of game patches, blocking or completely deleting them. In addition to the defender, the firewall and user account control are disabled, so the system will not bother you with reminders about a security breach.
The hibernation mode also does not work - modern laptops automatically save the same amount of energy when they go into normal sleep mode. To ensure that none of the above is restored without the user’s knowledge, the Update Center does not work automatically. If you want to install updates, you can enable it, but the author does not recommend doing this, since Windows 7 64 bit Ultimate already has everything you need.
The following rarely used services are also disabled:
· Remote registry editor. · Everything related to managing remote desktops. · Scheduled defragmentation. · Basic filtration. · Sending bug reports to Microsoft. · Additional features of Windows Media Center. · Bitlocker data encryption system. · Other useless services.
Installing an image of Windows 7 Ultimate 64 bit 2020 from a flash drive
First, you need to download the image of Windows 7 Ultimate 64 bit from our website and place it in any directory on your local disk (by default it usually ends up in the user's Downloads folder). In the future, you will need UltraISO or Rufus to transfer the image to bootable media. Both of these utilities are available for free download on our website.
If you plan to install Windows 7 64 bit ultimate 2020 from a DVD, choose UltraISO, and Rufus is more suitable for creating a bootable flash drive. Of course, you can write a flash drive using the first program, but the advantage of Rufus is that it can be used to make a flash drive for installation on a GPT partition via UEFI. Remember that installing Windows 7 64 bit Ultimate iso image on a disk of this type is only worth it if you have a license key.
Creating a Windows 7 64 bit Ultimate installation flash drive in UltraISO
1. Insert a USB drive with a capacity of at least 4 GB into the computer. 2. Launch Rufus. 3. Specify where the Windows 7 image is located. 3. Select the table type GPT or MBR. Don't make a mistake, otherwise the installation will fail. If you choose GPT, then the flash drive needs to be formatted in FAT32. 4. Click the Start button and see a message that all data on the drive will be destroyed. We confirm the action and wait for the recording to complete.
Starting the Windows installation
The process of installing Windows 7 Ultimate 64 bit from a flash drive and disk is absolutely identical. We save all the necessary data from the system partition to an external drive or another partition of the local disk, since during the installation of Windows 7 64 bit Maximum it will be formatted (if you want to be sure of the stability of the system, perform only a clean installation). There are two ways to boot from installation media:
· Via BIOS. In this case, when loading, press the button to enter the BIOS when turning on the computer - depending on the model, this can be Delete, Escape or one of the Fs. Find the Boot options tab and set the required option - USB HDD or floppy drive - to first place in the list of boot options . Press F10 – save and exit. After the automatic reboot, we see the line Press any key to boot from CD-DVD - press any key and proceed to install the image for the Windows 7 Maximum 64-bit flash drive.
· Using the Boot Menu, which can be called up by pressing the F8 to F12 keys while turning on the computer. Everything is much simpler here - we just select the boot device we need using the keyboard arrows and press Enter. Next, we proceed similarly to the previous point.
443