UltraISO error 121 when writing to device
Many times, users face difficulties in using the UltraISO tool due to constant errors occurring due to various reasons.
Error 121, which we will consider today, appears very rarely, but if you do not know the UltraISO program well, it will be difficult to solve the problem. Now we will look at the procedure for solving the problem. Editing error 121
Writing an image to a USB device may result in error 121. The main reasons are contained in the data system, which has individual characteristics. As an example, consider the FAT32 system. It is installed on media that cannot store information larger than 4 GB. The center of the predicament is in the memory capacity.
Confusion occurs when writing a disk image of 4 GB or more. Solving this is not as difficult as it seems at first glance, if you strictly follow the algorithm.
1.
First of all, we edit the data system of the required flash drive.
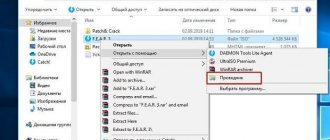
This action can only be performed by formatting the flash drive. Go to “my computer”
and right-click on the icon of your device and select the
“format”
.
2.
Under the
“file system”
in the window that appears, mark the NTFS file system and then click
“start”
at the bottom of the window. Do not forget to copy important files from the flash drive, because all data from it will be deleted.
This algorithm will not always be effective. In cases where it will not work, change the file system back to FAT32 in the same way as we changed to NTFS. Then just try everything in a new way. This happens mainly due to problems with the flash drive itself.
That's all. The problem is solved and you can easily burn the disk image to a flash drive without any hesitation.
Can't see the flash drive for recording
If you find that an error has occurred in UltraISO, saying that “Does not see the flash drive for recording.”
Causes of the problem
Let's look at the main reasons leading to the problem:
- The most common reason is the inaccuracy of the user himself. For example, if you missed some points in program management.
- Another reason is media failure. Try checking the flash drive and port to rule out that the problem is caused by them.
Ways to solve the problem
The following solution methods help only when the flash drive is clearly visible in Explorer, but the program cannot detect it.
Method 1: selecting the desired partition to work with the flash drive
If the media is not displayed in ISO due to your fault, then everything will be displayed normally in Explorer. Therefore, we recommend that you check this in advance.
UltraISO has independent tools designed to work with different types of media. Here you can find a tool for operating virtual drives or real disk drives.
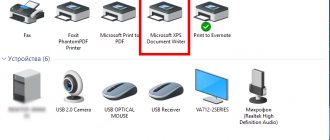
Most often, you try to simply “cut” the image in the usual way, but you are faced with invisibility. For proper operation, you need to select the option for the HDD, located in the “Boot” section.
If you click “Burn hard disk image” instead of SD, you will see that the media is displayed in full.
Method 2: Format to FAT32
If the first method does not help, you will have to format the device. To do this, go to “My Computer”, then go to the formatting section. You need to install the FAT32 file system.
If there is important data on the media, it is worth copying it first. Otherwise they may be lost.
To start formatting, you need to right-click on the media to go to the “Format” section. After that, specify FAT32 in the file system section. Once this is done, remove any formatting to completely get rid of the internal material. Start the process.
Wait until the computer completes the formatting process before continuing to use it. This process is several times longer than quick formatting, so it depends on how full the flash drive is.
If the message “power calibration area error” appears, you should change the media.
Method 3: Run as Administrator
To carry out some purposes used for a USB drive, special rights are required. Now detailed instructions will be presented on how to run the program as an administrator:
- Click on the Ultra ISO application shortcut on your PC mouse. Once the pop-up menu appears, click on the “Run as administrator” option.
- If you are using an administrator account, simply agree to the changes. If you do not have this option, Windows will ask you to enter a special administrative password. As soon as the correct data is entered, the program will launch instantly.
Please note that this method can solve almost all problems that arise during operation.
Method 4: Format to NTFS
NTFS is a popular file system capable of storing large volumes of materials. It is considered the most used in modern drives. If there is an error checking for free blocks on the media, try formatting:
- Go to Windows Explorer, and in the “Computer” section, and then right-click on the flash drive. When the context menu pops up, click Format.
- In the file system section, select “NTFS”, and then uncheck the “Fast” box. Start the process and then wait until it finishes.
- Everything works successfully and is ready for use.
Method 5: Reinstall UltraISO
If a similar problem is observed only in the software in question, then it is worth considering whether there is a problem with the operation of the software itself. The best solution is to reinstall the utility. Don't forget to remove it completely first. It is best to use uninstallers so that there is no residual data left.
These are all currently known recommendations that can help get rid of the problems under consideration. Users note that occasionally the operating system itself can cause misunderstandings. If none of the methods described above helped, you should consider reinstalling Windows.
Problem removing USB storage device: This device is currently in use
The standard procedure for removing a USB drive or any other external media is to select the "Safely Remove Hardware and Eject Media" option from the taskbar menu. However, from time to time, when trying to eject media using this option, users receive the following error: This device is currently in use, close any programs or windows that may be using this device and try again.
The error message is self-explanatory. You need to close the file, folder, or program associated with the external media before you remove it. However, users report that they encounter an error after closing the program. The problem is not typical for computers of any brand. So we can assume that the problem is at your end.
The reasons may be as follows:
- The virus uses a program associated with external media in the background.
- The bug prevents users from using the Eject media option on the taskbar.
- A process running in the background may be using external media.
- The USB drive can be formatted as NTFS.
You can continue troubleshooting as follows:
- Run a thorough scan for malware on your system
- Eject external media through this computer instead of the notification area icon
- Check all running processes in Task Manager
- Format the USB as exFAT and not as an NTFS partition.
1] Conduct a thorough scan for malware on your system
Use any reputed antivirus or antivirus software to scan your system. Also, remove any recently installed suspicious software, such as free software or software downloaded from an unverified source.
2] Eject external media via This PC instead of the taskbar
There is an option to remove the external drive from this PC other than the taskbar. We could use this as a workaround.
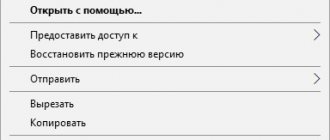
Open This PC and right-click on the external storage. Select the option to extract.
If this does not solve your problem, move on to the next solution.
3] Format the USB as exFAT and not as an NTFS partition.
Formatting your external storage will erase all data on the drive.
USB drives formatted as NTFS can be problematic on some Windows systems. The solution is to reformat on a different file system.
Right-click on the USB drive and select Format.
In the Format window, select exFAT as the file system and click Format.
Try removing the media now and see if it helps.
4] Check all running processes in Task Manager.
Check if all processes associated with the external media are still running in the Task Manager.
Press CTRL + ALT + DEL to open the Security Settings window. Select Task Manager from the list and open it.
In the list of running processes, check if any of the programs stored on your external storage are present.
If yes, right-click on the process and select End Process.
5] Using Process Explorer
Download Process Explorer from the Microsoft website here. This is a .zip file, so unzip it and open the extracted folder. Run the .exe file in it.
Check the list of running processes. This is a simpler view of background processes compared to Task Manager. Simply select the problematic process and click "Delete" to kill it.
Another way Process Explorer can help is with its search function.
Click on the Find button on the toolbar and select Find Handle or DLL.
Enter the drive letter of the external media and a colon (for example, E:) into the search field. Press Enter.
If there are no search results, it means that the process is not running from external media. If you find DLLs too, check the names and try to kill the process accordingly.
Burning a bootable USB flash drive
After everything is ready, we can move directly to our main goal, let's figure out how to burn Windows to a flash drive via UltraISO. Below you will find detailed step-by-step instructions on how to do this from an image, CD/DVD disk or directory with files.
From the image
Most often, the operating system for installation on a computer or laptop is supplied in the form of an .ISO image. Therefore, we will start creating a bootable flash drive in UltraISO with this method:
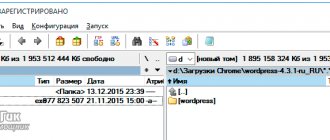
- We launch the program with administrator rights. We select a trial period and, using the main menu, in the “File” section, select the “Open” link. You can also work with the hotkey combination Ctrl + O.
- When the contents of the image are added to UltraISO, go to the “Boot” item and select the link about.
- After clicking on “Burn hard disk image”, a new window will open in which we need to make sure that our flash drive is selected as the target, then click “Burn”.
- We will once again be warned that all information on the drive will be deleted. If the necessary measures have been taken, click “Yes”.
- The process of copying bootable USB flash drive files to UltraISO looks like this:
- The successful completion of the recording is indicated by a corresponding inscription. All we have to do is close the window.
- As a result, in Windows Explorer you will see the media ready for installation.
- All the files and directories necessary for installing the OS will appear on the flash drive itself.
If something goes wrong during the installation process and the system does not start, read the manual for solving this problem.
From CD/DVD
You can create a self-booting flash drive in UltraISO not only from an image, but also from an optical disk. This is done as follows:
- As before, we launch our application as administrator. Select the “File” menu and then click on the “Open CD/DVD...” item.
- Next, we perform the same operations that were described in the previous version.
Attention: if your flash drive has a low speed class, recording will be quite slow.
From the files directory
Sometimes it happens that the files of our distribution end up on the PC in the form of a data folder. We can “cut Windows” onto a flash drive and make the drive bootable even in this form. Let's figure out how this is done:
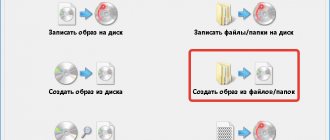
- Go to the menu “File” - “New” - then click the item marked with a three.
The device is still in use: how to safely remove a flash drive or external USB drive
The warning appears when we try to safely remove external removable drives. A notification appears on the screen: “Device is still in use. Quit all programs and close any windows that may be using this device, and then try again."
This warning is quite understandable, but many point out that even properly closing all programs does not prevent the notification from being displayed, and quite some time has passed since the device was no longer used. However, there are methods that you can use to solve this problem.
Error in the UltraISO program “Unknown image format”: reasons for its appearance
You may be interested in: Keyboard macro: what is it and why is it needed?
Let's start, of course, by considering the reasons for this phenomenon. In the most general case, it can be noted that in a sense, this application (as well as its analogues) works somewhat similar to archiver programs, which also seem to determine the type of file associated with it and sometimes see its contents, but cannot open it. The main reason that UltraISO issues a message about an unknown ISO image format even for registered file types is that the image was initially created incorrectly, which in a sense resembles incorrect data packaging or problems with underloaded archives. It is very possible that the application in which the image was originally created did not complete its work correctly, or the creation of the image was not fully completed. The same can be said about downloading images from the Internet when the desired file was damaged or incompletely downloaded.
It also happens that an error is issued for unsupported formats (for example, DMG), which are designed for operating systems other than Windows.
Why does a warning appear when removing a USB?
The list of reasons that the device is still in use is short, and they correctly notify why the system throws a warning when it is safe to remove an external USB drive.
- A warning may appear when an application is open on the taskbar, in which files from a flash drive or external USB drive are open.
- Some process is still using a file from the removable drive and you will need to find out what the program is and close it.
- On older versions of Windows, a warning may appear if the USB device is formatted as NTFS.
Burn an image to an ultraiso flash drive: making the complex simple
What is a disk image? This is a file that stores an exact digital copy of the file system, or data previously recorded on disk (CD/DVD/BR).
Previously, such images were widely used for data backup, but with the development of the Internet, ISO applications migrated to the category of files that were convenient to transfer over the network.
In order for the image to be used, it must be written to disk. For these purposes, many programs are used, including Alcohol, Daemon Tools, Nero, and UltraISO. We will focus on the last one, since it is very convenient and intuitive.
Most often, this software is used to record an OS image, in particular Windows. Why is this being done? Over time, any system acquires a certain number of obscene system and user files that consume memory, disk space and slow down the performance of the OS as a whole.
You can also use standard Windows tools, for example, recovery, but this is not always possible, so it is much easier to remove the old system and install a new one. To restore, you will need a disk or bootable USB flash drive.
Let's consider the process of creating an image using the example of recording Windows 8, although “seven” and other operating systems are written the same way.
Method 1: Ejecting a removable drive through the This PC app
If you receive a warning when safely removing an external drive or flash drive through the icon located on the taskbar, you can try to bypass it by following the instructions below:
Open Windows Explorer and click on the “This PC” button in the left side menu. If you are using Windows 7 and older, click on the “My Computer” shortcut on your desktop.
Right-click on the removable drive and select “Eject” from the context menu.
If a warning appears that the disk is still in use and the files on it will be closed without saving and loss of data, click Continue. You will then be notified that the device can be safely removed from the computer.
How to make a bootable USB flash drive from a disk image using UltraISO
First, let's look at the most common option for creating bootable USB media for installing Windows, another operating system, or resuscitating a computer. In this example, we will look at each stage of creating a bootable USB flash drive for Windows 7, from which you can later install this OS on any computer.
As is clear from the context, we will need a bootable ISO image of Windows 7, 8 or Windows 10 (or another OS) in the form of an ISO file, the UltraISO program and a flash drive on which there is no important data (since all of them will be deleted). Let's get started.
- Launch the UltraISO program, select “File” - “Open” in the program menu and specify the path to the operating system image file, then click “Open”.
- Once opened, you will see all the files that are included in the image in the main UltraISO window. In general, there is no particular point in looking at them, so let’s continue.
- In the main menu of the program, select “Boot” - “Burn hard disk image” (in different versions of the translation of UltraISO into Russian there may be different options, but the meaning will be clear).
- In the Disk Drive field, specify the path to the flash drive to which recording will be made. Also in this window you can pre-format it. The image file will already be selected and listed in the window. It is best to leave the recording method as the default one - USB-HDD+. Click "Burn".
- After this, a window will appear warning that all data on the flash drive will be erased, and then the bootable flash drive will begin burning from the ISO image, which will take a few minutes.
Method 2: Identifying the problematic process through the Event Viewer log
As the warning suggests, some program or process may be using data from a removable USB drive/flash drive without your knowledge or visible window. This program cannot be tracked using Task Manager, but you can use the Event Viewer log to check for the warning and find the process ID for this process.
Open Control Panel. To do this, type the corresponding name in the system search bar or display the “Run” window by simultaneously pressing Win + R and enter control panel.
In Control Panel, change the view in the top right corner to Large Icons and look for the Administrative Tools section. Then select Event Viewer.
On the left side of the menu, right-click on the “Application and Services Logs” tab, then go to “View” in the context menu that appears and check the “Show analytical and debugging logs” checkbox.
Then go to Windows Logs - System. Here, from a long list of various events, you need to find “Kernel-PnP” entries with something like the following text: “The application with process ID xxx stopped removing or extracting for the device...”
Instead of "xxx", a number will be displayed that can be used to identify the process that is blocking the removal of the external device.
Open the Task Manager by simultaneously pressing Ctrl + Shift + Esc.
Go to the Processes tab. Right-click on the name of any column to display the context menu and check the box for “Process ID”. Find the application whose “Process ID” matches the number, place the cursor on it and click “End Task” in the lower right part of the window.
Now check if the USB device is in use and can be safely removed.
Method number 4 - reinstalling the program
If the previous methods for eliminating the error in UltraISO “Virtual drive not found” did not help, then you need to reinstall the program.
To do this, you need to remove it using the standard program manager in the Control Panel or a third-party application to completely remove programs.
In Windows 8 this is done as follows:
- Hover your mouse cursor over the upper right corner of the screen.
- In the block that appears, select “Settings” and “Control Panel”.
- Go to “Programs and Features”, having first switched the view from “Categories” to “Large/Small Icons”.
- Select the program in the list, click “Delete” and follow the instructions of the removal wizard.
When the program is uninstalled, you can check the registry for its remains using CCleaner and restart your computer. After this, UltraISO is installed again.
Method 3: Format USB drives with exFAT format
Sometimes the problem can occur with flash drives and external USB drives that are formatted in NTFS format. Such external devices may be blocked by the Windows Transactional NTFS feature, which incorrectly identifies NTFS drives as non-removable.
The solution is to format external devices in FAT32 or exFAT format. FAT32 does not support files larger than 4 GB, so it is better to format it in exFAT.
- Open Windows Explorer and select “This PC” from the left side menu. If you are using Windows 7 and older, click on the “My Computer” icon from the desktop.
- Right-click on the USB drive to display the context menu and select “Format”.
- Expand the File System menu and select exFAT format. Click the "Start" button and wait until formatting is completed.
Then try to safely remove the USB device.
Ultraiso error 2
Messages: 18777
Thanks:
2893
| Computer configuration |
| Motherboard: ECS A780LM-M2 |
| HDD: Hitachi (DeskStar)500Gb + Hitachi 1TB + 80, 120, 200, 500 in BOX 2.5″ (collapsible, optional) |
| Sound: int. |
| CD/DVD: Optiarc DVD RW AD-5200 |
| OS: WinXP sp3 + Win7 + Kubuntu 16 + Lubuntu 14 |
| If you think this is a scam, delete the topic. Thank you. » |
——- The opinion of most people is always wrong, because most people are idiots.
Messages: 48
Thanks:
6
| MSL, If you need to edit images for work, try ISO Workshop FREE. I don’t know about the functionality, but try it anyway. » |
We will live, Maestro.
Messages: 6695
Thanks:
1392
| Computer configuration |
| Motherboard: ABIT IS7-E2 i865PE+ICH5, S-478 VC 6ch SB Lan ATX 2 DDR 400 |
| HDD: SAMSUNG HD103SJ (1000 GB, SATA) |
| Sound: Integrated sound |
| CD/DVD: LG DVD-RW, GSA-H30N RBBB (SATA) |
| OS: Windows XP Professional (SP-3) Russian. Special Edition XP |
| Article rating: Ultraiso error 2 Link to main publication Related publications
|
Method 4: Using Process Explorer Utility
Using the Process Explorer tool is a simplified version of the solution discussed in Method 2, without the need to view events. This utility is available for free and is an official Microsoft program. Used to display handles, DLLs, and processes running in the background.
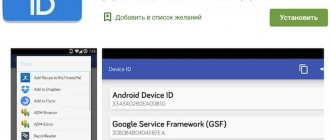
- Type “Process Explorer” in the search engine and go to the site shown in the figure.
- Click on the “Download” button, unpack the downloaded archive and double-click the executable file.
- Go to the tools menu along the path “Find” - “Find Handle or DLL”. Enter the letter of the external drive or flash drive in the “Handle or DLL substring” field and click the search button.
- The found processes are displayed in a dialog box. In the system process tree, find the program according to the “Find Handle or DLL” dialog box.
- Press Ctrl + H to show the handles in the bottom panel. Find the file according to the letter of the external USB device and right-click it, select Close Handle.
Now check if the USB device can be safely removed.
Camera is occupied by another application
When I launch HP Media Smart Webkam, it says that the camera is occupied by another application. In chatroulette, the camera turns on. Process Explorer does not see that the camera is busy with something. In Device Manager the camera is fine. HP pavilion dv6 laptop, Windows 7. Kaspersky does not find viruses, neither does DrWeb. What could be the problem please?
Answers from experts and user comments
To determine which application in Windows 7 is currently occupied by the camera, proceed as follows. Go to Start - Control Panel - Administrative Tools - Computer Management - Device Manager - Imaging Device.
There we see our webcam. Open Properties - “Details” tab - Select “Physical device object name” - right-click on this value and select “Copy”:
In the task of determining which application is using the webcam, the Sysinternals Process Explorer utility will help us, which can be downloaded from the official website https://docs.microsoft.com/en-us/sysinternals/downloads/process-explorer
In its panel, click “Search” - “Find descriptor or dll. " - and paste into the search field what you copied earlier in the properties of the device manager and click the "Find" button:
We will see the process that uses our camera, as well as its PID. In our case, this is the mmc.exe process.
Well, then in the Process Explorer window we look for this process by its name and PID value:
Well, then we select this process and press the DELETE key on the keyboard - the process will end and you can launch your application and use the webcam.
Preparing the image
So, we have UltraISO, you can start installing the OS on a flash drive, but first you need to download the image itself. In order to download the correct distribution, follow these simple rules:
- If it is Windows XP, 7 or 8, download the image via torrent from trusted sites and only in its original, “clean” form.
- For Windows 10, use the Media Creation Tools app. It should only be downloaded from the official website.
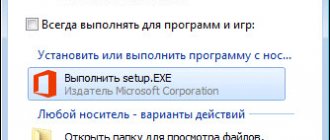
The .ISO file itself looks something like this.
You can also open the resulting image and mount it using the completely free DAEMON Tools Lite program.