How to create a disk image of Alcohol 120
To create a CD, DVD or boot disk image in Alcohol 120, you need to click “Create images”. A window will open in which you need to select the disk drive that contains the disk from which the image will be created.
Alcohol 120 image creation
When the disk is read by the program, the “Start” button will become active. Before clicking this button, you need to click “Reading Options” and indicate in what format we will make the image and where the finished image will be stored. Now you can click the “Start” button and wait until the Alcohol 120 disk image is completed.
Erasing Discs
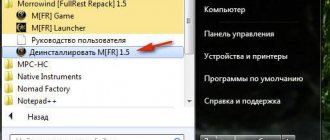
To erase a disc using Alcohol 120%, you need to insert a disc that can be erased (RW) into the drive and do the following:
- In the main program window, select “Erase disks”.
- Select the drive whose disk will be cleaned. This is done very simply - you just need to check the box next to the desired drive in the field under the words “DVD/CD recorder”. In the same window, you can select the erase mode (quick or full), erase speed and other parameters.
- Click the “Erase” button at the bottom of the window and wait for the end of erasing.
Alcohol 120 how to create an image from files
To create an image from selected files from a computer or disk, you need to click “Image Mastering”. A welcome window will open in which click the “Next” button. Now you need to select from which files you want to make an image; to do this, click the “Add file(s)” button.
Alcohol 120 instructions for collecting files for the image
A window will open in which you are looking for the file you need and when you find the file, click on it (the name of this file should appear in the file name field), and now click “Open”. This way we collect all the necessary files. Now that all the files have been collected, click the “Next” button.
Set the ISO Alcohol 120 parameter
In a new window, select the location where the image will be stored, indicate the image format and in the “Image name” field write what the image will be called. By clicking the “Start” button, the image will be created and will be located in the location you specified.
MASTER DISC
Sometimes, in order to transfer a disk over the Internet, or reserve a disk, you need to make a disk image. To create an image of a CD or DVD disc in the Alcohol 120% program, first of all, insert the source disc into the optical drive of our computer, the image of which needs to be made. Next, launch the program by clicking on the program shortcut.
In the program window that opens, we see the “basic operations” tab. Select the item “Create images” and click. The Image Creation Wizard window pops up.
If there are several drives installed on your computer, they will be displayed in this tab. The first thing you need to do is select the drive into which the disk you are copying is inserted. Next you need to go to the “Reading Options” tab.
Here you need to select the location where the image file (disk image) will be written. The image can be saved to any drive on your computer or a network drive. Here you can create a folder in which you can place the image. To do this, click on the “new folder” button
Enter the name of the folder, click OK.
In the “Image format” drop-down list, you need to select in which format the image will be created. As you can see, Alcohol120% can work with different formats. By default, Media Descriptor (*.mds) will be used. Please note that this format has two files, both. files are necessary for the image to work correctly. However, it is better to use the ISO format. This format is more widely used and therefore easier to read later.
“Image name” - here you need to enter the name of the file that will be created as a result of the program.
“Skip read errors” - this option allows you to continue copying in case of minor disk errors. It's better to leave it on.
“Fast skipping of erroneous blocks” - it is better to disable it (uncheck the box).
“Advanced sector scanning (ASS)” - it’s better to disable it (uncheck it).
“Reading subchannel data from the current disk” is better to disable (uncheck the box).
"Data positioning measurement" - SecuROM protection
“Data type ” - This option is best left by default
To start the program, click the “Start” button.
Then everything is as usual, the process indicator shows the percentage of readiness. When it reaches 100 percent, the disk image (image file) is ready.
Now a file with an exact copy of the disk can be sent to its destination via the Internet, can be mounted on a virtual drive, and without using the physical disk directly, use the contents of the disk as if it were present in the drive. To do this, right-click on the file and select “mount device”
You can create several virtual drives in the system, they will be visible in the same way as if several optical drives are installed in the computer, and disks are inserted into them. To disconnect a virtual drive, you need to select the required disk in the “my computer” window, right-click on it, and in the menu that opens, click “unmount disk”
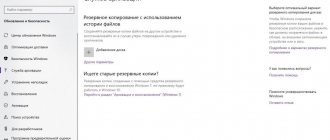
How to open the Alcohol 120 image
First you need to create a virtual disk using the Alcohol 120 program; to do this, click “Tools” - “Settings”.
Settings in Alcohol 120
In the left column, click on “Virtual disk”, and in the right window, indicate the number of virtual drives and click the “OK” button. Now go to Explorer, click on “This PC”, find the virtual disk drive and right-click on it.
How to mount an image on a disk drive in Alcohol 120
In the context menu that appears, select “Mount image” - “Open”. We find the image, left-click on it and click the “Open” button. So you can mount the image using alcohol 120 and now you can view the contents of the disk.
How to create a virtual disk (drive)
Hello dear friends! In this article, I would like to show, with an example, to novice users how to create a virtual disk using the Alcohol 120% and mount it on the device. In one of the articles I already mentioned this program, you can find out how to create an iso image of Windows 7. And of course, we will touch on a sore subject, where to change the language settings in the program.
The first thing we need is the Alcohol 120% program itself. Download it, the program is excellent, I’ve been using it for as long as I’ve used it, there haven’t been any problems. First, let's look at where to change the language from English to Russian.
Open the program and click on the “View (service)” tab, then, “Language (language)” and select the Russian language, everything is simple.
Now let's move on to creating a virtual disk. Why do you need to create a virtual disk? For example: You downloaded an ISO image with a toy or an image with a program that is installed directly from a DVD, this example makes it possible to install a game or program without a DVD. That is, the virtual disk emulates an installation DVD with a program or game. I hope I explained it clearly))). Let's look at everything with an example. Left-click the downloaded image and drag it into the program window. Click on the "Virtual Disk" tab.
In the window that opens, you can create up to 31 virtual disks , which is of course a lot and not necessary. It is not necessary to create so many disks; for each image, you create one virtual disk. Select the number of virtual disks (for example, I will select 3 disks) and click “OK”. You will notice that at the bottom of the program window, three virtual drives will appear on which you will need to mount the ISO image.
Right-click on your image. In the drop-down window, hover your mouse over the “Mount to device” tab. In the next drop-down window, select virtual drive .
After everything has been done, you will immediately see a window asking you to install the game or program. If the window does not appear, double-click on the virtual drive on which the disk is mounted. Also, when you open “My Computer”, you will see the created virtual drive with the icon of the program or game. It's that simple.
I hope I explained everything clearly. If you have any questions, write, I will try to answer everyone.
How to burn an Alcohol 120 image to disk
To burn an image to disk, click “Burn images to disks.”
How to burn an Alcohol 120 disc
In the window that opens, click the “Browse” button and look for the image file that we need to burn to disk. You can check the box next to “Delete image file after recording” if you no longer need this file in the future. Click the “Next” button, another window will open in which you need to click “Start” and recording to the disk will begin (at this moment it is better not to do anything on the computer so that a failure does not occur due to which the disk may be damaged).
How to burn an image
So, you've created the image, but what if your friend asks you to burn it to disk? Everything is very simple, to do this, without leaving the program, follow these steps:
- In the sidebar of the program, select “Burn images to disk.”
- In the new window, click on the “Browse” button, and in the file manager window that appears, select the image file that you want to burn.
- Read the information about it and click “Next”.
- Select the drive that contains the blank disc, specify the recording speed and method and click the “Start” button.
The recording of all image files to the selected disk will begin. Wait until the end and exit the program.