The UltraIso utility is designed for creating, converting and editing CD/DVD discs. It works with disk images in .iso format, and also supports images created in programs such as Nero or Alcohol 120%. The utility interface has been translated into 39 languages. Don't forget that you can download UltraISO for any version of Windows using our file archive.
The UltraIso working window is divided into four parts. The upper left section contains disk/image information (tree list of folders), the upper right section contains a list of files located in the folder. The lower left part of the screen displays the directory of the HDD and CD/DVD drives of the PC; the lower right section also provides detailed information about the files contained in the folders.
Burning a disc
Saving data to storage media is as easy as in Nero. The user only needs to place the required files into the project and then click the record button. However, you must first create an image from a folder stored on your computer. To do this, transfer the necessary files to the upper right window of the program, and then execute the command “file” → “save as...”. Next, the image can be moved to disk (“Tools – burn CD image”), specifying the recording speed and other parameters.
Create an image from files
Go to the Create an image from files tab and select the desired action. Next, we are offered 8 options for what type of image we want to create:
- Data disk
- Data disc with advanced settings
- Audio CD (for listening to music in the car)
- Create MP3 or WMA disc
- Create a video or slideshow DVD disc
- Create a video or slideshow Blu-rey disc
- Video DVD disc from folder
- Video Blu-rey disc from a folder
I'll select Create a video or DVD slideshow, you can choose any other. We get to the Start page for creating a disk image. We write the name of the project being recorded and Next.
It is possible to select the television system and screen format and Continue again.
After that, add the desired video, click Add video.
We select the desired video file, I chose the movie Aviator, starring Leonardo DiCaprio. The film is good, I advise everyone to watch it if they haven't seen it. Click OK.
Then our Aviator video appears on the screen and click Next.
You can choose a menu theme or skip this step by clicking Next.
Then we move on to the settings for saving, formats and sizes. We indicate the path of the disk image on the hard drive, select the image format (it is advisable to select the ISO format), you can limit the size of the image or leave it without limitation. As always Next.
Then the encoding of our video clip begins. Depending on the quality of the video and its volume, encoding time will vary. In my case it takes about an hour, but in fact it took about two, in yours it may be different.
Once the decoding process is complete, the next Folder Saving Status begins.
At the end, if everything went well, the following window should appear - The disk image of the video media has been successfully saved.
Click Exit, go to the save folder and look at the result.
After this, our new Aviator disk image can be mounted into a virtual drive or burned to a DVD.
Creating a disk image using Ashampoo | Moicom.ru
Creating an image from a CD/DVD disc
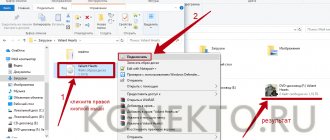
First of all, you should select the “Create CD image” command (the “Tools” tab). A new window will open in which you will need to specify the drive from which you want to make an image. Next, the user must assign the path to the folder where the image will be saved. In addition, the user can select the desired output format - standard .iso or CloneCD, Alcohol and others. You must confirm your command by clicking on the “Make” button. Using UltraISO, you can make any version of a CD or DVD image that will be supported by almost any popular imaging application.
Interface
The Ultra ISO program window consists of 5 elements:
- menu bar;
- quick access panel;
- area of work with the image;
- Windows Explorer;
- status bar.
The menu bar provides access to all functions of the application and consists of 6 sections:
- File . Allows you to create, open and save copies from optical media.
- Actions . Allows you to edit and extract information from files.
- Bootstrap. Allows you to create copies of floppy disks, hard drives, burn flash cards and drives for installing the OS.
- Tools . Allows you to work with real, virtual CD drives and images: create, burn, mount, convert to other formats, compress files with iso extension and check integrity using md5 sum.
- Options . Contains settings: interface language, design style and application operating parameters.
- Help . Contains information about the program's capabilities, version information and links to the official website and forum.
The Quick Access Toolbar includes the most frequently used commands . Unfortunately, there is no provision for adding or removing buttons. To the right of the panel is an indicator that displays the size of the image compared to the size of the physical disk.
The work area is divided into 2 parts. on the left . On the right - the contents of the folders selected on the left with detailed information about each file. Above the right area there are several buttons that allow you to edit the contents of the directory. The Explorer area is structured similarly.
The status bar displays information about the developer and the total size of the files in the folder open in the structure tree of each area.
Burning a CD/DVD image
To use this feature, you need to select the “Burn CD Image” option located on the “Tools” tab. Next, you need to specify the path to the folder with the file that you want to record (click on the “..." button located to the right of the “Image file” column). You can select additional parameters - method (TAO or DAO), as well as the disk writing speed. If the user has set the TAO (Track At Once) method, then only one track will be recorded at a time. If you want to burn the entire disc, you must use the DAO (Disk At Once) method. Please note that slower speeds are recommended for burning multiboot disc images.
How to create a disk image with Ashmpoo
I already wrote about the Ashampoo Burning Studio program in the article How to Burn Music to a Disc.
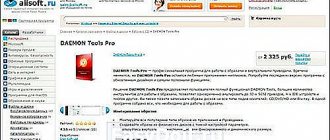
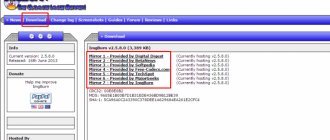
To download Ashampoo you need to go to the official website of the program, here you will have the choice of using the free Ashampoo Burning Studio 6 FREE or the latest version of Ashampoo Burning Studio 12. The twelfth version can be installed for free for a trial period, if you like it, there is the opportunity to purchase a license of this program for only $49.99.
I am posting three links to the free, 6th free and 12th paid versions:
- Ashampoo Burning Studio FREE
- Ashampoo Burning Studio 6 FREE
- Ashampoo Burning Studio 12.
I will use the latest paid version 12 of the program with a trial period. If you want to extend your trial period, you will receive an email with further instructions.
After you download and install the Ashampoo program, I suggest you get acquainted with the information on how to create a disk image using it. To do this, launch the Ashampoo Burning Studio 12 utility.
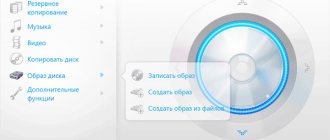
Go to the tab on the left called Disk Image and select the desired one from four options:
- Burn image
- Create an image
- Create an image from files
- View disk image
If you want to create a disk image, then select create image. If you have documents, data, files, and so on, then we go into creating an image from the files.
Bootable USB flash drive UltraISO
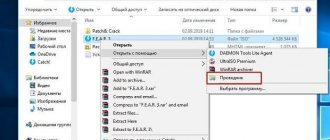
To perform this procedure, you will need almost any flash drive, as well as an installation disk image in .iso format. Having connected the drive to a free port, you should run the UltraISO program and open the ISO image (command “file” → “open”). Then you need to go to the “Boot” menu and select “Burn hard disk image”. From the drop-down list, you must select the letter corresponding to the flash drive and press the “Write” button. All information stored on the flash drive will be destroyed during this procedure. Therefore, it is recommended to disconnect all other flash devices from the PC in advance. It is recommended to use the default recording method, namely “USB-HDD+”. A distinctive feature of creating a bootable flash drive using UltraISO is the ability to create several MBR records on one medium, i.e. if desired and if the drive allows you to record several Windows or Linux boot records at once.
Installing the UltraISO program
First, we need to download the installer. Next, open the installation file and see on the monitor how the UltraISO installation wizard greets you. Click next. The next window asks you to accept the license agreement. It is not necessary to read it; besides, the text is very long and in English. Just check the box next to the line “I accept the terms of the agreement” and click next.
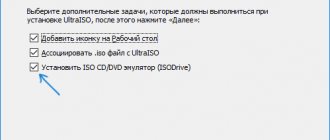
Now you are asked to choose where to install the program. Choose the file path that is most convenient for you, or better yet, leave everything as it is and click next. In this window, they ask you to select a folder in the start menu, don’t touch anything, click next. In the next window, check the boxes next to the parameters you need and click next. And here is the last step before installing the program, we check all the configured parameters, if something is wrong, you can go back and fix it. Now click on the install button. After installing the program, click Finish. Next, open UltraISO from a shortcut on the desktop and see that we need to register the program. Click enter the registration code and enter the following parameters in the window that appears.
Username: Steve Olson
Registration code: 2BEC-ED28-82BB-95D7
This data has always worked for me. But if they don’t suit you, then simply enter “UltraISO activation” in a search engine. The keys to this program are forever and can be used many times.