Today, the Windows XP operating system is considered obsolete. It has been replaced by more modern systems with much greater capabilities. But at a time when Windows XP was one of the most common, most users respected it for its high reliability and stability, ease of configuration and compatibility with most existing equipment.
At the moment, the XP system is used on computers that were once designed specifically for it and do not meet the requirements for installing more modern programs.
Most users note that a system that has a limited number of programs installed that meet operating system compatibility requirements can work indefinitely without reinstallation. At the same time, a computer on which many programs, sometimes of dubious origin, are often installed and uninstalled, may at any time refuse to work due to an OS failure.
The problems are caused by the fact that as a result of installing programs, various “garbage” accumulates in the system catalog and registry of the operating system, which at some point can be recognized by the system as working files and, naturally, lead to the “crash” of the system and the appearance of the “Blue Screen of Death” "
So, we can name the main reasons for the need to reinstall the operating system:
- “garbage” in the registry and system directory;
- hard drive failure;
- changes in computer hardware configuration;
- virus attack.
“Treatment” or reinstallation
There are many special programs or utilities for cleaning and restoring operating systems, but, as experience shows, their use by inexperienced users does not bring tangible results. This is due to the fact that the effect of these software tools is superficial, and more complete cleaning requires a lot of experience and time. In most cases, loading a new system takes less time and does not require special skills, since most actions occur automatically.
The only exceptions are computers with installed programs for which there are no installation images or media, since the newly installed system contains only the minimum programs necessary for the computer to operate.
Why not DVD and what is the difference between a regular flash drive and a bootable and multiboot one?
Almost all installation files for installing programs, including operating systems, are supplied on CDs or DVDs. Their volume is sufficient for any purpose. But modern computers allow initial startup, before the operating system starts, from other devices, including flash drives. What advantages does this provide:
- Firstly, reliability. A flash drive is much more reliable than a fragile disk made of thin plastic, the working surface of which is very easy to scratch. A small crack on the disk leads to its rupture in the drive with all the ensuing consequences.
- Secondly, the dimensions. Flash memory, which is smaller in size than a key fob or car alarm remote control, cannot be compared to a disk with a diameter of 12 cm.
- Thirdly, the speed of work. Installing programs from a flash drive is several times faster than from any other media.
A bootable USB flash drive with Windows XP allows you to install a new operating system and the necessary set of application software on your computer in a few tens of minutes, without changing the media.
An increasing number of users prefer to use bootable flash drives. Why they are called bootable, the fact is that you cannot simply take and write the operating system files to a flash drive. In order for the computer BIOS to start booting from an external drive, its structure must be designed accordingly. This applies to the structure of the drive as a whole and, in particular, its boot sector. The boot is based on the master boot record - MBR, which contains data about the boot order, the location of the loaded data and other service information. The MBR structure is inaccessible to the average user, so its formation requires special programs and utilities.
In addition to simple bootable flash drives, there are multiboot flash drives that allow you to select the necessary actions before installing the operating system. Such flash drives may contain:
- several OS boot options;
- several different operating systems;
- utilities for testing hardware;
- utilities for working with hard drives;
- a lightweight version of the operating system that does not require installation.
For these purposes, you need a specialized program or utility that would create the necessary partition structure of the external drive and copy installation data into it, placing them in a certain order.
Making an UltraIso flash drive
You can download the ultraiso program here:
uiso9_pe
Downloaded, unpacked and installed, go to UltraIso.
Next File >>> Open... or . These are quick navigation buttons in the UltraIso program. Want to know more about your keyboard's secret buttons, then read Windows 7 Hotkeys.
Select the desired image file with the extension (*.iso), in my case it is WinXPHomeSP3RU, you may have a different image name and click Open.
If you do not have a Windows XP installation disk, you can download it from the link below:
Windows XP distribution
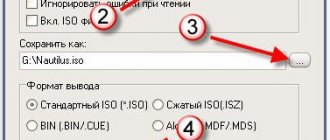
Then go to the Bootstrap tab >>> Burn hard disk image...
We specify the drive - Disk Drive, format it if you haven’t done it before and click on the Burn button.
They warn you about the loss of information, agree and click Yes.
After this, the process of formatting the flash drive and creating a new bootable USB device begins.
All that remains is to wait for the operation to complete; it took me a little over two minutes.
Close the window and use the flash drive at your discretion.
Bootable USB flash drive Windows XP - UltraISO program | Moicom.ru
Unfortunately, the flash drive you made will work with errors, I recommend using the second method, or other programs, such as Rufus.
The main difficulties when reinstalling the Windows XP operating system
Currently, MicroSoft Corporation has stopped supporting outdated operating systems, which, unfortunately, includes Windows XP. The biggest problem with this attitude is that when reinstalling outdated programs, sometimes a situation may arise when some hardware requires a driver. Sometimes finding the required driver takes longer than reinstalling the entire system.
Since the release and support of the Windows XP operating system has been discontinued, for recording it is necessary to use existing DVDs or download ISO images of the operating system from the Internet. Similar images are available in sufficient quantities on available file hosting services or torrent trackers. It should be especially noted that by downloading files from the Internet, users violate copyright laws, since the posted files are pirated, and do so at their own peril and risk. You also need to be aware that there is no guarantee that the installation images are correct and that they are identical to the original ones.
Winsetupfromusb utility
You can download this utility from the official website using the links below.
Official site
If you can’t download it on the official website, you can use an alternative link from my Yandex disk.
Winsetapfromusby
Open the downloaded file and go to WinSetupFromUSB_1-3.exe or WinSetupFromUSB_1-3_x64.exe, depending on the bit size of your operating system.
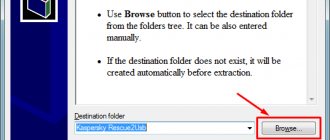
A window with the program opens, before copying data to a flash drive, I recommend formatting it, read more about formatting methods. We prepare the device, click on the RMPrepUSB button.
Afterwards, a settings window opens in which we set the following:
- Specify the USB storage device,
- Select the boot sector - put a dot next to XP/Bart PE bootable (NTLDR),
- File system FAT32 or NTFS, check the box Boot as HDD (C: 2PTNS),
- Finally, click Prepare disk.
A window appears with a command to launch further actions, click OK.
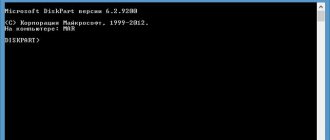
The command line opens.
And the proposal to create a new section, click OK.
Close the settings window, return to the main WinSetupFromUSB, check the box next to Windows 2000/XP/2003 Setup and click browse (the button on the right with three dots).
Insert the Windows XP installation disk into the drive or mount a virtual disk image, then select it in the Browse for Folder list and click OK.
If you have the original Windows XP installation disk or disk image, a window with a license agreement may appear, which you must accept by clicking I accept.
Next, I press the GO button and start the process of creating a bootable USB flash drive for Windows XP.
On average, this procedure takes about eight to ten minutes.
Upon completion, a small Job Done window will appear, the work is completed, click OK.
Next, close the WinSetupFromUSB utility or press EXIT and use the new bootable USB flash drive. We reboot the computer, set the BIOS to boot from a usb device, the following window appears.
Press enter, in the next window we go to the third item First part of Windows XP Home SP3 setup from partition 0.
Afterwards, the Windows installation process starts, downloading and unpacking the installation files.
Click Enter and then follow the standard installation procedure for the Windows XP operating system.
Bootable USB flash drive Windows XP - program Winsetupfromusb | Moicom.ru
Programs that allow you to create an installation flash drive
Those who want to reinstall Windows have at their disposal a large number of different programs for creating bootable flash drives. The programs include both paid and free programs. If you use them only for the specified purpose, then they do not have any special advantages over each other. There are only a few differences in the interface. Therefore, the use of a particular program is determined by personal preferences. In addition, paid programs usually have a limited period of use, so for one-time use to create a bootable flash drive they can also be used.
The Command Line method has broader capabilities for creating bootable, and especially multiboot, flash drives, but only trained users can do it. For the vast majority, this method is not applicable due to its high labor intensity and complexity.
Among the most common programs for writing bootable flash drives are:
- Win32 Disk Imager;
- Ultra ISO;
- UNetBooting;
- PeToUsb;
- WinSetupFromUSB;
- WinToFlash;
- Rufus.
For the Windows XP operating system, the bootable USB flash drive must have a capacity of up to 4 GB. It all depends on the size of the ISO image.
When creating a bootable flash drive, all data previously located on it will be irretrievably lost without the possibility of recovery.
Therefore, before making a bootable Windows USB flash drive, you need to take care of saving the necessary files and data. It is not necessary to format the drive in advance, since most of the programs listed can do this on their own.
UltraISO stands out . The program allows you not only to make a bootable USB flash drive for Windows XP, but also to perform many actions to create, copy and edit ISO images. On the other hand, the abundance of functions makes it difficult for less-skilled users to use such a utility.
To create multiboot flash drives, you can use the following programs:
- WinSetupFromUSB;
- SARDU;
- Easy2Boot.
When using these programs, you can create bootable flash drives with almost any set of installation images and test utilities. The only limitation is the amount of flash memory. It is very convenient to place anti-virus programs and driver sets on multiboot drives for various hardware configuration options, which in some cases allow you to avoid the process of reinstalling the operating system. That is, using a bootable USB flash drive with Windows XP, you can scan and “cure” the system in the event of a virus attack, test your hard drive for bad sectors, or copy important data to a third-party drive.
Why create a bootable USB flash drive?
A bootable flash drive is necessary for convenient and quick installation of not only the Windows XP operating system, but also any other program. The operating principle is the same as a boot disk, but the information is saved more compactly. And another important advantage is reliability. A flash drive cannot be damaged by a couple of scratches and you don’t have to store it so carefully or worry about letting someone use it.
A multiboot flash drive is a bootable flash drive that contains several installation programs under one shell. Before transferring the disk image to a flash drive, which was previously downloaded in finished form, it can be supplemented. You can also create a disk image yourself, where you can add all the necessary programs of your choice.
A Windows resuscitation disk can also be written to flash drives, which, if necessary, will allow you to start the system directly from a USB drive.
Not the easiest option, but very convenient when creating a bootable flash drive, use the UltraISO program.
How to create a bootable USB flash drive for Windows XP
In most cases, creating a bootable USB flash drive only requires specifying the location of the source image of the operating system and the designation of the drive on which the recording will be made. In a few minutes, the Windows XP bootable USB flash drive will be ready.
The Windows XP image can be on any media. If you are recording from the original installation disk, then you first need to create an image with any disk burning program, specifying an existing hard drive with the required capacity as the location of the final file. Using a bootable USB flash drive with Windows XP, copied from the original DVD, guarantees the stability of the newly installed system.
For faster installation and to avoid failures, it is recommended to disable anti-virus programs while preparing the bootable drive. The recording speed depends on many factors: the power of the computer, the DVD reading speed, the speed of the flash memory and the amount of RAM.
For example, you can show how to make a bootable USB flash drive with Windows XP using the examples of the most common programs UltraISO and WinToFlash .
Ultra ISO
To make a bootable USB flash drive using the UltraISO , you must perform the following sequence of actions:
- After starting the program, you need to click on the “ Open ” menu button or select the “ File ” item in the standard menu bar, and click “ Open ” in the list.
- In the Explorer window that appears, you must select the desired image file and click on the “ Open ” button. Now in the program window on the right side you will see the contents of the image of the bootable Windows XP operating system.
- After the flash drive is inserted into the computer slot, you need to select “ Burn Hard Disk Image... Bootboot .
- In the “ Write Disk Image ” window that appears, select the path to the installed flash drive and specify the recording method “ USB-HDD+ ”. To format the flash drive, click the Format button, then select the FAT32 and start the formatting process.
- Next, after formatting is completed, in the “ Write Disk Image ” window, click the Write button and confirm the start of the operation.
WinToFlash
To make a bootable USB flash drive using the WinToFlash , you must perform the following sequence of actions:
- After starting the program, the easiest way is to go to the “ Wizard Mode ” tab and click on the “ Windows Setup to USB Transfer Wizard ” button.
- In the window that appears, select the path to the drive and image file. Click the Next> button.
- In the next window you must accept the license agreement.
- After consent, the operating system image will be loaded onto the drive and can then be used to install the system on the computer.
As you can see, the latter program is much easier to use, but has a significant “minus” - it cannot be used for anything else. In this regard, more complex software provides greater opportunities due to its versatility and multifunctionality.
Starting the Windows XP installation
Immediately after turning on the computer, enter the BIOS, and not the boot menu (otherwise errors may occur when installing the operating system), to set the boot priority from a removable device previously connected to the computer. Until the installation of the operating system is completed, do not remove the bootable flash drive from the USB port of the PC.
Follow these steps:
- After loading, the “GRUB4DOS” window will open, in which the name of the operating systems “Windows 2000/XP/2003 Setup” is highlighted. Press the "Enter" keyboard key.
- In the next window, using the “↑” and “↓” arrows on your keyboard, go to item 3 “First part of Windows XP Professional SP3 setup from partition 0”, and then press the “Enter” key.
- Next, the process of installing the Windows XP operating system on your computer will begin.
After the first reboot, select item 4 “Second part of Windows XP Professional SP3 setup/Boot First internal disk” to boot from the hard drive. Wait until Windows installation is complete, do not remove the flash drive.
After completing the installation of the operating system, disconnect the bootable USB flash drive from the computer. Read a detailed article about installing Windows XP from a flash drive.