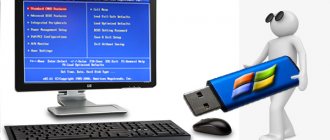
In this instruction we will show in detail how to create a bootable USB flash drive for a UEFI computer with Windows 10 or Windows 7 distribution.
We will need:
- USB flash drive (v 2.0 or v 3.0) with a capacity of at least 4 GB for Windows 7 or 8 GB for Windows 10;
- 64-bit installation image with Windows distribution (32 bit versions of Windows cannot be installed on a UEFI computer). The distribution can be in the form of an installation DVD or an ISO file with an image.
An important feature of a bootable USB flash drive for a UEFI system is that it must be formatted in the FAT32 file system.
Let's look at some of the most popular methods that allow you to create a bootable UEFI flash drive for installing Windows 10.
Using the Media Creation Tool to burn a Windows 10 image to a USB flash drive
Officially, Microsoft's tool for creating installation media and ISO images with Windows 10 is Media Creation Tool . You can download the latest version here: https://www.microsoft.com/en-us/software-download/windows10
The old version of Windows USB / DVD download tool for recording a Windows 7 image formatted the USB drive only in the NTFS file system. A computer with UEFI in native mode will not be able to boot from such media. Therefore, this utility is not suitable for creating an installation flash drive with Windows 7.
- Run the file MediaCreationTool2004.exe;
- Select what you want to create installation media - Create installation media (USB flash drive, DVD, or ISO file) for another PC) ;
- Select the language, bitness and architecture of the Windows 10 image that you want to burn to the USB drive;
- Then indicate that you want to burn the image to a USB flash drive;
- Select your flash drive in the list of removable devices and USB drives;
That's all. Click Next -> Next -> Finish and wait until the installation image is written to the USB drive.
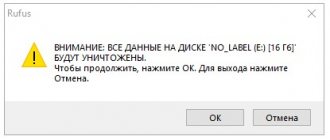
In this case, all data from the flash drive will be deleted during formatting.
This USB flash drive can be used to boot on both UEFI and BIOS computers.
Media Creation Tool
The easiest way to burn a USB drive to install the latest version of Windows 10 is to use the portable Media Creation Tool. It was developed by Microsoft and is available for download on the company's official website.
The utility is initially intended for downloading the latest Windows 10 distribution, but among its additional features it provides for the creation of a bootable flash drive, including one compatible with BIOS UEFI. After accepting the license terms, in the utility window you must select to create installation media.
Then decide on the language, edition of Windows, and processor architecture.
And finally, note the need to create a USB drive, indicating its drive letter accordingly.
The recording process will not be fast, since first the utility will format the flash drive and download the latest operating system distribution from Microsoft servers.
Download MediaCreationTool1903.exe (19 mb) or go to the website.
If the Windows distribution is stored on the computer, and the only issue is writing it to a flash drive, the following two programs will help.
Rufus – a utility for creating a bootable UEFI GPT flash drive for installing Windows
It is much easier for novice users to create their own bootable UEFI USB flash drive for installing Windows using the graphical interface of the popular Rufus . At the moment, the third version of the utility is available on the developer’s website https://rufus.ie - Rufus 3.10. The utility is quite compact (about 1 MB), does not require installation and is completely free. In addition, it works noticeably faster than analogues.
Run the Rufus utility with administrator rights and specify the following settings:
- Device: select your USB flash drive;
- Download method: specify a file with an ISO image of Windows (you can create an ISO image with the latest build of Windows 10 using the same Media Creation Tool, see example);
- Partition scheme: GPT;
- Target system: UEFI (non-CSM);
- File system: FAT32
Click START to start burning the Windows image to the USB flash drive. After 10-15 minutes, your bootable USB will accumulate with a Windows image for installation on the UEFI computer
How to create a bootable Windows 10 USB flash drive under UEFI or BIOS in Rufus (new 3.x version) [instructions]
Good day!
Lately, when creating bootable USB flash drives for installing Windows, there has been real confusion (with these UEFI, BIOS...). But if you write the flash drive incorrectly, then either the installation will not start at all (the PC/laptop simply won’t see it), or an error will occur during the Windows installation process (for example, the OS will report that installing the system on this disk is impossible.).
To avoid this, I decided to outline the note in a few simple steps (a kind of mini-instruction).
I will also note that during the work I will use the Rufus 3.x utility (one of the best utilities for preparing installation drives). In version 3, its design has changed slightly compared to 2.x (a number of articles on my blog now also need minor adjustments, which I will do with the help of this note).
And so, closer to the topic.
Diskpart: creating a UEFI installation flash drive with Windows 10 manually
You can create a bootable UEFI flash drive with the desired Windows distribution manually. The procedure below is suitable for advanced users, performed from the command line and allows you complete control (and understanding) of all stages of the process of creating a bootable USB flash drive.
- Insert the USB flash drive into the appropriate port on the computer;
- Launch a command prompt with administrator rights;
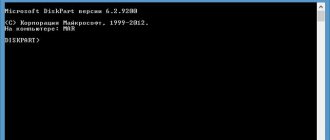
- Launch the DISKPART utility by typing at the command line: Diskpart
- List all disks on the system: list disk
- Find the disk corresponding to your USB flash drive (in our example it is Disk 2) and select it: Select Disk 2
- Warning. The following command will completely destroy all information and partitions on the USB flash drive, so it is advisable to once again make sure that in the previous step you selected your removable USB device, and not one of the computer’s hard drives.
Delete all data from this disk with the command: clean
- Create a primary partition on the disk: create partition primary
- Make the created partition active (system volume): active
- List the partitions in the system with the command: list volume
- Select the partition you created (in our example it is Volume 3): select volume 3
- Format the selected partition in the Fat32 file system: format fs=fat32 quick
Note . Unlike systems with BIOS, which allow you to boot from boot partitions with the FAT, FAT32, exFAT or NTFS file systems, UEFI only allows you to boot from the boot loader located on the boot disk formatted in the FAT32 file system. - Assign a drive letter to the formatted partition (if Windows does not automatically assign a letter to the flash drive - see the article): assign
- Quit DISKPART: exit
All that remains is to copy all the files from the mounted installation ISO disk image with Windows x64 to the USB flash drive you prepared. You can do this using Windows Explorer, your favorite file manager, or from the command line, for example, like this:
xcopy d:\* f:\ /s /e
(where d:\ is the installation DVD disk or mounted iso image with the Windows distribution, f:\ is the letter assigned to the flash drive)
Note Because The maximum file size on a FAT32 file system should not exceed 4 GB; you will not be able to copy a large install.wim system image file (this problem most often occurs with modified Windows images). The size of the install.wim file can be more than 4 GB if you have integrated updates, drivers, etc. into it. In this case, the install.wim file will have to be split into several files up to 4 GB in size (for example, 3 GB files). To do this, you can use the command Dism /Split-Image: Dism /Split-Image /ImageFile:D:\sources\install.wim /SWMFile:c:\tmp\install.swm /FileSize:3000 Or using the imagex utility: imagex / split D:\sources\install.wim c:\tmp\install.swm 3000 The resulting files install.swm, install2.swm, install3.swm ... need to be copied to a flash drive in the F:\sources directory. During the system installation process, the Windows installer will itself collect the swm files and apply the full wim image to the disk.
This completes the process of creating a bootable UEFI USB flash drive with Windows 10.
Removing partitions on a USB drive using DISKPART
In Windows 7, 8 and Windows 10 earlier versions, actions on partitions on a flash drive are not available in the Disk Management utility, and therefore you will have to resort to using DISKPART in the command line.
In order to delete all partitions on the flash drive (the data will also be deleted, take care of their safety), run the command line as an administrator.
In Windows 10, start typing “Command Prompt” in the taskbar search, then right-click on the result and select “Run as Administrator”, in Windows 8.1 you can press the Win + X keys and select the desired item, and in Windows 7 Find Command Prompt in the Start menu, right-click on it and select Run as Administrator.
After that, enter the following commands in order, pressing Enter after each of them (the screenshot below the list of commands shows the entire process of performing the task of removing partitions from USB):
- diskpart
- list disk
- Find your flash drive in the list of disks, we will need its number N. Do not confuse it with other drives (as a result of the described actions, the data will be deleted).
- select disk N (where N is the flash drive number)
- clean (the command will delete all partitions on the flash drive. You can delete them one by one using list partition, select partition and delete partition).
- From now on, there are no partitions on the USB, and you can format it using standard Windows tools, resulting in one main partition. But you can continue to use DISKPART, all the commands below create one active partition and format it in FAT32.
- create partition primary
- select partition 1
- active
- format fs=fat32 quick
- assign
- exit
At this point, all steps for deleting partitions on the flash drive are completed, one partition has been created and a letter has been assigned to the drive - you can use the full amount of memory available on the USB.
Finally, there is a video instruction if anything is not clear.
And maybe this will be interesting:
Why not subscribe?
Distribution of new, sometimes interesting and useful, materials from the site remontka.pro. No advertising and free computer help for subscribers from the author. Other subscription methods (VK, Odnoklassniki, Telegram, Facebook, Twitter, Youtube, Yandex.Zen)
01/05/2019 at 22:31
Thanks a lot! It helped!
01/27/2019 at 20:23
When I try to delete partitions, it says that it was successfully formatted, but the partitions remain. What to do?
01/28/2019 at 12:55
Does the flash drive work properly? Is there no way to delete partitions in Disk Management? (right click - delete volume)
01/28/2019 at 18:02
I tried through the command line. Before this I used a flash drive as internal storage on my tablet.
02/07/2019 at 20:09
same problem + in cmd it says volume is unusable
01/28/2019 at 21:13
Thank you very much, Author! Only your advice helped... and I tried the flash drive and Acronis, and through disk management... and a bunch of different programs... I was already ready to throw it away... And here everything is intelligible and point by point... with trembling hands I drove it into the CDD and got back 15GB of dead space! Be happy)
02/08/2019 at 11:25
On the command line I get to the command clear. That's it, it says the section is not selected. Although before this, when entering the corresponding command, it was written that the section was selected. How to get out of this situation.
02/09/2019 at 08:00
Do I understand correctly that up to the 6th step everything goes well, but the error occurs on the 9th? If so, then you can stop at 6 and try formatting using Windows.
03/05/2019 at 16:28
Thank you very much! I'm a complete computer novice, but using your instructions I got a flash drive with one partition!
03/19/2019 at 14:42
Thank you very much! Everything is very well explained, thanks again!
03/20/2019 at 12:12
Thank you for a very useful and understandable article, and the whole site is super! I often find the information I need here.
03/27/2019 at 07:44
After selecting a disk or volume (flash drive), the clean command responds: DISKPART> clean Virtual disk service error: No media in the device.
Attempting to format: Volume 4 selected. DISKPART> format fs=fat32 Virtual Disk Service error: Volume cannot be formatted.
Disk properties (flash drive): DISKPART> detail disk
U167CONTROLLER USB Device Disk ID: 00000000 Type: USB State: No Media Path: 0 Target: 0 LUN ID: 0 Location Path: UNAVAILABLE Current Read-Only Status: No Read-Only: No Boot Disk: No Page File Disk: No Hibernate File Disk: No Crash Dump Disk: No Cluster Disk: No No Volumes
03/27/2019 at 08:54
According to your description, the problem is not with the partitions, but more like a hardware problem. Why did you start behaving like this? What brand of drive is it?
08/18/2019 at 18:15
Hello Dmitry. I have the same problem as Vladimir. TV series were recorded on a flash drive for viewing on TV. They watched TV series from it, then didn’t touch the flash drive for a week, didn’t watch anything from it, but didn’t take it out of the TV either. The TV was turned off using the remote control and then the power filter was turned off (sometimes the electricity is cut off at night). And now diskpart writes the same problem to me as in Vladimir’s comment. There was also a second flash drive plugged into the TV at the same time, but everything was fine with it.
08/19/2019 at 10:32
Hello. I wish I could get such a flash drive for experiments... In the meantime, I can only advise this, without promising anything: https://remontka.pro/usb-repair-software/
12/25/2019 at 17:06
Good afternoon Dmitry! After trying to reformat exFat to FAT32, I got a message - The disk is write protected, the laptop sees it, but does not see the volume, when I try to format via diskpart, everything goes perfectly, after the format fs=fat32 command it says - virtual disk service error. The disk is write protected.
12/26/2019 at 12:12
Hello. Are there any switches on the flash drive? If not, then look also: https://remontka.pro/disk-write-protected/
12/26/2019 at 21:06
Good afternoon Dmitry! Nope, nothing helps, I already have an idea, maybe there is a lock switch inside the flash drive case, does this even happen? Or the flash drive died...
12/27/2019 at 14:45
No, there is no switch there (and if there was, it would not switch itself). She died - perhaps this is not such a rarity for them.
04/29/2019 at 02:49
only the console helped, thank you, as always, you are the best, for any help, only on your site is the solution! RESPECT
08/06/2019 at 16:14
Dmitry, thank you, it was very helpful. I thought it was the end of the flash drive, but no, your site appeared and I did as you said, and now I returned my 32 gig flash drive, for which I thank you very much. Success in life and success to your site.
09/18/2019 at 09:17
nothing works, it says the disk is write-protected
I tried all the known methods.. nothing helps. The 64 gig flash drive was transferred to it. Temporary and programs on the smartbook were transferred to it... I took it out and that’s it.. there is a flash drive, but it’s not formatted in NTFS and two partitions were created, I was mistaken, it’s not the flash drive I have, but micro sd Transcend 64 giga class 10
09.18.2019 at 11:18
Try this thing: Transcend JetFlash Online Recovery (despite the fact that it is for USB), and also this one: SD Memory Card Formatter. Where to download both: https://remontka.pro/usb-repair-software/
09.21.2019 at 14:52
thank you very much for the article. It helped a lot.
09.25.2019 at 22:54
Thank you, everything works 100 percent! Acronis couldn't, but I could)
Features of a bootable UEFI flash drive with Windows 7
If you are creating a Windows 7 installation USB flash drive for a UEFI computer, you need to follow additional steps:
- On the USB flash drive, go to the directory f:\efi\microsoft\boot;
- Copy its entire contents one level up (to the F:\efi\boot directory)
- Copy the file bootmgfw.efi to the directory f:\efi\boot and rename it to bootx64.efi;
Note. It is the bootx64.efi file that the UEFI environment must transfer control to. The bootmgfw.efi file can be copied from an already installed system with Windows 7 x64 (it is located in the %windir%\Boot\EFI directory), it can also be extracted from the install.wim file in the distribution using the 7ZIP archiver, you can find it in the sources path \install.wim\1\Windows\Boot\EFI\bootmgfw.efi).Note : For some motherboards, you must additionally copy the bootx64.efi file to the root of the USB drive, either with an identical file name or with the name shellx64.efi.
Equipment setup
Almost all modern computers and laptops do not come with the old BIOS system, but with the new one - UEFI. Unlike its predecessor, it is more “smart” and intellectual. It is very easy to determine what you are using. Firstly, if your computer came with Windows 8 or 8.1 pre-installed and when you turn it on, the operating system starts immediately, rather than the usual BIOS polling of controllers and a system test, this is UEFI. The same is true if an SSD drive is installed and the Windows 8 or 8.1 operating system is used. Although it is worth noting that the presence of this new product does not deny the possibility of installing older systems both in normal mode and in compatibility mode - legacy. In this post, I will talk about three simple ways to create a bootable UEFI USB flash drive to install Windows 7 or Windows 8 on a computer or laptop.
The first and easiest way is to copy the installation files
For now, this can only be done with Windows 8.1, with Windows 10, which has not yet been officially released, and on the latest versions of Ubuntu and ArchLinux. The procedure is as follows: Download the operating system distribution in ISO format. Unpack it to any folder on the disk using an archiver. 7zip works great with ISO images:
We format the flash drive to the FAT32 file system. To do this, go to “My Computer”, right-click on the USB drive:
Select the file system and click on the “Start” button. After that, it goes to the folder with the unpacked Windows image and simply copy everything that was unpacked directly to the flash drive:
The trick is that installers of new operating systems are already optimized for UEFI. All that remains is to boot from it and check its functionality.
Method two - using the Diskpart utility
This option is used to install Windows 7 on a computer or laptop with UEFI. The first step is to launch the Windows command line. To do this, press the Win+R key combination and in the “Run” window that opens, enter the command: “cmd”:
Click the OK button. Now on the command line it launches a utility utility for working with partitions: Diskpart Then enter the following commands one by one: list disk
A list of disks available in the system with numbers will open: select disk《Disk_number》 I think it is clear that at this step you need to indicate the number of the USB drive obtained from the list. For example, select disk 2, as in my case. We clear it completely: clean We create a partition: create partition primary We select it: select partition 1 We make the partition active: active We format it in FAT32: format fs=FAT32 We automatically assign a letter to it: assign We exit the program: exit Next you need to unpack the ISO image with the Windows operating system 7 to your computer, and then transfer all these files to the bootable USB flash drive you made.
But that is not all. On the USB flash drive, find the efi\microsoft\boot folder and copy it all to the efi folder. As a result, the efi\boot directory should appear. Now you need to find the file: bootmgfw.efi . To do this, you need to unpack the sources\boot.wim archive with a 7zip or WinRar archiver. The file you are looking for will be located in the sources\boot.wim\1\Windows\Boot\EFI\ folder.
Copy the bootmgfw.efi file to the efi\boot folder, and then rename it bootx64.efi . Ready. We made a bootable UEFI USB flash drive with Windows 7.
Method three - using special programs
Some programs for creating bootable flash drives can do this for UEFI. One of these is the free Rufus utility. Install and run the program:
Set the partition scheme and system interface type: - “GPT for computers with a UEFI interface” if you are using a GPT partition. — “MBR for computers with UEFI interface” if using compatibility mode (Legacy mode) and the MBR partition table. Next, we set the file system to FAT32, feed the program the operating system image and start the process of writing installation files to the USB drive by pressing the “Start” button. After about 10 minutes you will have a ready-made installation flash drive.
Bootable USB flash drive in Rufus 3.6
One of the most popular programs for creating bootable flash drives, Rufus, is constantly updated and version 3.6 was recently released. Using it, you can easily burn a bootable USB flash drive for Windows 10, 8 and Windows 7, various versions of Linux, as well as a variety of Live CDs that support UEFI or Legacy booting and installation on a GPT or MBR disk.
This instruction contains details about the differences and capabilities of the new version, an example of use in which a bootable Windows 10 USB flash drive will be created using Rufus, and some additional nuances that may be useful to users. See also: The best programs for creating bootable flash drives.