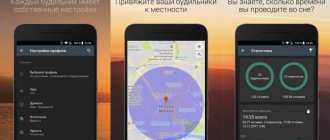
Best Information Widget: Google At a Glance (Free)
At a Glance is part of the Google app installed on every Android phone. It's a one-row widget that updates throughout the day and displays pieces of information like traffic or your next appointment. And if nothing special happens, then information about the date and weather.
Transparent weather clock
An excellent application for a smartphone is the Transparent weather clock widget. This is a multifunctional solution that includes a convenient transparent watch with weather data. The widget has a wide range of settings, which allows each user to choose their own style and format for displaying it on the gadget’s desktop screen.
The application is available for free, but it contains advertising. If you want to disable it, you need to purchase the paid version. Like many widgets for Android in Russian, this application is multilingual. The desired display language can be configured in the menu. The program automatically determines your location and always provides up-to-date weather data, shows local time, as well as the exact time of sunrise and sunset. In addition, the widget shows active alarms, calendar events and much other necessary information.
Best Weather Widget: Overdrop Weather (Free) | Overdrop Pro ($4)
Overdrop is a relative newcomer to the ever-expanding genre of Android weather apps. It looks the best and offers amazingly accurate minute-by-minute forecasts from the DarkSky service.
Also, much attention is paid to widgets. You get 21 free widgets, plus 17 more when you upgrade via in-app purchase. They cover just about every style you could think of.
Best clock and alarm widget: Chronus (Free, in-app purchases)
Every screen needs great looking clock widgets. Chronus gives you half a dozen of these. It offers a choice of digital and analog clocks with the added functionality of displaying your daily planner, weather, stocks or news feed. It even has a Google Fit-compatible widget that brings your daily steps to the home screen.
How to add widgets on Android - step-by-step instructions
- Long press an empty space on the home screen and you will see a context menu. From the context menu, select Widgets .
- Now select the widget from the menu that you want to add to your home screen. Touch and hold the widget and place it on the highlighted spot on your home screen.
- Once the widget is in place, you can adjust the size by clicking on the widget and dragging it out of the corner.
- If for any reason you don't like the widget, you can simply remove it by dragging it to the Remove window.
Keep in mind that the process of adding or removing widgets varies slightly from one Android skin to another, but the basic steps remain the same. Now that you have added a widget to your home screen, you can change some settings by tapping on the widget.
This option is not available for all widgets because not all widgets support customization.
Best Notes Widget: Google Keep (Free)
You'll find many great note-taking apps with widgets on the Play Store. But I recommend trying Google Keep.
It offers two widgets. One is a simple shortcut bar that lets you create basic notes, lists, voice notes, handwritten notes, or photo notes. Another lets you pin notes to the home screen. It's perfect for shopping lists or something similar.
Best To-Do widget: TickTick (Free, in-app subscriptions)
TickTick is an amazing task management app that comes with nine widgets to ensure you are significantly more productive. These range from a comprehensive multi-page to-do list to a three-day agenda submission and a basic checklist. There's even a Pomodoro timer widget.
Using a list widget in an application
Post Views: 3,584
Widgets are mini-applications . which can be built into the main screen of the device and display useful information from the application itself or even interact with it, performing any operations. Therefore, widgets are a very important part of the application, and they are also easy to use: for example, many music players have their own widget that allows you to change tracks or pause them without launching the application.
In early versions of Android, widgets could only display simple elements like TextView , ImageView , and so on. However, now their capabilities have become much greater; now you can use more complex ListView , GridView and StackView , which allows you to display more and different information in widgets.
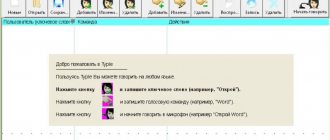
In this article, we'll look at how to add a ListView to a widget and handle clicks on its items. We will do this using the example of a widget for the Wi-Fi Network Password Manager application.
First, you need to create XML markup and metadata files.
The markup file will determine the appearance of our widget and the arrangement of elements on it. In this case, the widget will consist of a header with the name of the application and a ListView, which will contain a list of active networks. Add widget_network.xml file with the following code res/layout
Since the item in the list contains different data, it also has separate markup in the widget_list_item.xml , also located in res/layout , which is a slightly modified markup of the RecyclerView from the application.
The main data to be displayed here is the SSID of the network, its password, the date it was added, and a mark indicating whether the network is hidden or not. When you expand the item, additional buttons will appear that allow you to connect to the network, copy the password, or share information about it with other people.
Now you need to create a file with metadata. create a file network_widget.xml in the res/xml .
In this file we specify the widget markup that we added earlier, as well as the dimensions of the widget, the image that will be displayed in the list of widgets, the update time and the ability to change the size of the widget.
Now, having finished with the appearance of the widget, you can begin to implement work with the list. To do this, we will need to create 3 classes: WidgetRemoteViewsFactory , WidgetRemoteViewsService , WidgetProvider . The logic of their interaction can be described in the following words: When updating the widget, WidgetProvider will send an intent to WidgetRemoteViewsService, which will return an instance of WidgetRemoteViewsFactory. How this works will be discussed below.
WidgetProvider class inherits from AppWidgetProvider and its job is to implement the widget life cycle. Let's create a WidgetProvider class containing the following code:
public class WidgetProvider extends AppWidgetProvider { private static final String TAG = "PROVIDER"; @Override public void onUpdate(Context context, AppWidgetManager appWidgetManager, int[] appWidgetIds) { super.onUpdate(context, appWidgetManager, appWidgetIds); for (int widgetId : appWidgetIds) { updateWidget(context, appWidgetManager, widgetId); } } private void updateWidget(Context context, AppWidgetManager appWidgetManager, int widgetId) { RemoteViews views = new RemoteViews(context.getPackageName(), R.layout.widget_network); appWidgetManager.updateAppWidget(widgetId, views); } public static void sendRefreshBroadcast(Context context) { Intent intent = new Intent(AppWidgetManager.ACTION_APPWIDGET_UPDATE); intent.setComponent(new ComponentName(context, WidgetProvider.class)); context.sendBroadcast(intent); } @Override public void onReceive(Context context, Intent intent) { final String action = intent.getAction(); if (BuildConfig.DEBUG) Log.d(TAG, action); if (!TextUtils.isEmpty(action)) { if (action.equals(AppWidgetManager.ACTION_APPWIDGET_UPDATE)) { AppWidgetManager manager = AppWidgetManager.getInstance(context); ComponentName cn = new ComponentName(context, WidgetProvider.class); manager.notifyAppWidgetViewDataChanged(manager.getAppWidgetIds(cn), R.id.widgetList); } } super.onReceive(context, intent); } }
onUpdate() method is called when widgets are updated, passing in the parameters the application context, the AppWidgetManager object, and the IDs of all widgets that need to be updated.
If you look at the source code of the AppWidgetProvider class, you can see that it inherits from the BroadcastReceiver , so it can receive broadcast messages from an application. The onReceive() method receives these messages and processes them depending on what the developer needs.
In order for the provider to accept messages, you need to register it in the manifest. To do this, add the following code AndroidManifect.xml
In we indicate that we want to receive messages about widget updates, and in we indicate the XML file with metadata that we created earlier.
The WidgetRemoteViewsService class acts as an intermediary between the WidgetProvider and the WidgetRemoteViewsFactory. This service must accept an intent from the WidgetProvider and return a WidgetRemoteViewsFactory object that populates the list item in the widget with data. Let's create a class WidgetRemoteViewsService that inherits from RemoteViewsService .
public class WidgetRemoteViewsService extends RemoteViewsService { @Override public RemoteViewsFactory onGetViewFactory(Intent intent) { return new WidgetRemoteViewsFactory(this.getApplicationContext(), intent); } }
Like any other service, it needs to be registered in the application manifest. AndroidManifect.xml file :
android.permission.BIND_REMOTEVIEWS permission allows the system to bind a service to add a widget view for each element and prevents other applications from accessing the widget data.
WidgetRemoteViewsFactory class is to populate the widget's list with data. In other words, here it acts as a ListView adapter. In order to work with the list, the class must implement the RemoteViewsService.RemoteViewsFactory . Let's create a WidgetRemoteViewsFactory class with the following code:
public class WidgetRemoteViewsFactory implements RemoteViewsService.RemoteViewsFactory { private Context mContext; private List list; private DateFormat dateFormat; private int mWidgetId; public WidgetRemoteViewsFactory(Context context, Intent intent) { mContext = context; mWidgetId = intent.getIntExtra(AppWidgetManager.EXTRA_APPWIDGET_ID, AppWidgetManager.INVALID_APPWIDGET_ID); } @Override public void onCreate() { list = new ArrayList<>(); String pattern = ((SimpleDateFormat) DateFormat.getDateInstance(DateFormat.MEDIUM, Locale.getDefault())).toPattern(); dateFormat = new SimpleDateFormat(pattern, Locale.getDefault()); } @Override public void onDataSetChanged() { list.clear(); Set networkList = new HashSet<>(); String json = SP.getString(mContext, WIDGET_LIST, NULL); if (json != NULL) { networkList = SP.getWidgetList(json); } if (networkList != NULL) { list.addAll(networkList); } } @Override public void onDestroy() { } @Override public int getCount() { return list.size(); } @Override public RemoteViews getViewAt(int i) { WifiInfoWidget wi = list.get(i); RemoteViews rv = new RemoteViews(mContext.getPackageName(), R.layout.widget_list_item); rv.setTextViewText(R.id.widget_SSID, wi.SSID); if (wi.hidden) { rv.setViewVisibility(R.id.widget_tv_dot, View.VISIBLE); rv.setViewVisibility(R.id.widget_tv_hide, View.VISIBLE); } else { rv.setViewVisibility(R.id.widget_tv_dot, View.INVISIBLE); rv.setViewVisibility(R.id.widget_tv_hide, View.INVISIBLE); } rv.setTextViewText(R.id.widget_password, wi.password); rv.setTextViewText(R.id.widget_date, dateFormat.format(wi.date)); if (Build.VERSION.SDK_INT >= Build.VERSION_CODES.LOLLIPOP) { rv.setImageViewResource(R.id.widget_copy, R.drawable.ic_content_copy_black_24px); rv.setImageViewResource(R.id.widget_share, R.drawable.ic_share_black_24px); if (wi.widgetExpand) { rv.setImageViewResource(R.id.widget_arrow, R.drawable.ic_keyboard_arrow_up_black_24dp); } else { rv.setImageViewResource(R.id.widget_arrow, R.drawable.ic_keyboard_arrow_down_black_24dp); } } else { Drawable drawableCopy = VectorDrawableCompat.create(mContext.getResources(), R.drawable.ic_content_copy_black_24px, mContext.getTheme()); if (drawableCopy != NULL) { setDrawable(rv, R.id.widget_copy, drawableCopy); } Drawable drawableShare = VectorDrawableCompat.create(mContext.getResources(), R.drawable.ic_share_black_24px, mContext.getTheme()); if (drawableShare != NULL) { setDrawable(rv, R.id.widget_share, drawableShare); } Drawable drawableArrow; if (wi.widgetExpand) { drawableArrow = VectorDrawableCompat.create(mContext.getResources(), R.drawable.ic_keyboard_arrow_up_black_24dp, mContext.getTheme()); } else { drawableArrow = VectorDrawableCompat.create(mContext.getResources(), R.drawable.ic_keyboard_arrow_down_black_24dp, mContext.getTheme()); } if (drawableArrow != NULL) { setDrawable(rv, R.id.widget_arrow, drawableArrow); } } if (wi.widgetExpand) { rv.setViewVisibility(R.id.widget_more, View.VISIBLE); } else { rv.setViewVisibility(R.id.widget_more, View.GONE); } return rv; } @Override public RemoteViews getLoadingView() { return NULL; } @Override public int getViewTypeCount() { return 1; } @Override public long getItemId(int i) { return i; } @Override public boolean hasStableIds() { return true; } private void setDrawable(RemoteViews rv, int id, Drawable drawable) { Bitmap b = Bitmap.createBitmap(drawable.getIntrinsicWidth(), drawable.getIntrinsicHeight(), Bitmap.Config.ARGB_8888); Canvas c = new Canvas(b); drawable.setBounds(0, 0, c.getWidth(), c.getHeight()); drawable.draw(c); rv.setImageViewBitmap(id, b); } }
onCreate() method is called when the adapter is created, here we initialize the List and the date format to display.
onDataSetChanged() method is called when the adapter has updated the widget. In this method, we take networks from SharedPreferences and fill the previously initialized list with it.
onDestroy() method is called when the list is deleted; here, if required, you need to implement cleanup logic.
getCount() method returns the number of elements in the list.
getViewAt() method is the most important here; it fills the list element with data, then returns the finished RemoteViews .
getLoadingView() method returns a special View if the list items have not yet been created.
getViewTypeCount() method returns the number of view types in the ListView. Since the views in the list are the same, we return 1.
getItemId() method returns the ID of the item at the selected position.
hasStableIds() method returns true if the same ID always refers to the same object.
Now we need to connect the adapter to our provider. To do this, add the following code to the updateWidget() of the WidgetProvider class:
private void updateWidget(Context context, AppWidgetManager appWidgetManager, int widgetId) { RemoteViews views = new RemoteViews(context.getPackageName(), R.layout.widget_network);
setList(views, context, widgetId); appWidgetManager.updateAppWidget(widgetId, views);
} private void setList(RemoteViews views, Context context, int widgetId) { Intent intent = new Intent(context, WidgetRemoteViewsService.class); intent.putExtra(AppWidgetManager.EXTRA_APPWIDGET_ID, widgetId); views.setRemoteAdapter(R.id.widgetList, intent); } Here, using the setRemoteAdapter() , we install a list adapter that connects to the WidgetRemoteViewsService service through a special intent.
Now we need to make sure that when you click on the buttons in the widget list, certain operations are performed. The tricky part here is that when using collections, you are not allowed to set PendingIntent on individual elements. So we'll use the setPendingIntentTemplate() to set the PendingIntent template in the collection, and the individual elements will be called using the setOnClickFillInIntent() .
First, in the updateWidget() of the WidgetProvider class, we will create a template for the collection that will send a click event to onReceive().
public static final String ACTION_ON_ITEM_CLICK = "ON_MORE_CLICK"; public static final String COMMAND = "COMMAND"; public static final String MORE = "MORE"; public static final String CONNECT = "CONNECT"; public static final String COPY = "COPY"; public static final String SHARE = "SHARE"; public static final String ITEM = "ITEM"; ... private void updateWidget(Context context, AppWidgetManager appWidgetManager, int widgetId) { ... final Intent onItemClick = new Intent(context, WidgetProvider.class); onItemClick.setAction(ACTION_ON_ITEM_CLICK); onItemClick.setData(Uri.parse(onItemClick.toUri(Intent.URI_INTENT_SCHEME))); final PendingIntent onClickPendingIntent = PendingIntent.getBroadcast(context, 0, onItemClick, PendingIntent.FLAG_UPDATE_CURRENT); views.setPendingIntentTemplate(R.id.widgetList, onClickPendingIntent); appWidgetManager.updateAppWidget(widgetId, views);
} Then in the WidgetRemoteViewsFactory in the getViewAt() we will add intents when the buttons are clicked.
@Override public RemoteViews getViewAt(int i) { ... if (wi.widgetExpand) { rv.setViewVisibility(R.id.widget_more, View.VISIBLE);
rv.setOnClickFillInIntent(R.id.btn_widget_connect, createIntent(WidgetProvider.CONNECT, wi)); rv.setOnClickFillInIntent(R.id.widget_copy, createIntent(WidgetProvider.COPY, wi)); rv.setOnClickFillInIntent(R.id.widget_share, createIntent(WidgetProvider.SHARE, wi)); } else { rv.setViewVisibility(R.id.widget_more, View.GONE); } rv.setOnClickFillInIntent(R.id.widget_arrow, createIntent(WidgetProvider.MORE, wi)); return rv; } private Intent createIntent(String cmd, WifiInfoWidget wi) { Intent intent = new Intent();
intent.setAction(WidgetProvider.ACTION_ON_ITEM_CLICK); Bundle bundle = new Bundle(); bundle.putString(WidgetProvider.COMMAND, cmd); bundle.putSerializable(WidgetProvider.ITEM, wi); intent.putExtras(bundle); return intent; } Bundle object that will help the provider distinguish which button was clicked and what actions need to be performed.
The button clicks have been implemented, now we need to process them. Let's return to the WidgetProvider class and add the following code to the onReceive() method:
@Override public void onReceive(Context context, Intent intent) { final String action = intent.getAction();
if (BuildConfig.DEBUG) Log.d(TAG, action); if (!TextUtils.isEmpty(action)) { if (action.equals(AppWidgetManager.ACTION_APPWIDGET_UPDATE)) { AppWidgetManager manager = AppWidgetManager.getInstance(context); ComponentName cn = new ComponentName(context, WidgetProvider.class); manager.notifyAppWidgetViewDataChanged(manager.getAppWidgetIds(cn), R.id.widgetList); } if (action.equals(ACTION_ON_ITEM_CLICK)) { parseItemClick(context, intent.getExtras()); } } super.onReceive(context, intent); } private void parseItemClick(Context context, Bundle bundle) { if (bundle != NULL) { String command = bundle.getString(COMMAND); if (!TextUtils.isEmpty(command)) { if (BuildConfig.DEBUG) Log.d(TAG, command); switch (command) { case MORE: { WifiInfoWidget wi = (WifiInfoWidget) bundle.getSerializable(ITEM); if (wi != NULL) { wi.widgetExpand = !wi.widgetExpand; Set networkList = new HashSet<>(); String json = SP.getString(context, WIDGET_LIST, NULL); if (json != NULL) { networkList = SP.getWidgetList(json); } if (networkList != NULL) { for (WifiInfoWidget wifiInfo : networkList) { if (wifiInfo.equals(wi)) { wifiInfo.widgetExpand = wi.widgetExpand; SP.saveWidgetList(context, networkList); sendRefreshBroadcast(context); break; } } } } break; } case CONNECT: { WifiInfoWidget wi = (WifiInfoWidget) bundle.getSerializable(ITEM); if (wi != NULL) { App.selectContent("widget", "connect network"); WifiManager wifiManager = (WifiManager) context.getApplicationContext() .getSystemService(Context.WIFI_SERVICE); if (wifiManager == NULL) { return; } Toast.makeText(context, R.string.wifi_changing_network, Toast.LENGTH_SHORT).show(); Set networkList = new HashSet<>(); String json = SP.getString(context, MAIN_LIST, NULL); if (json != NULL) { networkList = SP.getList(json); } if (networkList != NULL) { for (WifiInfo wifiInfo : networkList) { if (wifiInfo.SSID.equals(wi.SSID) && wifiInfo.password.equals(wi.password) && wifiInfo.hidden == wi.hidden) { WifiConfigManager wcf = new WifiConfigManager(wifiManager); if (wcf.getStatus().toString().equals("PENDING")) wcf.execute(wifiInfo); break; } } } } break; } case COPY: { WifiInfoWidget wi = (WifiInfoWidget) bundle.getSerializable(ITEM); if (wi != NULL) { App.selectContent("widget", "copy"); Tools.CopyToClipboard(context, wi.password); Toast.makeText(context, R.string.Copy_value, Toast.LENGTH_LONG).show(); } break; } case SHARE: { WifiInfoWidget wi = (WifiInfoWidget) bundle.getSerializable(ITEM); if (wi != NULL) { App.selectContent("widget", "login-password string"); String s = "SSID : " + wi.SSID + "\nPassword : " + wi.password; Intent i = new Intent(); i.setAction(Intent.ACTION_SEND); i.putExtra(Intent.EXTRA_TEXT, s); i.setFlags(Intent.FLAG_ACTIVITY_NEW_TASK); i.setType("test/plain"); context.startActivity(i); } break; } } } } }
This way we can easily handle clicks on various list items.
All that’s left is to send a broadcast message to the widget, which will trigger an update when an element is added/removed from the list in the application. To do this, in the WidgetProvider the sendRefreshBroadcast() method , which will send a widget update message nReceive()
public static void sendRefreshBroadcast(Context context) { Intent intent = new Intent(AppWidgetManager.ACTION_APPWIDGET_UPDATE); intent.setComponent(new ComponentName(context, WidgetProvider.class)); context.sendBroadcast(intent); }
We will call this method in the main activity class in places where the list changes.
WidgetProvider.sendRefreshBroadcast(mainView.getContext());
That's all. You can see the result of how our widget works below.
Best Stock Widget: Investing.com Stock Exchange (Free, In-App Purchases)
Track stocks on over 70 global exchanges.
Thanks for reading! Subscribe to my channel on Telegram and Yandex.Zen . Only there are the latest blog updates and news from the world of information technology.
Also, read me on social networks: Facebook , Twitter , VK , OK .
Respect for the post! Thanks for the work!
Want more posts? Find out technology news? Read reviews of gadgets? For all this, as well as for promoting the site, purchasing a new design and paying for hosting, I need help from you, loyal and grateful readers. Read more about donations on the special page .
It is possible to become a patron to support the blog with a monthly donation, or use Yandex.Money , WebMoney , QIWI or PayPal :
Thank you in advance! All funds raised will be used for the development of the site. Project support is a gift to the site owner.
What kind of smartphone is needed for stable operation of applications?
If you plan to use your smartphone as functionally as possible, not only for calls and SMS, then you will need to install a fairly large number of widgets and applications. All of these programs require certain resources. This includes both processor performance and RAM. In addition, we must not forget that installing the application and its regular updates requires a certain amount of built-in phone memory. The best widgets for Android have many settings, functions and an attractive design. For such programs to work without freezes and crashes, the smartphone must have enough free resources.
So, we conclude: we need a powerful and productive smartphone with a good processor, sufficient RAM and internal memory. In addition, it would be nice to have a high-quality camera and other useful modules. Naturally, the device must have an excellent display and stylish design. And if you have a limited budget, then pay attention to the models of the British company Wileyfox.
This is a young brand that first entered the mobile gadgets market in October 2020. Each model of the company received the characteristics and functions most in demand among users. This:
- Work with two SIM cards;
- Support for 4G LTE data networks;
- Stylish modern design;
- Powerful hardware component;
- Stable operating system firmware;
- Affordable price.
If you need a stylish, powerful, modern and inexpensive smartphone, pay attention to the Wileyfox Swift 2.