Author of the article
Artyom Neuman
Web developer, content manager on IT projects
The Keenetic Viva KN 1910 router can be called a simplified version of some models from the Giga line. The device is suitable for those users who lack the power of younger models, but do not want to overpay for more expensive ones. It can be partially attributed to the premium segment, although the company classifies the router as a mid-price product. When reviewing this model, it is important to mention support for dual Wi-Fi frequency bands, the presence of gigabit ports and modern design.
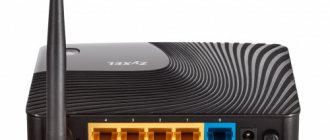
Indicators and connectors
On the front of the case there are 5 light indicators for the router status. USB connectors and Wi-Fi control buttons are installed on the side faces. The main interfaces of the router are located on the rear edge: one WAN, 4 LANs and a power connector. There is also a reset button, recessed into the case to avoid accidental pressing.
List of light indicators on the body:
- Power indicator;
- Internet connection indicator;
- Modem connection indicator.
- Two Wi-Fi connection indicators;
Let's describe the Zyxel Keenetic Viva router: appearance, price, features
The Zyxel Keenetic Viva model is already quite outdated - it has already been discontinued. However, the router can still be found in some stores. Its cost is about 2500 - 3000 rubles.
The Zyxel Keenetic Viva router is no longer produced, so it’s difficult to find this model in stores
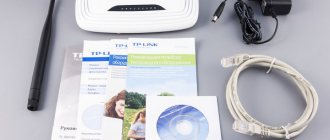
The equipment is standard for all routers: the device itself, a power adapter, an Ethernet cable for local connection of a PC and other devices, as well as instructions.
In the box you will find the router itself, instructions, power cable and Ethernet cable
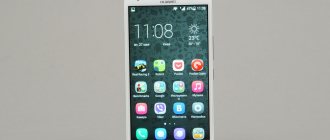
On the top panel there is a large “Wi-Fi” button for connecting devices to the network without a password (WPS function). The front panel contains indicators: power, 4 LAN ports, Wi-Fi, Internet access and connecting devices via USB.
On the side panel there are light indicators that show whether certain connectors are working, as well as whether Wi-Fi is turned on and whether there is access to the Internet
There are 5 network connectors on the rear panel: 4 for local (home) network and 1 for provider cable. To the left of the outputs are the “Reset” and Fn buttons, and to the right are the power key and the connector for the power adapter.
On the back there is a standard set of buttons and connectors for network cables
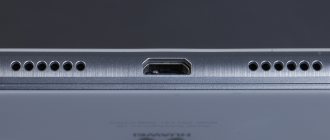
On one of the side panels there is a USB 2.0 output for connecting a printer, modem and various storage devices.
On the side there is a USB output into which a modem, flash drive or printer cable can be inserted
On the bottom panel there is a label with the MAC address of the device, data for entering settings and.
On the label below there is the serial number of the router, information for logging into the web interface for configuration
Table: main technical characteristics of the Viva model
| Parameter | Meaning |
| CPU | MT7620A 600 MHz |
| RAM | 128 MB DDR2 |
| Flash memory | 16 MB |
| Wi-Fi class | N300 |
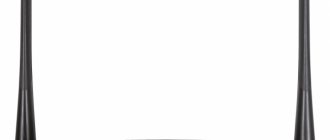
| Antennas | 3 dBi. They are not removable, so you won’t be able to expand the coverage area. They are enough to cover a standard apartment. |
| Wi-Fi network speed 2.4 GHz | 300 Mbit/s |
| LAN ports | Gigabyte |
| IPoE/PPPoE routing | Up to 1800 Mbit/s in duplex |
| L2TP/PPTP routing | Up to 500 Mbit/s |
| Reading from USB disk | 17 MB/s |
| Additional features | IPTV and Smart-TV, file server, torrent client, DLNA / UPnP AV, guest network, parental controls |
| Device dimensions excluding antenna, W x D x H | 160 mm x 110 mm x 35 mm |
| Device weight | 240g |
| Operating temperature range | 0–40°С |
Video: which is better - Zyxel Keenetiс Viva or Xiaomi MI3
Connection
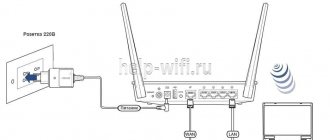
The Keenetic Viva KN 1910 is connected in a standard way: the router is installed on a wall or other surface, connected to the power supply and the Internet itself via a WAN connector or a USB modem.
More detailed connection instructions:
- Connect the device to a 220V power supply using the power supply included with the router.
- Connect to the laptop/computer through which the router will be configured. This can be done via a LAN cable or Wi-Fi.
- In order for the router to distribute the Internet, connect to it an Ethernet cable or a USB modem with an operator SIM card installed in it.
When connecting via Wi-Fi, you will need to find the name of your access point in the wireless connections section of Windows. Usually it is called the same as the router, but it can be labeled 5G if Wi-Fi is distributed at a frequency of 5 GHz. The network name may be changed by your ISP. In this case, look at the current name in the contract or contact the provider’s support.
Further configuration should be done through the web interface. It can be called through any browser, even the one installed on Windows by default. The web browser will not make any fundamental differences.
Entrails
The device is based on the MediaTek MT7620A SoC, which is built on MIPS24Kc. The frequency reaches 580-600 MHz. The chip consumes little power, so it is covered with a small heat spreader plate. The chip inside has a radio unit with a 2.4 GHz band, and there is room for a USB 2.0 controller.
There is not much flash memory - only 16 MB, but this is enough. RAM 128 MB should also be enough. To ensure correct operation of the wired ports, a switch was installed in the device. In general, these values are enough for a good middle-class system. Interestingly, inside there is a processor that is very similar to the already forgotten third Pentium.
Login to router settings
Login to the settings of the Keenetic Viva KN 1910 router occurs at the standard address: https://192.168.1.1. You need to enter it into the address bar of your browser and press Enter.
To enter the settings, you will have to enter your username and password in the pop-up window. There, most likely, the default values will be used: login – admin, password – 1234 or admin. In rare cases, the provider may change the login information in the router settings. Then the current data is indicated in the contract or obtained from technical support.
Using standard login and password on an ongoing basis is unsafe, so the router firmware prompts you to change them the first time you log in. You can do this later after completing the basic settings.
How to connect Zyxel Keenetic Viva KN-1910 - Instructions
To connect the Keenetic Viva router (formerly Zyxel), we use the power adapter included in the kit. Immediately after power is applied, it will begin to emit a wireless signal.
Default login and password
The default network name, login and password for connecting to the Keenetic Viva network and logging into the admin area are on a sticker located on the bottom of the case.
- Accordingly, we need to connect to it.
- If they do not fit, or you do not see such a WiFi network at all, then reset the settings to factory settings. After this, if there are no equipment failures, everything should work out.
Automatic setup
Automatic configuration of Keenetic Viva KN 1910 allows you to quickly specify important parameters of the device. The process of setting automatic parameters occurs through the built-in NetFriend assistant:
- In the assistant's welcome window, you need to indicate the language you are using. It is usually determined automatically. Having selected a convenient language, click “Start quick setup”.
- You will need to change your password without fail. Write a new password for the router and repeat it in the special field. The username cannot be changed.
- Select your internet connection type. There are three options available here: Ethernet, 3G/4G and connection via ADSL and VDSL. After selecting one of the options, click “Continue”.
- Specify the service you are going to configure. In this case, the Internet is automatically configured. Select the desired option and click “Continue”.
- The firmware will prompt you to change the MAC address or leave it as default. If the provider does not require changing the MAC address, then leave the default value.
- By analogy, you will need to specify the type of IP address: static or dynamic. The type chosen depends on the provider and must be specified in the contract.
- You will be asked to select an Internet filter to protect against cyber attacks. You can choose nothing or specify one of the filters offered by the firmware.
- As the final step of automatic setup, you will need to come up with a name for the wireless access point and enter a key for it, which can be found on the device (or come up with your own password).
- Complete the setup using the button of the same name.
Setting up Keenetic Viva routers
It is known that configuration of routers of any type is carried out through a proprietary Internet center, which is most often launched in a browser. Keenetic Viva was no exception in this regard, so you will initially have to authorize it. You will find a detailed thematic guide on this matter in another article at the link below.
Read more: Login to the web interface of Zyxel Keenetic routers
Once you are on the main page of the web interface, you can proceed to the following instructions. They will be discussed using the example of the latest current version of the Internet center. If, while reading the article, you notice that the appearance of the menu differs from the one used, be guided by the names of the items, finding the parameters necessary for editing.
Using the Setup Wizard
The main attention will need to be paid to the Keenetic Viva quick setup tool, since it is the one that turns out to be most useful for novice users and those who are not interested in manually setting up basic network parameters.
- After logging into the web interface, select “Quick Setup”.
- Enter the country of the Internet service provider from which you purchased the plan, and then continue.
- If the provider was immediately identified, the Wizard will prompt you to fill in the basic data. For example, when using the PPPoE protocol, you must enter a username and password. A static IP address involves obtaining a permanent router address, subnet mask and DNS servers. If the provider uses the dynamic IP address protocol, no additional settings are required. If you find it difficult to fill out the form, find documentation from your Internet service provider, which should contain the required information, or contact the technical support service directly to clarify all the nuances.
- The Keenetic company actively cooperates with Yandex, so you will be asked to connect a secure DNS from this company. In the same window, familiarize yourself with the principle of its operation and activate it if you see fit.
This was the last item in the Setup Wizard, which means you won’t be able to change the wireless network settings in it. This forces users to still open the advanced web configurator and look for the relevant items there. We will talk about editing them in one of the next steps.
Setting WAN parameters manually
Sometimes it is not possible to set the Internet connection parameters using the method described above, so you have to go to the advanced web interface and set them yourself. Use the following instructions to quickly and correctly handle this operation.
- On the main page of the Internet center, select the “Web Configurator” option.
- You will immediately be prompted to set a password for the administrator, which is then used as protection when connecting to the Internet center. Enter a password that you are sure you will remember, and then proceed to the next step.
- Open the Internet section, which is divided into different tabs. Specify the protocol that your provider provides to you to set its parameters. First, let’s look at PPPoE, where when you switch to the tab, click “Add connection”.
- Activate the network by checking the appropriate box, make sure the protocol type and set the username and password that were received from the provider when concluding the contract. Be sure to apply the changes before exiting the menu.
- Users who have encountered dynamic or static IP protocols need to navigate to the “IPoE” page. You can set the ports to use, specify the received IP address and DNS server. If necessary, the physical address is cloned here. If you are the owner of a dynamic IP, select “Without IP address” in the pop-up menu.
Be sure to apply all changes that were made at this stage. Almost always after this the router reboots, but in some cases this may not happen. Then you will need to manually carry out this process, and then check network access when connected via a LAN cable.
Enabling the wireless network
Many users connect to any modern router via a wireless network using a laptop, smartphone or tablet. Then Wi-Fi will have to be configured to suit your own needs, giving it the optimal name and installing protection.
- To do this, through the bottom panel, go to the “Wi-Fi Network” section and select the first tab. Activate the access point by checking the box next to the corresponding item, give it a name and a security key consisting of at least eight characters. It is not recommended to change the key type, since the optimal option is already used by default.
- Additionally, the functionality of Keenetic Viva allows you to configure a guest access point, which is useful in cases where you do not want any of the clients to connect to the main Wi-Fi. In a separate tab “Guest Wi-Fi network” you configure it, select a separate name and optionally set a password for the connection.
The downside of the Keenetic Viva router is that in addition to the listed wireless network settings, there are no more parameters, for example, for setting access control. However, most users do not need them, so only a few will consider this situation a huge drawback of the web interface.
Home group
Configuring a home network is required when several devices will be connected to the router via a local network at once. Then you will need to pay attention to the following important parameters.
- To use devices on your home network, adding them there is mandatory. Open the Home Network category and go to the Devices page. A client is added to the table by clicking on the “Add device” button. From the list, select the IP or physical address of the equipment to confirm, after which all clients can be tracked through the corresponding table.
- By default, setting up automatic acquisition of IP addresses of local network participants for Keenetic Viva users is not necessary, however, the web interface has a “DHPC relay” section. Change the parameters present there only if it is required to configure the local network or if recommended by your provider.
- Additionally, it is recommended to make “NAT” settings if you do not want all members of your home network to receive the same IP address when connecting. To do this, go to the penultimate tab and uncheck the only box.
Security Settings
Before completing the setup of the Keenetic Viva router, some users need to go to the security settings to set the rules for the built-in firewall. To do this, a number of special actions are performed, which look like this:
- Open the "Security" section and use the first tab - "Network Address Translation (NAT)". We have just figured out the principle of operation of NAT technology, and this filtering rule allows us to determine which of the connected clients will be able to receive a common address, and which will have to use the default one.
- Through the Firewall, filtering rules are configured by MAC and IP addresses. There you can create a black or white list by setting a filter by physical or Internet addresses. This is done extremely simply, because you just need to click on “Add rule” and make changes by filling out the form that appears.
Completing configuration
Before exiting the web interface and moving on to using the router, all you have to do is check the system parameters, changing them to suit your requirements. This is done through a specially designated section.
- Open the System menu and select Options. Here you can change the name of the device and workgroup if you plan to use the router in a home group. Don't forget about the system time: set it to the correct values to get the correct information from the router's event log.
- Through the “Mode” section, you select the type of operation of the router. There are detailed descriptions of each possible option, so you just have to read them and choose the one that suits you.
- One of the features of the Keenetic Viva settings is the ability to configure the Wi-Fi button. It can be responsible for connecting via WPS, disconnecting or switching the network. Review your click options and set your preferences for each using the Button tab.
We are glad that we were able to help you solve the problem. Add the Lumpics.ru website to your bookmarks and we will be useful to you. Thank the author and share the article on social networks.
Describe what didn't work for you. Our specialists will try to answer as quickly as possible.
Manual setting
Manual configuration of the KN 1910 is a bit difficult compared to other Keenetic routers, since the interface of the firmware used has been updated and rethought. Some options may not be available as they are now determined automatically after connection.
After the automatic configuration of the router is completed, the user sees several blocks with basic information on the wired connection and wireless access points. From here you can change some parameters, but this is not very convenient. Scroll to the bottom of the page to see the expanded menu.
In the “Internet” block, click “Wired”. A more familiar manual configuration interface will open. In the left menu, you can select a different custom connection type or switch to other firmware options.
In the wired connection settings section you can:
- Specify the name of the provider and/or add another provider;
- Set the router operation schedule;
- Configure IP and MAC addressing, although they are configured automatically and do not require adjustments.
In the section with settings for connecting via a modem, the options are approximately the same.
Setting up via mobile application
You can interact with Zyxel and Keenetic routers using a special application for smartphones. There are no options for full customization here, but you can view the latest information about the firmware, search for and install updates.
Download the application for setting up routers:
Android;
iOS.
For example, let’s check the relevance of the device’s firmware through the mobile application:
- Click on the “About device” block on the main screen of the application.
- To start searching for updates, use the “Device Update” button.
- If there are updates, the Update button will become active. Click on it.
Packaging and equipment
The box is traditional, made in blue and white colors.
On the reverse side there is complete information about the characteristics of Keenetic Viva. Also, attention is drawn to the image, which reminds us that the router has the ability to be configured through the My.Keenetic mobile application
The kit includes an adapter, instructions and a cable made in the original “noodle” form factor.
Wi-Fi connection and settings
The Wi-Fi connection is configured during the automatic configuration of the router, but adjustments can be made to it at any time:
- Connect to the router's wireless access point. On the taskbar in Windows, click on the wireless connection icon.
- Select the name of the router's access point and connect. You will have to enter your network password.
- Open your router settings in your browser.
- Wireless network settings are placed in a separate block. There are two networks listed there: 2.4 GHz and 5 GHz. They have the same name, since the device now decides for itself which network to connect to. Here you can disable one of the access points using the switch.
- For each access point, you can set a name and password by simply clicking on the “Show password” button.
Additionally, the same block indicates the number of devices connected to the router via Wi-Fi.
Setting up the Zyxel Keenetic Viva KN-1910 router
Now you can start setting up the Keenetic Viva router - that is, connect it to the Internet and establish a wifi connection.
- Open a browser on your computer and go to https://my.keenetic.net to enter the settings. If you can’t log in, then read a separate article that describes in detail all possible errors and options for solving them.
- Here, when connecting for the first time, we set a password for the administrator. The default login is “admin”.
- Connecting to the Internet
- And set the wireless network settings.
- The result of the work should be the Keenetic Viva router control panel page that opens.
You will read more about the initial setup of the Kinetic series in another guide.
Setting up IP TV
You can configure IP TV on your router as follows. The instructions below are shown using the old interface of Keenetic routers as an example, but they are also relevant for the model in question:
- Connect the set-top box to the router via LAN.
- Click on the inscription “Broadband connection”, located in the “Other connections” tab from the “Internet” section.
- In the “IPTV set-top box” line, put a check mark under the connector to which the TV set-top box is connected via LAN.
- Apply the settings.
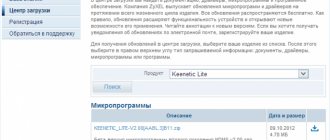
Firmware update
In the case of the Keenetic Viva KN 1910 router, you don’t need to bother searching for and installing firmware updates, since it does it automatically.
For example, you can update the firmware via a smartphone application:
- Open the Firmware tab.
- Set the switch for “Automatic software updates” to the active position. If current updates are found, they will be installed automatically.
An example of port forwarding using the example of Zyxel Keenetic 4g II
We do the following:
- In any device browser, enter “192.168.1.1” and go to the router menu;
- Then open the “Security” item;
- Then go to the “Firewall” section;
- Next, indicate “Home Network”;
- Select the item “Add rule”;
- At the final stage, we indicate all the data indicated in the lower photo and click the “Save” tab.
The same thing is done with Zyxel Keenetic Viva.
In addition, you can use the Keendns remote access service. To do this, you need to perform the following procedures
1.Open the KeenDNS section.
2. Then you need to come up with a memorable name (domain address) for the router, which is necessary for the connection, and enter it in the “Internet Center Name” box. Then you need to check whether this name is available or occupied (to do this, click the “Check” button). If the name is taken, the system will offer available options, select one and click “Apply”.
3. Then you need to select the appropriate operating mode “Direct Access” or “Via Cloud”.
4. If the Cloud Clients service is not activated, the system will advise you to activate it.
5. After turning it on, the router will automatically register on the server under the selected name.
6. At the final stage, you need to open access to the Internet center from the global Internet. To do this, go to the “System” section and open “Settings”, where you need to activate the “Access to the web configurator via the Internet” function and click “Apply”.