Author of the article
Artyom Neuman
Web developer, content manager on IT projects
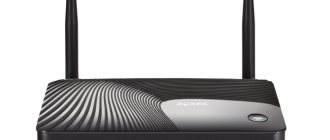
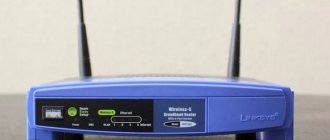
The Zyxel Keenetic Lite III router belongs to a line of inexpensive, but at the same time high-quality and reliable devices for home and small offices. The router is not particularly different from its predecessors in the line: the design of the device has been slightly rethought and some technical characteristics have been improved to meet modern needs. Since the device is from the budget segment, it is equipped with only the essentials to create a stable connection.
Connection
The router is connected in a standard way: first the router is connected to the network, and then the connection with other devices occurs. More detailed instructions are as follows:
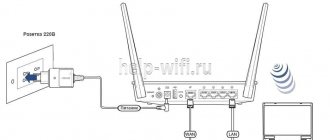
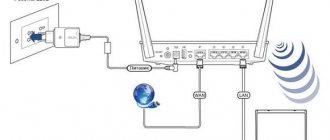
- Connect the router to a 220V power supply. Use the included power supply for this. If necessary, first secure the router to the wall.
- Connect the router to your PC or laptop via Wi-Fi or LAN.
- Connect an Ethernet cable or USB modem to the router so that it starts distributing the Internet.
To connect to the router via Wi-Fi, you need to follow these steps:
- Open the list of available wireless access points. In Windows, this requires clicking on the Wi-Fi icon in the taskbar.
- Among the list of access points, find “Keenetic Lite 3”. The name may be changed by the provider. In this case, look for up-to-date information in the contract for the provision of communication services.
- Connect to this network.
Configuration occurs through a web interface, which can be opened through any browser on a computer.
Wireless connection
As soon as Kinetic Light 3 is turned on, turn it upside down and look at the label.
- Wi-Fi network – the name of the wireless network to which you will connect;
- Network password is a key that must be entered when connecting.
If there is no such network, look at the indicators. The WiFi indicator should be on - if it is not on, press the button on top. If the indicator is on, but there is no network, reset to factory settings.
Login to router settings
To enter the router settings, enter the following address in the search bar of your browser: https://192.168.1.1. To move on, press Enter.
You will be asked for a login and password. Specify the standard ones: login – admin, password – admin or 1234. The data can be changed by your provider. In this case, see the latest information in the contract or contact technical support.
Immediately after logging in, the firmware will prompt you to change the standard login-password pair. You can perform the change later - when you are finished with the basic settings.
Setup via phone app
Let me remind you that the application works only with new firmware on versions “Rev. B". The product version is indicated on the label under the housing.
- Go to Google Play or AppStore. In the search bar, enter the name of the program “My.Keenetic”. Download and install.
- Then simply follow the instructions. The router will ask questions, and you answer them. But the phone or tablet must be connected to the router’s network via Wi-Fi.
Automatic setup
By default, it is proposed to configure Zyxel Keenetic Lite 3 in automatic mode:
1. A window will open asking you to quickly configure the router. Click "Quick Setup" to confirm.
- The type of network connection will be automatically detected: Ethernet, modem or ADSL cable. If the automatic detection did not work correctly, you can specify the desired type yourself.
- The system will ask if you need to register MAC addresses. If the provider does not register MAC addresses, then leave the default value. Otherwise, check with your provider for current MAC addresses.
- Next, select your country and region of residence. This is done through a drop-down list. If your locality is not on the list, then enter its name manually.
- At this step, you enter your login and password, which are issued by your provider/operator. You can find them out from the contract or by contacting technical support.
- The firmware will prompt you to enable “Yandex Internet filter with DNS”. It allows you to protect yourself from various attacks. Whether you turn it on or not is up to you.
- Click on the “Go online” button to complete the automatic configuration of the router.
The globe icon on the router body should light up, which will indicate successful setup and connection to the Internet.
Setting up the ZyXEL Keenetic Lite 3 router
The material discusses setting up the ZyXEL Keenetic Lite 3 for any provider providing services using Ethernet technology, and with any protocol - PPTP, PPPoE, L2TP, binding by MAC address and setting a dynamic or static IP address, as well as as a repeater ( access point, repeater)
You can find prices for setting up network equipment in the section “Services - Setting up a router”
We looked at setting up this model for the thirty largest providers in Moscow and the Moscow region (for other regions, the settings of the listed providers may differ)
You can read about the choice of installation location or installation of the router, as well as some of its characteristics that affect the signal quality in this material
You can get additional instructions and options for solving problems associated with poorly functioning Internet from the Computer Help section
| Avelak | NoBuyNo |
| Akado | Online |
| AlfaNetTelecom | RialCom |
| ASVT | Rinet |
| Beeline | Rostelecom |
| Birulevo.Net | Seven Sky |
| ButovoNo | Smile |
| VelNet | Starnet |
| City Committee | Starlink |
| Inetcom | Tushino Telecom |
| Lantec | Home Net Telecom |
| Maryino.Net | Digit 1 |
| Morton TeleCom | Qwerty |
| MosNet | Union Line |
| MTS (MGTS) | 2KOM |
Added: ProLink, Ecotelecom
Using these instructions, you can configure not only any of the black ZyXEL Keenetic models with interface version 2, but also others due to the standard structure of the WEB interface
Content
| Assembling and connecting the ZyXEL Keenetic Lite 3 router |
| Login to WEB interface |
| Internet setup |
| Dynamic IP |
| Static IP, repeater |
| Static IP + MAC address binding |
| PPTP |
| PPTP + Static IP |
| L2TP |
| PPPoE |
| PPPoE + Static IP |
| MAC address |
| Setting up WiFi security |
| Changing the subnet |
| Reset to factory settings |
| Setting up the Lite 3 router as a wireless receiver |
| WPS button |
Setting up a router for your provider, Moscow, price, telephone
. Assembling and connecting the ZyXEL Keenetic Lite 3 router
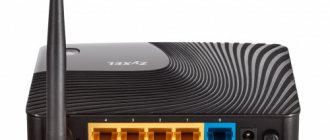
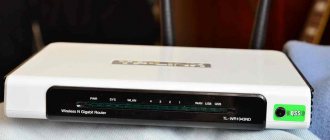
All router connectors are on the rear panel
We connect the router to the electrical network and turn it on with the Power button
We insert the provider cable into the Internet port (if the router is connected as a wireless repeater, then leave the Internet port empty)
If the device is intended to be used as repeater from the main router via wire, the Internet port must be connected with an Ethernet cable to one of the LAN ports of the main router or ADSL modem
For use as an ADSL modem with providers MTS, MGTS and Rostelecom (via a two-wire telephone cable), the Keenetic Lite 3 router is not suitable - you need to either connect it as a repeater from the ADSL modem, or a Keenetic DSL router (Annex A - for use without security alarm) or TP-Link TD-W8961NB (Annex B - for use in conjunction with a security alarm). When setting up a PPPoE connection on ADSL equipment, in addition to the login and password, also specify the VPI and VCI values. For MGTS they are equal to 1 and 50, respectively, for Rostelecom - 0 and 35
Attention! This material discusses setting up the ZyXEL Keenetic Lite III router in repeater (repeater, access point) mode manually, so select the “Main” mode with the switch, as in the illustration above
Insert the Ethernet cable that comes with the router into any yellow port. We connect the other end of the same cable to the Ethernet port of a laptop or computer
After these operations, a network connection should be established on the computer, about which you will see a notification in the corner of the screen
. Login to the WEB interface of the ZyXEL Keenetic Lite 3 router
If you have already tried to configure the router or if it is impossible to connect to the device (its WEB interface does not open), then you should first install the factory settings. If an error occurs, also check your computer's network card settings
To reset the settings of the ZyXEL Keenetic Lite 3 router, you need to press and hold the RESET button on the side panel (with a toothpick or a needle) for 10-20 seconds when the device is turned on. After this, the POWER LED on the router panel will blink and the device will reboot with factory settings
The router is configured via the WEB interface
Launch your favorite browser
enter the text 192.168.1.1 into its address bar and press the Enter key
On the first page of the WEB interface, click the “Web Configurator” button
Create a password to log into the WEB interface and enter it twice in the appropriate fields, then click the “Apply” button
Now you are in the WEB interface of the ZyXEL Keenetic Lite 3 router
If you need to configure your router as a wireless receiver, come here
When connecting as a repeater via wire, follow the link
First, let's configure the Internet on the router, and then the WiFi security settings
Setting up a router, Moscow, price, telephone
. Setting up the Internet on the ZyXEL Keenetic Lite 3 router
In the lower menu of the WEB interface, select “Internet” (globe)
Now click on the logo of your provider from the list below to go to the corresponding settings item
If your operator is not in our table, or you are from another region, just slowly follow the instructions under the table
| Provider | Router connection type | |
| Avelak | 1 var. L2TP 2 var. PPPoE | |
| Akado | Dynamic IP and MAC address binding | |
| AlfaNetTelecom | PPTP | |
| ASVT | Dynamic IP | |
| Beeline | L2TP | |
| Birulevo.Net | 1 var. Static IP 2 var. Dynamic IP | |
| ButovoNo | Dynamic IP and MAC address binding | |
| VelNet | PPTP | |
| GORKOM | 1 var. Static IP + MAC address binding 2 var. PPPoE 3 var. Dynamic IP and MAC address binding | |
| Inetcom | PPPoE | |
| Lantec | Dynamic IP and MAC address binding | |
| Maryino.Net | PPPoE | |
| Morton TeleCom | Dynamic IP | |
| MosNet | Dynamic IP and MAC address binding | |
| MTS (MGTS) | PPPoE | |
| NetbyNet | 1 var. PPPoE and MAC address binding 2 var. PPTP and MAC address binding 3 var. PPTP + Static IP and MAC address binding | |
| Online | Dynamic IP | |
| ProLink | Dynamic IP and MAC address binding | |
| RialCom | PPPoE | |
| Rinet | Dynamic IP and MAC address binding | |
| Rostelecom | PPPoE | |
| Seven Sky | PPPoE and MAC address binding | |
| Smile | PPPoE | |
| Starnet | PPPoE | |
| Starlink | 1 var. L2TP (Severny, Degunino and Dmitrovsky districts) 2 var. PPTP (Severny, Degunino and Dmitrovsky districts) 3 var. Dynamic IP (new access system) 4 var. PPPoE required: binding by MAC address 5 var. Static IP + MAC (Ostankino and Alekseevsky districts) | |
| Tushino Telecom | 1 var. PPPoE 2 var. Dynamic IP (new access system) | |
| Home Net Telecom | Static IP | |
| Digit1 | 1 var. PPTP and MAC address binding 2 var. Static IP + MAC address binding | |
| Ecotelecom | Dynamic IP | |
| QWERTY | Dynamic IP | |
| Union Line | Dynamic IP and MAC address binding | |
| 2KOM | Dynamic IP | |
To set up the Internet on the router, you need two things: the type of connection and data from your contract (login-password pair, static IP address and/or MAC address)
If you do not know the type of connection, then before setting up the router, dial the technical support number of your provider and ask the employee the following question - “What type of connection should be used to set up the router?” It’s also worth checking separately whether there is a binding by MAC address. You should be answered with one of the options below - click on it with your mouse
Dynamic IP, DHCP or IPoE - pronounced "dynamic IP address", "DH-CP-pee" and "ah-pee-oh-e"
- Static IP - “static IP address”
— Static IP + MAC address binding
- PPTP - point-to-point tunneling protocol (pronounced "pee-pee-tee-pee")
— PPTP + Static IP
- L2TP - second-level tunneling protocol (“el-two-ti-pi”)
- PPPoE - network protocol for transmitting packets over Ethernet (“pi-pi-pi-o-e”)
— PPPoE + Static IP
Binding by MAC address - pronounced “mac-address”
Attention! Your provider may have mixed authorization - for example, PPTP + MAC address binding
Setting up a router of any model in Moscow, price, phone number
3.1. Dynamic IP
This type of authorization involves automatic assignment of an IP address. It is also one of two options when configuring the router into repeater (repeater, access point) mode. This type of connection is installed by default, so on black Keenetic models the Internet starts working automatically after a correct connection. You only need to create this connection if your provider requires binding by MAC address, otherwise no additional configuration is required
This authentication type must be selected if your provider is one of the following
| Akado |
| ASVT |
| Online |
| Morton Telecom |
| MosNet |
| Rinet |
| Starlink (third option) |
| 2KOM |
| QWERTY |
| Birulevo.Net (second option) |
| Lantec |
| ButovoNo |
| Union Line |
| Tushino Telecom (new access system) |
| GORKOM (third option) |
| ProLink |
| Ecotelecom |
In the top menu, click the IPoE tab, and then the “Add Interface” button
In the “Configure IP settings” item, select the “Automatic” value, then click the “Apply” button
For providers Akado, ButovoNet, Starlink, MosNet, Lantek, Union Line, 2KOM, GORKOM, ProLink and Rinet, you also need to enter the value of the MAC address obtained from the provider's technical support. Read about this in paragraph 3.6
When setting up a router as a repeater, go to Change subnet
Now move on to setting up WiFi security
Computer assistance in Moscow with home visits, phone number - 8(495)782-65-87
3.2. Static IP (static IP address, that is, it must be set manually) - this type of authorization is necessary to configure the ZyXEL Keenetic Lite 3 router for providers
| Home Net Telecom |
| Birulevo.Net (first option) |
You will need IP addresses (numbers in the format XXX.XXX.XXX.XXX) that you received from your provider. There must be a minimum of two addresses (IP address and subnet mask), a maximum of five (IP address, subnet mask, gateway address and two DNS server addresses)
This type of connection is also required to configure the router in repeater mode - in this case, do not forget to change the subnet
If you have already figured out the IP parameters, then the IP address, Netmask, Gateway IP address and Primary DNS server fields for repeater mode should be filled in with the values from the console window as follows:
| web interface | name in the console | meaning |
| IP address | IPv4 address | 192.168.0.49 |
| Subnet mask | Subnet mask | 255.255.255.0 |
| Main gate | Main gate | 192.168.0.1 |
| DNS1 | DNS servers | 192.168.0.1 |
Please note that the subnet number (the third octet is the number marked in blue) may be different in your case. In the fourth octet of the “IP address” field (192.168.0.NNN) you can specify any number in the range 2..255
In the top menu, select the IPoE tab, then click the “Add interface” button
In the “Configuring IP settings” item, select the “Manual” value, then fill in the fields IP address, Subnet mask, Default gateway, DNS1-DNS3
Click the "Apply" button
When setting up the router as a repeater, go to Change subnet; when setting up as the main router, go to setting up WiFi security
Setting up a router of any brand, Moscow, price, telephone
3.2.1 Static IP + MAC address binding
This type of authorization is required to configure the ZyXEL Keenetic Lite 3 router for the providers Digit 1 (second option), Gorkom (first option) and Starlink (fifth option)
In the top menu, click IPoE and then the "Add Interface" button
Prepare IP addresses obtained from your provider - these are numbers in the format XXX.XXX.XXX.XXX - there can be from two to five of them
You also need to prepare a MAC address - a number in the format XX:XX:XX:XX:XX:XX
In the “Configuring IP settings” item, select the “Manual” value, then fill in the fields IP address, Subnet mask, Default gateway, DNS1-DNS3
In the “MAC Address” item, select the “Enter manually” value, and then enter the MAC address value in the next field
Now click the "Apply" button
Now move on to setting up Wi-Fi security
3.3. PPTP
Setting up the ZyXEL Keenetic Lite 3 router for providers Digit 1, VelNet, NetBayNet, Starlink and AlfaNetTelecom requires a PPTP connection type
Prepare your Internet login and password, and also check with your provider the name of the VPN server
| provider | VPN server name | |||
| Number 1 (first option) | ppp.ultranet.ru | |||
| VelNet | vpn.velnet.lan | |||
| NetByNet (second option) | ppp.lan (address 10.10.3.36 can be used) | |||
| Starlink (second option) | vpn.starlink.ru | |||
The name of the VPN server for the AlfaNetTelecom provider depends on your address
| address | VPN server name |
| Quarter 66.67 | vpnk66.ant.ru |
| Quarter 95 | vpnk95.ant.ru |
| Zarechye | vpnzar.ant.ru |
| Novoivanovskoe, Nemchinovka | vpnnem.ant.ru |
Click the PPPoE/VPN tab in the top menu, then click the “Add connection” button
In the “Type (protocol)” item, select PPTP and fill in the Server Address, Username and Password fields
Click the "Apply" button
In the “Description” field, enter the name of the connection - any set of characters
Also, to configure the ZyXEL Keenetic Lite 3 router for the providers Digit 1, Starlink and NetByNet, you must authorize by MAC address
Now don't forget to set up WiFi security
Setting up a router in Moscow for any provider, home visit, price, phone number
3.3.1. PPTP + Static IP
Configuring the ZyXEL Keenetic Lite 3 router using the PPTP + Static IP protocol is required for configuration in some segments of the NetByNet network
| provider | VPN server name | ||
| NetByNet (third option) | ppp.lan (address 10.10.3.36 can be used) | ||
In the top menu, click the PPPoE/VPN tab, then click the “Add connection” button
In the “Type (protocol)” item, select the PPTP value, then fill in the Server Address, Username and Password items
Now in the “Configure IP settings” item, select “Manual” and fill in the details IP address, Subnet mask, Default gateway and DNS addresses. The DNS field value for the NetByNet provider is 212.1.224.6
Click the "Apply" button
In the “Description” field, enter the name of the connection - any set of characters
Also for the NetByNet provider you need to bind by MAC address
Now move on to setting up Wi-Fi security
Computer assistance in Moscow, home visit, telephone
3.4. L2TP
An L2TP connection is required when setting up the ZyXEL Keenetic Lite 3 router for the following providers
| provider | VPN server name | ||
| Avelak (first option) | l2tp.avelacom.ru (to be safe, you can write the address 95.143.0.247) | ||
| Beeline | tp.internet.beeline.ru | ||
| Starlink (first version) | l2tp.starlink.ru | ||
For other providers, the server name will naturally be different - check its correct spelling with technical support
In the top menu, select the PPPoE/VPN tab, then click the “Add connection” button
In the “Type (protocol)” drop-down menu, select L2TP
Fill in the details Server Address, Username and Password
Click the "Apply" button
In the “Description” field, enter the name of the connection - any set of characters
For the Starlink provider, you need to bind by MAC address
Proceed to setting up WiFi security
Setting up routers of any model in Moscow, regardless of provider, price, phone number
3.5. PPPoE
The PPPoE connection type is required to configure the ZyXEL Keenetic Lite 3 router for the following providers
| Seven Sky |
| Starnet |
| Rostelecom |
| Smile |
| Inetcom |
| MTS |
| Maryino.Net |
| RialCom |
| Tushino Telecom (first option) |
| NetByNet (first option) |
| Starlink (fourth variant) |
| City Committee (second option) |
| Avelak (second option) |
In the top menu, select the PPPoE/VPN tab and click the “Add connection” button
In the “Type (protocol)” item, select the value PPPoE and fill in the details Username and Password
For the Starnet provider, you need to enter the value “starnet” in small letters without quotes in the “Service name” line
Click the “Apply” button
In the “Description” field, enter the name of the connection - any set of characters
For providers Seven Sky, Starlink and NetByNet, you must additionally enter the value of the MAC address obtained from the provider - read about this in paragraph 3.6
Don't forget to set up WiFi security
3.5.1. PPPoE + Static IP
Prepare your login and password from the agreement
In the top menu, select the PPPoE/VPN tab, then click the “Add connection” button
In the “Type (protocol)” item, select PPPoE and fill in the Username and Password fields
In the “Configure IP settings” drop-down menu, select “Manual”, then enter the IP address values in the corresponding fields IP address, Subnet mask, Default gateway and DNS
Click the “Apply” button
Now don't forget to set up Wi-Fi security
Setting up routers in Moscow, price, phone number
3.6. For the following providers, you must bind by MAC address when setting up the ZyXEL Keenetic Lite 3 router
| GorKom |
| NoBuyNo |
| Digit 1 |
| Seven Sky |
| Akado |
| Lantec |
| ButovoNo |
| Union Line |
| MosNet |
| Rinet |
| Starlink |
| 2KOM |
| ProLink |
In the top menu, select the IPoE section, then click the “Add connection” button, or click on the line with an already created connection
This item can’t hurt to perform for any provider, so you need to configure your router on the computer that was directly connected to the Internet with a cable - in this case, in the “MAC address” item, select “Take from your PC”
Otherwise, in the “MAC address” item, select the “Enter manually” value, then enter the value received from the provider in the next field
Click the "Apply" button
Computer assistance in Moscow, home visit, telephone
. Setting up the security of the ZyXEL Keenetic Lite 3 WiFi router
A mandatory measure when using a WiFi router is to encrypt the wireless network to protect information on computers connected to it from unauthorized access
At the bottom, select the wireless connection settings menu, as shown in the screenshot below
At the top, click on the “Access Point” tab, then fill in the “Network Name (SSID)” and “Network Key” fields
Click the "Apply" button
Now reboot the router - select “Settings” (gear) in the bottom menu, then “Configuration” at the top, then click the “Reboot” button at the bottom
After loading the router, the Internet should work and you can try to connect to the created wireless network from a laptop or smartphone using the password you set
At this point, the router setup can be considered complete.
If an insidious router does not want to raise the Internet channel, call the number and a technician will come to you immediately
. Changing the subnet on the ZyXEL Keenetic Lite 3 router
Changing the subnet on the router is necessary if your device is a signal repeater from another router
Click the local network icon at the bottom, then select the “IP Settings” tab at the top, then in the “IP address” attribute, change the third octet in the address, for example, write “192.168.3.1”. It is also necessary to change the third octet in the “Start pool address” attribute
Click the "Apply" button
Attention! After changing the subnet, you should log in to the WEB interface of the router using the new address that you just set (192.168.3.1)
Setting up a router for any provider in Moscow, price, phone number
Reset the ZyXEL Keenetic Lite 3 router to factory settings
To reset, you can either use the RESET button or perform it via the WEB interface
Click the “Settings” menu (gear) in the bottom menu, then select the “Configuration” tab at the top
Click the “Return to factory settings” button, confirm the action and wait until the router reboots
Configuring the ZyXEL Keenetic Lite 3 router as a wireless signal receiver
In this mode, the ZyXEL router connects to the wireless network of the main router, and you connect your devices to the wireless network of the ZyXEL router
In the lower menu of the web interface, click “globe”, then select the “WISP 2.4 GHz” tab at the top
In the “Wireless Network name (SSID)” attribute, enter the name of your current Wi-Fi network (you can click the “Browse network” button and click on the desired network name). Enter the main network password in the “WPA Pre-shared key” attribute, and check the “Use to access the Internet” checkbox, then click the Apply button
Now check your Wi-Fi security settings
Setting up routers in Moscow, any provider, price, telephone
Setting up the WPS button
This button is designed to connect devices to a wireless network without entering a password.
We will show this process using Windows as an example.
Click the network connection icon in the system tray, then click on your wireless network and click the Connect button
You should be prompted to press the WPS button on your router
In the Keenetic Lite 3 model it is located on the top panel. Press and release the WPS button
After this, the message “Receiving parameters from the router” should appear on the computer
The network will connect on its own, and the computer will display the message “Connected, secure”
If the WPS button does not work, then check its settings in the router’s web interface - in the bottom menu, click the antenna (1), then the Access Point tab at the top, check the “Enable WPS” checkbox, and then click the Apply button
Manual setting
The settings of the Zyxel Keenetic Lite 3 router suggest the ability to make more precise adjustments to the parameters. For example, here you can establish a VPN connection and set non-standard values for providers.
For Rostelecom
Manual configuration of a router for Rostelecom, Dom.ru, TTK and other similar ones follows the same instructions:
- Open the “Internet” section using the corresponding icon at the bottom of the interface.
- There, in the “Connections” tab, click on “Broadband connection”.
- In the “Use connector” line, set o. It is marked in purple.
- Check the “Enable” and “Use to access the Internet” checkboxes.
- “IP Settings” set to “Without IP address”. Apply the settings.
- Now switch to the “PPPoE/VPN” tab. There, click on the “Add connection” button.
- Fill out the “Connection setup” form as follows:
- Check the “Enable” and “Use to access the Internet” checkboxes;
- “Type (protocol)” - PPPoE;
- “Username” and “Password” enter those that are by default, if they have not been changed previously;
- “Configuring IP parameters” - “Automatic”.
- Apply the settings using the button of the same name.
For Beeline
The instructions will be relevant for other mobile operators from the Russian Federation:
- Open the “Internet” section using the corresponding icon at the bottom of the interface.
- There, in the “Connections” tab, click on “Broadband connection”.
- In the “Use connector” line, set o. It is marked in purple.
- Check the “Enable” and “Use to access the Internet” checkboxes.
- Set “IP Settings” to “Automatic”. Apply the settings.
- Now open the “PPPoE/VPN” tab. Click "Add Connection".
- In “Type (protocol)” set the value to “L2TP”.
- “Configuring IP parameters” - “Automatic”.
- Apply the settings using the button of the same name. This completes the setup of the Zyxel Keenetic Lite 3 router.
Settings
The Zyxel Keenetic Lite III has a major advantage over many other products, which is its excellent Express Setup mode, which allows you to safely set up the device in a few minutes
even for an untrained user. To quickly get started, just insert the provider cable into the blue connector, plug the router into a power outlet and connect to the Wi-Fi network from your computer (the network name, login and password are written on a sticker on the bottom side of the case).
When you first connect, you will be greeted by a friendly setup wizard that provides express setup based on optimized configuration templates for real-life providers. All that is required of you is to consistently answer simple questions in a step-by-step menu, indicate your city of residence and select the name of your provider from the list, after which the device will configure itself and reboot.
By connecting again to the Wi-Fi network after rebooting the device, you can immediately start using the Internet. It is also very convenient that when you first start, Zyxel Keenetic Lite III can independently check for a software update and offer to reflash the device if new improved versions of individual components are detected or new functions appear.
For more detailed configuration of the Internet center, you need to go to the page my.keenetic.net . The fine-tuning interface works almost without delay, has hints and is as functional as possible.
The entire menu is divided into sections, indicated by icons at the bottom: System Monitor, Internet, Home Network, Wi-Fi Network, Security, System. Inside each section there are many tabs that clearly structure options and settings.
encryption type , and also reduce or increase the signal strength , may be first of all useful in the settings .
Here you can easily create a guest network, allowing other users to use the Internet without giving them access to your home network.
System section also contains options for customizing actions for the hardware button with the Wi-Fi icon on the top of the device. You can select different action scenarios for short, double and long press by selecting options from the drop-down list.
In the Security , you can use DNS services SkyDNS or Yandex.DNS , which allow you to speed up page loading, as well as protect yourself and your children from Internet fraud, viruses, dangerous and unwanted information on the network.
Setting up via mobile application
The manufacturing company has developed a special application for smartphones, with which you can find out the current firmware version, view the devices connected to the router, and update the firmware if necessary. The application is distributed for Android and iOS.
Download the application for Kinetic Light 3:
Android;
iOS.
It is not possible to fully configure the router through a mobile application, but, for example, you can check the relevance of the firmware and update it:
- Click on the “About device” block on the main screen of the application.
- To start searching for updates, use the “Device Update” button.
- When updates are detected, the Update button will become active. Click on it.
Setup via smartphone
Basic settings of the Zyxel Keenetic Lite III Internet center can also be done using a smartphone through the free ZyXEL NetFriend , available for Android and iOS devices . The setup practically duplicates the express setup on a computer, that is, it allows you to select the simplest parameters from a list to quickly get started.
1 of 5
Advantages and disadvantages of the router
Pros:
- Does not “cut” speed (suitable for any tariffs up to 100 Mbit/s and higher in duplex)
- Internet access reservation (several providers simultaneously)
- Optimization of settings for most well-known Russian providers
- Semi-automatic express setup mode
- Simultaneous access to the Internet and local network resources (Link Duo)
- Advanced settings and options for advanced users
- Fast and convenient web interface, updatable software
Minuses:
- Lack of USB connector
- Stainless glossy body elements
Text: Anton Kopnov
Wi-Fi connection and settings
Connecting and setting up a wireless access point (Wi-Fi) works like this:
- Connect your computer to the router via Wi-Fi. To do this, click on the wireless network icon in the taskbar and select “Keenetic Lite 3” from the available connections. The network name may be changed by your provider.
- Open your router settings in your browser.
- Switch to the wireless network settings using the icon at the bottom of the interface.
- Open the “2.4 GHz Access Point” tab.
- Fill out the setup form:
- Check the box next to “Enable access point”;
- "Network Key" Copy the corresponding value from the bottom of the device;
- Choose a country.
- Apply the settings.
Local LAN and DHCP
You can change the home network of the Lite III router to suit you in the third section (icon with monitors):
- We are interested here in the second menu “IP Settings”. We write, if necessary, the new Lite III address in the local area. This is necessary, for example, when the router “subordinates” to another device - a modem.
- In the second menu you need to activate the server. Set up a pool of local addresses (they will be distributed to devices when they log into Wi-Fi). Calculate a pool of the maximum number of gadgets that are on your network.
- Apply the settings using the button at the end of the page.
Setting up the local network takes place in the main section “IP Settings”
Setting up IP TV
IPTV is configured like this:
- Connect the set-top box to the router via cable.
- Expand the “Broadband connection” section in the “Internet” tab.
- In the “IPTV set-top box” line, put a check mark under the connector to which the TV set-top box is connected via LAN.
- Click "Apply" and reboot your router.
Wi-fi
To establish a Wi-Fi connection:
- go to the router interface;
- select the “Wi-Fi” section and then the “Access Point” tab;
- set a name for the connection (it can be any word written in Latin);
- security mode – specify “WPA2-PSK”;
- in the “Network key” column, enter the password for the connection;
- click “Apply”.
Attention! Once the connection is established, the router will automatically connect to the Internet without requiring you to click on the shortcut each time.
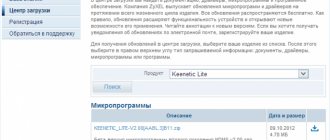
Firmware update
The firmware regularly receives updates from the manufacturer. If their installation is neglected, problems with the operation of the router may begin.
The update follows the following instructions:
- Open the "System" tab.
- The “Updates” line should say “Available”. Click on it.
- Confirm the installation of the available list of updates.
- Wait for the download and installation of updates to complete.
How to setup?
You can also watch the setup in video format:
To configure Zixel Kinetic Light 3 you need to perform the following steps:
- Enter the address 192.168.1.1 into the address bar of your browser. It will allow you to open the control room. When logging in, you must specify your login and password: “admin”.
- We'd better select "Quick Setup".
- The configurator will prompt you to select a MAC address. But in most cases, service providers do not enable this option, so we select “My provider does not register MAC addresses.”
- Click “Next”. A window opens where we are asked to configure IP protocol parameters. Select "Automatic".
- Here is an authorization page for Internet access, where you need to specify the login and password provided by your operator. After saving the data, the router will work and the configurator will be available for more precise configuration.
Follow these instructions and you should not have any problems while connecting the router and setting up the Internet.
Reset
Resetting Zyxel Keenetic Lite 3 to factory settings occurs either through the RESET button on the back cover, or through the web interface:
- Switch to the firmware settings by clicking on the gear icon at the bottom of the interface.
- Switch to the "Options" tab.
- Click on "Return to factory settings".
- Confirm reset.
IPTV
Let's start connecting the IPTV function:
- go to the router interface by entering the address “192.168.1.1” in the browser;
- enter the login and password – “admin” and “1234”;
- at the bottom of the menu, click on the network icon;
- select “Connection” and then click on “Broadband Connection”;
- check the boxes “Use connector...” and “Use to access the Internet”;
- In “Setting IP parameters” we set it to “Automatic”.
Important! This step may vary for some providers. If the operator does not support automatic IP acquisition, then select “Without IP address”. This information can be obtained from your service provider.
- o and “Use connector” opposite the 4th port, which will be used to connect the set-top box;
- save the changes.
Update
To update the software on the ZyXel Keenetic Lite 3 router, do the following:
- We go into the interface and check the software version;
- If an update is needed, go to help.keenetic.com, where we download the current version to your PC;
- Unpack and start installing the file with the .bin extension.
After installing the software, the router will reboot and will be available for use.