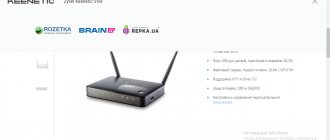
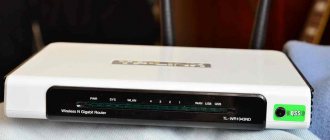
Description of the TP-LINK TL-WR741N router: appearance, cost, equipment
The TL-WR741ND model costs about 1,100 rubles. It is already outdated, so many large stores do not have it in stock. But at some individual points you can still purchase it.
Includes disk, Ethernet cable and setup guide
The router operates in router (access point) and switch mode (4 LAN ports), which connects all devices to a local network. What comes in the box with the router:
- the device itself TL-WR741ND;
- 1 removable omnidirectional antenna;
- power adapter;
- Ethernet cable;
- CD with materials;
- Quick Installation Guide.
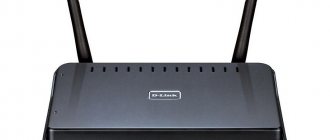
Now let’s talk about what the router looks like and what outputs and buttons are on it. The body is white with one black antenna attached to the back. Its power is only enough for a small apartment. There is also one blue WAN connector for an Internet cable and 4 local outputs, painted yellow, on the rear panel. To the right of WAN is the QSS (WPS) button. Using it, you can connect devices to the network without a password.
On the back panel there are all the outputs of the router - 4 LAN and 1 WAN
On the bottom panel there is a label with login data for the web shell (where the model is configured), 2 holes for fixing the router on the wall and 4 rubber feet to prevent the router from slipping on surfaces.
There are fasteners on the bottom panel with which you can fix the router on the wall
On top of the router there are indicators that are responsible for the current state of the buttons and outputs (whether cables are connected to them or not), as well as a Wi-Fi LED (indicates whether the network is on or not).
There are 9 indicators on the front panel
Internet setup
The network is installed in the WAN item in the “Network” section. TP-LINK TL-WR741ND is able to work with any provider, the main thing is to configure it correctly.
Setting up PPPoE
This type is considered the most popular. It is used by such well-known providers as Rostelecom, ID-Net, Dom.ru and Megaline. So, enter the following parameters in WAN:
- connection type - PPPoE;
- login/pass — enter the data issued by the provider;
- WAN connection mode - connect automatically;
- disable secondary connection.
There is no need to change any other fields. If the information is entered correctly, the Internet will appear almost immediately.
Setting up PPTP
The companies Ufanet and Aist Tolyatti use exactly this type of connection. The main difference from other connection options is the use of a VPN server. To configure your PC to work with these providers, enter the following data:
- connection type - PPTP;
- server address and name - enter the information provided in the contract;
- IP - check the box next to the address type (dynamic or static, specified by the provider);
- fill in the login/pass fields as written in the contract.
- MTU size is 1420.
If you want the Internet to always connect automatically, set the WAN Connection Mode parameter to the “Connect automatically” position.
L2TP setup
Here everything happens according to instructions similar to PPTP, the only difference is the connection type (we recommend specifying L2TP).
Table: technical characteristics of the model
| Parameter | Meaning |
| Data transfer rate | up to 150 Mbit/s |
| Wi-Fi network standards | IEEE 802.11b/g/n. |
| CCA technology (channel availability assessment, which allows you to automatically avoid channel conflicts when transmitting data) | There is |
| Bandwidth control (assigning channel width) by device IP address on the network | There is |
| WPA/WPA2 encryption support | There is |
| IPTV support | IGMP Proxy, bridge mode and 802.1Q TAG VLAN for IPTV Multicast |
| Frequency range (reception and transmission) | 2400–2483.5 MHz |
| Antenna | 5 dBi, detachable omnidirectional antenna |
| Passing VPN traffic | PPTP, L2TP, IPSec (ESP Head) |
| Protocols | IPv4 and IPv6 support |
| Guest network | Guest network at 2.4 GHz |
| System requirements | Microsoft® Windows® 98SE, NT, 2000, XP, Vista™ or Windows 7, Windows 8/8.1/10 MAC® OS, NetWare®, UNIX® or Linux |
Setting up a PPPoE connection
- In the WAN connection type field: select PPPoE/Russia PPPoE
- Username: your login according to the contract
- Password and Password Confirmation: your password according to the agreement
- Auxiliary Connection: Disabled
- WAN connection mode: Automatic connection
- After entering the above settings, click Save . The Internet is configured.
Setting up IPTV
The IPTV option is only available for the latest router firmware. If you see that you do not have an IPTV block in the Network section, first update the firmware using the instructions in the section below.
So, how to set up digital TV in the web interface:
- Open “Network” and the IPTV section. Set the mode to “Bridge”.
- In the “Port” menu, set the port to which the TV set-top box will be connected.
- Click "Save".
Set the bridge mode and specify the LAN port for the set-top box
- Wait until the router reboots and saves the settings.
- When you see “Completed”, connect the set-top box to the LAN output and turn it on - the TV should work.
Wi-Fi setup
You can quickly set up Wi-Fi on the TP-LINK TL-WR741ND. To do this, go to the first item in the Wireless section and enter the network name (SSID). There are also these fields:
- channel - Auto;
- channel width - Auto;
- type - 11bgn mixed;
- region - Russia.
Don't forget to check the boxes next to "Enable SSSID Broadcast" and "Enable Router Radio".
Then go to “Wireless Security” and use these instructions:
- Type - WPA2-PSK.
- Encryption - Auto.
- PSK Password - come up with a keyword for the network.
- Update Period - 0.
- Save your changes.
Factory reset
You can restore factory settings through the web interface: to do this, open the System Tools section, click on Factory Defaults. Click on Restore to start the reset and confirm the action in the dialog box. The router will reboot with factory settings.
Click Restore to begin restoring the router settings
Settings
Any instructions for TP-LINK TL-WR741ND are carried out through the interface. Any changes to the parameters of this router need to be made only with a cable connection. We do not recommend changing anything after connecting to Wi-Fi.
Note that after the first turn on the device must connect to the PC in auto mode. If this does not happen, then make sure that the configured configurations for the network card are correct (they should be issued automatically).
Now enter 192.168.0.1 in the browser, and in the authorization window enter the standard parameters for these devices (new routers use admin/admin data). To enter the device settings with other authorization parameters, hold down the reset key for a couple of seconds. This will make it possible to reset any changes to the product configuration and return to the original parameters.
How to reboot the router
You can reboot the router using hardware: remove the power adapter from the outlet, wait at least 10 seconds and connect the router to the power supply again. Wait for it to load.
Restarting is also possible through the router’s web shell: go to System Tools, to the Reboot tab. Click on the button of the same name in the section and wait until the device turns off and turns on again.
To start the reboot, click on Reboot
FOR UPDATE
IMPORTANT: To avoid problems when updating the software, please read the following information about the update procedure.
- Check that the hardware version and software version match. Installing the wrong software version may damage your device and void your warranty. (Usually V1.x =V1)
It is NOT recommended to install a software version that is not intended for your region. Click here to select your region and download the most current software version.
- DO NOT turn off the power during the update process as this may damage the router
- Do NOT update your router software over Wi-Fi unless this is the only way.
- It is recommended that all users stop using all Internet applications on the computer or disconnect the network cable from client devices before updating.
Note: Configuration files may not be installed correctly on new firmware versions that require a factory reset.
Recommendations for updating software: Wi-Fi router, Wi-Fi router with ADSL2+ modem, Wi-Fi signal amplifier
| TL-WR741ND_V4_140521_RU | ||||||||||||||||||||
| Publication date: 2014-05-21 | Russian language | File size: 3.14 MB | ||||||||||||||||||
| ||||||||||||||||||||
Router tp link wr741nd: setting up wifi
To set up a WIFI network on the tp link wr741nd modem, go to the “Wireless Mode” section and open “Wireless Mode Settings”. This subsection requires you to specify five parameters, namely:
- - “Network name”. Aka “SSID” - the name entered in this line will be visible to all users connecting to the network.
- - “Region”. The default is Russia.
- - "Channel". This is one of the most important parameters necessary for the correct operation of a wireless network. You can select either the “Auto” value or the channel number from 1 to 13. If it is possible to determine the occupancy of channels (using any convenient utility), do this and select the maximum free channel.
- - "Mode". The best option is to select "11bgn mixed", since it is not known exactly which standards the devices connected to the network support.
- - “Channel width”. You can leave it unchanged in Auto mode.
Next, you need to configure the security settings of the created wireless network. This can be done in the “Wireless Protection” section:
— select one of the security modes: “WEP”, “WPA-Enterprise”, “WPA2 – Enterprise”, “WPA – Personal”, “WPA2 – Personal”:
— select the encryption type in the line of the same name – “AES” or “TKIP”;
— create and enter a password in the “PSK Password” line.
To complete the wifi settings on the tp link wr741nd router, click “Save”.
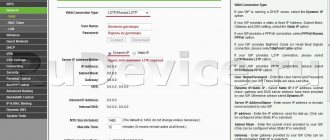
Setting up a WAN connection
Now you need to configure the WAN connection settings on the router. To do this, select “Network” and “WAN”. Now you need to specify the connection type based on the information specified in the agreement with the provider:
- Dynamic IP address. Here you just need to click the “Connect on demand” button and wait a few minutes. All necessary information will be received automatically, and no user action is required.
- Static IP. On the main settings panel, fill in the “IP Address”, “Mask” and “Gateway” cells. They are also indicated in the contract; in extreme cases, you can call the operator.
- PPPoE. Here you need to specify the login and password for connecting to the Internet, which are specified in the agreement. If the provider allows the possibility of an additional connection, then in the “Secondary connection” block you need to select the appropriate option and provide information. If this is not specified in the contract, you need to select the “Absent” option. In the “Mode” block, it is recommended to select “Connect automatically” or “...on demand”.
- L2TP. Here, in addition to the login/password, before gaining access to the Internet, you need to specify the server. For example, for Beeline it is tp.internet.beeline.ru.
- PPTP. The settings are the same as for L2TP, but instead of “tp” we write “vpn”.