Description of Zyxel Keenetic Start II: case, price, equipment
The router stands out from other models from the Zyxel Keenetic family. It is smaller in size. There are only 3 indicators in front:
- power (the router is currently working or not);
- Internet (is there a connection with the provider);
- Wi-Fi (is the hotspot enabled).
At the top there is a proprietary round key for activating Wi-Fi and connecting via WPS.
There are only 3 indicators on the front panel
There are two ports on the back: local (the router is not designed to actively work with a home network) and for the provider’s cable. On the right is an internal button for resetting the current user settings to the original ones and a connector for the power adapter.
You can only connect one device to the router via wired connection
The scope of delivery is minimal: there is no network cable for local connection. The cost of the model is about 1500 rubles.
Table: technical features of Start II
| CPU | MT7628N 575 MHz |
| RAM | 64 MB DDR2 |
| Flash memory | 8 MB |
| Wi-Fi class | N300 |
| Antennas | 5 dBi |
| Ethernet ports | 2 x 100 Mbit/s |
| Wi-Fi/WPS button | There is |
| Access point, amplifier, adapter modes | There is |
Internet center ZyXEL Keenetic
In the new line of ZyXEL Internet centers, the oldest is the “simply” Keenetic model. Its “seniority” refers exclusively to the Keenetic line in question, and not to ZyXEL products as a whole, and is only relevant until the line has expanded upward. The Keenetic model uses a faster processor, and the built-in Wi-Fi access point is built according to the 2T2R scheme with support for speeds up to 300 Mbit/s.
However, these characteristics are not the only ones of interest. Keenetic has a USB port that can be used to connect various devices - drives, printer and USB modem. Moreover, they can all be connected simultaneously through the hub. As a result, the user can get some of the functions of a network drive - access to disks via the SMB and FTP protocols and even offline downloading of torrents. Let's see how effectively this Internet center works in various scenarios.
Contents of delivery
As we have already said in previous articles, the packaging and packaging of ZyXEL products deserve an extremely positive assessment. All information, manuals, descriptions, programs and even the web interface are presented in Russian.
The equipment is standard for ZyXEL Internet centers - the device itself, a 12 V 1.5 A switching power supply, two antennas with a gain of 5 dBi, a network patch cord, a CD with programs and manuals, a warranty card, a full user manual . The only thing that attracts attention is the unexpectedly powerful power supply - it was required to ensure reliable operation of USB devices connected to the Internet center.
Appearance
The design of the device is similar to the previously reviewed Keenetic 4G - white glossy top, light gray matte bottom. Only now the dimensions have become a little larger - 16.2 × 11.2 × 3 centimeters. On the front rounded end there are status indicators for ports and connections. On the sides there are passive ventilation grilles and a USB port on the left side. There is only one, but if you need to connect several devices at once, you can use a USB hub.
On the rear panel you can find two connectors for Wi-Fi antennas, a hardware switch for the wireless module, a WPS button, a configuration reset button, four LAN ports and a WAN port, as well as a connector for connecting a power supply.
If necessary, the device can be mounted on the wall.
Hardware configuration
This time the filling is a little more powerful than other models in the line - Ralink RT3052 processor with a frequency of 384 MHz, 32 MB RAM, 8 MB flash chip. The processor integrates an Ethernet switch, an 802.11n radio module (2T2R, up to 300 Mbit/s) and a USB controller. On the board you can find a console connector. Perhaps this is a feature of the test sample, since we have not seen it on other devices in the line.
The device has a hardware switch for the wireless module. It works very quickly and efficiently - the state changes in just a couple of seconds. This is a fairly convenient way to increase the security of your home network.
The dimensions of the printed circuit board have also increased slightly - to 14x9.5 centimeters. The processor is covered with a small metal plate to improve cooling.
The device was tested with firmware version V1.00(BFW.2b)D0. In tests for the speed of working with a network drive, we additionally used a version with the NTFS driver from Tuxera.
Settings and features
Like other modern devices manufactured by ZyXEL, you can configure Keenetic to connect your home network to the Internet through the NetFriend program. This is the simplest and most convenient method if your provider is known to her and does not impose any specific requirements such as authorization through a script.
But since the device in question has significantly more capabilities than just providing Internet access, you will most likely have to turn to the web interface. In the new Keenetic line, it is presented exclusively in Russian and has retained the structure familiar to other models. In this section we will look at the basic network capabilities, and we will devote the next one to working with USB devices.
After entering a password to access the interface, the user is taken to the monitoring page. It displays the main parameters and current state of the device. Most of the information is provided with hyperlinks to other sections of the web interface for changing the corresponding options.
The item for setting up an Internet connection automatically changes its appearance depending on the selected operating mode of the device - Ethernet, 3G/4G, Wi-Fi. In the first case, the device can work with direct connection, PPPoE/PPTP/L2TP and supports MPPE encryption and 802.1x authorization.
The manufacturer pays special attention to the fact that all connection options and support for all compatible USB modems actually work on the same official firmware and you do not need to look for alternative options.
The user can change the IP and MAC addresses. There is a built-in DDNS client for three different services and the ability to program your own static routes.
In the “Home Network” group, the internal address of the Internet center, DHCP server options (including address reservation) are set, IPTV is configured (selection of physical ports or VLANs) and port translation is programmed. The proprietary TVport technology allows, in particular, to significantly reduce the load on the main processor of the device when broadcasting IPTV, working with traffic at the hardware level of the switch, and in many cases it works completely “transparently” for the user without special settings. Note that there is support for multicast transmission over Wi-Fi.
The volume of the list for providing access to local services is a hundred entries, each of which includes an IP address, starting and ending port numbers (internal and external in this firmware are the same, but the manufacturer is already working on firmware with PAT support), protocol (TCP , UDP or both). You can enable the transfer of all (except those specifically specified previously) incoming requests to a specific client in the local segment.
The built-in wireless access point operates using 802.11b/g/n protocols and supports connections at speeds up to 300 Mbps. It does not have any special settings: network name, choice of standard and channel, access control mode (open network, WEP, WPA/WPA2). A list of “black” or “white” MAC addresses is provided. On a separate page you can see a list of connected clients indicating the duration of the session. The device supports WPS, making it easy to securely connect new devices.
A separate group of pages with settings is dedicated to various traffic filters. In particular, there are “black” or “white” lists of MAC and IP addresses. There is also a service filter (blocking external resources by port numbers) and a URL filter (programming keywords in the blocking link).
Of the system options, the first thing worth noting is the choice of operating mode. Keenetic can provide Internet access via a dedicated Ethernet line, via 3G/4G networks (using appropriate modems) or via Wi-Fi networks. In the last two cases, all five wired ports are available for connecting clients. There are also access point and wireless bridge modes.
Standard capabilities are provided for working with configuration, firmware and administrator password. The port numbers for accessing the web interface and telnet can be changed, as well as providing access to them from the Internet.
The built-in clock of the device can be synchronized via the Internet. The built-in log can be sent to the syslog server. There is no email option. The log itself does not have any settings for displaying events and, apparently, represents grouped reports from the embedded Linux OS and a number of software modules. Unfortunately, its information content is not optimal for a home system - there are many system messages (for example, about the process of loading the OS), but at the same time there is no information about who is connecting via Wi-Fi and when and who is assigned which addresses, not to mention already about the operation of access blocking functions.
Working with USB devices
The Keenetic model has one USB 2.0 port on the left side. It can be used to connect storage devices, a printer, and cellular modems. Moreover, several devices can work simultaneously through a USB hub. But in this case, it is recommended to pay special attention to the power supply of the disks and the hub itself.
We talked about the option of working with a 3G/4G modem in the review of the Keenetic 4G model, so we won’t dwell on it in detail. This feature allows you to provide Internet access to your home or office network through most domestic cellular operators or broadband mobile Internet providers, such as Yota.
The second (or even the first) most popular option is connecting external drives to implement some of the functions of network drives. Keenetic supports multiple devices at once, understands partitions, and compatible file systems are FAT32/NTFS/EXT2/EXT3. The device cannot format disks. To safely disconnect external drives, you can use the web interface or reassign the WPS button. Each partition or disk receives a network name of the form DISK_A1, where “A” indicates the disk number, and “1” indicates the partition number.
The device provides access to data via the SMB/CIFS (normal Windows network environment) and FTP protocols. In the first case, you can change the name of the server and workgroup; in the second, you can change the port number (command only) and open access from the Internet. In addition, the FTP server supports passive mode, adding files, working in multiple threads, and Russian file and directory names when using a UTF8-compatible client. The maximum number of simultaneous connections is ten. It is apparently dictated by the hardware characteristics of the device.
To limit access to network resources, there is an option to program up to two dozen name/password pairs indicating the rights - “read only” or “read/write”. If such complications are not needed, then you can open full access to resources or give read-only rights to all users. There is no option to set a user different rights for different shared folders.
We measured the speed of operation as a network drive together with a 500 GB Seagate FreeArent GoFlex external hard drive. The first graph shows the results of some subtests of the Intel NASPT utility with various file systems. The tntfs mode was tested with a special firmware version that uses the Tuxera driver instead of the standard ntfs-3g.
As you can see from the numbers, Keenetic cannot compete with classic network drives. However, this was not required. You need to understand that working with USB drives is an additional option, and not the main purpose of routers. As for file systems, access to EXT2 turned out to be the fastest, which could have been predicted in advance.
Let's see what changes in the case of the FTP protocol.
In general, the figures have increased slightly, but the capabilities of the Fast Ethernet network are still far from being achieved. FTP is most attractive for providing external access to data, and the speeds shown in this mode will allow you to exchange files with friends quite comfortably.
The third use of the USB port is to connect a printer. A list of compatible models recently appeared on the website, so you can determine in advance the possibility of working in this mode. We tried to use a Canon MFP whose model number was slightly different from that listed, but the system could not recognize the printer, although there were corresponding driver entries in the log. Traditionally, Linux routers do not support printers with a GDI interface.
A connected USB drive can be used to organize an offline system for downloading files from BitTorrent networks. To do this, you need to select the desired section through the web interface and activate it for the Transmission client. Like working in network storage mode, this function is not designed to achieve record speeds. In particular, the maximum download and upload speeds are strictly limited in the client to one megabyte per second. This number was chosen based on the performance of the device so that working in p2p would not interfere with the main tasks of the Internet center.
This client is often used on network drives and other relatively weak devices. It has the ability to change port numbers, support for UPnP and DHT, distribution of downloaded files and other options. To control from a PC, you can use either the built-in web interface (available, if necessary, from the Internet) or third-party utilities. All options require an administrator username and password. For convenience, you can configure the device to automatically launch Transmission when it is detected on the connected hard drive.
To begin with, we checked the operation of the system with a connection to Beeline Internet via PPTP at a speed of 10 Mbit/s. Hard drive - Seagate GoFlex, file system - NTFS. Control was carried out through the Transmission Remote program. Adding hundreds of popular tasks from an open tracker went without problems. The Internet center distributes the load very evenly, so that while the client is working, you can use the Internet, network access to the disk, and easily work with the Keenetic web interface. True, in this case, the processor load (according to the built-in monitor) is 80–100%, and the access speed naturally decreases. For example, reading from the same partition over the network drops to 200 KB/s. The device was tested in this state for more than twelve hours, and we did not have any comments regarding the stability of operation.
It should be noted that working with such a large number of tasks makes virtually no sense - due to the general limitation on the channel width, each of them gets very little. In our case, the numbers were from 80 to 800 Kbps. So it is much more effective to work with a small number of tasks, say, from three to five. On our hundred torrents, the overall download speed was 700–800 Kbps. And after reducing the number of tasks to five, it increased to the prescribed 8 Mbit/s.
A similar note applies to the size of downloaded files. Formally, you can download several tens of gigabytes in a day, but what to do with this volume later at the above-mentioned speed of reading from a disk over the network is not very clear. We conducted an experiment with a small number of large files (ten gigabytes or more) - the Internet center coped with this in a couple of days of non-stop work.
Launching the router in the same scenario, but with a direct connection on a 100 Mbit/s channel showed that in this case everything works the same way. Which, however, is not surprising, given the built-in speed limiters.
Performance
We have already written above about working with Beeline Internet - the connection was easy, the speed corresponds to the tariff, there are no problems with stability. When the torrent client was running on a PC, the 10 Mbit/s channel was completely used up. The number of connections was 200–300. Simultaneous work on the Internet and access to the device’s web interface worked fine.
On a 100 Mbps channel with a static connection, we were able to download torrents on a PC (100 back in the uTorrent program) at speeds of 80 Mbps and higher. The number of connections was 300–400. And even in this case, the Internet could be used - however, taking into account the reduction in speed due to the fact that the resources of the 100 Mbit/s channel were almost completely exhausted (www.speedtest.net showed 0.5/1.8 Mbit/s for speed download and transfer respectively).
Synthetic tests to determine the maximum capabilities of the device were carried out in the IxChariot program. Direct Ethernet connection modes, PPTP and L2TP were tested.
The numbers show that the device turned out to be very productive for its class - the speed of downloading data from the Internet is 82–95 Mbit/s, depending on the mode. If we compare it with the younger models in the line, the difference is very noticeable, especially when using L2TP.
In general, Keenetic copes with most current tariff plans, falling slightly short of the download speed of 100 Mbit/s in PPTP/L2TP modes.
LinkDuo technology allows you to get simultaneous access to both the Internet and the provider’s local network. Moreover, the device implements this mode very effectively, as can be seen from the second graph.
The wireless module of Keenetic is more productive than that of younger models - it is required to do this by at least the 2T2R operating mode and a theoretical speed of up to 300 Mbit/s. Let's see how much faster it is in reality. The test was carried out together with a laptop in which an Intel 5350 adapter was installed. The devices were placed at a distance of about five meters. There were several other networks on air, including 802.11n. The wireless network operating mode is WPA2-PSK.
If we compare these figures with the performance of single-channel modules in other models in the line, we will see a clear increase of 40–70% in the case of one-way transmission. The final figure of 70 Mbit/s is almost three times higher than the actual operating speed of 802.11g access points. An additional advantage of the new standard is the increase in the range of reliable wireless communication.
conclusions
The older Keenetic model, like other Internet centers in the series, performed well in our laboratory. Its capabilities include: support for all modern standards for connecting to the Internet on official firmware, effective work with IPTV, LinkDuo technology, an 802.11n wireless module with a 2T2R scheme, as well as work with 3G/4G modems.
The presence of a USB port for connecting various devices allows you to implement some of the capabilities of a network drive - access to shared folders via the SMB/CIFS and FTP protocols (in the second case, via the Internet), shared access to a printer and offline file downloading via the BitTorrent protocol. Although you need to clearly understand that in terms of speed and capabilities, all routers, including Keenetic, are inferior to even the younger models of modern NAS. But if we compare it with other routers, then Keenetic is already at its best.
In terms of performance, the considered model allows you to download data from the Internet at almost full Fast Ethernet network speed - about 100 Mbit/s in all modes. Note the high stability when working under high load with a large number of connections in peer-to-peer networks.
The device's wireless module showed real performance at 70 Mbit/s - this is a good indicator, especially for an inexpensive device with a 2T2R access point.
The ZyXEL Keenetic Internet center is already available in stores. The recommended price for the “simply” Keenetic model is 3,200 rubles. The average retail price in Moscow, current at the time you read this article, is $56 (144).
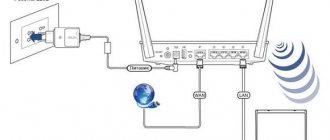
How to connect your computer to the router before setting up
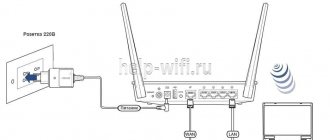
The connection is as simple as possible (we will use the wireless option, since the kit does not include a wire to connect the PC to the router):
- We insert the provider cable into the blue port.
- We connect it to the mains using the power adapter from the box.
- We go to Wi-Fi devices on the computer through the list of available networks in the panel on the bottom right.
- We find the login information on the sticker on the back panel.
The label contains the login information for the router's Wi-Fi network.
Description of the Zyxel Keenetic 3 router: appearance, cost, what’s included
Standard items in the box:
- the router itself;
- charger for connecting the device to the electrical network;
- Ethernet cable for connecting to devices via wired local communication;
- instructions for use.
The kit includes a yellow Ethernet cord for connecting devices to the router
The model is made in black color. On the top panel there is a large “Wi-Fi” button - with it you can connect devices to the router’s access point without using a password.
On the side there is an Fn key and a USB connector.
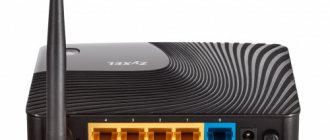
On the back there are 4 classic yellow LAN outputs ("Home Network") and one blue output for the Internet cable (the one that was brought to your apartment by the provider). To the right of the blue socket is a connector for connecting the power adapter and a button to turn on the device. At the left end of the panel there is a key to reset the router settings to factory settings.
All main outputs are located on the rear panel: for the power adapter, local connection of devices and for the Internet provider cable
The ZyXEL Keenetic III model is not only a router, but also an entire Internet center. You can connect a digital phone to it (the gray Phone socket on the rear panel), as well as external drives, printers, or 3G or 4G modems (the USB port on the left side panel). Two panels on the sides have mesh for ventilation. Two antennas are also attached here.
You can connect IP telephony and an external hard drive to the Internet center
Next to the USB port is the Fn button. There is a label stuck at the bottom - on it you will find all the login information for the web platform where the device is configured.
On the bottom panel there is a label with basic information about the router
On the front side panel there are standard indicators to display the status of all ports and buttons of the device.
There are 9 indicators on the front side panel
What about the cost of the Internet center? Approximate price: 1800 rubles. However, the model is no longer produced by the manufacturer, so the router is already sold out in many large hardware stores. However, it can be found in isolated small spots.
Table: main characteristics of the model that you need to know about
| Parameter | Meaning |
| CPU | MT7620A 600 MHz |
| RAM | 128 MB DDR2 |
| Flash memory | 16 MB |
| Antennas | 5 dBi |
| Ethernet ports | 5 x 100 Mbit/s |
| USB ports | USB 2.0 |
| 3G/4G connection | Via compatible USB modem |
| DSL connection | ADSL2+/VDSL2 via Keenetic Plus DSL |
| Telephony support | 1 built-in FXS port |
| Wi-Fi network speed 2.4 GHz | 300 Mbit/s |
| IPoE/PPPoE/L2TP/PPTP routing | Up to 95 Mbit/s |
| Reading from USB disk | 12 MB/s |
| Device dimensions excluding antenna, W x D x H | 166mm x 116mm x 34mm |
| IPTV and Smart-TV support | There is |
| File server, torrent client, DLNA/UPnP AV | There is |
| Yandex.DNS and SkyDNS protection | There is |
Video: review of the ZyXEL Keenetic III router
How to get to the local page with router settings
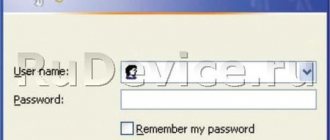
The starting address of the settings is 192.168.1.1. Copy and paste it into the address field in any browser on your PC. Another possible address is my.keenetic.net. Use this if the first one didn't work. After going to the page, enter admin and 1234 in the login form (this will be the password).
Enter the address in the browser navigation bar
If this is your first time entering Settings, you will be prompted to run the Quick Debug Wizard. If you are an insecure PC user, run it. You will be guided through the basic settings that are needed for the Internet to work on the router. We are moving on to more advanced settings through the configurator.
Select Russian language and click on “Web Configurator”
How to set a different password for the “admin panel”
Protect your router, its settings and the entire local network by setting a different password on the web settings panel. If the standard login information remains, an outsider will be able to come in and change it.
The change occurs in the last section “System” in the “Users” block. Click on setting access rights and enter a new passphrase in the “Set password” field. The admin name does not change.
Set the password for “admin” in the dialog box
Login to settings
If the user has a Keenetic device installed, in normal cases entering its settings is quite simple. In the address bar of your browser you need to enter my.keenetic.net or 192.168.1.1. These are clone addresses. They work with equal success, unless the IP of the device has changed.
When you log in for the first time, you don’t even need login. The device itself will recommend choosing a username and password before starting configuration.
Web interface and netfriend
It should be noted that, unlike, say, Tp-Link with its tplinkwifi.net, Zyxel did not start from scratch. The box with the device previously included a disk with the netfriend program, a proprietary utility of the company that did not even require a browser to operate. By installing the program, the user received full access to all parameters. Using the program, you can check your router's Internet connection, set the necessary local network parameters, and even open ports.
Mobile application My keenetic
All this was available when working on a computer. Despite the development of mobile technologies, smartphones are in no hurry to acquire disk drives. Therefore, the developers did not just add a new address.
In the Play Market or App Store, you can download the application of the same name to your phone and configure Internet access, manage routing, and even change the operating mode - adapter, amplifier, access point.
The ability to manage clients is separately implemented. All devices connected to the Internet center in any way can be blocked, their speed or time of access to the Internet can be limited.
But the company didn't stop there. If keeneticos version 3.1 and higher is installed on your device, a new application has been developed for it. Instead of mykeenetic, a new, more functional “Keenetic” application is offered for owners of such devices.
How do you decide which app to choose?
Firmware created on the basis of a newer OS version is supported by all Keenetic Internet centers with the KN index.
May occur on:
- Zyxel Keenetic Ultra II;
- Zyxel Keenetic Extra II;
- Zyxel Keenetic Giga III;
- Zyxel Keenetic Air.
Of course, regardless of the device version, you can access the web interface through a web browser by entering the admin login in the window that opens.
Setting up protocols on the router (the Internet itself)
We find the protocol in the agreement with the provider - the document that you signed on the day you connected the Internet, when company employees came to your house and installed the cable. The document will indicate by what standard the company operates. All configuration data is also written there (username and password for logging into the Internet).
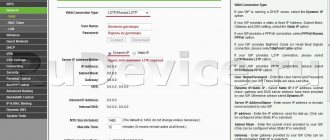
L2TP, PPTP or PPPoE standards
These three standards are configured in Zyxel Keenetic in the “Internet” block (click on the planet icon) and in the PPPoE/VPN tab:
- Click on “Add connection”.
If you have PPPoE, enter the name and password from the agreement with the provider to set up the connection
- On the new line we indicate the type of protocol: PPPoE, PPTP or L2TP. For the first protocol, it is enough to enter the password and login from the agreement. Without this data, you will not gain access to the provider's network, since authentication is required. For the last two, we add the operator’s VPN server (also from the contract).
- Set manual or automatic IP configuration. The second type is possible if the buyer additionally took the option “Static (unique) IP on the Internet” from the provider. When purchasing, you should have been provided with an address, mask, gateway and DNS - all this must be entered very carefully in the router settings.
If you have a static IP, put “Manual” in the “Configure IP settings” field
- Click on “Apply”. Now the router is able to access the Internet.
Static or dynamic IP
To debug these types, go to IPoE. Open the form to create a new connection. Select WAN (line “Use connector”). Let's activate the interface. Now in the IP address settings you need to specify an automatic or manual value depending on the type of protocol:
- automatic if you have a dynamic IP;
- manual if you have a static IP.
In the latter case, we enter the data from the document signed by you and the provider. We save all settings.
A dynamic address is the easiest to set up
Excursion
In the mid-2000s, Zyxel's retail department launched new devices on the consumer router market, which were called Internet Centers. These devices were originally developed for home use. The first generation of Keenetic was introduced in the tenth year, and they became very popular because they offered the fastest and easiest way to connect not only computers, but also everything that is at home to the Internet. Then IP-TV came into fashion. These devices did not compromise on speed; they worked with all protocols and providers.
Modern Keenetic devices are the basis of home networks for millions of families around the world, both households and small offices. In our country, the company ranks in the top 3 in terms of sales.
Login, or My.Keenetic.net password Connect Keenetic Mobile application Excursion
Wi-Fi setup
The second important step in setting up the router is creating a Wi-Fi access point, to which we will later connect through different devices (PC, phone, etc.):
- Go to the “Access Point” section in the Wi-Fi network block. Let's activate it first.
- Set a new name for the network as desired. You can leave the original name.
- We don’t set a schedule unless necessary, and we don’t hide the SSID.
- We use mixed defense. We enter a pre-designed password into the network key.
- We leave the channel, its width and power as is; there is no need to change it. Be sure to set your country and combined network standard. We leave WPS active. Click on “Apply”.
The most important thing is to specify a complex password for your access point
Creating a guest network
The guest network is an additional network of the router. Users on the guest network do not have access to the functions of the main local network (transferring files from device to device, etc.). That is, it is a limited network, necessary only for accessing the Internet. How to set it up on Start II:
- In the Wi-Fi section, switch to the second tab.
Guest network is needed if you don't want some users to access your local network
- Enter the name of the new network in the SSID. We set WPA2-PSK protection, as for the main network, but enter a different password to log in.
- Click on “Apply”. Another access point will appear in the list of available networks on the devices.
Local network and DHCP server for Start II
All home network settings are located in the section with an icon in the form of two computers:
- Let's describe the main block “IP Parameters”. In the first part, you can set a different IP for the router. If we have changed anything, click on “Apply”.
- In the second part “DHCP Server” we highlight the line “Enabled” with a bird.
- We determine the starting address in the address pool and indicate the number of available local IP addresses for gadgets connected to Wi-Fi. Take the maximum number of devices that can be on the network at the same time, but with a reserve.
- Define primary and secondary DNS if necessary. Don't forget to save your settings.
The DHCP server must be enabled if you are using Start II as your main router
Local LAN and DHCP
On Keenetic III, the local network and DHCP server are configured as follows:
- Go to the third section “Home Network” on the bottom panel of the web platform. Click on the Home network line.
Click on Home network
- Check the box next to the first item “Enable”. Select all yellow ports that should be used to connect devices to the local network. Change the IP address of the router in the local area if necessary.
- Set about and for the DHCP server, which automatically distributes local IP addresses to devices on the network. Enter the IP from which the range of addresses for devices on the local network begins. Then set the size of this range depending on the number of devices that will be connected to your router at the same time.
Activate the DHCP server and specify a pool of IP addresses
- The rental time can be left as default. If necessary, write the addresses of the DNS servers. Click "Apply".
How to configure Zyxel Keenetic Start II in repeater mode
Start II perfectly copes with the repeater function - it expands the network of the main router. Setting up repeater mode is very simple:
- Open the section for the system, and in it go to the tab with the available modes.
- Highlight the amplifier status and apply the setting.
Select the third mode in the list
- The router will reboot in the new selected mode. All that remains is to connect it to the main device. To do this, click on the round button on top of Start II, and then on the same one, but on the main router, it can be on the back (if the company is not Zyxel Keenetic). The devices will establish communication with each other, the network will be expanded.
Using the WPS buttons, configure the connection between the main router and the repeater
Port forwarding
This procedure is needed if you want to remotely access any device on your home network, for example, a home IP camera. Let's look at forwarding using its example for Start II:
- Go to the “Security” section, select “Network Address Translation (NAT)”. Add an address translation rule.
- To add a rule, let's imagine that we have an IP camera connected to a router. Let its IP address be 192.168.1.50, and the local port be 80 (in most cases, the port of IP cameras is 80, although there are exceptions).
- We see the “Configuring address translation rule” window. Its fields must be filled in as follows:
- “Interface” - Broadband connection (ISP);
- “Packets to address” and “Mask” - leave empty;
- "Protocol" - TCP;
- “TCP/UDP ports”—one port;
- in the field below - indicate the external port to which we will access from the Internet. Since the IP camera has an IP address of 192.168.1.50, it is most convenient to remember, for example, take port 10050. The port must be selected greater than 5000 so that there is no overlap with ports used by standard services and protocols;
- “Redirect to address” - specify the local IP address of the camera, i.e. 192.168.1.50;
- “New destination port number” is the local port of the IP camera. By default this is port 80.
You can configure forwarding in the “Address translation rules” window
- Reboot the router (optional) and check the configured port forwarding to the IP camera from the Internet through a browser. To do this, enter https://:10050 in your browser. Your browser should display your IP camera.
How to return the router to default (factory) settings
From the web panel, select the System tab. In the settings, click on the button at the bottom “Restore factory settings”. The router will reboot with the initial parameters.
In the settings, select the option "Return to factory settings"
If you do not have access to the web panel, use the miniature Reset button on the back of the Start II case. Take a thin object that will fit into the hole on the back of the router (it could be a match, a needle, a pin). We hold down the button and wait for all the indicators to light up. Release the button, the reset is completed.
Updating the firmware of the Zyxel Keenetic Start II router
The update can be automatic:
- Go to the "System" section.
- Find the “Updates” line in the right menu.
- If there is the word “Available” there, click on it and confirm the download and installation of the updated software. Wait for the procedure to complete. It will take a little time - about 5 minutes at most.
Start the update via the “Available” line
If the words “Available” are not present, but you are sure that something is wrong with the router firmware, proceed to the manual update:
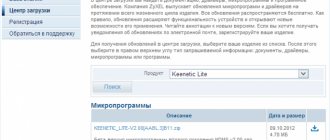
- Follow the link to the official download page for the Start II model. Download the latest firmware for 2020 (it will be first on the list).
Download the official firmware from the manufacturer's website
- Go to the “System” directory to the block with files. Click on firmware.
Upload the firmware file to the web interface
- Upload the file you downloaded from the site to the web panel using the special button. A window will open, select the file there. Start the update and wait for it to complete.