If you need to combine several hard drive partitions into one volume, then the first thing you need to do is save important data on another medium. Most likely, they will be irretrievably destroyed. If the logical drive you are removing contains an operating system paging file, move it to the primary partition in advance.
Merging partitions can be done correctly not only by OS tools, but also by external programs.
During the procedure for merging hard disk partitions, all programs must be closed. A program or process accessing the hard drive may block access to the system, and the procedure will not be able to start. Do not turn off or restart your computer during the disk change procedure.
Merging partitions using external programs
You can merge hard disk partitions, for example, using the Acronis Disk Director Suit package with the Acronis Partition Expert utility or the AOMEI Partition Assistant program. There are other programs, but these have proven to be the best.
The Acronis package is convenient, has an intuitive interface, and is capable of merging disks without losing data, just like the free AOMEI Partition Assistant.
Merging partitions using AOMEI Partition Assistant
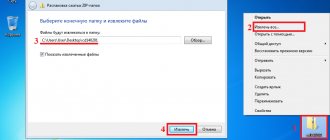
In the main screen of the program, right-click (RMB) on drive C and select “Merge partitions” in the context menu
You mark the disks for merging, confirm Ok and the program places the order you created in the delayed start queue.
To start the procedure, click the “Apply” button.
The program will ask you to confirm the operation several more times, then check the disks for errors and merge the volumes into one.
All folders of the former D drive will be placed in the D-drive folder on the C drive.
Using third-party programs to work with partitions
Using third-party utilities to merge hard drive partitions can be useful in cases where:
- You need to save data from all partitions, but you cannot transfer or copy them anywhere.
- You need to merge partitions that are located out of order on the disk.
Among the convenient free programs for these purposes, I can recommend Aomei Partition Assistant Standard and Minitool Partition Wizard Free.
How to merge disk partitions in Aomei Partition Assistant Standard
The order of merging hard disk partitions in Aomei Partition Aisistant Standard Edition will be as follows:
- After starting the program, right-click on one of the partitions to be merged (preferably the one that will be the “main” one, i.e. under the letter under which all the partitions to be merged should appear) and select the “Merge Partitions” menu item.
- Specify the partitions that need to be merged (the letter of the merged disk partitions will be indicated at the bottom right in the merge window). The placement of data on the merged partition is shown at the bottom of the window; for example, data from drive D, when merged with C, will end up in the C:\D drive.
- Click “Ok” and then “Apply” in the main program window. If one of the partitions is system, you will need to restart the computer, which will take longer than usual (if it is a laptop, make sure it is plugged in).
After restarting the computer (if necessary), you will see that the disk partitions have been merged and are presented in Windows Explorer under one letter. Before you begin, I also recommend watching the video below, which mentions some important nuances on the topic of combining sections.
You can download Aomei Partition Assistant Standard from the official website https://www.disk-partition.com/free-partition-manager.html (the program supports the Russian interface language, although the site is not in Russian).
Merging partitions under Windows XP
To solve the problem of combining hard disk partitions running XP, there are several options.
1) Through the OS control panel.
“Start” - “Control Panel” - “Administrative Tools” - “Computer Management” - “Disk Management”
- Having entered the “Disk Management” menu, right-click (RMB) and click on the name of the volume that you want to delete. In the context menu, select "Remove logical drive"
- After removing the logical drive, delete the empty partition. Right-click on it and select “Delete partition”
- Right-click on the name of the remaining volume and select “Extend Volume”. The extension wizard will launch, follow its instructions.
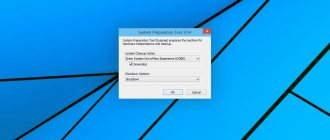
2) Using the DISKPART utility located C:\WINDOWS\system32\diskpart.exe.
To launch the DISKPART utility, select “Run” from the Start menu or press the key combination “Win + R” and manually enter the name of the utility: diskpart.
To work with this utility, you need to remember the principles of managing the operating system from the command line.
Method 1: using standard Windows tools
In Disk Management
You can merge disks without installing additional programs by using the built-in Disk Management tool.
Important! Merging requires deleting the second partition. Therefore, before performing the procedure, you must transfer all files to the partition to which the free space will be applied, or to external media.
1. Right-click (right-click) on the Start menu and select “Disk Management”.
If you have Windows 7, go to Start - Control Panel. Set the View option (at the top) to show Small Icons. Then select "Administrative Tools" from the list, open "Computer Management" and "Disk Management" (on the left).
2. Right-click on the second partition and select “Delete Volume”.
3. You may still have free space, which we also remove. To do this, right-click and select “Delete partition”.
4. Next, right-click on the working partition, in our case the system partition, and select the “Extend volume” item.
5. The right field will display the amount of free space that can be applied partially or completely:
- To apply the full volume, click the “Next” button.
- To use a partial volume, enter it manually in the “Size of allocated space” field and click “Next”.
Clicking "Done" confirms completion. After this, the system disk will be combined and expanded in volume due to additional space.
In my case, there was little space left to create a new partition, since the volume was partially used.
Using the command line
Similar actions can be performed using special commands in the diskpart application. The method may seem complicated for beginners, so I will show it for informational purposes.
1. In the Start menu, type cmd and run the application as administrator.
2. Enter the diskpart command to launch the application.
3. The first thing you need to do is look at the list of disks and delete additional partitions. To do this, enter the following commands:
- List disk – to display a list of physical disks connected to the PC.
- List volume – to show active sections.
- Select volume D: - to mark a partition for deletion (in my case, partition D).
- Delete volume – to confirm deletion.
4. Now we merge the active partition with free space:
- List disk – we look at the list and remember how much free space we have available.
- List volume – look at the list of active sections.
- Select volume C: - select a partition (in my case, this is partition C).
- Extend – to use all free space. You can assign the size manually: to do this, enter extend size=2000, where 2000 is the volume in megabytes.
Merging partitions running Windows 7
The diskmgmt.msc utility allows you to merge hard disk partitions. The utility can be launched in two ways:
- Through the control panel. “Start” - “Control Panel” - “Security and System” - “Administration” - “Computer Management” - “Disk Management”.
- Through the “Start” menu - “Run” or the key combination “Win + R”, then enter the name of the utility diskmgmt
Step-by-step algorithm for merging sections:
In the “Disk Management” window that appears with a list of disks, right-click (RMB) on the name of the volume you want to delete. Select "Delete Volume" from the context menu
After deleting a volume, an unnamed partition will appear in its place. Right-click on it and select “Delete partition”
Select the volume to be expanded, and right-click on it, select “Extend volume” and then “Next”
Specify how much you want to expand the disk and click “Finish”.
Immediately after the process is completed, restart your computer.
How to merge disk partitions without losing data
There are many free (and paid too) programs for working with hard drive partitions. Among those that are available for free are Aomei Partition Assistant Standard and MiniTool Partition Wizard Free. Here we will consider the use of the first of them.
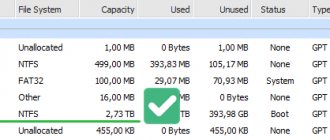
Notes: to combine partitions, as in the previous case, they must be located “in a row”, without intermediate partitions, and they must also have the same file system, for example, NTFS. The program merges partitions after rebooting in PreOS or Windows PE - in order for the computer to boot to perform the operation, you will need to disable secure boot in the BIOS, if it is enabled (see How to disable Secure Boot).
- Launch Aomei Partition Assistant Standard and in the main program window, right-click on any of the two partitions to be combined. Select the “Merge Partitions” menu item.
- Select the partitions you want to merge, for example, C and D. Please note that below in the partition merge window it will be shown what letter the merged partition will have (C), as well as where you will find the data from the second partition (C:\d-drive in my case).
- Click OK.
- In the main program window, click “Apply” (the button at the top left), and then the “Go” button. Agree with the reboot (merging partitions will be performed outside of Windows after a reboot), and also uncheck o - in our case this is not necessary, and we can save time (in general, on this topic, before starting, watch the video, there are nuances there).
- When rebooting, on a black screen with a message in English that Aomei Partition Assistant Standard will now be launched, do not press any keys (this will interrupt the procedure).
- If after the reboot nothing changed (and it went surprisingly quickly), and the partitions were not merged, then do the same, but without unchecking the 4th step. Moreover, if you are faced with a black screen after logging into Windows at this step, launch the task manager (Ctrl+Alt+Del), there select “File” - “Run a new task”, and specify the path to the program (the PartAssist.exe file in folder with the program in Program Files or Program Files x86). After the reboot, click “Yes”, and after completing the operation, click Restart Now.
- As a result, after completing the procedure, you will receive merged partitions on your disk with data saved from both partitions.
You can download Aomei Partition Assistant Standard from the official website https://www.disk-partition.com/free-partition-manager.html. If you use the MiniTool Partition Wizard Free program, the whole process will be almost the same.
AOMEI Partition Assistant
If you use Windows XP or do not want to temporarily transfer all your important information, you can use the AOMEI Partition Assistant application. With its help, you can combine several logical HDDs into one without losing data:
- Install and launch the application.
- RMB click on the system disk.
- Select Merge Partitions.
- Check the remaining objects and click “Ok”.
- Click on the “Apply” button.
- Click "Go".
- Confirm the action.
All files will be saved and moved to the “*disc_name*-drive” directory.
Programs for combining hard drives
Acronis Disk Director
Acronis Disk Director is the first in this review because it contains one interesting option that significantly speeds up the process of combining a hard drive. In the program interface itself, it is called “Merge Volume”, and the principle of operation is to select several logical partitions, indicate the main one and combine them into one. The file structure and the system itself are preserved, so you can be sure that not a single important object will be accidentally deleted.
At the same time, nothing prevents the Acronis Disk Director user from taking a different route - deleting existing hard drive partitions and leaving only one, to which he can assign the resulting free space. However, you won’t have to use this method with a complex algorithm of actions if you get comfortable with the Volume Merger Wizard. The remaining functions in this software are also designed to interact with the HDD drive, and you will find a more detailed description of each of them in the article at the link below.
EaseUS Partition Master
EaseUS Partition Master operates on approximately the same principle as the previous representative, and there is also a separate option that allows you to combine all existing hard drive partitions into one. However, the developers warn that it is better to make a backup copy in advance, since the integrity of any components may be compromised due to random failures or incorrect user actions. In the Connection Wizard itself, you only need to select the disk itself, mark it with volume markers, assign the primary one and start this operation. During the merge process, try not to do anything in the operating system to avoid errors.
EaseUS Partition Master is available for a fee, and the trial version may not be suitable for the task. However, we still recommend downloading it first and testing it to see if it's worth purchasing. In the review below, you will not only find a link to the official website for downloading a demo version of the software, but you will also be able to explore the remaining options included in the tool.
MiniTool Partition Wizard
The third representative, despite the prefix “Mini” in its name, provides the user with a huge number of diverse tools for managing hard drives. In some ways, the implementation of functions is similar to the standard representation in the operating system, but with expanded capabilities and some simplifications. MiniTool Partition Wizard also contains a separate module “Merge Partitions”, which works in much the same way as in other programs discussed above. Here you select the target partitions, specify the main one and start merging them, which sometimes takes a lot of time, because the total space and the amount of information stored in the partitions are always different.
Otherwise, MiniTool Partition Wizard can be considered the same standard software as the one discussed above. The main features of this solution are free distribution, full support for the Russian language and the presence of Wizards for interacting with logical volumes. We need to talk about Masters in more detail so that novice users know in what cases they should be contacted. There are four different wizards in MiniTool Partition Wizard, and to start, just click on the dedicated button in the menu on the left, selecting the appropriate process, for example, disk cloning. Then all you have to do is follow the instructions displayed on the screen.
AOMEI Partition Assistant
AOMEI Partition Assistant, unfortunately, does not have a separate module that would help you combine a hard drive in just a couple of clicks, but this software contains other useful tools that allow you to manage logical volumes. You can delete the necessary partitions, transferring all important files in advance, and then expand the existing volume, transferring it to another file system if necessary. To do this, you will have to use three different tools, but the task is completed almost as quickly and with a minimum amount of effort.
The AOMEI Partition Assistant interface has been almost completely translated into Russian, so there should be no difficulties at all when interacting with Masters. This software is also distributed free of charge, so you can freely download it from the official website and immediately start using it. We suggest that you familiarize yourself with the remaining functions available in AOMEI Partition Assistant in a full-length review on our website at the link below.
Eassos PartitionGuru
The developers of PartitionGuru pay a lot of attention to the constant development of their software, which is why after some time this tool has grown from a regular tool for monitoring the status of a hard drive into a full-fledged assistant for managing logical volumes and connected media. Here you will find all the functions you need to combine HDDs and you can use them with minimal effort. Anyone can understand the PartitionGuru interface, which is helped by its intuitive design and the presence of the Russian language.
Merging logical volumes almost always takes a long time, and during this process it is not recommended to work in the operating system in parallel. The PartitionGuru feature will also be useful, offering to select the manipulation that will be performed upon completion: for example, the computer will be sent to reboot, put into sleep mode, or turned off. If you are interested in performing additional actions related to HDD or other connected media, PartitionGuru is ideal for this, providing a basic set of tools.
Macrorit Disk Partition Expert
Macrorit Disk Partition Expert software does not have a separate tool that allows you to simply merge logical volumes, but nothing prevents you from using several tools at once to first remove the partition, creating free space, and then attach it to the main partition. Before doing this, be sure to transfer files from other volumes to it if you do not want to lose them when deleted. There is no Russian interface language in Macrorit Disk Partition Expert, so you will have to figure out the items yourself, but this will not be difficult.
Intuitive controls will allow you to quickly free up space on your drive and attach it to the required partition, leaving only that partition. It should be taken into account that the file system will not be changed and no other actions related to its configuration will have to be performed. Macrorit Disk Partition Expert is distributed for a fee, but the functions present in the free version are quite enough to cope with the task.
Paragon Partition Manager
The selection of programs for combining a hard drive is completed by Paragon Partition Manager. Here you will find the same standard list of tools for managing connected drives. They are almost identical to those that are provided by default in the operating system, but they are much easier to use, and certain restrictions are automatically removed. Paragon Partition Manager will perfectly cope with its mission and combine HDDs without data loss.
One of the main features of Paragon Partition Manager is the ability to create virtual drives, which is useful when using virtualization tools. These sections can also be connected or changed in any way, because by default Windows does not allow this. You can download the trial version of Paragon Partition Manager from the link below, and the functions available in it are quite enough to perform connection of partitions and other manipulations with the HDD.
We are glad that we were able to help you solve the problem. Add the Lumpics.ru website to your bookmarks and we will be useful to you. Thank the author and share the article on social networks.
Describe what didn't work for you. Our specialists will try to answer as quickly as possible.
Did this article help you?
NO
How to merge two non-adjacent hard drive partitions
To effectively distribute space on a Windows computer, it may be necessary to enlarge one partition at the expense of another partition, but not adjacent - located relative to the first one, not before, not after, but somewhere in another part of the disk. The standard system tool, the Disk Management , copes with this task only if the disk of a basic type is converted to a dynamic type.
In terms of operating basic disks, the utility's capabilities are very limited: it can increase the size of volumes only due to the unallocated space located after these volumes. And no more. The utility will not be able to increase the volume using the free space in front of it. Not to mention performing merge operations on non-contiguous volumes.
How to combine two non-adjacent hard drive partitions? To do this, you will have to resort to third-party software - the AOMEI Partition Assistant . To solve the problem, a basic edition of the program will be enough, which, by the way, is supplied completely free of charge.
So, let's launch the program.
In our case, two non-adjacent sections that need to be combined into one are H and I. In this case, H is the original section that we want to leave and enlarge, and I is the one being added, which will subsequently disappear and give its place to H.
You can’t just go ahead and carry out the operation of merging them. Even if we select this operation in the context menu on any of the sections,
then we will only discover the possibility of their unification with adjacent ones.
The attached partition I will have to be deleted to create unallocated space in its place. But first, of course, you need to take care of the data (if you have it). H during the merge operation . It is on it that you can transfer data, right up to filling it to capacity. If there is not enough space on the latter, the remaining data will have to be temporarily scattered elsewhere on the computer. But it is undesirable for these to be intermediate sections located between the original and the attached one. To simplify the task of transferring data, you should always attach a smaller partition to a larger one. The letter, if it is specified in programs as a data path, can be changed at any time after the merger.
Well, let's get started. Call the context menu on section I and delete it.
As you can see in the screenshot below, now unallocated space has formed in its place. Let's go further: call the menu on the original section H and select the merge operation.
In the window that appears, check the “Unoccupied” (this is the former section I) and click “Ok” .
That's it - the operations are planned. We can analyze the future picture of the disk and, if necessary, by clicking the “Reset” , cancel everything in order to redistribute the space in some other way. If you are satisfied with the future structure of the disk, we can begin to directly implement everything that is planned. Click "Apply" .
Then - “Go” .
And - “Reboot now” .
Next, AOMEI Partition Assistant will continue to work in pre-boot mode. If we are talking about carrying out a task on the HDD , it may take a long time to wait for its completion. After all, when merging non-adjacent partitions, other partitions located between the original and the one being joined are shifted. Accordingly, all data stored on these intermediate partitions will be overwritten to other areas of the media. And the HDD, according to the conditions, will not be able to cope with such a load quickly. The more data is stored in the intermediate space, the longer the displacement process will take.
As for SSDs , the operation of merging non-adjacent partitions will naturally proceed more quickly. However, as mentioned, the data will be overwritten. Therefore, it would be advisable to redistribute space on an SSD disk in this way only in conditions of real need.