Methods for creating a wireless access point
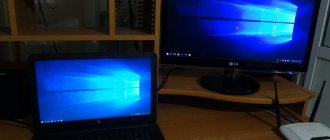
Any modern laptop is equipped with a wireless adapter that can be used as a Wi-Fi router. To do this, you need to create a kind of virtual bridge connecting network equipment (Wi-Fi adapter and network card).
To obtain such routing, you can use the following tools:
- using standard Windows OS tools (the graphical application “Network Center ...”, the command line or a bat file);
- additional software.
Whatever method is chosen, the following conditions must be met:
- The laptop must have Windows 7 or higher installed. In earlier versions of operating systems (for example, Windows XP), support for Wi-Fi networks is implemented at a low level. Therefore, it is not a fact that you will be able to enable Internet distribution on older operating systems.
- The laptop must be equipped with a Wi-Fi adapter. To find out whether a wireless adapter is installed on your PC, you can go to “Device Manager” and look at the required information in the “Network Adapters” tab. The Wi-Fi adapter is called Wireless 802.11.
- The PC must be connected to wired or wireless Internet.
How to share internet with Windows 10
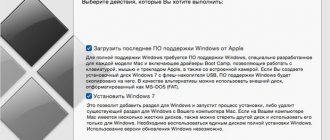
If you're using Windows 10 with Update Anniversary v1607, then you're in luck. With this update, Windows now has an easy method that can be used to share internet with Windows 10 and turn any PC with Wi-Fi into a hotspot. Moreover, it does not matter whether the Internet connection you want to share is wired or wireless.
1. Launch Settings in any way convenient for you: by pressing + I on the keyboard, through the START menu by clicking on the icon. On the main settings page, click the Network and Internet .
2. Next, on the edit side, go to the Mobile hotspot and there allow the use of an Internet connection by turning on the switch.
3. Next, if you want, you can set your own network name and password. To do this, click on the Change .
4. In the edit network information window, set the network name and enter your password, consisting of at least 8 characters.
That's all you need to do in Windows 10 to distribute the Internet from your computer via Wi-Fi. This is one of the best features of the Windows 10 Anniversary Update.
Creating a Wireless Access Point Using the Windows Menu
The easiest way to create a virtual router is to use the “Network Center...” function built into the OS. To do this you need:
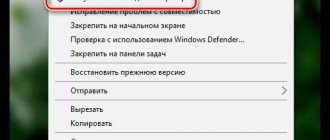
- In the system tray, right-click on the global network access icon and select the required item.
- In the window that opens, activate the “Create a new connection” function, and then go to the “Connecting to a Wi-Fi network manually” section (“Configuring a PC-to-PC network”).
- Set the name of the future wireless network (for example, VirtualRouter), security type and access key. Using a security key, you can prevent third parties from connecting to Wi-Fi. For protection, it is recommended to use the WPA2-Personal type, which allows you to set a password of 8 characters. If your phone can't find a network protected by WPA-2, try changing the encryption to WEP or giving up the password altogether.
- To create a Wi-Fi point, click “Next”.
After a virtual router has been created, in order to successfully use the Internet through it, you may additionally need to enable public access. This is done as follows:
- We go to the “Network Control Center...” and call up the properties of the network through which the laptop is connected to the Internet.
- In the “Access” tab o.
- We select the device with which the phone or other device will be connected. In our case, access will be via Wi-Fi.
After all the steps have been completed, turn on Wi-Fi on the mobile gadget and start searching for available networks. In the drop-down list, select the name of the network that was specified when creating the virtual Wi-Fi router, and indicate the specified key.
How to distribute WiFi from a laptop on Windows 7: Video
How to organize a home computer-to-computer network
To do this, in the so-called tray (the lower right corner where the clock and date are located, as well as other icons), you need to find the “Internet connection” icon (as in the picture).
Click on the icon, and in the window that appears at the bottom you need to click “Network and Sharing Center”. If you cannot find the icon, then in the “Start” menu, enter the specified phrase in the search bar and start the service.
In the window that appears, click “Set up a new connection.” Next, select “Set up a computer-to-computer wireless network” and click “Next”.
A window will appear in which you only need to fill in three fields:
- Network name – can be anything you like;
- Security type – it is recommended to select “WPA2-ptersonal;
- The security key is a password that will be required in the future to connect other devices. You also come up with it yourself, but you need to remember it.
After filling out, you need to check the box “remember network settings” and click “next”. The system will configure Internet distribution via WiFi and in the window that appears, click “Enable Internet connection sharing.”
Now you should go to the “Network and Sharing Center” and go to the “Change advanced sharing settings” section. Here in all items you need to check the “Enable” checkbox. This will give other group members access to files and other computer resources.
This completes the system setup. If everything is done correctly, the PC will distribute the Internet via WiFi. As you can see, distributing the Internet via WiFi from a Windows 7 laptop or PC is quite possible. Moreover, organizing a private group is easy and simple. But this is not the simplest method. The second option works most stably - organizing a network using the command line. At the same time, setting up a group is simpler and faster.
How to set up WiFi distribution using the command line
It is worth noting that in addition to the well-known advantages, this method allows you to use the laptop’s wireless connection to receive and distribute the Internet at the same time. That is, a laptop not only creates a network, but also acts as a signal amplifier from an existing router or access point. In this case, the PC can also act as the main access point.
Please note that this method only works if the wireless adapter driver supports the Virtual Router feature. But don’t worry, any laptop that runs on the Windows 7 operating system has this function. And even if the device is quite old, you can simply update the driver.
So, how to set up to distribute the Internet from a laptop via WiFi running Windows 7? It's simple. First of all, you should launch the command line. This is done using the key combination “Win” + “R”. In the window that appears, enter cmd and press “Enter”.
That's it, the command line is running. Now you need to write a command that will install the virtual access point driver and create a virtual WiFi network. It is written as follows: netsh wlan set hostednetwork mode=allow ssid=My_virtual_WiFi key=12345678 keyUsage=persistent, where My_virtual_WiFi is the name of the network, you can change it to any other, and Key is the password, instead of the numbers 12345678 you can come up with any another key.
After you have entered the command, you need to press “Enter”. After this, if the line is entered correctly, the new hardware “Microsoft Virtual WiFi Miniport Adapter” should appear in the task manager.
Now you need to configure the connection in Windows 7. To do this, in the Network and Sharing Center, go to the “change adapter settings” section. Here you will see a new connection called “Wireless Network Connection 2” like in the picture.
In order to distribute WiFi from a laptop with Windows 7, you should go to the properties of the connection through which the computer accesses the Internet. Here, in the “Access” tab, in the “Home network connection” item, select the connection we created” and check the boxes, as in the picture.
Click “Ok” and close all windows. Now you need to go to “Change advanced sharing settings” and enable network discovery. If necessary, you can enable access to files and other resources here.
Save the settings and close all windows. Now, to distribute WiFi from a laptop running Windows 7, you just need to launch the created network. To do this, you should enter a simple command on the command line: netsh wlan start hostednetwork. Press "Enter".
Remember that distribution will only occur while the laptop is running, and even putting the device to sleep stops distribution. When choosing slot machines with quick withdrawal of winnings to electronic wallets, you need to check whether such a service is available in a particular virtual club. This question can be freely asked to the technical assistance service specialists directly in the online chat. They promptly respond to numerous requests from players, advising them around the clock. After each reboot, you will need to re-enter the netsh wlan start hostednetwork command again.
How to create a WiFi hotspot in Windows from the command line: Video
Using third party programs
How to distribute wifi from a laptop with Windows 7 using a special program? Everything is extremely simple. All programs work on the same principle, so setting them up comes down to three general parameters:
- Selecting a group name;
- Key for connecting to a virtual group;
- Selecting the connection through which the laptop gains access to the global “web”;
- Selecting the network type.
There are actually quite a lot of such programs, and many of them are absolutely free. For example, one such program is mHotSpot. It's easy to set up. However, it should be noted that in order to distribute the Internet via WiFi, the laptop must be connected to cable Internet. The fact is that, unlike the previous method, the mHotSpot program is not capable of using one wireless adapter to access the Internet and distribute it at the same time.
Now you know how to distribute the Internet via WiFi from a laptop running Windows 7. As you can see, there is nothing complicated about distributing WiFi from a laptop. However, it is worth noting that the second option, although not the simplest, is the most reliable and stable.
How to easily distribute WiFi in Windows 7 using Conectify Hotspot: Video
Kuleshov Vyacheslav
I have more than 10 years of experience in the IT field. I am engaged in designing and setting up commissioning works. We also have extensive experience in building networks, system administration and working with access control and video surveillance systems. I work as a specialist in .
Creating Wi-Fi access via the command line
To connect your phone to the Internet via a laptop, that is, using a virtual router, you can also use the command line. This procedure may seem complicated to an inexperienced user, however, by strictly following the instructions, you will be able to turn on the Wi-Fi hotspot in just a few minutes.
To start distributing wifi from your laptop to your phone, you need to:
- Enter command entry mode as administrator. To do this, in the “Search” line (called using the Win+Q keys), enter “Command Prompt” or cmd. In the drop-down list, right-click on the corresponding line and select “Run as administrator.”
- Initialize the Wi-Fi network using the first command presented in the image. In it, the TestShare parameter indicates the name of the future network, and the numbers in order are the input password (minimum 8 characters). The second command in the list can start a registered network, and the last one can stop it.
To distribute the Internet via a laptop computer to a phone or other device, you need to enable shared access to the newly created Wi-Fi point. To do this, go to the “Network Connections” section and call up the properties of the network through which the Internet is connected to the laptop. After that, in the “Advanced” tab, check the box next to the corresponding item, and in the drop-down list, select the name of the created virtual router.
Using a bat file
Creating a Wi-Fi access point via the command line is inconvenient because every time you turn off the PC you need to re-enter all the commands. Therefore, this method of turning a laptop computer into a router can only be used for a one-time Internet connection to a phone.
The execution of the above commands can be fully automated . To do this, you need to write a small script in a standard Windows text editor, and then save the document on your laptop desktop under any name in .bat format. To start distributing Wi-Fi using a virtual router to your phone, you just need to run this document with administrator rights. An example of a script is shown in the figure, where YourSSID and YourPassword are the name of the wireless connection and the access key to it.
Creating a virtual router using additional software
If none of the above methods helped activate Internet distribution on your phone, you can try creating a virtual Wi-Fi router using special software. There are quite a lot of similar utilities on the Internet, but among them the most convenient are:
- MyPublicWiFi;
- Connectify.
Wi-Fi distribution using MyPublicWiFi
This application is absolutely free and has a user-friendly interface, although in a foreign language. With it, you can make a Wi-Fi access point in just a few clicks:
- Download and install the utility on your laptop. The latest version of the program weighs about 1 MB, so there will be no problems with downloading.
- Run the application as administrator.
- The utility itself consists of three tabs: Setting, Clients and Management. In the first tab, you can specify the connection name (Network name), set a password (Network key) and select the connection that the laptop uses. Be sure to check the “Enable Internet sharing” checkbox. To start the virtual router, click LMB Set Up and Start Hotspot.
- To have the program automatically load every time you turn on your PC, go to the Management tab and select the appropriate item. You may need to prohibit users of the created network from using the Download Master and mTorrent file hosting services. To do this, check the top checkbox as shown in the figure.
- To find out who is connected to your point, go to the Clients tab.
Creating a Wi-Fi hotspot using Connectify
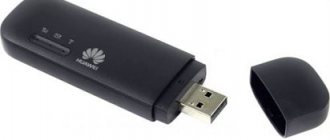
The MyPublicWiFi utility may experience problems if the Internet is connected to the laptop not via a cable, but via a USB modem. In this case, it is better to use the Connectify application. There is a paid and free version of this program. For periodic use, the second option is sufficient. To enable Wi-Fi distribution from a PC to a phone using Connectify, you must:
- Download and install the software on your laptop.
- After launching the utility for the first time, you may need to select its version - Lite or Pro. We mark the first option, since Pro is only available to users who have paid about $45 for the program.
- The application menu is practically no different from MyPublicWiFi. Here you also need to enter the name and password of the access point, indicate the Internet source and the interface through which the mobile phone will be connected. In the Sharing Mode line, you additionally need to specify the type of network: open or closed with authorization.
- To start distributing the Internet via Wi-Fi, click Start Hotspot.
Without a router. Using programs
There are many applications designed specifically to distribute Wi-Fi to other home devices of the user through a computer.
After all, almost every modern smart phone running operating systems: Android, Windows and iOS is capable of accessing the World Wide Web via Wi-Fi.
"mHotspot"
The mHotspot program has many positive reviews.
You don’t even need to install it on a PC or laptop, and by downloading it from the resource “mhotspot.com”, you can immediately launch and organize a home wireless point without using a router.
Once you open the application, you must do the following:
- In the “Mhotspot name” column, enter the name of the network being created;
- In the line below, write your own security code;
- Then specify the maximum number of users who have the right to connect to the point;
- Click “Start Mhotspot”;
- Ready.
"My Public"
Like the previous utility, it does not require installation. All you need to do is download “MyPublikWiFi” and use it right away.
To distribute the Internet using this application, you will need to complete the following steps:
- Run the program as administrator;
- Put o;
- Enter the name of Wi-Fi in the “SSID” column;
- Next, in the column below, write your own network code (in the future, users will type it in their gadgets when connecting to a Wi-Fi access point);
- Set o;
- Then indicate the PC’s connection to the global network and click “Start Hotspot;
- Ready.
"Switch Virtual Router"
The “Switch Virtual Router” program works perfectly in the Windows environment. It is available for download and installation on the Internet for free.
Settings are made in an intuitive interface, which is completely Russified.
The application can launch automatically immediately after the PC boots. The user is once required to indicate the name and password for the Wi-Fi being created and check the boxes that interest him.
Then the program will do everything itself. One of the main advantages of this utility is the display of devices connected to a Wi-Fi point.
Possible difficulties when creating a Wi-Fi access point
When creating a new Wi-Fi access point, users often encounter minor difficulties. The table shows the most common problems that can prevent you from distributing the Internet from a laptop, and possible solutions to solve them.
| The essence of the problem | The reason behind this | Possible Solution |
| The phone cannot locate the Wi-Fi network, although it is running | Blocking the connection by an installed antivirus or firewall | Temporarily disable your firewall or antivirus program |
| The Internet does not work on the phone, although Wi-Fi is connected | The user forgot to enable sharing when setting up | Go to Network and Sharing Center and turn on sharing |
| The connection is blocked by a firewall or antivirus program | Disable online protection temporarily | |
| The message “The network could not be started” pops up. | The wireless adapter is disabled on the laptop | Turn on Wi-Fi in your laptop settings |
| Drivers for the adapter do not work correctly | Update drivers using the disk that came with your PC or the Internet |
How to remove Wi-Fi sharing from a laptop?
To stop distributing the Internet from a laptop:
- open the Start menu with the right mouse button;
- launch command line;
- enter netsh wlan stop hostednetwork;
- press “Enter”.
A situation may always arise when wireless Internet is required, but a router is not at hand at that moment. In such cases, you can resort to one of the methods for setting up Wi-Fi distribution from a laptop. You don’t need any special skills to do this, the main thing is to carefully follow the instructions.
Previous post Connecting a TV to a computer via Wi-Fi - step-by-step instructions
Next entry How to distribute a Wi-Fi signal from your phone - step-by-step instructions