Introduction. Nostalgia for the Apple Macintosh
In general, you don’t need to read the introductory part.
If you came for instructions, you can immediately proceed to the process of installing the Mac OS emulator on Windows. First, just some lyrics. A long time ago, in the 90s, I had a bright dream - to buy a Mac computer. There was little money then, and Apple Macintoshes cost astronomical sums. This was the era when the LC Performa and Quadra appeared. And they appeared, which is the strangest thing, also in Omsk, thanks to.
Apple Macintosh Quadra Centris 660AV
I liked everything about the Macintosh. A magical interface with windows, a recycle bin and other goodies (while on the PC pure DOS + Norton Cammander dominated). One-button mouse. Workmanship. Assembly without a single bolt. Amazing sound. In general, as soon as my friend and I saw Maki, we immediately became their fans.
And when Valerka Maniac took out the just released game MYST from the branded box and put the disc into the Caddy... That day we saw for the first time a “live video,” as it was called then. It was a Making of Myst video, where the creators talked about the development process of one of the most famous games in their entire history. The game is still on sale and in demand! To say that we were amazed by what we saw is to describe the sensations very dimly. It was youth and freshness of emotions. Apple was still far from being mainstream in Russia, and no one even dreamed of such an abundance of everything that is now on the market.
So, everyone grew up and became uncles, but I haven’t had Mac since then, for various reasons. Of all the Apple equipment, I only owned the iPhone, the very first model, and even then only for a couple of months. Recently, succumbing to a fit of nostalgia, I started searching on the Internet to see if there were any emulators available to run Mac OS under Windows 7?+ It would not be out of place to remind you that the same Quadra was able to emulate a PC AT 286 using software back in those distant nineties, I remember , Lines was played on a Mac.
But Mac emulation on PC became possible much later.
Why SheepShaver?
After a lot of googling, I came to the conclusion that the best emulator for Apple Power PC with Mac OS is SheepShaver. I don’t remember exactly how I came to this conclusion, but I read a lot of English pages for this. In general, there is not much choice there at all, judge for yourself:
- SheepShaver - for Mac based on PowerPC G4 with the ability to install Mac OS up to 9.0.4;
- Basilisk II - for older Macs based on Motorola 68XXX processors;
- Mini vMac - for even older Mac Plus with System 6 operating system.
These are not all emulators, you can find more, but it was enough for me to understand the following: if I want to try to “teleport” to those very times, then I need SheepShaver. The second task was to find a disk image with MYST and run it on the emulator.
All this turned out to be very difficult, although it was crowned with success. I had to spend the whole day, but why? Yes, because I haven’t found a single sane, adequate description in Russian to set everything up and run. This is precisely the reason why I created this text, what if it helps someone else?
So, let's begin.
Files for Mac OS emulator - SheepShaver Windows
What do we need?
- Actually, the SheepShaver emulator, GUI graphical shell , and a program for creating a virtual MAC HDD - HFVExplorer
- SDL 1.2 Libraries
- GTK+ 2 runtime package
- The ROM file is an Apple ROM dump. You need a ROM that supports OS from version 7.5.3
- Everything listed above will allow you to create the virtual Mac hardware. After which you will still need an installation disk with Mac OS. For my tasks (playing around with the operating system and running MYST) I needed the System 7.5.3
- Boot disk DiskTools85_PPC .
In fact, the Basilisk II emulator would have been more suitable for my specific task, but it crashed for some unknown reason. As written above, SheepSaver is an emulator for more recent Macs and Mac OS, starting with 8. Nevertheless, it works great with 7.5.3-7.5.5, but the installation turned out to be much more confusing, since I had to study and compare two different instructions, go through options, make mistakes, and ultimately spend a lot of time to understand what's what .
Everything will be much simpler for you, since now all the files, verified, compatible and functional, are collected in one package. So what needs to be done: . One archive, everything included.
BootCamp
Boot Camp is a program included with Mac OS X 10.6 Snow Leopard that allows you to install and use a compatible version of Microsoft Windows on an Intel-based Mac. (Apple)
Apple introduced BootCamp in 2006, after Macs switched to Intel processors. For the sake of historical justice, we note that it was possible to run Windows applications on the Macintosh before: for this, an expensive expansion card was installed on the Macintosh. For obvious reasons, this solution was not popular.
Before you create an additional partition on your Mac's hard drive, back up your computer using Time Machine, then launch BootCamp Assistant (located in Programs - Utilities) and follow the instructions.
The solution is not ideal, but the main thing is that the Mac turns into a Windows computer. This means that the Microsoft system will work at maximum speed.
Disadvantages of BootCamp:
- A complete reboot of the Mac is required to start Windows. To select an operating system (OS X or Windows) during boot, press and hold the Option (Alt) key.
- Partitions (logical drives) created in Windows are not visible in OS X and vice versa. Why? Windows does not understand the HFS+ file system that OS X works with, and the latter does not work with NTFS by default. Using additional utilities like Tuxera NTFS, you can add NTFS compatibility (read and write) to OS X.
- BootCamp only installs certain versions of Windows. So, the newest Mac models will not support Windows 7, only Windows 8 with all its inconveniences.
BootCamp is suitable when there is no need to load two operating systems at the same time and you need maximum performance. For example, it may be useful for gamers: after working in OS X, they restarted the computer and launched their favorite game in Windows.
Setting up the MacOS SheepShaver emulator
Having all the necessary files, the rest will not be difficult to do. Read the text carefully and follow the instructions.
- the downloaded archive 0-sheepshaver.zip to drive C: and unpack it by right-clicking on it and selecting “unpack here”. Don't worry, there is a subfolder there, there will be no garbage;
- Go to the 0-sheepsaver folder and install the GTK+ 2 (gtk+-2.10.13-setup.exe file). Normal installation procedure for Windows;
- Go to the HFVExplorer folder and run HFVExplorer.exe. Using this program you need to create a virtual hard drive for your Mac. To do this, select from the menu: File > Format new volume
- You will see these settings. Fill in all the fields. You can use the same values as in the picture. Volume name is actually the same as the volume name in Windows. Choose a size no more than 1Gb, this is enough, but the program does not allow you to create more. When I tried to create 2Gb I got the no space . To set the path and name of the HDD image file, click the red arrow. .dsk extension itself, enter only the file name.
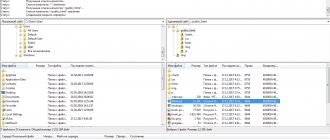
- After clicking OK, the program generates the HDD for a few seconds, please wait. When the creation process is complete, the volume name (disk1) should appear in the left navigation pane, above all of your physical disks. The next thing to do is to transfer the installation files from the System753 . Go to this folder using the HFVExplorer browser, select all the files (20 of them), then click 'Copy' in the top panel. Go to the virtual disk (I have disk1), and also click 'Paste' in the top panel. Both buttons are marked in the picture.
- After clicking 'Paste' the Select copy mode dialog will appear, leave the value Automatic, let the program decide and click OK to All . The files should appear in a new location. After which you can close HFVExplorer - you have prepared Makos for installation.
- Now run SheepShaverGUI.exe, and the first thing we need is the Volumes tab. There you need to add, using the Add button, first the DiskTools85_PPC.img file, then your created virtual disk. This is nothing more than indicating the boot order of the Apple Macintosh - boot disk, followed by hard disk. Here, indicate the letter of your CD/DVD ROM, I don’t have one, so the virtual one is indicated - that’s also possible. Not a required item if you do not plan to install anything from disks. Enable “My Computer” icon checkbox will allow you to organize direct file exchange between a real computer and a virtual one by mounting an external file system.
- On the Graphic/Sound tab, set the screen resolution of the virtual Mac, and you can also select Fullscreen mode instead of windowed, and increase the window refresh rate. I didn’t change anything except the resolution, I set it to 800 x 600. Experiment with the rest yourself.
- Let's go further to the Memory/Misc tab. Here set the memory volume to 512 Mb, since with a smaller amount there may be glitches and the emulator crashing. Also check the Ignore Illegal Memory Access box to avoid hemorrhoids.
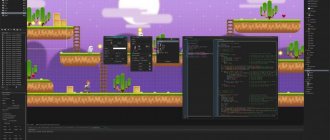
Congratulations, all settings are done, and when you click the Start button, the emulator should start. The boot disk will warn you about installing the system. Picture below. Feel free to click OK, the simplest thing left is to install System 7.5.3.
After clicking OK, a graphical shell appears. This is not a system yet, as you can see by clicking the coveted apple and selecting from the menu: About this computer. Simply a bootable utility disk designed to install Mac OS.
We go to the disk (disk1), where the System 7.5.3 install files copied to you are located. Double-click the file System 7.5.3 01 of 19.smi. A window with a license agreement will appear, in which you must click Agree. After which the installation program will generate a Sys 7.5 V7.5.3 CD Inst folder on the virtual desktop
Inside this folder we find the Installer file and run it. A splash screen of System 7.5 appears, click Continue.
The installer complains that no installation files were found on the Disk Tools disk. Well, that’s understandable, they are on disk1. Here you just need to click Switch Disk, perhaps a couple of times, until you see the disk with the given name. At the same time, the Install button will become active - the green light for installation has been received. Click Install.
Copying files will begin immediately. We wait until it completes, and when finished, click Quit. The installation is complete, but it’s too early to relax. From the top shell menu, select Special > Shut Down . We fall out of the emulator and run SheepShaverGUI.exe again. The point is that you need to remove DiskTools85 from the download. Do it as in the picture - select DiskTools85 and click Remove. All that remains is to boot from the HDD. After this, click Start.
And now this is a victory. After the system boots, the EnergyStar window will appear, you can close it, or configure the energy saving settings, otherwise it will pop up every time you boot. But the main thing is that you are now the owner of a virtual Mac. This is easy to verify, click on the apple > About this Macintosh , information about System 7.5.3 should appear.
The easiest way to work with Windows programs on Mac
Above we have studied all possible options (if not all, then write in the comments, we will add to the article). But which of these options to choose?..
The least-evil option for most people is to install Windows in a virtual machine (option #1). The exception is for users who need Windows for gaming.
Using a virtual machine allows you to open Windows programs at the same time as opening Mac applications, all without restarting your computer. And it works much more reliably than Wine.
Whether you use Parallels or VirtualBox is up to you. If you don't mind paying for a boxed solution, are not a computer specialist and want to get the best results, choose Parallels. If you are “on a short leg” with a PC, have the time and desire to get confused + want to save money – choose VirtualBox.
Running MYST on a MAC Emulator
Well, what is the main goal? - someone might ask. Launching MYST? Let's start with the fact that I only found an ISO file in Japanese. I would be grateful if anyone has a lead to a disk image with the original, English MYST. Not reissued. Maybe put it on a torrent?
And the Japanese one, of course, launched. It's simple, mount the image, for example, in Daemon Tools Lite, after which the MYST icon appears in the emulator instead of the CD-ROM icon. You should go to the disk and copy a couple of folders to the Mac OS desktop, after which you can launch it.
As for youth, unfortunately, you can’t bring it back with an emulator. Even if you buy on EBAY and bring a real Mac Quadra, which now costs a lot of money, it should be noted (thanks to the USD exchange rate and Waldemar Putin personally), then at least there will be more fun, but still. It is no longer possible to bring together Mitya, Valerka Maniac, and all the people who were around in the 90s. And the retail premises in the socio-political center of the city of Omsk, where everything took place, no longer seem to be trading premises. And the OPC itself has long been renamed into RCSO - Regional Center for Public Relations.
P.S. Those who finished reading and had a need to run a Macintosh emulator under Windows, please leave feedback if possible. Did you manage to launch and configure everything according to the instructions? Is it necessary to provide more information on installing a more recent Mac OS? What is missing overall?
May be interesting: Your first website on WordPress How to type the copyright sign on a laptop keyboard?
We use VMWare Workstation
Before writing this material, we did a lot of research to find quality information on the topic. It turned out that those who want to complete the task quite often use VMWare Workstation.
Step-by-step instructions on how to launch the MacOS emulator in this program look like this:
- Download and install VMWare Workstation. The best way to do this is from the official website vmware.com.
- Next, download the Mac OS image in .iso format. On the official Apple website, files are distributed in .dmg format. This will not work for us, so we will have to look for some alternative sites on the Internet.
- Launch the emulator, click the “New” button at the top left.
- In the next step, select Mac OS in the “Operating System” and “Version” fields. You can also enter the name of your virtual OS in the “Name” field. Click the "Next" button after that.
- Specify the amount of RAM that will be allocated to the emulated system.
Rice. No. 1. Creating a new image in VMWare Workstation
- In the same way, specify the size of physical memory. Click “Finish” in the next step.
- The virtual machine has not yet been created. Click the plus icon below. Select the operating system image downloaded at the very beginning. Click "Select".
Rice. No. 2. Selecting an OS image
- Click "Start". When loading the operating system, click the “F8” button.
Then the OS will start and you can use it. If you've ever used Mac OS, you know how to do this.