Forkplayer
Forkplayer is a unique browser that adapts to the user's gadget, allowing you to browse sites and create XML, M3U (IPTV) playlists. At the same time, the list of available sites is periodically updated, providing a wider range of services to the end consumer.
The content is available to the user directly from the global network and undergoes little processing. Forkplayer developers have created an application similar to Opera Mini, only not for phones, but for TVs. Each gadget uses a default browser, but it does not function properly, periodically throwing an error with the detail: “Insufficient memory.” This happens when launching a heavy website. The quality of the content, both audio and video, depends on the site on which the film is posted and the Internet connection.
Posting content and managing a personal playlist is done directly by the user. The playlist is uploaded through your personal account. The entire process is controlled using a push-button or pointing remote control.
Briefly about the program, the player allows you to watch almost all new films, TV series and TV shows broadcast on IPTV. Now let's look at how to set up the TV and the application for comfortable viewing.
To launch the player, you need to make adjustments to the DNS data. To do this, you will need to go to the network settings of the TV and change the DNS address to 85.17.30.89 or 195.88.208.101. The entered data determines which application will launch the player.
Let's look at the example of a TV from the LG brand. First you need to visit the official LG STORE application store, enter Tvigle in the search, download and install. The entered DNS data affects which application will be launched: IVI, RU, Tvigle, Accu weather, Action and thrillers.
If the applications still do not appear, then you should check the data about the country in which the TV is used. The settings must indicate the country Russia or Ukraine.
If, when launching the above applications, the player stops starting, then using a PC you need to check the router or provider for DNS blocking mode.
If the player starts and the user sees a loading screen instead of activating the Tvigle application, then the setup was successful.
How to set up Forkplayer
You can make adjustments to the player's start screen. You can enter the player settings menu by pressing the button with three bars at the top of the screen. It is worth noting that to set up comfortable use, it is enough to use 2 points:
- Setting up the start menu;
- Setting up the application.
The start menu allows you to adjust the number of icons used in the main menu. The second point requires detailed consideration.
A very interesting section is available in the application settings, which is turned off by default. This item is called Third Party Content. For high-quality data loading, it must be enabled. The rest of the settings are at the user’s personal discretion.
Setting up and adding a playlist
Since Lazy IPTV does not contain built-in playlists, the main setup at the beginning of work is adding a playlist.
To do this you will need to follow these recommendations:
- Install the additional video player first. It can be “MX Player”, “VLC” or any other.
- After installing the additional program, launch Lazy IPTV and go to the “Settings” section. In the “Video player” section, indicate the one you installed.
- The program has a “+” button in the upper right corner. Click on it. It performs the “Add Playlist” function.
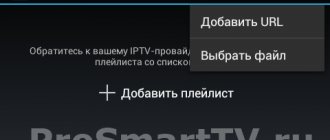
- After clicking, a new window will appear on the screen containing adding methods. These are “From a file on the device”, “From the Internet (via link)”, “From the clipboard”, “Empty playlist”. Let's take a closer look at how each option works:
- Upload the file with the created playlist from the device itself. To do this, use a file you prepared in advance.
- On the Internet, just find “Android TV playlists”, copy the link and paste it into your application. The advantage of the presented method is that it will be a self-updating playlist.
- It is possible to paste the channel list itself into the application using the copy function.
- By choosing to add a new (empty) playlist, you can create your own from many others.
- Having selected the desired settings, you will then need to click the “Save” button.
Having completed the presented settings for adding a playlist, we proceed to pleasant viewing.
Thanks to the built-in playlist manager function, it is possible to create any number of desired lists. If one of them fails, you can switch to another in a few clicks.
OTTPlayer
Ottplayer evokes conflicting feelings among users. On the one hand, the end consumer is provided with large-scale content without paying for satellite television services. This “trick” relieves the user of monthly payments for satellite television and the equipment that comes with the package. On the other hand, the user is “plunged” into a list of channels that are not always of ideal quality.
Another difference from other smart TV applications is that many channels are available to the user for free. The application also has paid channels, but the monthly fee for them is minimal.
How to set up OTTPlayer
The OTTPlayer network parameters are configured according to the following algorithm:
- Open the application and find the Resource section. In the window that opens, you will need to enter data about the site that provides the rights and services to watch OTT TV or IPTV;
- Next you will need to enter the Menu. This key is located in the upper left corner;
- The window that opens will require registration. The process is not complicated, and is carried out in a standard manner for all users, so there should be no problems;
- After this you need to find the Playlist item. You need to check the boxes next to the first line and start the generation process;
- Next, the user will see a web link, which is copied and saved in Notes;
- After this, you need to visit the official website ottplayer.es and go through the registration process;
- Finally, you need to go to your personal page - click on the personal account icon and select Playlists.
The player is fully launched after registration on a third-party resource, so you need to enter data about the provider you are using. You need to give a specific name to each playlist to launch.
Express guide to watching IPTV on Android boxes
With the spread of high-speed Internet, with the advent of many VOD services, with the growth of YouTube and streaming services, television is losing content consumers in Russia. But at the same time, television continues to hold a significant market share. Naturally, by television I do not mean only the trash-heap zombie channels of the federal network (although many people watch them), but a fairly large collection of all kinds of educational, entertainment, sports and other television channels. I have suffered through several years of optimizing my television viewing, although I rarely watch it. It was satellite television, and IPTV from providers with their own set-top boxes, and DVB-C, and IPTV through programs in Smart TV, etc. Ultimately, I came to Android boxes (here we also mean and TVs with Android TV), which have revolutionized content consumption before our eyes, but many have not even noticed it yet. They have yet to discover this wonderful world. These are real media hubs, digital content centers. I've been using Android boxes in the living room and kitchen, hidden behind TVs, for almost two years now. I periodically tell you about Android boxes in reviews. And the search for the ideal option for watching television has stopped (only the models of the boxes themselves have changed), because everything has reached a level of comfort that simply does not require anything else.
My soul was torn when one of my friends said that everything didn’t work as colorfully as I described to them - I had to look for new options, I couldn’t let my friends down. My head was boiling when one of my relatives complained that something was inconvenient and wrong for them - I had to look for new options to make everything work the way they wanted. I get depressed if I encounter hackwork, incompetence, inconvenient remote controls, inconvenient controls, low-quality software, poorly thought-out implementation of functions in the software, inconvenient interface, because... in any projects I adhere to a simple rule - either we do it well, or we do nothing and leave (yes, I know, fanatical maximalism does not lead to good). All this forced me to constantly be in search of something new and right. But now I know how most people watch television, and I understand what they really need for convenience.
I will share my little experience in this area with you today. Of course, this experience will be unacceptable to some, because they have their own vision of beauty.
I will not touch on the topic of choosing an Android box; I will do this later in a separate article; I will only touch on the topic of watching IPTV. The hardest part, so to speak, is the settings, which only need to be done once. The result of the described method is also suitable for elderly parents and grandparents. They will get used to the controls in 30 minutes, because everything is intuitive and simple. And you are unlikely to be able to exchange it for something else in the future.
In the end, everything will look like this:
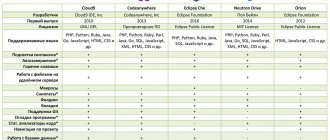
Criterias of choice
What is required from the IPTV provider is: acceptable quality of HD/FHD channels, a large selection of channels, fast access to streams (so that there is a fast channel switching speed), low cost and, most importantly, high uptime and high stability.
What is required from an IPTV manager (program) is: extreme simplicity without sacrificing functionality, an intuitive and well-thought-out interface (clean and clear), good overall functionality and stability. Clear and understandable control is required strictly using the D-Pad (“cross” on the remote control and a couple of function buttons), without the need to use mice, air mice and other wonders of modern technology. It is desirable to support the so-called modern autoframe rate (support for switching the scan frequency through the system API on boxes where such an API is implemented).
Well, the combination of content between the IPTV provider and the IPTV manager - they should work well together.
IPTV provider
Torrent TV services (for example, through Torrent TV, Torrent Stream Controller, LOL!TV, etc.) provide the highest possible quality, because most of them contain uncompressed streams from TV channels or from high-bitrate satellites.
Most of the streams there have interlaced video, and some have a multi-channel audio track. Naturally, this is the so-called pirated version of IPTV. The cost is low, it is possible to use some services for free. But this option is absolutely not suitable for constant full use. Low uptime and low stability. Today there are some channels, tomorrow they are gone. Today some channels work well, tomorrow they work poorly. The flows themselves impose certain requirements on the boxes, software selection and configuration, because Not all boxes and not all decoding libraries have high-quality deinterlacing systems. Without this, you cannot watch such channels with maximum quality. But this option is very convenient to use when you want to watch something specific in the highest possible quality (if these channels work at the right time). For example, a specific live football match or Eurovision with a perfect picture and excellent sound, etc. We will use EDEM as an IPTV provider. This is the most famous, not entirely legal IPTV provider with high uptime and stability. It meets all the requirements that were stated earlier. Its popularity has reached such a level that some Internet providers are quietly (by their own decision) shaping traffic to EDEM servers, forcing consumers to use their own IPTV service. There are not many of them. For example, among the large ones, Rostelecom does this. Such providers, of course, need to be changed immediately. EDEM has an extensive CDN network; you can choose the appropriate server yourself in your personal account.
For $1 (60 rubles) per month you get access to about 400 channels, of which about 60 are HD. We will not use all of them, only selected ones. EDEM has an archive for 4 days. One EDEM account can be used on two devices at the same time. For example, on the box in the living room and in the kitchen.
We will use OTTCLUB as an additional IPTV provider. Also a well-known IPTV provider with high uptime and stability. It has fewer channels than EDEM, about 220, of which about 70 are HD. The quality (bitrate) of the channels themselves is higher than that of EDEM. There is also an archive. The price is quite high. But OTTCLUB has a very cool tariff with hourly pricing. You put $5 into your account, and the balance will only be used when you watch channels. This is exactly what we need. We will not use OTTCLUB fully, but only as a small addition to EDEM. We will use a single specially prepared playlist, which will consist of EDEM channels, to which will be added channels from OTTCLUB that are not in EDEM. And some SD EDEM channels will be replaced with HD ones, if there are any in OTTCLUB. Over the past year, my family has spent about $3 on OTTCLUB. Quite budget-friendly.
In the guide, I will discuss two options for your convenience. Only EDEM and EDEM + OTTCLUB. You choose for yourself what suits you best. But I recommend the second option, because... it will expand the list of available HD channels, and costs will increase slightly.
Preparation
Download the archive with prepared EDEM, EDEM + OTTCLUB templates and logos.
Templates prepared from official playlists (06/15/2018). Most of the work is done automatically; I wrote a special program for this. Then a manual check and adjustment was performed.
- All duplicate channels have been removed (if there are SD and HD versions of one channel, then only HD remains).
- Only Russian channels and a couple of foreign ones were left (Polish, Ukrainian, Armenian, etc. were removed, sorry, bros - friendship is friendship, but television is apart).
- Adult channels have been removed. We are all human, but it’s better to watch porn in 4K rather than re-recorded on IPTV.
- All channels are divided into groups: Educational, Films and TV series, Sports, General, Children's, Music.
- The channels are aligned with the EPG (already listed in the playlist - programtv.ru and teleguide.info). Only less than 10 minor channels from the entire playlist will not have an EPG.
- Logos have been selected and registered for all channels.
- The EDEM and OTTCLUB channels have been merged into a single playlist. The basis is EDEM. Only those channels that are not in EDEM were added from OTTCLUB.
- Channels in groups are sorted. Primary sorting criterion by HD, SD. Secondary alphabetically.
If you only want EDEM...
You will get 178 channels, 40 of them FHD.
Register on the EDEM website. Top up the balance in your personal account by $1 (via Interkassa). This will be enough for you to understand for yourself whether this IPTV option is right for you or not. Activate your subscription for 1 month. Load the m3u playlist - Menu > Playlist > m3u8. We will only need part of one link from this file; we will not use it directly.
If you need EDEM + OTTCLUB...
You will get 218 channels, 55 of which are FHD.
Follow the previous step - register and download the EDEM playlist.
Register on the OTTCLUB website. Top up your personal account balance by $1. This will be enough for a while. Activate the “Per-Demand Billing” tariff plan. Download the m3u playlist - Profile > Playlists > m3u. We will only need part of one link from this file; we will not use it directly.
You will need a text editor with bulk replacement capabilities. For example, Notepad++ for Windows.
If you only need EDEM...
Open the downloaded EDEM playlist and EdemTemplate in a text editor. Select any line with a link to a TV channel in the EDEM playlist. It looks like:
https : //LINK/PERSONAL_KEY_EDEM/INTERNAL_NUMBER/index.m3u8
For example, https://86b24a81.iptvbot.ru/iptv/8GAX4A5EFNY25A/106/index.m3u8.
Copy only part of it to the clipboard - LINK/PERSONAL_KEY_EDEM. For example, 86b24a81.iptvbot.ru/iptv/8GAX4A5EFNY25A. In the EdemTemplate file, bulk replace EDEM_URL with LINK/PERSONAL_KEY_EDEM. That's it, your playlist is ready.
If you need EDEM + OTTCLUB...
Follow the previous step, but use the ComboTemplate. Open the downloaded OTTCLUB playlist in a text editor. Select any line with a link to a TV channel in the OTTCLUB playlist. It looks like:
https : //LINK/PERSONAL_KEY_OTT/INTERNAL_NUMBER.m3u8
For example, https://ottnow.in/stream/94FQOCRRPK/131.m3u8.
Copy only part of it to the clipboard - LINK/PERSONAL_KEY_OTT. For example, ottnow.in/stream/94FQOCRRPK. In the ComboTemplate file, bulk replace OTT_URL with LINK/PERSONAL_KEY_OTT. That's it, your playlist is ready.
If you wish, you can delete unnecessary channels, change the order and regroup.
Preparation on the computer is complete. Copy the TVLOGO folder (from the channel logo) and the edited template file to the Android box.
IPTV manager
I have tried many available IPTV viewing programs and IPTV managers.
Most of them are the bottom of hell. At the same bottom are programs for IPTV from most major operators. How they manage to do this, why they release such products, what kind of idiots approve the release of such products, I cannot answer. Perfect Player is an IPTV manager that is close to ideal. The person who makes it understands perfectly how people watch IPTV and what they need. I don’t know the author, but it’s clear from the product that he approaches it with soul and knowledge of the matter. Perfect Player fully complies with the previously stated requirements. And it even supports the so-called modern autoframe rate. The latter is not important to everyone, but for me it is one of the key requirements. Perfect Player has many features that will be important to some people. For example, it is possible to autoload when the box starts, and it is possible to autostart the last channel. You can change the color theme and the appearance of the channel list. There are favorites and adaptive sorting - the channels you watch most often will be displayed first in the group lists. For each channel, you can individually select the decoder and aspect ratio if there are problems with the stream on a particular box. And other possibilities.
The program itself is free. The full version can be activated within the program. The full version will have no ads and a couple of additional features. It costs a few pennies, like $2 (I bought it a long time ago).
If you already have Perfect Player installed, reset its settings. Enter the main menu (hold the OK button) > Settings > Initial settings > Reset to original.
Open Settings > General > Playlist and select the prepared playlist that you copied to the box. There is no need to specify the EPG, two servers are already registered in the playlist, Perfect Player will pick them up. Select “Logo Folder” and specify the logo folder that you copied to the box.
Go to Settings > Playback. You need to select a decoder. This setting is individual for different devices. On different boxes, one decoder may work better than another. For example, for Nvidia Shield TV select HW+, for Minix Neo U9-H select Hardware. Select the maximum buffer size. Enable AFR if you need autoframe support. This is the so-called modern autoframe rate. It is supported only on the most advanced boxes in terms of media functionality, for example, Nvidia Shield TV and Minix Neo U9-H. The Perfect Player program will manage the autoframe rate itself, the frequency will switch according to the frame rate in the stream/channel. When switching channels, if the frame rate in the streams is the same, there will be no intermediate switches.
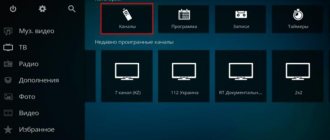
Return to the main program window. Wait until the EPG downloads. Select any channel, hold OK on it and select View from the menu that appears. The view changes to Details. You can select the Table as you prefer. That's it, the basic settings are completed, you can use it for your pleasure. Then you can adjust the program to your preferences. Briefly about navigation. Back twice (or holding Back) exits the program. Up/Down - sequential channel switching. Back — show/hide information. OK—display the list of channels. Up/Down—move through the channel list. Left/Right - Move between channel groups. Holding OK on a channel in the list is an additional menu of settings and functions.
Here's how it will look like in real life (don't mind the moire, it's normal when filming the screen):
Give it a try. I am sure that many of you will like it, and watching television will move to a new level of convenience and comfort. Nastya Olivier's apron for everyone!
KODI
The Kodi player has won the sympathy of users with a set of useful commands and functions. The player allows you to play almost all available video and audio formats. Navigation inside the player is simple and easy; in addition, the Russian language is available, which greatly simplifies the setup process. Using the additional program IPTV Simple Client makes it possible to view more than 150 channels. The video is played in FULL HD mode. The user can also create their own playlist.
How to set up Kodi
Before you begin the process of setting up the player, you initially need to perform some actions: search and download a program, search for a playlist, select software individually for each gadget. The preparatory stage takes quite a lot of time due to the intensive application.
First you need to find out what type of device the signal will receive. Next, select the OS for the device to operate:
- Tablet PC, phone, Raspberry Pi module;
- Smart TV or mini OS running on Android;
- PC with any OS.
Next, you need to download the required playlist for viewing in m3u format. This file uses a directory of links for broadcasting television channels. Kodi works exclusively with m3u formats. It is not recommended to ignore this modification, since using a format that is inaccessible to the program, it will be possible to detect the absence of television broadcasting.
Next, you will need to decide on the version of Kodi. Next, you will need to download the program; it is recommended to install Kodi from the official website. If your TV runs on Android, you can download the program from Google Play. If the downloaded application does not open, then the problem lies in the device itself. Minimum requirements for Android version 4.2. Therefore, first you need to check the installed OS version on your TV.
To simplify the setup process, the developers have provided instructions for Kodi. Correct setting is the main key for a comfortable viewing experience. Below is the complete algorithm of actions:
- After starting the media center, you will need to activate the TV mode. Next, you need to find the System->Settings->General->On icon. A message will appear on the screen and you will need to press OK. In “PVR IPTV Simple Client” select On.
- Next, the user will need to connect the playlist in Kodi. After going to the Settings menu, you need to specify the location of the playlist. This line contains the copied playlist link;
- Then you will need to activate the program guide. You need to go to PVR IPTV Simple Client Properties->EPG Installation->Path to XML TV. The address must be specified without parentheses;
- Reboot your player. To successfully reboot, you will need to close absolutely all open windows. The reboot wait time is 5-20 seconds.
After reloading the playlist, the user receives a message indicating that both programs and channels have been downloaded. This information is displayed at the top or bottom right of the display. Once the setup is complete, the TV item will open in the menu.
Possibilities
Lazy IPTV is an application with minimal system requirements. To install it, a few megabytes of free memory will be enough. The player is free, so there are no detailed instructions on setting it up from the developer, but due to its popularity, the corresponding thread is available on the 4PDA resource.
On a note! There is information that a paid version of Lazy IPTV Pro with expanded functionality is being prepared for release, but for now this news is at the level of rumors, and the free option suits most users.
Advantages of the program:
- video playback in FHD resolution;
- sheet manager – you can add an unlimited number;
- automatic or manual update of playlists;
- EPG support;
- convenient navigation;
- “Favorites” menu - the most frequently viewed channels are added here for quick access;
- the application allows you to create reminders;
- reproduction of links from VK, YouTube;
- reading uTorrent files - the movie is not downloaded, but immediately played in the player;
- free distribution.
One of the most popular Android IPTV players of 2019 was not without its drawbacks.
- Inconvenient to control from the remote control. If you are watching on Android TV or a set-top box with this OS, the remote control does not perform all functions; it is more convenient to connect a mouse.
- The application requires installation of an additional video player. As practice shows, this is not very practical, and on systems with a small amount of RAM, broadcasts may freeze.
Lazy IPTV
It's time for a detailed analysis of the Lazy IPTV player. The setup process and adding channels to the player using available free m3u playlists will be discussed.
pros
One of the main advantages of the player is the simple setup process. The player takes up only 5 MB of RAM and general memory of the user's gadget. The interface is quite clear and convenient, which almost everyone can understand.
The Playlist Manager function selects a player from all available ones. The user can set the maximum number of playlists, and in case of failure, quickly switch to the working playlist.
The user can update the channel list. If you are using an auto-updating playlist, then you can enable the auto-update function or update manually.
The Favorites function allows you not to get confused in a large list of TV playlists, moving on to the more important ones in just a couple of clicks.
In addition, the user has access to a large selection of functional commands:
- Search for channels or TV shows,
- Synchronized browsing history,
- Reminder about upcoming broadcast programs,
- And others.
Minuses
Despite its advantages, the program has objective disadvantages that are revealed in the initial stages of use.
Obvious problems begin when controlling the player. The fact is that this program was developed more for tablets and smartphones than for Smart TV. Operating with a remote control can be a frustrating process for the user. And although only a couple of function keys do not work, you simply cannot do without them. For example, it is not possible to use the number keys to switch channels, and the previous or next channel key does not work.
Another obvious drawback is the lack of an internal player. Therefore, users, along with LazyIptv, are forced to install another VLC player or MX player. Constantly switching between two applications will make the user nervous, and also consumes memory on the Android device, putting an additional load on it.
How to add a playlist to Lazy IPTV
In order to use the application resources, you will need to install another additional player “MX Player”.
After downloading, you need to go to LazyIptv and find the Video Player item. In the window that opens, you will need to give permission to use the MX player.
Adding playlists is done in a few taps. First you need to select playlists. After this, you need to open the player menu and select Add playlist at the bottom. Next, you will need to enter a link, for example, and click on the Add or Save button. After this, the user can enjoy watching his favorite TV shows.
Disadvantages of the player
Despite the above, not everything is as good as we would like and the application has a couple of flaws, which we will now consider:
- Control. It’s almost ideal, especially for phones and tablets, but on a TV using the remote control it’s not so simple. Only a few functions do not work, but without them there is no way at all: there is no way to switch to the desired channel using the corresponding numbers and the “next/previous channel” button does not work.
- Lack of built-in video player. Along with the “Lazy IPTV” application, you will have to additionally download the “VLC” or “MX player” player. This is not entirely convenient, and for weak Android consoles there is an additional load, which affects performance.
KmPlayer
Kmplayer is a universal player for playing audio and video formats: DVD, VCD, AVI, MKV, Ogg Theora, OGM, 3GP, MPEG-1/2/4, WMV, RealMedia and QuickTime. The key feature is the built-in codecs and flexibility of settings. Also, the player is able to work not only with internal, but also with external filters and plugins. This modification allows you to configure the audio and video playback parameters of the file system with maximum flexibility.
Using KmPlayer, the user in return receives a set of additional functions: support for playing subtitles, increasing volume, Panorama mode, playing streaming content, capturing video with a TV tuner and camera, using screenshots and much more. In addition, there is one more specific detail - setting the standard volume and normalizing it in case of loud or quiet use of the audio mode.
pros
The player is fully customizable, from the interface to the playlists. Codecs eliminate unnecessary elements, avoiding system clogging. In addition, the application allows you to view incompletely downloaded files and plays streaming audio and video formats. Another detail is that the player reads compressed zip and rar files. The user can specify a specific segment of video format playback using the start and end points. You can also use Winamp plugins and use Dscales filters.