The performance of a computer depends on the RAM installed on it. Some PC users may not know that it’s not just the volume, but also the clock speed of the installed boards. It depends on their capacity:
- starting computers or laptops;
- downloading programs;
- performing any tasks.
How to find out the frequency of RAM
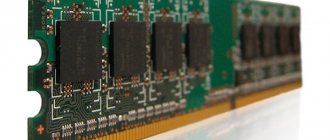
What is RAM and what is it for?
Random access memory (RAM) is the computer's memory. The central processor processes incoming information using RAM, which is considered an intermediate link in the functionality of the motherboard.
Note! If the computer has 2 RAM cards with different frequencies, then the information will be processed at the speed of the smaller card. Many PC users are unaware of this. By installing several of these boards on the motherboard, you expect more powerful performance from the system.
How to find out the frequency of RAM
You can find a RAM module with information about it, both using third-party programs and without using them.
We use programs to determine frequency
If you don’t want to get inside the system unit, then all the necessary characteristics can be found using special software.
The most popular program, in our opinion, is AIDA64 (analogous to Everest). It provides an extensive range of all technical data about your device. The trial version is free for 30 days.
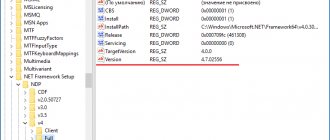
Launch and expand the item Test - reading from memory . We update at the top and get the result .
The program will highlight the used memory bold . In our example, the memory frequency is 1866 Hz, which corresponds to the stated parameters in the documents.
Another way is to select SPD system board . Here you can see how many strips you use, the frequency and a lot of other useful information.
If you want to see the real and effective frequencies, then go to the Motherboard in the section of the same name.
Another frequently used program that provides a lot of useful technical information about hardware is the CPU-Z . Unlike AIDA64, it is completely free .
Once launched, go to the Memory . In the DRAM Frequency you will see exactly what you need.
It should be noted that we are talking about the real frequency, that is, the physical frequency at which the chip operates. There is no way to see what is effective in this program; it is usually 2, 4 and 8 times larger than the real one.
How to check and test RAM using third-party utilities
There are quite a few programs on the Internet for checking and testing RAM. It is advisable to download and install those versions that are time-tested and do not contain additional third-party equipment and viruses:
| Name | Description |
| Windows Memory Diagnostic Utility | One of the effective programs that works without an OS. The developer is Microsoft. This is the best option for finding errors in RAM |
| MemTest86+ | This program works without loading the OS. Has a high speed of passing tests, shows information about the amount of memory |
| SuperRam | This is a multifunctional utility. It conducts memory speed tests and monitors resources. The main function of SuperRam is the main focus on RAM optimization. The program scans RAM and frees up space that is not being used by the CPU |
| MEMTEST | A very small utility. In the Free version, it diagnoses the declared amount of memory. Other paid versions have advanced functions for displaying RAM information |
| RightMark Memory Analyzer | This utility already has a built-in graphical interface for working with Windows. The main argument of the program is to set the priority of checking RAM without loading the system |
Tests and checks of RAM must be carried out in cases where:
- The computer freezes with some program running;
- When Windows starts, a blue screen of Death appears;
- During Windows installation various errors appear and work stops.
Let's check and do a RAM test using the MEMTEST program
This program takes up virtually no space on your computer and when installing it, it is better to select “Install on desktop” so that after checking it can be easily removed from the system.
- Let's launch the program. A small window with simple functionality will open.
Run the memtest program
- Click the “Start Testing” button.
Click “Start Testing”
Note! The testing process is carried out at the bottom of this utility and will take a certain time, while the processor will not be overloaded, as will the RAM. This will not affect your real-time work with the computer.
Video - How to check RAM using Memtest86+
* * *
As you can see, you almost always have to change the reference frequency during more or less serious memory overclocking (and if Sandy Bridge didn’t exist, this statement would be even more categorical). Yes, sometimes serious frequencies can be achieved using multipliers alone, but the step between the frequency values available for activation in this case turns out to be too large, so to more accurately find the frequency ceiling you still have to play around with the clock generator. Well, this, as you know, leads to a change in processor frequency.
The moral is this: if you are serious about overclocking memory, then you should also overclock the processor at the same time. In fact, why squeeze all the juice out of the dies and at the same time try to restrain the operating frequency of the processor, if even a slight overclocking of the CPU will give a much greater effect than all the experiments on memory? Thus, before you start overclocking your memory, it would be a good idea to know what frequencies your processor can handle. Well, after that you will have to look for a balance between the speed of the crystal and the frequency/timings of the RAM, because it is usually impossible to set the most attractive values for both components at once.
Difficult? Well, no one is stopping you from simply tweaking the timings slightly or increasing the memory multiplier, and then enjoying the performance that has dropped out of nowhere, without going into further overclocking of the computer. If you don’t want to reveal the full potential of the system, don’t. Well, we wish gentlemen enthusiasts good luck in this difficult but interesting task.
What to do - Windows 10 RAM is overloaded?
A few proven tips:
- Click on the “Show hidden icons” arrow in the lower right corner of the screen. Pay special attention to the Utorrent program. Exiting this program will significantly relieve the load on RAM;
- reinstalling drivers to newer ones may also eliminate freezes and free up the load on RAM (the driver update program Driver Booster 5 will help you);
- update the antivirus, the percentage of RAM takes its attention;
- Through the “Task Manager”, determine the most loaded program and try to end its process (only if you are sure that the program will not affect the operation of the system).
Rebooted RAM
Video - How to clear your computer's RAM
What to do if Windows 10 does not see the RAM device
Motherboards have limitations in the amount of RAM they can accommodate. Older models fit a maximum of 4 GB of RAM, newer models have 16 GB, and currently 32 GB are already available. To find out the capabilities of your motherboard, look at the specifications at the office. manufacturer's website. Pay attention to the frequency of the RAM.
Motherboards have limitations in the amount of RAM they can accept
Make sure the memory is working.
It also happens that the RAM was purchased defective or damaged upon delivery, and in order to check, you need to manipulate the motherboard.
Attention!!! All actions with RAM strips must be carried out when the computer is disconnected from the network.
The dies must be removed one at a time, inserting one into one connector at a time. Boot your computer and enter the BIOS by clicking the Delete button. The instructions above described how to check the RAM frequency. You can also check the RAM on another computer using the same steps.
We check the RAM on the motherboard one by one
Reset BIOS settings.
Attention! Don't forget to unplug your system unit before removing the battery.
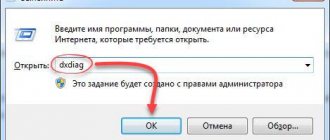
This method will not harm your installed OS, it will only lead to resetting the BIOS content itself. There is a round battery on the motherboard. She needs to be pulled out. Wait 15 seconds. and insert into place. To reliably reset the BIOS to factory settings, you can carefully short-circuit the contacts with a screwdriver, as shown in the photo below.
Use a screwdriver to carefully short-circuit the contacts
No rush
| The RAM actually has a lot of timings, but only four of them deserve our attention. |
So, delays - or timings. Before explaining what it is, it wouldn't hurt to familiarize yourself with DDR memory architecture.
To store the simplest unit of information (a bit), DDR chips use a cell that is a combination of a transistor and a capacitor. There are a huge number of similar cells in each memory chip. They are arranged in rows and columns, which ultimately form arrays called banks. Since DDR chips are a dynamic type of memory, their contents must be periodically updated (recharged), otherwise the information recorded in them will be lost.
The so-called memory controller interacts with RAM. Having received a command from the processor to read or write a data bit with a logical address, it determines in which bank/row/column the desired cell is located and what should be done with it. The problem is that the cell cannot be processed instantly - a certain amount of time (read: number of memory cycles) must pass before the desired operation is performed. Delays that occur at certain stages of reading/writing bits are called timings.
| The motherboard manual is a useful read if you haven’t combed through the BIOS up and down yet. |
There are a large number of timings, but only a few of them have a key impact on memory performance. Specifically - CAS Latency, RAS-to-CAS Delay, Row Precharge Time and Row Active Time. This is their order in order of importance, and it is in this sequence that they are located in the BIOS of motherboards and in the descriptions of memory modules. For example, in the technical characteristics of Kingmax DDR3 2400 MHz Nano Gaming RAM
there is a line “10-11-10-30” - so, these are the timings. The first digit shows the CAS Latency value, the second - RAS-to-CAS Delay, and so on.
To understand what these or those delays are responsible for, you need to understand how data is read from cells. First, the memory chip must prepare the required row and column in the bank for processing. To do this, the corresponding command is sent to them, after which the process of activating the line occurs, which takes a certain time. The number of clock cycles required to “awaken” a line is called RAS-to-CAS Delay.
Next, the controller sends a read command to the required sequence of cells (its length depends on the type of memory and additional settings), but the first piece of information does not arrive on the data bus immediately, but after several clock cycles - this delay is called CAS Latency and is considered key for memory modules. After all the necessary data has been read, the controller issues a command to close and recharge the line.
| Sometimes, to revive the motherboard after overclocking, you need to remove the battery from it for a while. |
Where are the other two timings? The first, Row Precharge Time, takes effect immediately after the row is closed. The fact is that subsequent access to this row does not become possible immediately, but only after recharging, which takes a certain number of clock cycles - Row Precharge Time is responsible for this interval. Well, the Row Active Time timing shows the period of activity of the row, that is, the number of cycles that have passed from the moment of its activation until the moment the recharging command is received. In fact, this delay depends on the parameters RAS-to-CAS Delay, CAS Latency and the length of the read line, but usually its value is selected by simply adding three other timings. This is not entirely correct, but it is guaranteed to avoid problems with stability with minimal performance losses.
Writing data to memory cells is carried out in a similar way, so we will not consider this process in detail. We will also not focus on additional memory settings such as line length and secondary timings - their impact on the overall performance of the system is too insignificant. These parameters will be of interest to overclockers who are going for a record, and not at all to ordinary users.
| Stick it in - and everything is fine? |
| It was customary to put the “SLI Ready” label on modules with built-in EPP profiles, although such memory had nothing to do with SLI technology. |
Many novice builders often make the following mistake: in an effort to equip the system unit to the maximum, they install DDR3 modules with an exorbitant operating frequency (say, 2400 MHz) into the motherboard and remain in the happy confidence that the memory in their computer already works at the declared speed. However, without additional manipulations on the part of the user, such dies will work in the same mode as their cheap counterparts. This is explained by the fact that the motherboard derives its basic memory settings from a special SPD (Serial Presence Detect) chip, which is mandatory for each DDR module. The frequencies and timings specified in the SPD are, as a rule, far from the maximum possible - this is done so that the modules can start even in a very weak system. Accordingly, such memory has to be overclocked additionally.
Fortunately, sometimes this process can be made much easier. Thus, Intel has been promoting a special extension for the SPD chip, known as XMP
(Extreme Memory Profiles). It writes information about additional system settings into memory modules, which can be read by motherboards that support this technology. If the motherboard manages to pick up the required XMP profile (it is selected through the BIOS), then it will automatically set the memory frequency stated in it, adjusting other system parameters for this purpose - automatic overclocking will occur. True, it is highly desirable that the memory be certified for the platform on which it is installed, otherwise the profile will either not work or will work, but not as it should. In addition, it is never a bad idea to double-check the values set automatically, since some memory manufacturers manage to specify settings in the XMP profile that can cause the system to suddenly die. In general, this technology is very useful, but it is only compatible with Intel processors.
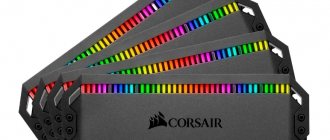
It is worth noting that even before the advent of XMP, NVIDIA
and
Corsair
promoted a similar design known as
EPP
(Enhanced Performance Profiles), but it did not catch on.