Setting up a personal computer is not limited to its operating system. Primary settings related to computer initialization are carried out in the PC BIOS.
Most BIOS settings are in “Auto” mode and do not require close attention, however, some of them are necessary when installing the operating system and fine-tuning the PC.
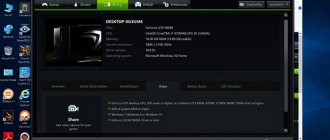
ASRock UEFI SETUP UTILITY BIOS setup
Difference between BIOS and UEFI
BIOS is a program “built into” a special chip on the computer’s motherboard that initializes its devices upon startup.
There are two types of BIOS - “old” BIOS and BIOS/UEFI. Nowadays, almost all computers come with BIOS/UEFI, which makes the PC start up faster and provides a friendlier user interface.
Interface of the old version of BIOS and BIOS-UEFI
Windows installation and boot information
Boot Windows in GPT mode
Reference! GPT is a new HDD partition structure that allows you to use more than 2 TB of disk space.
Step 1. Open the “Boot” section, select “EFI Compatible ROM” in “PCI ROM Priority” and save the UEFI changes.
In the “Boot” section, open the “PCI ROM Priority” subsection
Select "EFI Compatible ROM"
Step 2. When starting to boot the PC, press the “F11” key and select “UEFI: xxx” in the menu that appears, where “xxx” is the Windows boot device.
Select the item called “UEFI”
Booting Windows in MBR mode
When starting to boot the PC, press the “F11” key and select “AHCI/SATA: xxx” in the menu that appears, where “xxx” is the Windows boot device.
Note! The latest versions of UEFI can recognize the necessary devices automatically; in this case, entering the bootloader using the “F11” key is not required.
Installing an operating system on a hard drive with a capacity of more than 2TB
Step 1: Make sure you are using a 64-bit version of Windows for installation.
Step 2. Go to the “Advanced” section, click “Storage Configuration” and in “SATA Mode” select “AHCI Mode”.
Go to the “Advanced” section, click on the “Storage Configuration” subsection
In the “SATA Mode” subsection, select the “AHCI Mode” value
Step 3 : Save UEFI settings.
Step 4. When starting to boot the PC, press the “F11” key and select “UEFI: xxx” in the menu that appears, where “xxx” is the Windows boot device.
Select the item called “UEFI”
Step 5. Start installing the operating system from the boot device.
Installing Windows 7 on a GPT disk
The main task of “Secure Boot” is to block third-party processes when loading the PC, up to blocking removable media.
Windows 7 does not support installation on GPT hard drives. To install Windows 7 in UEFI, you need to disable the “Secure Boot” (“UEFI-boot”) option in its settings.
Go to the “Security” section and in the “Secure Boot” item select “Disabled”.
Go to the “Security” section, in the “Secure Boot” item select “Disabled”
Reference! It is not possible to disable Secure Boot in all versions of UEFI. In these cases, only changing the BIOS firmware helps.
How to use Asrock A Tuning Utility
ASRock A-Tuning is a utility designed to tune the operation of computers built on ASRock motherboards without the need to change BIOS settings. It contains a large set of tools for adjusting the parameters of the processor and cooling system. In this article we will get acquainted with this utility and find out what opportunities it provides us for setting up the system.
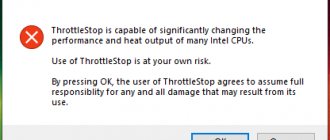
At the outset, it is important to note that you are personally responsible for the settings you make. Be careful and act at your own risk. Next, we will look at how to install and use Asrock A Tuning Utility.
Installing ASRock A-Tuning Utility
The installation process is simple - all additional software for ASRock motherboards can be found on the optical disk supplied with the board. If you do not have a disk drive or an optical disk itself, or the software on the disk itself is most likely very outdated, the ASRock A-Tuning utility can be downloaded from the official ASRock website. This article uses the ASRock B450 Pro4 motherboard as an example. It is important to note that different ASRock motherboards require their own version of the ASRock A-Tuning utility that is suitable for them.
To download the ASRock A-Tuning installer, search for the motherboard by its name in your browser and go to that ASRock motherboard's page:
On the website, go to the Support and click the Download :
Specify the OS version, then download ASRock A-Tuning Utility by selecting the Global .
After downloading the archive, unzip it and run the installer. The program installation process is standard; click Next :
Once the installation is complete, you will need to restart your computer.
How to use ASRock A-Tuning utility?
Let's look at the interface and capabilities of the utility.
Operation Mode Tab
Having launched the program, we see the following start window:
the Operation Mode tab open . Here you can select one of three preset computer operating modes: Performance Mode , Standard Mode and Power Saving . By default, Standard Mode .
OC Tweaker Tab
It is on this tab that all basic manipulations with frequency, voltage and other processor parameters are carried out. Here you can also overclock the processor. The parameters available for change can be seen in the screenshots attached below:
This tab essentially duplicates the tab of the same name from the motherboard BIOS settings:
The utility allows you not to have to access the BIOS settings every time when some changes are required, and to perform all manipulations directly from the working environment.
Let's look at the parameters available for change. On the OC Tweaker we see the following:
- CPU Speed - processor frequency;
- CPU Voltage - voltage supplied to the processor cores;
- VCore Voltage (Offset) — offset of the voltage value supplied to the processor cores;
- VDDCR_SOC Voltage (Offset) - offset of the voltage value supplied to other components located on the chip;
- DRAM Voltage - voltage supplied to RAM modules;
- 1.05 V, 2.50 V and +1.8 V - voltage on the lines 1.05 V, 2.50 V and +1.8 V, respectively;
- VPPM Voltage - voltage that determines the reliability of access to the DRAM line;
- VDDP Voltage is the voltage of the transistor configuring the contents of the RAM.
Equipment activation
Sometimes situations arise when the equipment in the operating system is disabled, and when viewed in the “Task Manager” it is not possible to activate it. Often a similar situation occurs when using USB ports, built-in video cameras, sound cards, etc.
This may mean that the hardware is disabled in the BIOS/UEFI.
To turn on the equipment, you need to enter the BIOS/UEFI, find it and activate it. To do this you need:
- Go to the “Advanced” section, then expand the “South Bridge Configuration” subsection.
Go to the “Advanced” section, then expand the “South Bridge Configuration” subsection
- Find a disabled device with the value “Disabled” or “Off”, activate it by changing to the value “Enabled” or “Auto”.
In the line with the disabled device, change the value to “Enabled” or “Auto”
Exit ASRock UEFI
After making all the settings, you can exit UEFI SETUP UTILITY, saving the changes made.
To do this, go to the “Exit” section, click on the “Save Changes and Exit” item and click “Yes”.
Go to the “Exit” section, click on the “Save Changes and Exit” item, click “Yes”
If for some reason you need to reset UEFI to its original (factory) settings, you need to click “Load UEFI Defaults” and answer “Yes” to the prompt that appears.
To reset the BIOS to factory settings, click on “Load UEFI Defaults”, then on “Yes”
UEFI SETUP UTILITY also provides many other settings, details of which can be found in the documentation for the motherboard and in the help called up by pressing the “F1” key.
Review and testing of ASRock B450 Steel Legend motherboard
Introduction
The AMD Socket AM4 platform continues to gain popularity thanks to excellent competitive solutions in the form of processors and chipsets. And due to this success, full-fledged competition again emerged between the two processor giants - Intel and AMD, which had a positive effect on the market. And not only primary, but also secondary. It has dropped significantly, and CPU models of previous generations began to be sold inexpensively. And while the processor itself is easy to find and can be bought relatively inexpensively, the same cannot be said about motherboards.
Personally, I recently encountered the problem of finding a system for LGA 1155. Imagine my surprise when they asked about 10,000 rubles for the average model on the Intel Z77 chipset! And for this money there is also no guarantee. I had to rummage through flea markets and look for something simpler (at least on the Intel H61), otherwise my old Intel Core-i7 3770K would meet the fate of a key fob. The situation is stalemate: it’s a shame to throw it away, and I don’t want to spend money on something outdated. You will involuntarily begin to look towards something new...
Today, in the mid-range segment, in my opinion, AMD rules the roost. Moreover, now everyone is hiding in anticipation of the new Ryzen 3000 series processors, for which they promise to raise the performance bar even higher. Meanwhile, motherboard manufacturers continue to stir up interest in the AMD platform by releasing new modifications based on AMD A320, B450 and X470 chipsets.
How can you lure a buyer now? For example, appearance. You take a middle-class model, decorate it to the maximum, come up with a loud name - you're done. The main thing is not to raise the price. All brands are following this path, and now it is difficult to surprise anyone with a budget model with a Gaming console without overclocking, but with a bunch of diodes, which reassures the buyer and creates the illusion of exclusivity of the device.
It has gotten to the point where it is difficult to understand at first glance: what is this? The model can turn out to be either new and interesting or an absolute dud. How to determine this? Unfortunately, only testing and studying the features will help here, so before purchasing, many began to study materials on each specific device, so as not to get into trouble and not become a pioneer themselves.
announcements and advertising
2080 Super Gigabyte Gaming OC for 60 rubles.
Compeo.ru - the right comp store without any tricks
RTX 2060 becomes cheaper before the arrival of 3xxx
Ryzen 4000
series included in computers already in Citylink
The price of MSI RTX 2070 has collapsed after the announcement of RTX 3xxx
Core i9 10 series is half the price of the same 9 series
The price of memory has been halved in Regard - it’s more expensive everywhere
We received an interesting model from ASRock for testing, which never ceases to amaze with interesting products. Not long ago, a good Phantom Gaming line was introduced. And now a new one is coming out called Steel Legend.
The ASRock B450 Steel Legend motherboard has just appeared, and has already become a “Steel Legend”. Apparently, this time the manufacturer paid special attention to reliability and durability, so that later we would not have to face the problem of finding motherboards on the secondary market. Let's see.
Packaging and equipment
A new product line is always associated with a new design and idea. It is clear that producers are working for the audience. You need to understand what the buyer wants and simply give it to him at the most attractive price. It is clear that there must be some benefit from this whole event, otherwise there is no point in starting it. But in fact, now we see a bunch of monotonous products with the Gaming console.
Previously, manufacturers honestly tried to expand functionality for gamers (improve sound, improve the performance of the network adapter, provide the ability to install multiple video cards, think through the design and provide additional software), but now they realized that they can’t make much money from this... Although everyone wants to play, so we take the most budget model, solder in a couple of LEDs, sculpt a Gaming sticker, add a price - we get success. Buyers have already realized that they are being led by the nose and are already tired of this endless “gaming”. For me, for example, reliability and a longer resource are more important than a couple of additional LEDs. However, to each his own.
And now ASRock is releasing a new line called Steel Legend. I don’t know how it is for others, but for me, first of all, it is associated with some kind of legendary reliability. And even if this is just a smart marketing ploy, the influence of the name on the product itself cannot be underestimated, because Christopher Banifatich himself said: “Whatever you call the boat, so it will float” (and it’s hard to argue with that).
Let's return from theory to the new product itself and begin our study with packaging. Typically, ASRock does not pack the most budget-friendly solutions into such “elegant” glossy boxes, and many have already become accustomed to this.
For me personally, as a person who buys everything online, packaging means nothing. I don’t see it in advance, so it’s difficult for me to judge the product based on it.
Here we are again faced with the fact that there is a beautiful wrapper on the outside, and an unremarkable cardboard box hiding inside. It is medium in size, suitable for a full-size ATX board. There are no handles because the box is not that big or heavy.
Oddly enough, but the design is related to metal. The background is stylized to resemble a metal surface. There is also some kind of stylized pattern in the corners. Again made of metal, but in a light shade. And there are two colored rainbow stripes.
The manufacturer's logo is located at the top center, and below is the name of the model, and even lower is the branding of the line. An inscribed letter S, but not in a pentagram, but in a rhombus or square (Superman and his fans are still not happy). Below is the Steel Legend inscription, for those who have not yet understood. At the very bottom, but above the colored stripe, we see a lot of different icons. They go in some kind of reverse order than usual. Maybe this is also some kind of message that everything has changed dramatically.
HDMI comes first. This tells us that the board has such a connector, and the image is output to it provided that an appropriate processor with integrated graphics is used. Next comes Polychrome Sync. It means that the board supports the technology of the same name for synchronizing with RGB strips and other peripherals that have RGB backlighting. Next we see the AMD Ryzen 2000 Desktop Ready insert. Perhaps someone else doesn’t know that the 400 series chipsets were timed to coincide with the release of Ryzen 2000. This is followed by the AMD Ryzen, AMD Athlon logos, mention of AMD AM4 and the AMD B450 chipset.
Let's see what's on the other side.
Strangely enough, most of it is occupied by the description of ASRock Polychrome Sync technology. We are already very familiar with it; Perhaps something has changed or the manufacturer is focusing on appearance? On the right side there is a small image of the board itself. Below it is a schematic representation of the rear panel connectors and specifications.
To the left there are four inserts. They describe other technical solutions. It all starts with the mention of M.2 Armor. This is an aluminum plate that covers the M.2 drive, protects it and dissipates heat. Next we are told about the use of 12K capacitors from Nichicon and talk about premium 60A inductors. Then they report the power of the USB ports.
At the very bottom there are two more small stripes. One of them reports the presence of a USB 3.1 interface, and the other reports a thick layer of copper in the metallization layers of the motherboard.
On one side of the box there is a sticker with serial numbers and some characteristics of the new model.
It's time to find out what's inside the package. There is a black cardboard box hidden there.
It is unremarkable except for the light company logo on a black background at the top. Let's take a look inside.
At the top, as usual, is the delivery kit. It is not that big, so the box itself is quite compact. There is a cardboard divider installed under it, and at the very bottom the board is in an antistatic bag.
Among the information media you can find the following:
- Quick Installation Guide (user guide);
- Software Setup Guide;
- Installing Memory Modules leaflet;
- ASRock Steel Legend Card;
- DVD with drivers and software for various operating systems;
- Body sticker.
These are the accessories included in the package.
- Two SATA 6 Gb/s cables;
- Two screws and one mounting sleeve for M.2 drives;
- Plug for the rear panel;
There are not many accessories, but this is now almost everywhere, even on more expensive models.
Board design and features
The motherboard is packaged in an antistatic bag and lies on a polyethylene foam backing. This is additional protection against mechanical influences. Fastening to the substrate is carried out with small black ties in the corners.
We have before us a model of the ATX form factor, the dimensions of which do not differ from the classic ones for this format: 305 x 244 mm.
Externally, the board looks very interesting and is clearly more expensive than it costs. It is distinguished by characteristic prints on the surface, which echo the design of the packaging. There's also a nice plastic shroud over the rear panel connectors and some heatsinks. Everything looks harmonious.
The model is well made, although not without the usual flaws. It’s difficult to say why, but the manufacturer is unable to solder the inductors evenly. There are also advantages. There are no ends from the coils on the back side, apparently they are simply soldered at the front. And the board itself is quite rigid. It doesn’t flex or crunch anything, apparently this has something to do with the thick layers of metallization reported by the manufacturer.
There are practically no elements on the reverse side, there are no beautiful prints.
Power is supplied to the motherboard through the main and additional ATX connectors according to the 24+8 scheme.
This is a common pattern for this platform. Only on very budget models can you find 24+4.
There are four black slots for DDR4 memory modules. To activate dual-channel mode, you need to install two brackets one slot apart from each other.
It is recommended to fill in starting from the right edge of the board or further from the socket. It is to indicate the sequence that the manufacturer provides a special leaflet in the kit.
The manufacturer claims support for DDR4 2133, 2400 (2666, 2800, 3000, 3200, 3300, 3333, 3400, 3533+ (overclocking)) MHz operating modes with a standard voltage of 1.2 V, which can be increased. Many memory modules operate at 1.35 V when overclocked.
The maximum allowable capacity of 64 GB is achieved by installing four 16 GB modules. Looking ahead, I will say that the modules on this board did not reach a frequency of 3600 MHz, although this was possible on other models. Either the memory layout is not entirely successful, or I was unlucky.
The processor is powered using a six-phase circuit, 4+2. And it's not a joke. It’s clear that nothing is doubled here, but...
By the way, during the transition from AMD B350 to B450, many manufacturers began to improve the power subsystem. It became clear that 2000 series processors consume no less, if only by increasing the clock frequency. In addition, there must be some kind of power reserve.
The manufacturer tried to strengthen the upper two phases and placed four Low Rds(on) transistors on each, and three on the side ones. Well-known NIKO Semiconductor microcircuits labeled PK618BA and PZ0903BK are used.
These transistors are soldered even on devices with Intel Z390. This means that they have proven themselves well and are fulfilling the warranty period.
The inductors are super ferrite, one per phase. Apparently, the manufacturer also strengthened this place because in the specifications he reports that they hold 60 A. Nichicon 12K solid-state capsule capacitors are all soldered right next to each other.
As the main PWM controller, you can find a microcircuit labeled uPI Semiconductor uP9505P. It is used in many places, including on video cards. The specifications talk about 4+2 phases and everything fits here.
It is not yet entirely clear who this board is intended for, but, apparently, not for overclocking - there are few power phases. As a result, the transistors will get very hot. The manufacturer took this point into account, so two large radiators remove heat from them.
However, the user should not forget that when using a tower-type processor cooler, they will not be blown through by anything. This will need to be taken into account because these radiators can burn your fingers under load.
There is also a decorative casing above the rear panel connectors.
It is made of black plastic and painted gray-silver on top. There is also the inscription “Steel Legend”. There is also a slot through which a module with RGB LEDs can be seen. It is connected to the board with a cable through a special connector.
The casing itself is secured to the back of the board with three screws. After dismantling the casing, it is more convenient to remove the side radiator.
Both radiators are made of aluminum alloy and covered with something on top. It feels like ceramic coating. The surface is matte and rough. Although I could be wrong and this is just such processing. A bright yellow thermal rubber band is used as a thermal interface. Each radiator is secured with two screws on the reverse side. Thanks to this, they do not dangle and stand very firmly, further strengthening the space around the socket.
The side radiator is slightly larger than the top one, but this is little consolation. Under load with mild overclocking, it heats up to 85 degrees, which means the transistors themselves are even hotter. It's a bit much, but it was predictable. I would advise immediately during assembly to install at least some kind of fan for airflow.
Another heatsink is located on the chipset.
It is also made of aluminum alloy and is quite large and chunky. The coverage is similar to the top ones. The only difference is a small decorative frame on top with imitation metal, screws and the ASRock inscription. Through the slot you can see another one - Steel Legend.
All this looks good, but it is implausible. Well, I don’t believe that for the design it was impossible to use such a small fragment of real steel and tighten three real screws. A square of black thermal rubber is used as a thermal interface. It's funny, but it is smaller than the chipset itself, which is comparable in width to the protrusion on the back of the radiator. The fastening is again on the reverse side and rigid.
Under the heatsink is the AMD B450 chipset.
34th week of 18th year. We have already studied all the characteristics of this chipset inside and out, but in essence it is not much different from its predecessor. For example, it supports four SATA 3 ports, but there are as many as six of them on the board, like on the older AMD X470. All six are placed sideways, but, in my opinion, it is irrational and inconvenient.
The manufacturer decided to expand the functionality and therefore equipped the device with an additional SATA controller. Here its function is performed by a chip that we have all known for a long time, ASMedia ASM1061.
Along the perimeter of the chipset heatsink installation, several RGB LEDs are soldered on the board itself.
Above the SATA ports there is a block of USB 3.0 ports. It provides operation of two devices.
In the lower right corner there are connectors for connecting buttons and indicators of the case, as well as a speakerphone. There are also a couple of fan connectors here.
We can also find a jumper here to reset the BIOS settings, which is called ClrCMOS. There is also a connector for synchronizing the backlight lamps.
Further along the bottom edge there are two USB 2.0 ports. We can connect four more devices to them. Above, the space for installing an M.2 drive is clearly visible. Of course there is a corresponding connector. It’s with this M.2 port that things are not so simple. The fact is that, according to the instructions, it can operate in SATA mode or PCI-e Gen3 x2 mode. Accordingly, either it or two SATA 3 ports on the board work.
We move further along the bottom edge and see the COM port connector.
Next we have a connector for connecting RGB backlight strips. Next to it is a connector for installing a TPM module.
In the very corner you can see the connector for connecting the front audio panel of the case. Special musical capacitors are visible nearby.
Another well-known Realtek ALC892 chip is used here as an audio codec.
Yes, these are still the same eight channels, but the codec is already a bit old. Of course, the audio part is separated from the rest of the board by a strip with missing metallization layers. There are simply no LEDs that would illuminate it.
Above on the left edge is the Nuvoton NCT6779D input/output controller and system monitoring chip.
Even higher is the Realtek RTL8111H gigabit network adapter chip. But this is an unpleasant situation. Go back to the packaging and look at the very bottom of the back for the Intel Gigabit Ethernet icon.
On this board we see six expansion slots. Two PCI-e x16 and four PCI-e x1.
A true PCI-e x16 slot, which receives all of its PCI-e Gen3 lanes directly from the processor, is immediately visible. It stands out with its steel frame. Four PCI-e x1 Gen2 are provided by the chipset.
The remaining PCI-e x16 can only operate in PCI-e x4 Gen3 mode and shares its lines with the port for the M.2 drive, which is soldered above. Therefore, there is no SLI support, and either this PCI-e x16 slot or an M.2 drive can work. By the way, there are two such connectors, but this is the only one, which is called Ultra M.2 because it can operate in PCI-e x4 Gen3 mode.
The connector is covered with a special plate, which serves as protection and heat sink. It is also made of aluminum alloy and is styled like other radiators.
It has the inscription M.2 Armor on it. It is attached directly from the top using two screws. There is a thermal rubber band that is sealed with film.
Another connector for connecting RGB backlight lamps is located in the upper right corner.
Here we see two more connectors for fans. The following interfaces are located on the rear panel.
- One PS/2 connector for mouse or keyboard
- Two USB 2.0 connectors;
- Four USB 3.0 connectors;
- Two USB 3.1 connectors (one Type-C);
- One HDMI 2.0 video output;
- One Display Port video output;
- One gigabit RJ-45 network connector;
- Five minijack audio connectors;
- One optical audio output.
After the review, I couldn’t shake the feeling that somewhere I had already encountered all this (with exactly the same functionality). This is practically a clone of ASRock Fatal1ty B450 Gaming K4.
Specifications of ASRock B450 Steel Legend
| Supported processors | AMD Ryzen first and second generation, AMD Ryzen with Vega graphics, AMD Athlon X4 (full list of supported CPUs can be found on the model page) |
| System bus, frequency | PCI-e 3.0 x4 |
| System logic | AMD B450 |
| Supported RAM | 4 x 288-pin DDR4 DIMM, dual channel, up to 64 GB @ 2133 (2400 / 2666 / 2800 / 3000 / 3200 / 3300 / 3333 / 3400 / 3533+ (overclocked)) MHz |
| Expansion slots | 1 x PCI-e x16 Gen3; 1 x PCI-e x16 Gen3 (x4); 4 x PCI-e x1 Gen2 |
| Multi-GPU support | CrossFireX |
| SATA/RAID support | 4 x SATA 6.0 Gb/s ports – AMD B450; RAID 0, 1, 5, 0+1, JBOD; 2 x SATA 6.0 Gbit/s ports – ASMedia ASM1061; 1 x M.2 port – 1x PCI-e x4 Gen3; 1 x M.2 port – 1x PCI-e x2 Gen3 or SATA3 (there are restrictions depending on the processor model, more details on the website) |
| M.2 SATA/PCI-e support | Yes Yes |
| Net | 1 x Realtek RTL8111H |
| Audio | Realtek ALC892– 8-channel HD audio codec |
| USB 2.0 | 2 + 4 x USB 2.0 (AMD B450) |
| USB 3.0 | 4 + 2 x USB 3.0 (AMD B450) |
| USB 3.1 | 2 x USB 3.1 (AMD B450) |
| System monitoring | Nuvoton NCT6779D |
| Motherboard power | ATX 24-pin, 8pin ATX 12V |
| Rear Panel Connectors and Buttons | 1 x PS/2; 2 x USB 2.0; 2 x USB 3.1 (1x Type-C); 4 x USB 3.0; 1 x RJ45; 1 x HDMI; 1 x DP; 5 x 3.5 mm Jack; 1 x Optical out |
| Proprietary technologies |
|
| Dimensions, mm | 305 x 244 |
| Form factor | ATX. |
BIOS Features
The shell is absolutely the same as on many ASRock models, only the external design is different, which is different for each product line. Typically, this BIOS shell is beautiful, convenient and functional.
But the new motherboard looks somewhat simplified, since there is no EZ Mode, although the most necessary things are there, and most importantly, everything works well. Overclocking both RAM and processor is not very difficult. All this is done in one section.
When you start surfing the menu, you realize that there are a huge number of items. There are so many transitions here that you will get lost. And after studying the shell, you fully realize that you can configure anything.
Despite the fact that you can get lost in the menu, all the main and important items are on the surface. Everything is easy, simple and accessible. It’s a pity that the company still hasn’t bothered to provide a hint about the changes made before saving and exiting.
Test bench
The ASRock B450 Steel Legend motherboard was tested with the following configuration:
- Processor: AMD Ryzen 5 2600X (3600 MHz);
- Cooler: Noctua NH-D14;
- Thermal interface: Noctua NT-H1;
- Motherboard: ASRock B450 Steel Legend, BIOS version 2.00;
- Memory: 2 x 8 GB DDR4 4133, A-DATA XPG Spectrix D80 (Samsung B-die);
- Video card: NVIDIA GeForce GTX 1080 Ti 11 GB (1481 / 1582 / 11008 MHz (core/boost/memory));
- SSD storage: Samsung 970 Evo 250 GB;
- Power supply: AeroCool Hero 775, 775 Watt.
Board testing and overclocking
We start by assembling the system, with which there were no difficulties. Despite the high RAM heatsinks, its modules easily fit under the Noctua NH-D14 cooler. The video card was at a sufficient distance from it (about 2 cm) and also did not interfere.
Indicating the operation of the motherboard is simple - RGB lighting helps. ASRock has modified it a little by adding a rainbow effect.
Another LED module is installed in the housing, which is located above the rear panel connectors.
The effects are absolutely the same. It must be admitted that at this stage, ASRock’s implementation of RGB backlighting has stepped far forward. It's not so much the rainbow effect that has appeared, but better synchronization (for example, with memory modules). Everything began to work no worse than that of ASUS motherboards.
Let's move on to testing. First, traditionally, we start the motherboard in normal mode. Initially, BIOS version 1.00 was installed on it.
After checking on the manufacturer’s website, it turned out that a new modification 2.00 is already available. And in it the AGESA version changed from 1.0.0.6 to 0.0.7.2.
Now we need to check all this in operation, for which we will use the LinX AMD Edition package.
The side radiator warms up to 70°C under load, which is a lot.
It's time to move on to acceleration. We enter the BIOS on the OC Tweaker page, select manual mode, set the multiplier to 42.5, voltage 1.3750 V. It is worth clarifying that the memory modules used are intended for the Intel platform, and they will not run here at 4133 MHz even if they wanted to. Therefore, we set it manually to 3400 MHz.
However, in order to consistently pass all tests, the memory frequency was subsequently reduced to 3200 MHz. Let's launch LinX again. As expected, the temperatures of the transistor radiators in the most severe mode reached a maximum of 80°C, or rather it was the side radiator.
It is clear that the new product is poorly designed for overclocking, and perhaps it is worth abandoning it. The memory needs to be driven as far as DDR4 modules allow, and the processor needs to be driven at a maximum boost frequency for all cores. And even in this case, the power system gets quite hot.
Performance and thermal conditions
The ASRock B450 Steel Legend was tested on an open bench at room temperature 22°C in the following modes:
- ASRock B450 Steel Legend, AMD Ryzen 5 2600X (3400 MHz), memory 2666 MHz, timings 20-19-19-43-1T, NVIDIA GeForce GTX 1080 Ti 11 GB;
- ASRock B450 Steel Legend, AMD Ryzen 5 2600X @ 4250 MHz (42.5 x 100), memory 3200 MHz, timings 16-16-16-36-1T, NVIDIA GeForce GTX 1080 Ti 11 GB.
The tests were carried out under the operating system Windows 10 x64 version 1809, ran five times, then average values were selected.
PCMark 10
Overall, Marks Enable JavaScript to see graphs Essentials, Marks
Enable JavaScript to see graphs
Productivity, Marks
Enable JavaScript to see graphs
Digital Content Creation, Marks
Enable JavaScript to see graphs
Gaming, Marks
Enable JavaScript to see graphs
Cinebench R10
1CPU, Marks Enable JavaScript to see graphs xCPU, Marks
Enable JavaScript to see graphs
Cinebench R11.5
OpenGL, FPS Enable JavaScript to see CPU, FPS graphs
Enable JavaScript to see graphs
Cinebench R15
OpenGL, FPS Enable JavaScript to see CPU graphs, cb
Enable JavaScript to see graphs
SVPmark 3.0.3a
Synthetic CPU, MC Enable JavaScript to see graphs Synthetic CPU, FC
Enable JavaScript to see graphs
AIDA64 5.97 Cache & Memory Benchmark
Memory read, MB/s Enable JavaScript to see graphs Memory write, MB/s
Enable JavaScript to see graphs
Memory copy, MB/s
Enable JavaScript to see graphs
Memory latency, ns
Enable JavaScript to see graphs
Fritz Chess Benchmark
kNodes Enable JavaScript to see graphs
Super PI
1M, seconds Enable JavaScript to see graphs 8M, seconds
Enable JavaScript to see graphs
wPrime v2.09
32M, seconds Enable JavaScript to see graphs 1024M, seconds
Enable JavaScript to see graphs
7-Zip v18.06 (x64) 32MB
Packaging, final rating, MIPS Enable JavaScript to see graphs Unpacking, final rating, MIPS
Enable JavaScript to see graphs
Overall rating, MIPS
Enable JavaScript to see graphs
Winrar 5.60
KB/s Enable JavaScript to see graphs
3D Mark (Fire Strike)
Marks Enable JavaScript to see graphs
3D Mark (Sky Diver)
Marks Enable JavaScript to see graphs
SPECviewperf 13
3dsmax-06, fps Enable JavaScript to see graphs catia-05, fps
Enable JavaScript to see graphs
creo-02, fps
Enable JavaScript to see graphs
energy-02, fps
Enable JavaScript to see graphs
maya-05, fps
Enable JavaScript to see graphs
medical-02, fps
Enable JavaScript to see graphs
showcase-02, fps
Enable JavaScript to see graphs
snx-03, fps
Enable JavaScript to see graphs
sw-04, fps
Enable JavaScript to see graphs
Crystal Disk Mark 6.0.2
M.2
Let's now look at the temperature of the radiators.
Temperature of the upper transistors
Simple | Load, °C Enable JavaScript to see graphs
Temperature of the side radiator of transistors
Simple | Load, °C Enable JavaScript to see graphs
Chipset heatsink temperature
Simple | Load, °C Enable JavaScript to see graphs
Built-in sound
The audio codec is represented by the Realtek ALC892 chip. Listening was carried out using Sennheiser HD569 headphones and Creative GigaWorks T20 SeriesII acoustics.
The sound quality does not cause any serious complaints. I also tested the built-in audio using RMAA and got the following results.
16 bit, 44.1 kHz
24 bit, 192 kHz
Conclusion
Here we encountered a situation similar to that in the review of the ASRock B365 Phantom Gaming motherboard. Precisely similar, and not exactly the same, because this board still has overclocking. In short: it looks cool, but it doesn’t live up to the tops. And it’s difficult to make claims here; I myself recently saw a video on Youtube in which guys put a Porsche or Lamborghini frame on something like a “classic gigue”. Interesting content, and probably there should be something like this too. I am sure that part of the audience will be attracted by the design, and not the content.
Here too, in the case of the ASRock B450 Steel Legend, there are zero complaints about the design, packaging and appearance of the model itself. Everything looks very nice and advanced. The quality of printing, board manufacturing - everything is at a high level. They even worked on the RGB backlight, adding a rainbow effect, and in general moved to a different level of synchronization with Polychrome Sync (apparently, someone at ASRock reads my articles and listens). The result was such a light, non-aggressive “military” style, without pathos or excesses. Nice, laconic, beautiful and with some idea that... was not fully developed. “The Steel Legend” sounds cool, but in fact it’s just the beginning.
Where is the extended warranty like on ASUS Sabertooth? It is not and will not be, and ASUS itself has moved away from this, releasing a simple TUF in the same format. Perhaps at least the power subsystem is cool? Past again. Even the inexpensive ASRock B450-HDV has 4+3 phases, but here it’s 4+2! And again, the comparison with the ASRock B450-HDV is not for the better - memory overclocking is worse, an old audio codec is installed.
And a lot will depend on the price of the new motherboard. ASRock B450 Steel Legend is suitable for those for whom appearance is important, but for serious overclocking you can look for something else.
Andrey Ponkratov
aka
wildchaser
We express our gratitude to:
- ASRock for providing the ASRock B450 Steel Legend motherboard for testing.