Windows operating systems
26.07.20193457
The ability to disable hibernation in Windows 7, remove hibernation data, and adjust the page file size is undeniably important and great. But having mastered seemingly all the functions of the OS, the user may one day encounter a new problem - the system does not turn on for a long time, including after a reboot. What to do if a computer or laptop on Windows 7 does not start - let’s try to figure it out.
Hardware problems
A typical situation: the user not only fails to load Windows 7, but also cannot start the computer. If the power button does not work, the screen remains black throughout the boot, or the characteristic sound of the hard drive is not heard, it’s time to do hardware diagnostics. You can do this yourself, focusing on visible signs, or better yet, take your PC to a service center.
Important: until hardware problems are fixed, you will not be able to understand why you cannot start your computer on Windows 7. Even if the user manages to solve one problem using one or another means, it is possible that new ones will arise related to the improper functioning of the equipment - and so on ad infinitum.
Download steps
First, let's try to understand exactly how the OS loads on a computer. This way the user can find out at what stage the problems occurred. This will definitely help in the future.
Today, Windows boots up in 3 stages. Namely:
- OSLoader. The stage that begins with starting the BIOS. That is, immediately after turning on the computer. First, the BIOS code is executed, then the main drivers are connected. They are needed to read data from the hard drive. After this, the Windows kernel is connected, as well as the registry branch.
- MainPathBoot. Largest loading step. It connects all the necessary components and drivers to the operating system. Settings, options, some applications and all built-in services are loaded during MainPathBoot. This stage is displayed on the screen as a blue background with “Windows 7” written on it.
- PostBoot. Activated when loading the desktop. This stage completes the download of Windows 7 and connects the remaining applications and programs.
That's all. In fact, everything is not as difficult to understand as it seems. However, you will have to figure out what to do if Windows 7 does not boot. Problems are usually detected at the MainPathBoot stage. But they also happen with PostBoot. At the OSLoader stage, errors with loading the operating system almost never occur. This step only takes a few seconds.
Incorrect boot priority setting
A user who tried to clear RAM or restore “bad” sectors of a hard drive at the pre-boot stage probably used a special image recorded on an optical disk or flash drive for this purpose. To run Windows 7 from removable media, you most often need to change the priority in the BIOS; if the owner of a computer or laptop did it with his own hands, he can easily return everything “as it was.”
However, some software products, which are completely harmless in themselves, set the priority on their own, and after removing the media, they “forget” to return the original parameters. In this case, Windows 7 does not load precisely because of the lack of primary media; You can fix the problem without any diagnostic tools, just by getting into the basic I/O system.
Doing this is no more difficult than understanding why Windows 7 won’t install; the user needs:
- Turn off the computer, start it again and use the appropriate key or key combination (they vary depending on the manufacturer and model) to enter the BIOS. Go to the Boot section - you will have to use only the keyboard: commands sent by the mouse are not recognized by most BIOS firmware.
- Open the Hard Disk Drives subsection.
- And get acquainted with the list and order of hard drives installed on a computer running Windows 7. The first in order should be the one on which the owner installed the system; You can identify it by its name, which includes the serial number and, if you're lucky, the name of the manufacturer.
- If the order is broken, select the 1st Drive partition and in the window that appears below, select the hard drive with Windows 7 boot files as the first device. This is done using the “Up” and “Down” arrows and the Enter key; clicking the mouse, as already mentioned, is futile.
- Make sure that the hard drives are now in the correct order and press the Escape (Esc) key.
- Open the Boot Device Priority subsection.
- And see how the media from which the computer or laptop boots is located here. If the first, second, or even third place is not the just selected hard drive, Windows 7 does not start for this very reason.
- To fix the problem, the user needs to select the 1st Boot Device item, press Enter and select the hard drive with Windows 7 files as the first boot device in a similar window.
- For greater reliability, it is recommended to disable all other media by setting the Disabled parameter for them.
- Exit the subsection using the Escape key and go to the Exit section.
- Select the Exit & Save Changes option.
- By confirming the action, the user will cause the computer to automatically restart - and will be able to check whether Windows 7 can now start.
Blue Screen of Death: Driver IRQL not less or equal
Windows critical error messages, which are called “blue screens of death” (BSOD, Blue Screen of Death) because of the background color, are quite common problems not only in Windows 7 but also in Windows 10 (especially due to installing the wrong update). Moreover, in the top ten this screen can be green or red. The cause of a critical error may be malfunctioning hardware, for example, RAM or the absence of some system files.
Most often, early boot BSOD messages appear after updating device drivers and contain the text “DRIVER_IRQL_NOT_LESS_OR_EQUAL” along with a file name with the SYS extension. To remove the problematic driver in Device Manager, you can try starting Windows in safe mode, because it uses only a minimal set of drivers. To do this, press the F8 key while loading the OS and select “Safe Mode.”
If you still get the blue screen of death when you boot into safe mode, you need to revert to a previous version of the driver that didn't have any problems. This can be done using a restore point, if one has been created previously.
In Windows 7, to do this, press the F8 key while the OS is loading and select “Troubleshoot computer problems” in the menu that appears. After which we find ourselves in exactly the same “Recovery Options” menu as when using the Windows installation disk.
This time we are interested in the “System Restore” item, where you can select one of the available restore points.
System error
Boot data necessary for the successful launch of Windows 7 can be damaged for a variety of reasons - from careless user actions to the incorrect operation of a program that has access to hidden sections of the operating system. It is theoretically possible to identify exactly what error is causing Windows 7 to not start using diagnostic tools, but the list of recovery methods is very limited - which means it will be easier to immediately begin fixing the problem.
The easiest way to do this is to use removable media or a flash drive with a recorded image of Windows 7. The second one can be original or not - the main thing is that you can access the “System Restore” option from it.
To fix a problem due to which Windows 7 does not load on a computer or laptop, the user will have to:
- Insert the disk into the drive or flash drive into a USB connector, restart the PC and, in response to the system prompting you to start from the removable media, press any key on the keyboard. To do this, you may need to adjust the boot data priority again - how to do this is described in the previous section of our material.
- Wait until the installation files are unpacked onto your hard drive.
- Go through two standard steps familiar to the user who installed Windows 7 himself: selecting the interface language.
- Data format and keyboard input method.
- On the new page, click on the “System Restore” button located at the bottom left.
- Wait until the diagnostic tool collects information about the OS installed on your computer or laptop.
- And select the required one, that is, Windows 7, and then click on the “Next” button.
- Click on the “Startup Recovery” link.
- The utility will begin searching for problems.
- Upon completion, the user will be prompted to either fix the faults found, as a result of which Windows 7 does not start normally, or read the notification that no problems were found. In the second case, all that remains is to close the utility window and start looking for other ways to correct the situation.
Using a bootable USB flash drive
If you don’t have a boot drive for Windows 7, you can create one yourself using an empty flash drive/DVD and instructions from our website.
So, to launch the bootable media menu, the skill of working with BIOS, acquired in the previous section of the instructions, will be useful. Press the menu start key again (it may differ depending on the model and firmware) when the computer starts, and go through the steps to set the priority. Only this time the connected flash drive is put in first place.
Restart your computer to launch the Windows 7 installer. After that, follow the instructions:
- At the language setting stage, click “Next”.
- Click on the “System Restore” button.
- After this, the “System Recovery Options” window will appear, which is similar to that described at the beginning of the article.
Use this option in situations where Windows has completely crashed (the recovery environment does not even open).
If the user has changed the boot priority to an external drive, then the next time he starts he needs to either remove it or put the hard drive in first place again.
MBR partitioning failure
Theoretically, the method just described to resolve the error that Windows 7 does not start should solve this problem; in practice, everything is more complicated - and if you were unable to restore the system using a standard utility, you will have to try working with the markup on the command line. This is done as follows:
- Having called the “System Restore” option again, the user selects the “Command Prompt” item by clicking the mouse.
- Next, enter the bootrec command in the window that appears. exe / fixmbr and apply it by pressing Enter.
- As soon as a message appears indicating the command completed successfully.
- Enter and apply the following - bootrec. exe/ fixboot .
- And wait until it is processed.
- Great! Now the owner of a computer or laptop that does not start Windows 7 should reboot the machine using the wpeutil reboot and check how successfully the problem is resolved.
I encountered a problem: Windows 7 64bit stopped loading after installing the update. I already solved the problem, but I decided to post my struggles on the forum. I think this might be useful to other users. I have experience communicating with a computer, but in this case I encountered something new (that’s why I decided to tell you).
1. History:
Windows 7 64bit was installed (one HDD [2 logical drives], one OS). After installation, Win7 downloaded updates and periodically rebooted. After one of the reboots, it refused to start (after the page with the assembled Windows icon, the backup recovery menu loaded with 2 options: normal boot and system restore).
2. Unusualities:
- Some update files (more precisely, some folders with HEX names - I can’t be sure that they are related to updates) were for some reason saved to the root of the external hard drive (I worked with it while the system was pumping updates for itself). The OS did not allow me to delete or even open them, even as an administrator. At the same time, at least once after one of the reboots I noticed that these folders were deleted on their own (as if Windows 7 decided to use the EHDD as external memory).
- I also note that the last time (before the crash) I disabled EHDD before rebooting (i.e. the last update setup took place without EHDD, and all others - with it).
- While still trying to solve the problem, I noticed that the system sees itself on the D:\ drive (this is the second of two logical drives; although I installed the system on C:\)
So far I have not been able to logically link these facts with the collapse of the system (but it seems to me that it is involved in this).
3. Solution:
1. Delete the file “oem-drv64.sys” from the “C:\Windows\system32\DRIVERS” folder (I recommend saving the file itself somewhere on an external drive, just in case) 1.1. Access to the list of disks (read: My Computer) can be obtained either through internal system recovery, or (if your Win7 does not offer this to you) through a system backup disk, which I made according to Microsoft instructions with another Win7 64bit (you can access the command line get it there) 1.2. All the points from the “Unusual” section did not affect the decision in any way 2. It is advisable to read the list of my attempts below - because your situation may be different from mine
4. What I tried:
1. Tried to reboot Win7 with and without the EHDD connected - to no avail
2. System recovery: 2.1. From the DVD from which I installed it, it swears: “This version of system recovery options is incompatible with the version of Windows being restored. Use a recovery disk for this version of Windows.” This is where I noticed that the system sees itself on the D:\ 2.2 drive. Several times Win7 offered me its recovery mode (without DVD): 2.2.1. Without result (wrote that it was unsuccessful and suggested sending a report) 2.2.2. However, below there was a button “Advanced recovery options”, there:
- “System Restore” - no result (the same thing: it was not possible to send a report)
- “Last Known Good Configuration” - no result (she swore that there was not a single backup copy - which is strange, updates usually always do them themselves)
- “Command line” - see point 3
2.3. Restoring from a system recovery disk (did according to Microsoft instructions with another Win7 64bit) 2.3.1. I deleted the file “oem-drv64.sys” (judging by the text of the error from step 3, the problem is in this file) 2.3.2. I was able to see that my OS actually mixed up (more precisely, shifted) the names of the disks (or maybe this is normal? - after all, now I’m not looking at the user’s “My Computer”, but through backup recovery):
- C:\ – this is the name of the disk with system data (which is allocated automatically when installing the OS, 100 MB, usually hidden)
- D:\ is the former C:\
- E:\ is the former D:\
3. Command line 3.1. I went through three commands (bootrec.exe /FixMbr; bootrec.exe /FixBoot; bootrec.exe /RebuildBcd). The first 2 were successful, the last one gave the answer: “Total number of detected Windows systems: 0” 3.2. I did this: https://forum.oszone.net/post-1569830-7.html (successfully; by the way, the OS was also detected on D:\) 3.3. After this, the system began to generate an error and stopped offering its recovery mode (without DVD). Error text:
Code:
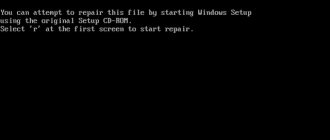
Windows failed to start. A recent hardware or software change might be the cause. To fix the problem: 1. Insert your windows installation disc and restart your computer 2. Choose your language settings and the click next 3. Click “repair your computer” If you do not have this disc, contact your system administrator or computer manufacturer for assistance. File: \Windows\system32\DRIVERS\oem-drv64.sys Status: 0xc0000428 Info: Windows cannot verify the digital signature of this file
The “Continue” button prompted me to select the OS (mine is Win7), then it offers modes:
- Safe (in all variants) – after some thought, it brings me back to the same error (“Windows failed to...”). The download process hangs on the “CI.dll” file (see attached screenshot - the quality is not very good, but readable)
- Last Known Good Configuration - Returns to the same error
- Normal loading also returns to the same error
- Disabling mandatory driver signature verification - it loads to the update settings screen, and even shows interest, but quickly crashes with BSOD (0x00000109), besides, each time the interest starts anew (after deleting the “oem-drv64.sys” file, this problem went away: all configured it and booted normally)
_____
Solution to the problem:
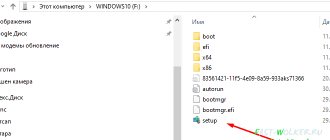
- Go to step 6 of the instructions, launch Command Line.
- In the console, write the following lines in order (yes, yes, all by hand):
Hidden textdel “%windir%\system32\drivers\oem-drv64.sys” del “%windir%\system32\xNtKrnl.exe” del “%windir%\system32\xOsLoad.exe” del “%windir%\System32\ru- RU\xOsLoad.exe.mui” del “%windir%\System32\en-US\xOsLoad.exe.mui” %windir%\system32\bcdedit.exe /set {current} path \Windows\system32\winload.exe % windir%\system32\bcdedit.exe /deletevalue {current} kernel %windir%\system32\bcdedit.exe /deletevalue {current} nointegritychecks %windir%\system32\bcdedit.exe /deletevalue {current} custom:26000027 reg delete HKLM\ SYSTEM\CurrentControlSet\services\oem-drv64 /va /f
- Reboot, then after rebooting in the system Start – Run – slmgr /rearm, reboot.
- Re-activate the system (illegally).
SOURCE: https://forum.oszone.net/thread-290169.html
___________________
+ from the Service Administrator
Boot from any resuscitator and completely delete the files and folders of the system loader, and then simply restore them (for example, in the 2K10 resuscitator through the utility - WinLoad)
6
Disclaimer: The author or publisher has not published this article for malicious purposes. All information posted was taken from open sources and is presented for informational purposes only and does not contain a call to action. Created for educational and entertainment purposes only. All information is aimed at protecting readers from illegal actions. The visitor assumes all possible damages caused. The author performs all actions only on his own equipment and on his own network. Don't repeat anything you read in real life. | Also, if you are the copyright holder of the material posted on the pages of the portal, please write to us via the contact form with a complaint about the deletion of a certain page, and also read the instructions for copyright holders of materials. Thanks for understanding.
Crash after system update
Automatic updating of Windows 7 is undoubtedly a useful feature, however, it can also lead to the system not booting or entering a loop at startup. The situation can be corrected if the creation of restore points is enabled on the machine; This option is activated by default and, if the user has not opted out of it, should work.
A user whose Windows 7 does not load should:
- In the already known “System Restore” menu, select the option of the same name.
- Click on the “Next” button.
- Select a restore point from the list.
- If there are too few available items or none of them suit the user, check the “Show other recovery points” checkbox, select the one you need and click “Next” again.
- Click "Done".
- Confirm the action using the “Yes” button.
- Wait while the utility collects data.
- And when the recovery is complete, click on the only button available in the window, “Reboot”.
- As a result, Windows 7 should start in normal mode - and without the latest updates that negatively affected the operation of the OS. On the desktop, the user will see a window with the same text as at the final stage of recovery - all that remains is to “Close” it and proceed with the usual manipulations.
Recovery Wizard
But the user will not always be able to use the automatic operating system recovery wizard. Sometimes you have to call him yourself. In addition, if Windows 7 does not boot, everyone has the right to use a set of OS recovery tools.
To launch the corresponding menu, you must:
- To restart a computer.
- At the PC boot stage, press “F8” several times.
- Select "Troubleshoot your computer."
- Enter the access password.
- Click on “Startup Repair”.
- After completing the operation, reboot the PC.
Using the menu called up, you can perform a system rollback. To do this, just select “System Restore”. There is nothing unclear or difficult about this.
Incorrectly configured programs
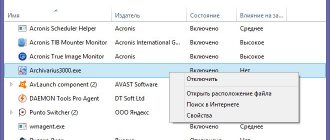
It is extremely rare, but Windows 7 may not boot due to installed applications - especially if they have access to the OS folder and/or Internet traffic control. For the most part, this applies to a variety of antiviruses, firewalls and “mixed” products; The most reasonable way to fix the situation is to uninstall the program and try to start Windows 7 in normal mode.
There are two ways to complete the task. If you can start Windows 7 in safe mode, the user only needs:
- Wait for the executable files to load.
- Open the Start menu and call Control Panel.
- Go to Programs and Features.
- Find the application due to which, in the user’s opinion, Windows 7 does not start in normal mode, and click on the “Delete” button.
- Now the owner of a computer or laptop on Windows 7 needs to go through the standard uninstallation procedure - and upon completion, reboot the OS and make sure that the problem is resolved.
- If the first option is not suitable, you must use any disk with a “live” operating system that runs directly from the media - usually such assemblies are called LiveCD. The main condition is that the image contains a file manager that allows you to access the hard drive with the installed program.
To remove it from the LiveCD, it is recommended:
- Start from a boot disk or flash drive and select a file manager in the start menu - in the example this is Total Commander.
- Confirm your selection and proceed to view the data.
- In the window that opens, switch to the hard drive with Windows 7 installed - it will be easiest to find it, focusing on the capacity.
- Open the directory containing program data - depending on the bit depth of the system and application.
- Select the folder in which the executable file is located and click on the “Delete” button or use the Delete (Del) key.
- Confirm your intention.
- And indicate that you want to delete all data, including hidden files and subdirectories.
- By restarting the computer, the user will make sure that the problem that prevents Windows 7 from starting has been resolved. Now it is strongly recommended to clean the system with any program to get rid of junk files and correct registry errors.
Unknown system error
Not all failures that prevent Windows 7 from loading are amenable to diagnosis and logical analysis. Any little thing can cause a computer or laptop to fail to work normally; and if none of the options listed above and below helped, you should try running the Last Known Good Configuration of the OS.
This is done literally in one step. The user, having rebooted the system and waited until the BIOS window flashes, quickly presses the F8 key (for a laptop - Fn + F8), after which he selects the “Last Known Good Configuration” option from the list of boot options and waits for Windows 7 to start.
- Now all that remains is to carry out the full range of measures to clean the OS of garbage and fix the registry - and enjoy the stable functioning of Windows 7.
"Disk boot failure" problem or message with the text "Insert system disk"
The startup error is caused by one of several reasons, the essence of which is the following: the computer is trying to find a boot entry on a disk that is not bootable. Factors that prevent Windows 7 from starting:
- The device from which the computer starts to boot is not the system drive - try disconnecting all flash drives, phone, camera, including external hard drives, and rebooting the system.
- Check the BIOS settings that determine the priority of boot devices - there is a high probability that the computer starts booting from a disk that is not the system one. Also look in the BIOS or through one of the special utilities to see if the hard drive on which Windows 7 is installed is detected.
- Reconnect the HDD to a different cable and power cable; perhaps the problem lies in the unreliability of the connection or damage to one of the cables, for example, due to its significant bend.
The list of reasons can easily include the absence of Windows 7 installed due to the fact that the disk with it was formatted due to the carelessness or inexperience of a novice user, and reinstalling it or restoring a deleted partition will help here.
If none of the options brings the desired result, try restoring the OS as described in the previous paragraph, and also make sure that the hard drive is working.
System registry crash
An error in the main storage of paths, links and parameters of Windows 7 quite rarely ends with the system not starting. However, this is also possible; To get rid of the problem you will need:
- Using the boot disk or flash drive, go again to the “System Restore” menu, select “Command Prompt”, enter and apply the command diskpart .
- Next is the list volume .
- Find the system hard drive in the list displayed on the screen (to do this, pay attention to the capacity and absence of a label, as well as the type of file system) and remember what letter it is designated by - with a very high degree of probability it will differ from the usual C.
- To exit DISKPART mode, enter and use the exit —or simply close and restart the Command Prompt.
- Next, sequentially use the commands B:, where B is the drive letter just found.
- cd\ windows\ system32\ config - allows you to go to the section where the current configuration data is stored.
- md backup - creates a folder for a backup.
- copy "." backup - copies data to the created directory.
- Wait until the utility copies the data and notifies the user that the process has completed successfully.
- Apply final commands: cd regback - allows you to go to the system registry backup storage.
- And copy "..." , always with a colon at the end - replaces the current version of the registry with the latest successful one.
Important: during the copying process, the user will need to confirm the replacement of files by selecting the ALL option. If a backup copy of the system registry has not been previously created, it will not be possible to restore the state - the system will notify you of the error at the stage of using the cd regback .
Cyclic reboot
Common problem: Windows 7 does not start as a result of incomplete installation of updates and the presence of uninstalled ones in the queue. You can get rid of the error by calling the command line in the “System Restore” menu again, and then:
- Select, as described above, the system drive letter, then enter and apply the command cd windows\winsxs .
- Use the second command: del pending.xml .
- After confirming the deletion of the queue file, the user can try to start Windows 7 again - the system should boot in normal mode.