What is an action in Adobe Photoshop?
Actions translated from English means “action”, “behaviour”. This translation poorly explains the essence of actions, but gives a hint: it means working with all the actions that you perform with the image.
The task of the action function is to save all stages of image processing in Photoshop’s memory in a given order, and then use the saved template for other work. As a result, we no longer waste time performing all processing stages one by one, but use a ready-made solution created according to all suitable parameters.
The word “Actions” itself is used in the English version of the program, but in the Russian version the tool will be called the “Operations” palette. But for many users, the Russian version of “action” has stuck, so be prepared for the fact that you will have to remember and use all three options. In the program itself, you will initially find several “generic” actions that are aimed at simplifying basic actions. At the bottom of the window you will find several functions for managing operations, including “Stop action”, “Record new”, “Play”, “Create folder”, “Create operation” and “Delete”. It is this bottom panel that will allow us to perform basic manipulations with actions.
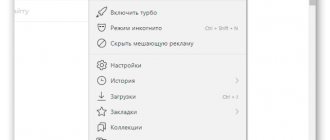
You can open the “Operations” palette by selecting “Window” - “Operations”. For those who like hotkeys, there is a simple combination Alt+F9.
Standard solution
How to install an action in Photoshop CS6? Let's start with the simplest layout. It is used by the majority of users. This is a normal tool initialization.
To do this you will need to perform the following manipulations:
- Find a ready-made action. This is a document in .atn format. It is in this interpretation that a person will be able to load the tool into the application.
- Open Photoshop.
- Go to the “Window” menu item. It is located at the top of the dialog box.
- Go to the "Operations" section.
- Click on the button responsible for expanding the functional menu of the toolkit. This is the control in the upper right corner of the Operations section.
- Click on the line that says “Load operations...”.
- Specify the path to the previously unpacked file with the action.
- Confirm the procedure.
After a few seconds, the tool will be loaded into the graphic editor. You don't need to do anything else. If you wish, you can restart Photoshop and start working with the action.
Important: To quickly go to the Operations menu, you can press the Alt + F9 key combination.
Using actions in Photoshop
Using Actions in Adobe Photoshop, we thereby record all the actions performed on the image in a specific order. This way we won’t have to repeat the same manipulation anymore, because now a template has appeared with the processing option that needs to be used for several pictures.
Logo actions are one of the most common ways to use this tool. When we need to add our corporate logo and text to a photo, we don’t need to create them from scratch every time, performing routine steps. We will record the sequence only once, and will always use it using one button: to do this, you need to click the record button and start creating an object. This could be creating a text layer and an inscription, applying the necessary layer styles and effects. Once all the steps to create a logo are completed, you can stop recording. Now the sequence is fixed in the “Operations” palette! All that remains is to open the next photo, click on the necessary actions and “Play”. As you can see, now you only need a few seconds to place a logo on a photo.
Photoshop is able to record every, even the most insignificant action, preserving the exact sequence and all settings. If there are operations that you plan to use on an ongoing basis, then you can attach them to hot keys - this will speed up the work even more. All you need to do is double-click on a specific action, thereby opening the “Operation Options” dialog box. With it, you can assign keys from the “Function Key” list. Immediately select the second key that will create the combination.
If you are a photographer or just someone who likes to take a lot of shots, then this function will give you an amazing opportunity to process all the shots at once in the same style in the shortest possible time. For example, you can resize or crop several photos at once. Meet the Batch function. To run it, use the path “File” - “Automation” - “Batch Processing”. All you need is to specify the folder in which the desired images are collected, as well as the folder in which all edited options will be collected. Here we indicate the necessary action that we want to apply to the pictures. And that’s it – processing happens by itself, your participation is no longer required.
Preparation
The first stage is preparation. The thing is that if we are talking about an installed action, then you will have to implement some actions. Actions performed directly on the image during operation do not require any loading. They are initially displayed in the corresponding window.
How to install an action in Photoshop? To do this, you will have to download the tool. You can easily find suitable actions on the World Wide Web.
Preparing for installation is sometimes described in the form of short instructions. Namely:
- Find suitable “actions” for Photoshop. It is important to maintain compatibility with one or another version of Photoshop.
- Download the document to your computer. Typically the downloaded file is saved as an archive.
- Unpack (if necessary) the action into a convenient place. The document, ready for further work, is in .ATN format.
Everything is ready for further action! How to install actions in Photoshop CS6? Just a few simple steps and it's done! Even a beginner can cope with the tasks.
Create an action in Photoshop
Let's return to placing a logo in a photograph and use its example to look at how to create an action in Adobe Photoshop. The first thing to do is create a new actions folder in the Actions palette. Give it a memorable name to make it easier to find in the window later. You can skip this step if the folder has already been created (some use the standard “Default Operations”). Let the desired logo be created in advance in a graphic file format. Don't forget about a transparent layer that will neatly fit the object into the image.
In order to start recording your actions, click on “Create a new script”: this will open a window in which you can specify the name of the operation, select a hotkey and color. The latter is needed to quickly determine the required operation. Now you can start performing actions in a strictly observed order - they have already begun to be recorded in our new action. In order to understand whether recording has started, just look at the “Operations” palette: at the bottom of the window the red button should be lit, which indicates activity.
Now select the required image and open the object (that is, the logo) in Photoshop: “File” - “Place”. Place the object where you want the image and adjust the size of the logo using the handles on the corners. If necessary, you can add a little transparency: in the settings of the layer with the logo, set the desired percentage in “Transparency”. Now it’s time to merge the layers together: click on the layer and select “Merge” from the pop-up menu. All you have to do is select a folder to save the object and click “Stop”. “Done”, your personal Action is ready to be applied to other photos as quickly as possible.
It is worth noting that any of the stages of creating an action can be disabled: at this moment it will stop, and the program will wait for your next action.
Keep in mind that sometimes you may end up with a photograph that is not the right size for your subject, and the result will be awkward. This is due to the fact that actions are only able to strictly adhere to the actions that you assigned to them, and at the same time are not at all able to adapt to other conditions.
Download instructions
Let’s assume that the user’s prepared Actions are stored on the “Desktop” of the computer. How to install an action in Photoshop?
Some actions will help bring your idea to life. It is recommended to pay attention to the fact that the names of the folders change depending on the version of Windows. But the general meaning remains the same.
To install actions in Photoshop, you need:
- Copy all documents in .ATN format to the clipboard. You can use the Cut command.
- Find a suitable folder for downloading actions. English-language versions of the program allow you to move previously copied documents to the address: C:\Program Files\Adobe\Adobe Photoshop\Presets. For Russian-language Photoshop, you will have to go to: C:\Program Files\Adobe\Photoshop\Presets.
- Find and open the Actions folder. In Russian versions it is called “Photoshop Operations”.
- Paste the previously copied Actions into the mentioned folders. You can simply drag them with the cursor from the desktop to the specified addresses.
This is where the main actions end. How to install an action in Photoshop? It is such an algorithm that helps bring the idea to life. But often work with the tool does not end at this stage. There are a few more simple steps you need to take.
How to install the action?
The number of actions that you can install in your Photoshop is countless. Some professional designers and retouchers sell them on their websites, while others give them away for free to everyone. There are even pirated copies of those action games that are not so easy to get at an adequate price. It doesn’t matter how you got this or that template - it’s time to learn how to install them in the program.
Let's look at the only and very simple way to install an action in Photoshop - using the “Operations” palette. Open it using “Window” - “Operations” or the key combination Alt+F9. In the palette menu you will find a “Load Actions” button: click on it and open an Explorer dialog box, which will ask you to select the location where the saved action is stored. By the way, its format must be strictly ATN, otherwise nothing will work. Now click the “Download” button and enjoy the result - immediately after downloading the template is ready for use!
Useful commands in the Actions palette
There are a number of keys in the window that we haven’t talked about yet, but the help of which will be indispensable for any Adobe Photoshop fan:
- “Clear” allows you to remove all Actions from the palette, leaving it empty;
- “Restore” will help return the “Operations” palette to its original state, leaving only the generic “Default Operations” folder;
- “Replace” resembles the “Load” key in its function: the only difference is that this command will delete all previous templates, leaving only the loaded ones;
- “Save” will help you save the new result when you make any changes to the palette.
How to make your own action?
Here's how to record an action in Photoshop:
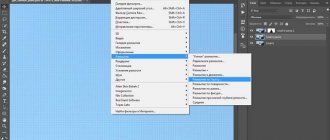
- Open the Actions panel.
- Click on the button with horizontal stripes. She's on the top right. The operation menu appears.
- Click on “New Action”.
- In the “Name” field, write the name of the future action.
- In the Set list, select which directory the action should be in.
- To create your own section, select “New Set” in advance in the operations menu.
- You can set keyboard shortcuts to call this function.
- When everything is set up, click “Record”.
- Start executing commands and actions for the action. Add levels, masks, adjustment layers. Do what you planned.
- After that, click on the “Stop” button. It looks like a square. Located at the bottom of the panel. A similar option is found in the operations menu.
- Save the processed drawing. Go to File – Save for Web.
- The action itself will be placed in the main program directory in the \Presets\Actions subdirectory.
- You can remove it or get rid of its individual parts. To do this, in the list of operations, select the desired action or command inside it and click on the image of the trash can. This cannot be done while recording.
It's useful to learn how to add an action in Photoshop. It will help you finish your layout or drawing much faster. You won't have to waste time on the same commands. You can immediately see the result without selecting parameters yourself. Why do boring and monotonous work? If you haven’t found a suitable action, or your set of actions is too specific, you can record it as an action file and fully use it.
Recording a controlled action
After all the basics of using actions have been discussed above, you can proceed to a more detailed analysis of this tool and additional functions.
If we need to record an action with the actions stopped, but so that we have the opportunity to make changes using some kind of dialog box, with the closing of which the action would automatically continue to work, then how to do this? For example, let’s take a simple case in which it is necessary to carry out such a manipulation: imagine we need to write the following order into the action: insert a text layer - rasterize it - open the “Gaussian Blur” filter - make adjustments - apply a layer style to the text. It is important to make sure that when the “Gaussian Blur” filter window opens, after clicking OK, the action itself will continue its actions.
All we need is to record the action in the required order, following the instructions from the text above. After this, the sequence of all your actions will appear on the palette - find “Gaussian Blur” on it. To the left of the parameter there is an empty square with a long name “Sets or cancels the opening of a dialog box”: click on it so that the system remembers your desire to add adjustments to this window yourself. This is how controlled action is recorded! All you have to do is click “Play” and make sure that the result fully matches your expectations.
Action recording
To create your own action and have quick access to it, it is advisable to write it in a new folder, giving it a clear name. The action is recorded after clicking the “Start Recording” button
After this, you need to sequentially perform all the actions that you need to remember. When recording is complete, click the “Stop” button
As a result, a new operation will be ready, which you can immediately start working with other photographs. Each operation can be assigned its own hotkey to make the action even faster.
To do this, double-click with the left mouse button, a settings window will pop up, where you need to select the Function Key from the drop-down list
The operation will be called by pressing a combination of the selected function key and the Shift or Ctrl buttons, which are specified immediately by the selection method.
Create Actions in Photoshop
Actions in Photoshop is a very convenient tool for processing photos. Actions make it possible to record the stages of photo processing and then apply them to all your other photos with one click. But many photographers don't take full advantage of action photography.
In our article we will tell you how to make processing a large number of photos in Photoshop as fast and efficient as possible. You will learn how to work with actions and what opportunities actions open up for a photographer. And as an example, we will make a simple and convenient action that will automatically put your copyright on the photo.
Essentially, actions are the ability to record the sequence of all your actions in Photoshop. You opened a file, changed the size, applied a filter - the actions will record all these actions in detail. The action will record exactly how you changed the size and what filter settings you applied. You just need to press the “record” button and you can record the action with the processing that you use especially often. And on the Internet you can find a lot of ready-made actions created by other photographers.
How to use actions? To effectively work with actions in Photoshop, there are two convenient functions:
Hot keys Any action can be placed on a hot key. For example, you can make changes to Hue/Saturations, then adjust Curves and put it all on the Alt+F12 keys. Now, when you open any photo, you just need to press these keys and Photoshop will apply all the programmed processing to it.
Batch The Batch function is located in the File—>Automate tab and gives you the opportunity to apply an action to a large number of photos at once.
You just need to specify the folder from which the photos will be taken, the folder where they will then be saved and the action that you want to use.
You can simply set all the photos to be processed by the action and go about your business.
Comfortable? Of course, it was precisely for the convenience of photographers that Adobe created actions in Photoshop.
Now let's create our action.
When working on articles for FotoTips, I need to put our copyright on each photo-illustration. Doing this manually each time takes a lot of time, so I decided to write a simple action that will automatically add copyright to the photo. And you can use this action for your photos.
So, let's begin.
1. First, let's create a new folder with actions and call it FotoTips.
2. Then create the action FotoTips-Copyright in it and set the hotkey Shift+F12 to it.
3. Let's open the file with our logo and make sure that it is located on a transparent background.
4. Now press the “record” button and start recording the action itself.
5. Open our photo and go to the File->Place menu. Select the file with our logo and click Place.
6. Now we place it where we need it.
7. If you want to make the logo more transparent, change the Opacity parameter in the logo layer settings. For example, so that the logo in our illustrations does not distract attention, I set the Opacity to 22%. But it is important to do this as a separate action after Place, then it will be written to action.
8. Now merge all the layers by clicking Layers—>Flatten Image. And save our image and close it (these actions must also be written in the action if you want to use the Batch mode).
9. Press the “stop” button and that’s it! Our action is ready. Let's see what kind of action we got.
By the way, while working with actions, we can disable any stages of the action or enable a request to execute the action. For example, now I have disabled the Close action, and on the Save action Photoshop will ask where and how I want to save the file.
Now we can apply our action to any photo simply by pressing a hotkey or by sending many photos into Batch at once.
But it is important to remember that if the photo is of a different size, aspect ratio or vertically oriented, our logo will not be placed where we need it. Unfortunately, actions record a strictly defined sequence of actions and cannot determine for themselves what and how they need to do. But we can create a second action “Fototips-copyright-vertical” and make an action for vertical files. Now, with the click of one button, we can put copyright on both horizontal and vertical photographs.
As you can see, actions are a very convenient tool that provides great opportunities for working with photographs. For example, in my work I constantly use actions to increase sharpness and work with color. What’s important is that action games are a universal format. This means that an action created on one computer can be used on another without any problems. If you have your own actions, send them to us and we will publish the most interesting actions in one of the following posts, be sure to indicate your authorship.