Using custom recovery
Recovery is a lifeline for smartphone or tablet users. This is a means of restoring the operating system in case of critical errors during use. The program’s functionality also includes limiting user actions in relation to the gadget’s internal system.
Despite this, users who want to change the smartphone’s firmware or install an external operating system for the device replace the factory Recovery with a custom version.
The functionality of the custom recovery system is similar to its standard counterpart. Although there are also several additional features of custom Recovery, for example, access to protected files and functions. Most often this is used as a basis for global user changes to the system.
The most reliable custom recovery systems are:
- ClockworkMod Recovery.
- Team Win Recovery Project (TWRP).
Bootloader is a program that does not allow the owner of a portable device to replace the firmware with third-party firmware. However, there are several ways to unlock the restriction from developers.
Benefits of an unlocked bootloader
An unlocked bootloader opens up exactly the same possibilities for the user as on a PC, namely:
- Flash any operating system (available for your device).
- Installation of individual modules, OS kernels, applications, patches.
- Freely migrate between stock firmwares, especially if they are based on different versions of Android.
- Easily create backup copies of the current OS and/or applications, as well as restore them without using a PC.
- Use Dual-Boot and install two or more operating systems, both in internal memory and on an external SD card.
- Wider recovery options in case of unsuccessful firmware.
And this is not the entire list of possibilities after factory unlocking Android.
The main reasons why Bootloader Android fails
The most popular reason for problems with the Bootloader system is a problem during flashing a mobile gadget. Most often, this occurs due to the fact that the selected version of custom Recovery contains internal defects or a failure occurred during the installation of components.
We recommend: Increasing speaker volume on Android
Bootloader also stops functioning due to a virus that has collected files in the portable gadget.
There are no irreparable situations with the performance of the internal system of a portable device. The files responsible for restoring the OS are located in a specialized memory section that is not accessible to the user. If Bootloader or Recovery fails, the path for starting the recovery is broken, but the data itself remains unharmed. Reinstalling a capable program solves this problem.
Bootloader - how to unlock the bootloader on Android
Bootloader - how to unlock the bootloader on Android . Unlocking the Bootloader on an Android phone or tablet is necessary if you need to get root (except when you use programs like Kingo Root for this), install your own firmware or custom recovery. This instruction describes step by step the unlocking process using official means, not third-party programs.
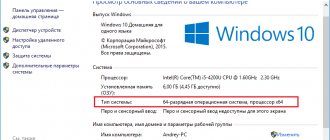
At the same time, you can unlock the bootloader on most phones and tablets - Nexus 4, 5, 5x and 6p, Sony, Huawei, most HTC and others (except for unnamed Chinese devices and phones tied to the use of one telecom operator, this may be problem).
Important information: Unlocking the bootloader on Android will delete all your data. Therefore, if they are not synced with cloud storage or not saved on your computer, take care of it. Also, if you do it incorrectly or simply fail during the process of unlocking the bootloader, there is a possibility that your device will simply not turn on again - you take these risks upon yourself (as well as the possibility of losing the warranty - different manufacturers have different conditions here). to fully charge your device's battery before you begin .
Download Android SDK and USB driver to unlock Bootloader
The first step is to download the Android SDK developer tools from the official website. Go to https://developer.android.com and scroll down to the “ Other download options ” section.
In the SDK Tools Only section, download the option that suits you. I used a ZIP archive from the Android SDK for Windows, which I then extracted to a folder on my computer drive. There is also a simple installer for Windows.
From the folder with the Android SDK, run the SDK Manager file (if it does not start - a window just appears and immediately disappears, then additionally install Java from the official website java.com).
After launch, check the Android SDK Platform-tools ; the other items are not needed (except Google USB driver at the end of the list if you have a Nexus). Click the Install Packages , and in the next window - Accept license to download and install components. Once the process is complete, close Android SDK Manager.
In addition, you will need to download the USB driver for your Android device:
Recovery methods through the standard Recovery application
Restoring Bootloader is possible through Recovery mode, since these programs are extremely interrelated. If the portable device restarts when turned on, then you should try to enter the internal menu mode of the portable gadget and reset it to factory settings.
To begin with, the device owner opens Recovery mode. This is done when you turn on your smartphone or tablet. During startup, the user presses the specified key combinations on the device body. The most common combinations are:
- Volume down button and screen lock key.
- Volume and Power control.
- Both volume buttons and screen lock.
- Home and Power keys.
If the combination of buttons is selected correctly, the Recovery option will appear on the device’s operating screen. All that remains is to launch the recovery in a special tab - Wipe Data/Factory Reset .
After which the system will be completely rebooted and reset to factory settings, which will return Bootloader to working condition.
How this function can be useful
When the user launches the function, a menu with an interface in English will open in front of him. Movements are performed by pressing the volume up and down buttons, and the Home button is used for selection.
The interface has points where the user:
- Receive all information about devices, test them or analyze the operation of the operating system.
- It will block the bootloader and fix existing bugs with the firmware.
- Change the installed version of the operating system to a new one.
- It will remove programs and software that cannot be removed normally (“ built-in ” applications from the developer).
- Resets your phone to factory settings if the gadget is malfunctioning. There are other ways to reset the firmware version, but this one is effective.
We recommend: What to do if applications are installed on Android themselves
- Clears cache. Junk files gradually accumulate in the device's memory and slow down the phone. In the first year of use, the smartphone works at normal speed, but later it fluctuates more often.
The user makes settings in bootloader mode at his own risk, since there is a high probability of breaking the device if the buttons are pressed incorrectly.
There are other tasks performed by the bootloader. For example, in Reboot to Bootloader, the owner of the phone will receive Root rights if necessary. Many users install third-party software for this. Here you need to unlock the bootloader, and Root rights will be granted.
Recovery via PC
Restoring the bootloader of the Android OS loader on a tablet or smartphone is also launched using computer utilities.
Popular programs with similar functionality:
- FlashTool - for owners of Sony equipment.
- Odin - for Samsung mobile devices.
When using this method, the user connects the portable gadget to the PC via a USB cable. The return to the initial state occurs automatically when the function is launched in the program.
Microcontroller and Bootloader. Description and principle of operation.
I welcome everyone to our website and today, after a short break, we will return to the topic of microcontrollers. To be completely precise, we are beginning to discuss one very interesting and important topic, namely the use of a bootloader when programming controllers. Today we will look at the theoretical part - why a bootloader is needed, how it works and what it even is. The next article will be devoted entirely to practice. Looking ahead, I’ll say that we will write our own bootloader for our favorite STM32 !
So, in simple words, bootloader is a special program that is located in the memory of the microcontroller and can independently reprogram it. For a better understanding of the process, let's look at how the program stitched into the microcontroller is generally executed and where it is located.
As you remember from the article on the flash memory of STM32 microcontrollers, the main user program starts from the first page of memory, or more precisely from address 0x08000000. That is, when power is applied, the controller immediately runs to this address.
When using the bootloader, everything looks a little different. The main program is written to different addresses and is located, for example, from address 0x0800A000. And the memory area (0x08000000 – 0x0800A000) is completely given to the bootloader. As a result, we have two full-fledged programs in the controller’s flash memory. When the device is turned on, the bootloader receives control (since it is located in the area starting from the “starting” address 0x08000000), and during further operation, the bootloader, having completed all its tasks, transfers control to our main program, which is located at address 0x0800A000 (we took this address as an example ). Here is a small diagram to demonstrate how the bootloader works:
It seems clear how it works, but the question arises: why is all this necessary? Let's find out!
The bootloader's primary task is to program the microcontroller. It doesn’t just perform some actions and then transfer control to the main program (goes to the address that corresponds to the beginning of the main program), it, first of all, independently writes this main program into flash memory at the required addresses.
Let's look at a small example for better understanding. Let us create a bootloader (a bootloader is exactly the same ordinary project as any other program for a microcontroller), which interacts with an external memory card, searches for a program file on the card and, if found, writes the program to the desired memory area.
A small digression from the main topic... Let me explain what I mean here by “program file”.
When we create a project (Keil, IAR - it doesn’t matter), then at the output (after assembling the project) we receive a compiled file for flashing the firmware into the microcontroller. Most often we used the .hex file of the program. So this is the file we need in this case.
But the hex file is not entirely suitable for our purposes, since in addition to the code of our program, it contains additional service information. In order not to process it and not pull out the code we need from the hex file, which the bootloader should write to flash, in the compiler settings in the Output tab we will ask it to generate a bin file for us instead of a hex file.
A binary, unlike a hex, contains only sequential program code and nothing more. That is, the bootloader can only read bytes from the bin file and write them to flash memory. That is, in our example, the bootloader’s task is to read bytes from a file on the memory card and write them to addresses starting from 0x0800A000. Here's the pseudocode for clarity:
void main() { // Initialize the SDIO interface for communicating with the memory card SDIO_Init(); while(1) { // Looking for the firmware file if (f_open(file.bin) == FR_OK) { ProgramFlash(); JumpToMainProgram(); } } }
Of course, this is a greatly simplified version of the bootloader. Here we are in an eternal loop trying to open a file with a program, and as soon as we succeed (the user has written the long-awaited file to the card), the bootloader programs the flash memory and jumps to the address of the program it recorded. The controller then starts executing the user program. Once again, this is just pseudocode for an example; we will definitely write a full-fledged bootloader for STM32 in the next article!
All this, of course, is very interesting, but it is still unclear why all these difficulties are needed...
With this, everything is actually simple - for example, the first situation - there is a huge number of devices, at the factory workers flashed a bootloader into each controller (for example, using ST-Link) on each board, which, when connected to a flash drive (in advance) provided connector) searches for the firmware file on it and performs programming. The main program, of course, can also be flashed together with the bootloader via ST-Link. But the subtlety here is that the bootloader project always remains unchanged and there is no need to reflash it, but the version of the main program can be updated a bunch of times during the process of testing devices.
And here it’s much easier to connect ST-Link once and flash the bootloader, and then simply dump the new version of the main program onto a flash drive and stick it into the finished device, where the bootloader will do the flashing, than to run from one board to another a hundred times, plugging ST -Link, while carrying a laptop with ST-Link Utility