- 7shared
- 1Facebook
- 6Twitter
- 0VKontakte
- 0Odnoklassniki
During the operation of a hard drive, errors accumulate on it over time, which can be both software and hardware in nature. To fix them, Windows provides a special utility program chkdsk. It is console-based, but can also be launched from a graphical interface. Despite the fact that this tool is very important and useful, many users do not burden themselves with information about its use, and in vain. To fill this gap in the knowledge of novice users, we will look at some aspects of using the “checkdisk” using specific examples.
Accessing chkdsk through disk properties and console
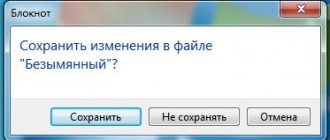
The easiest way to run chkdsk in Windows 10 is through the partition properties. To do this, right-click on the drive you are checking, select “Properties” from the menu and go to the “Service” tab. In the window that opens, click “Run check” and follow the instructions. If problems are found, you will be prompted to fix them. By default, the check is performed only in read mode, that is, chkdsk is limited to only displaying information about the state of the file system.
Since the utility requires full access to the disk to correct errors, if it works with the system partition, Windows will be rebooted.
You can also run chkdsk disk scan from the command line or PowerShell console. To do this, open the console as an administrator, go to the root of the partition you are checking and run the chkdsk command. The check will be performed in reading mode.
If the utility finds errors during the scan, run the same command, but with the -f and -r parameters, as shown below.
How to run CHKDSK (check disk) on the command line
The chkdsk command to check a hard drive with the specified parameters is executed from the command line:
- Run Command Prompt as Administrator. Read here how to find the command line in Windows
- To check the system partition (system drive) in the command line interpreter window, enter the command:
chkdsk c: /f
- Press the "Enter" key.
- A message appears in the Command Prompt window indicating that the CHKDSK command cannot be executed because the specified volume is in use by a system process. To start checking the system disk after rebooting the system, press the “Y” key and then press the “Enter” key.
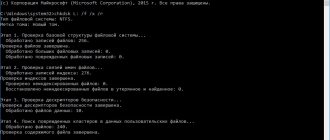
- During the system reboot, the system disk will be checked and restored.
A sample command template looks like this: ["chkdsk" (application name)], space, [drive letter of the drive being checked followed by a colon ("c:", "d:", "f:", etc.), path, or filename], space, [command options].
Command parameters have the following meanings:
- /F - checks the file system and automatically corrects errors found.
- /R - search for bad sectors on the disk, restore the contents (the command requires the /F key, example: “chkdsk C: /F /R”).
- /V - displays full file paths, displays file names on the disk, in the NTFS file system - displays cleaning messages.
- /X - disconnect the disk before scanning; the descriptors of this disk will not be scanned (the mandatory /F key must be set, example command: “chkdsk C: /F /X”).
- /I - Performs a less stringent check of index items; CHKDSK performs a faster but less thorough check.
- /C - skips checking cycles within the folder structure.
- /L: size - Changes the log size to a value specified in kilobytes.
- /B - reset the scan results, re-check previously found damaged hard disk sectors (the /R key is required, example command: “chkdsk C: /F /R /B”).
In most cases, to check the file system and eliminate bad sectors on the hard drive, it is enough to use the “F” and “R” flags.
Run chkdsk when Windows 10 starts
In certain situations, it may be necessary to schedule a chkdsk check when the machine boots. For this purpose, Windows has a special console utility CHKNTFS . It also works from the command line and uses a number of special options. chkntfs /cd: on the command line , to cancel an already scheduled scan - chkntfs /xd :.
If you want to check all partitions with default settings, run the command chkntfs /d - the volumes will be scanned when Windows boots. Note, however, that chkdsk only runs when errors are detected.
And now about how to run chkdsk if Windows 10 does not boot. In this case, you can perform the check by booting from the Windows installation disk or from a special rescue disk with a set of administration tools on board, for example, Sergei Strelec.
Let's look at the algorithm using the example of booting from regular installation media. When the Installer Wizard window appears on the screen, press Shift+F10 to launch the command prompt. Next, you need to determine the partition letter, since the letters may differ in the boot environment. The easiest way to do this is to launch Explorer with the explorer right there on the command line. Then we check the volume by running the chkdsk command.
Checking a non-system disk for chkdsk errors
7. If not only your system disk is acting up, but also another partition, then launch the command line window again and enter the letter of the partition that you want to check in this way E: or D: that is, by analogy, substitute the letter you need and press Enter (the partition letter can be find out by going to My Computer, for example, in this case I’m checking the section with the letter E)
8. Next, in the command line window, enter chkdsk /r and press Enter (The entire line will look like this - DRIVE LETTER:\>chkdsk /r )
9. The message “The Chkdsk command cannot be run on this volume because... The volume is in use by another process. To run Chkdsk, you must first unmount the volume. ALL OPEN VOLUME DESCRIPTORS WILL CONTINUE TO BE INCORRECT. Confirmation of volume disconnection [Y<yes>/N<no>]" enter the Latin letter Y and press the Enter
10. The process of checking and correcting errors will begin, after its completion you can close the console window (Percentages may reach a certain level and fall again, don’t worry, this is normal)
Chkdsk FR Command Options
As mentioned above, by default Chkdsk runs in read mode. To correct the errors found, the utility must be launched with parameters or other keys. To repair damage to the file system, chkdsk has the F and R keys. They are added after the main command, separated by a space using a slash or a hyphen, like this: chkdsk /F /R . There are also other parameters, among which the most common are:
- /F – searches for and corrects FS logical errors;
- /R – searches for bad sectors and transfers their contents to spare areas;
- /X – forcibly disables the locking of the volume being scanned;
- /I – speeds up the scanning process, which affects quality;
- /B – used only in conjunction with the R parameter to rescan bad sectors;
- /SCAN – performs a proactive scan of the partition;
- /C – Skips scanning within nested directory structures.
In practice, the commands most often used during “repair” are chkdsk /f and chkdsk /f /r , and the need to use other keys arises much less often.
Startup procedure using GUI
If the operating system is functioning normally, then the CHKDSK utility utility can be launched directly from the Windows interface. Starting the service differs slightly for different OS versions. Let's figure out how to run CHKDSK in Windows 7:
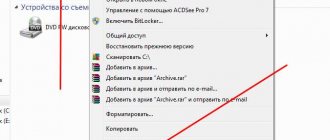
- Go to “My Computer” (on Ten the directory is renamed “This Computer”).
- Click on the one you want to scan, RMB - “Properties”.
- On the “Service” tab, click “Run check”.
- In the window that appears, about and “Check and repair damaged sectors.”
- We start the scan by pressing the appropriate button; the process is performed automatically and takes a certain time, which depends on the volume and workload of the internal storage volume.
Using the properties of the desired volume, the disk is checked for errors.
When choosing a scan for the system partition, you need to schedule a scan or reboot the device right now. So, the C:\ partition (or whichever one you have allocated for the system) will be checked the next time Windows starts.
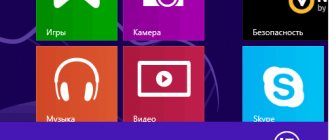
In Windows 10, you can call CHKDSK in a similar way:
- Press Win+E or go to “This PC” using any convenient method (if you don’t have this shortcut on your desktop, this can be easily fixed in the “Personalization” section).
- On the drive being scanned, right-click – “Properties”.
- Go to the “Service” tab and click “Check”.
- In versions of Windows 10 and 8.1, when everything is normal with the file system, a window will open informing you that the check is unnecessary, and you can launch the tool by clicking “Check disk”. If you suspect that errors are present, the window will also have a button to start the HDD scanning and recovery process.
- The system partition can be restored after rebooting the OS.
How to disable Check Disk at startup in Windows 10
We have already shown how to run a chkdsk disk scan from the command line or through partition properties, now let's turn to one common problem associated with the operation of this tool. The scan launched when Windows boots is performed once, and after the procedure is completed, the computer continues to operate as usual. But it also happens that the scan starts automatically every time you boot. This is undesirable, since scanning the disk increases the load on it. In this case, the automatic launch of the Chkdsk utility should be disabled. This can be done in two ways: through the registry and using the CHKNTFS tool already mentioned above.
Open the registry editor (regedit) and navigate to the HKLM/SYSTEM/CurrentControlSet/ControlSession Manager key. In the right column, find the multi-string parameter BootExecute and replace its value, whatever it is, with the line autocheck autochk /k:C * , where C is the letter of the partition for which you want to deactivate the check.
The second method is less troublesome. Having called the CMD console with admin rights, run the command chkntfs /x C:, where C is again the partition letter.
In general, nothing complicated, but sometimes the chkdsk utility freezes. If this happens and you simply forcefully restart the computer, the scan will start again the next time you start it. To break this cycle, you need to change the value of the above BootExecute parameter in offline mode. To do this, you will need to boot your computer from at least the installation disk. It’s even better to use a ready-made solution - the Sergei Strelec rescue disk, which has a tool for offline editing of the registry.
Download the Sagittarius disk on the Internet (it’s free), burn it to a flash drive, boot the computer from it and run the “Remote Registry” utility from the desktop.
In the overview window that opens, select the Windows root directory, and then navigate to the HKLM/SYSTEM/ControlSet001/Control/Session Manager key. On the right you will have the BootExecute parameter - edit it as shown above.
That's it, now you can reboot in normal mode, Chkdsk will no longer start.
- 7shared
- 1Facebook
- 6Twitter
- 0VKontakte
- 0Odnoklassniki
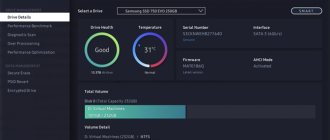
Checking the hard drive in running Windows
To check the logical partitions of a hard drive using CHKDSK in a running Windows, you must:
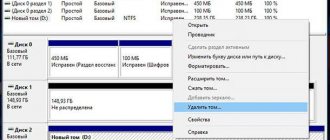
Step 1. Open the “This PC” , right-click on the required logical partition and select “Properties” .
Step 2. In the window that opens, go to the “Service” and select “Check” .
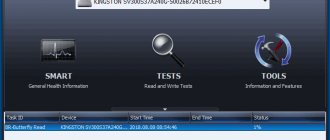
Step 3. Confirm the disk check and after it is completed, click on the “Show details” .
Step 4. All information and results of the disk scan will be available in the “Information” .
Restoring the Windows 10 bootloader
In my case, problems were found and fixed on the disk, but the operating system still did not boot. Restoring the bootloader helped me.
NOTE: During this procedure we will be formatting the boot partition. Your files and documents will remain intact if you CORRECTLY specify the path to the partition. Therefore, do the following steps as carefully as possible - an error in choosing a partition will lead to formatting the wrong disk. As a result, there will be nothing to restore...
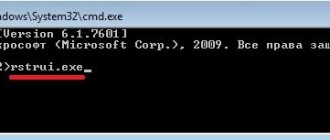
On the command line, run the program and wait for it to open:
diskpart
At the DISKPART prompt, type:
list disk
We need to find out what number the boot disk has. In my case it is 0.
Now enter the following command, replacing the 0 with the number of your boot disk:
sel disk 0
Now with the following command we will display a list of volumes:
list vol
This is a very important step! We need to find out what number the EFI partition has. The EFI partition has a file system of FAT32 and this partition does not have a letter.
In my screenshot, the EFI volume is number 3.
Run the following command, replacing 3 with your partition number:
sel vol 3
Now you need to assign a letter to this section. This can be any unoccupied letter.
assign letter=V:
Exit DISKPART:
exit
Type at your command prompt (replace with the assigned letter for the EFI partition):
V:
Now that the EFI partition is assigned a letter in Diskpart, we can format it. Be very careful and specify the letter correctly, replace V with the one you used:
format V: /FS:FAT32
The program will warn you that all data will be deleted from this partition. Press Y. _ Also enter Y to confirm that the volume is disabled.
It is not necessary to enter a volume label.
Now run the command which will create the bootloader. In this command, change only the letter V (if you used another one).
bcdboot C:\windows /s V: /f UEFI
Once the message “Download files have been successfully created” appears, your system is ready for normal use.
Close Command Prompt and restart your computer.
CHKDSK command - check the disk.
CHKDSKused to scan disks and display reports on scan results. Command line format:
CHKDSK [volume:[[path]filename]] [/F] [/V] [/R] [/X] [/I] [/C] [/L[:size]]
Volume
Specifies the mount point, volume name, or drive letter of the drive being checked, followed by a colon.
file name
Files checked for fragmentation (FAT/FAT32 only).
/F
Correcting disk errors.
/V
Detailed output mode. For FAT/FAT32: Displays the full path and name for each file on this drive. For NTFS: also displays cleanup messages.
/R
Search for bad sectors and restore their contents.
(requires /F
).
/L:size
For NTFS only: Changes the log file size to the specified size (in KB). If a size is not specified, the current size value is displayed.
/X
If necessary, forcefully disable the volume.
All open handles to this volume will be invalidated. (requires /F
).
/I
NTFS only: Less strict checking of index elements.
/C
NTFS only: Skip checking for loops within the folder structure.
Keys /I
or
/C
reduce CHKDSK execution time by skipping some volume checks.
Examples of using:
CHKDSK
— check the current disk (volume) in read-only mode
Sample report:
File system type: NTFS.
Volume label: DISK_C.
ATTENTION! Parameter F is not specified.
CHKDSK runs in read-only mode.
Verifying files (step 1 of 3)… Verifying files is complete. Index Verification (Step 2 of 3)… Index Verification is complete. Security Descriptor Validation (Stage 3 of 3)… Security Descriptor Validation is complete. CHKDSK checks USN log. USN log check completed
488384000 KB total on disk. 482155688 KB in 332072 files. 108552 KB in 14989 indexes. 0 KB in bad sectors. 1120884 KB is in use by the system. 65536 KB are occupied by the log file. 4998876 KB free on disk.
Cluster size: 4096 bytes. Total clusters on the disk: 122096000. 1249719 clusters on the disk.
CHKDSK D:/F
— check drive
D:
in error correction mode.
If in this check mode CHKDSK
cannot obtain exclusive access to the volume being checked, the program will prompt you to set the mode to automatically start testing the specified disk the next time the system is rebooted.
The check will be performed by the Windows Session Manager service, in accordance with the contents of the registry key HKLM\System\CurrentControlSet\Control\Session Manager\BootExecute The results of the check can be viewed in the system event log - (Control Panel - Administrative Tools - Event Viewer - Application) Winlogon
.
The presence of the CHKDSK program launch sign the next time you restart Windows can be checked using the CHKNTFS
, a link to the description of which can also be found on the page with a list of Windows CMD commands. In addition, it can be used to change some testing parameters.
It is not recommended to interrupt the CHKDSK
, launched with the
/F
because, in this case, there is a possibility of violating the integrity of the file system.
CHKDSK's work is divided into three main passes, during which CHKDSK checks all metadata on the volume, and an optional fourth pass. The term "metadata" means "data about data." Metadata is a layer on top of the file system that keeps track of information about all the files stored on a volume. The metadata contains information about the clusters that make up the data volume of a particular file, which clusters are free, which clusters contain bad sectors, etc. On the other hand, the data contained in the file is referred to as "user data". In NTFS, metadata is protected using a transaction log. The process of changing metadata is divided into certain logical stages, or transactions, which are recorded in a log. If the sequence of actions to change metadata is not logically completed, then a rollback is performed using the transaction log data to the moment when this change has not yet been started. In other words, using a transaction log greatly increases the likelihood of metadata integrity.
This method is not used to protect user data (not metadata) in the NTFS file system.
Stage 1. Checking files
During the first pass, CHKDSK displays a message indicating that files are being scanned and the amount of file scans performed, expressed as a percentage (0 to 100). During this phase, CHKDSK checks the record segment of each file in the master file table ( MFT
) volumes.
Stage 2. Checking indexes
Essentially, indexes are directories in the NTFS file system. CHKDSK checks that there are no "orphan" files and that all directory listings contain existing files. An orphaned file is a file for which a valid file record segment exists, but for which there is no data in any directory listing. A lost file can be recovered in its corresponding directory, if that directory still exists. If the corresponding directory no longer exists, CHKDSK creates a directory at the root of the disk and moves the file to it.
Step 3: Checking security descriptors
Security descriptors contain information about the owner of the file or directory, NTFS permissions for the file or directory, and auditing information for the file or directory. CHKDSK checks the structure of each security descriptor, but does not verify the actual existence of the listed users or groups or the validity of the permissions granted.
Stage 4. Checking sectors
This stage of CHKDSK execution is determined by the presence of the /R
when starting the program.
The volume's free space
is searched for bad sectors .
CHKDSK attempts to read every sector on the volume, and if an error is detected, the cluster that contains the sector is marked as bad and removed from the volume's logical structure. Even without using the /R
, the program always reads the sectors related to the
MFT
(metadata). In addition, the sectors that are used for the user data area are checked in the previous stages of CHKDSK.
It is necessary to take into account the fact that the execution time of CHKDSK with the /R
may be significant.
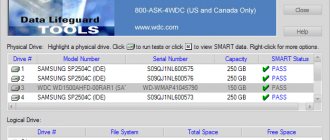
In addition, modern hard drives have a built-in self-test and parameter monitoring system (SMART), the presence of which makes it pointless to use the search mode for bad sectors using CHKDSK
, since all modern drives constantly perform internal routines for monitoring technical condition and self-diagnosis, as well as those built in at the firmware level procedures for reassigning poorly readable sectors (unstable sectors) to sectors from the reserve area (remap procedure or remap). These processes occur invisible to the computer user. Therefore, the presence of bad blocks (Bad Blocks) is possible only if there is no free space in the reserve area for reassignment, or if failures occur while writing data to the sector, for example, during an emergency shutdown of the primary power supply.
If lost files are detected, the CHKDSK
creates them in the file system structure as files with the
.CHK
.
In practice, information from such files can be recovered manually only in cases where it is presented in text form. In some cases, you can use third-party software, such as the CHKParser utility. Full list of CMD Windows commands
World of digital information
The previous article described a GUI disk check tool. However, it is not always possible to use it; for example, due to disk errors, Windows may stop starting. However, even in this case, you can check the disk using the chkdsk .
To use the chkdsk from the Windows graphical environment, you can either use the program's GUI or open a command prompt window.
If Windows doesn't start normally, try starting it in "safe mode". If Windows does not start in "safe mode", try starting "safe mode" with command line support. In this mode, the Windows graphical environment will not be loaded; the command line will be loaded immediately. However, Windows may not start even in this mode. Then you should start recovery mode from the Windows boot disk, select recovery mode and go to the command line.
chkdsk command has the following format
chkdsk [drive:[\[path]filename]]] [/F] [/V] [/R] [/X] [/I] [/C] [/L[:size]]
Square brackets indicate that the parameter can be specified only if necessary. For example, the command can be used with all keys, with a few or without them at all.
Instead of drive , specify the drive letter (letter) of the drive that should be checked. If in the path and file name you specify the path and file name, respectively, then this file will be checked for fragmentation. This check only works if FAT and FAT32 file systems are used. /F switch specifies that errors found should be automatically corrected. /V switch enables display of the full path and file name when checking FAT and FAT32 file systems, and when checking the NTFS file system, messages about completed corrections. /R switch enables checking the disk surface and automatically recovering information that can be read from damaged sectors. Using the /R also implies using the /F . /X , /I , /C and /L[:size] switches only work when checking the NTFS . /X switch forces the disk to be disconnected if necessary, so that other programs do not interfere with checking it. /I switch reduces the level of index checking. /C switch disables checking cycles in the folder structure. /L[:size] switch allows you to change the size of the log file to the specified size in kilobytes.
It is recommended to always perform a full disk scan (similar to the enabled options Automatically fix system errors and Scan and repair bad sectors in the disk scan GUI). chkdsk program with the /F and /R .
To fully check drive “C”, enter chkdsk /F /R .
When booting into recovery mode from a boot disk, the current drive assigned the letter “C” may not correspond to drive “C” during normal booting.