The method described below for merging disk partitions was used by me to remove and connect the backup part of the media where Windows writes data when updating the operating system version. All actions took place on the system drive (C:\). This method works flawlessly, and there is no need to install third-party software, which is why I love it so much. The only drawback compared to programs that perform such actions is that it deletes all data from the partition, but this is not a problem because you can always copy it somewhere and then write it to an already merged disk. All manipulations are carried out using the built-in DISKPART utility.
How to delete a partition (disk management)?
Windows systems themselves have a built-in tool for working with any type of partition. This is a utility called Disk Management. Deleting a partition or performing any other manipulations with its help is quite simple.
This tool can be accessed in several ways: through RMB on the computer icon, through the “Control Panel” (disk management is called up through administration) or through the “Run” menu by entering the command diskmgmt.msc.
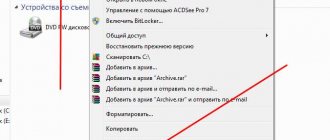
Here you just need to select the desired partition and use the volume delete line through the RMB menu. The system will issue a warning that the data in this section will be destroyed. If you agree, confirm the action, after which a so-called unallocated area will appear in which you can create a new partition or expand another section at its expense. But that is another topic.
Power Shell
Power Shell is a component of the Windows system, an automation tool with which you can delete blocks of information from the hard drive. Find the application on your computer using search, right-click on the icon and open the application as an administrator.
In the window that opens, enter Get-Patrition and press Enter. A list of disk parts - so-called volumes, indicated by letters - will open. Identify the volume you have selected for deletion and remember the letter.
Enter the following: Remove-Partition – DriveLetter “the letter of the part you are removing”, press the enter button. Confirm your action by pressing the Y key - the partition you selected will be erased from the disk.
Disk management in Windows 10 through the command console
One of the universal tools for such operations is the command line, which uses the DiskPart tool (a tool for managing disk partitioning). The steps here are quite simple, but you should be especially careful when choosing the right sections.
So, disk management in Windows 10 or any other version of the system through the command console begins with calling it with administrator rights (cmd) and entering the primary command diskpart and pressing the enter key after it.
After this, executing the list volume line makes it possible to view all the disks and partitions available on the system. Only they will be marked not with letters, but with numbers (the required section can be determined at least by its size).
Next, select the partition to be deleted using the line list volume N, where N is the number of the desired partition.
Finally, we enter the delete volume command, after which, in fact, the deletion follows. If the selected volume cannot be deleted for some reason, you can use an extended version of the deletion command – delete volume override. Upon completion of all procedures, you exit with the exit line, after which you can close the console and reboot the system.
Removing partitions using Microsoft DiskPart*
| One | Critical instructions:
|
Used
Microsoft DiskPart is a powerful tool that can be run on CMD without using a GUI. The tool is more flexible compared to Disk Management.
To start DiskPart, follow these steps:
- Type the command DiskPart
on CMD or run the tool using the
Run
(program window). A User Account Control message appears. - Grant administrative rights to the tool and accept the message to run the tool.
DiskPart offers many options and commands. Review the basic steps below to initialize and erase your drive.
First, select the device you are working on:
- Drive List: Displays a list of connected drives and USB flash drives
- SEL Log Drive (select drive): Select the area to use
- Clear All: Delete partition and volume information from the selected device
Next, use the device to “clear” (in the factory area) to create and format partitions. Select the drive and enter the following commands to create partitions:
- List part: Displays the partitions available on the disk (the structure state will have no partitions)
- SEL Log Part: Used to select the section to use
- del part: Used to delete the selected partition
If you don't have any partitions, you can create a new one.
Create Primary: This command creates a primary partition with the full size of the disk. You can also specify an additional or logical partition or partition size using size="XXX".
Now select the partition to format it and configure it for the selected partition type:
- Format override FS = "NTFS" Label = "Label": Performs a low-level format (Secure Erase), configures the partition in the NTFS file system and sets the desired label.
Additionally, you can use other options and functions of this command. For example, to perform a quick format instead of an override, enter Format Quick FS = "NTFS" Label = "Test" size = 409600
(size in MB).
You have created and formatted your partition. If the partition is not assigned an alphabetic character, you will not be able to see the drive in Windows*.
To view the disk, enter the following commands:
- List! List of all available volumes
- Volume SEL: Select the volume you are already creating with the last commands.
- Assign a letter: Assign a drive letter so that Windows sees the drive. The drive is ready for use.
: assign letter = D.
For more information about DiskPart, see Command Syntax and Command Descriptions.
The best applications for working with disks and partitions
If for some reason the user does not want or cannot use the tools built into the system, any disk management program used to create logical partitions will be suitable as a removal tool.
Among the simplest and most popular utilities are the following:
- AOMEI Partition Assistant Standard;
- MiniTool Partition Wizard;
- Acronis Disk Director;
- EaseUS Partition Master;
- GParted;
- [email protected] Partition Manager, etc.
Tip #2: Installing two or more Windows operating systems on one hard drive
All you need is a few sections. If there is already a second partition on your hard drive, which is visible in the “ Computer ” window, make sure that there is at least 20 GB of free space there (more is better), then during Windows installation simply specify this second (third, fourth, etc.) .) disk. Once installed, you will be able to select Windows using a menu that appears when you turn on your computer.
Just don't try to install Windows XP after Windows Vista, 7 or 8 - this ancient OS corrupts the bootloader. Read more about this here: Installing Windows XP on a computer with Windows 7.
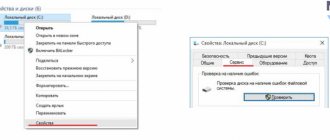
If you have only one disk ( C ), I suggest the simplest option: Through Disk Management , first give partition C the command Compress , reducing it by at least 20 gigabytes (or better yet, more, because in addition to Windows you will also be installing programs):
Right click on drive C...
We indicate 20 thousand megabytes (this is about 20 gigabytes). And better - more.
After clicking the Shrink the size of disk C is reduced, and unallocated (free) space appears in the partition map:
19 and a half gigabytes is enough to install an operating system
Then, having configured the BIOS to boot from disk, we start the Windows installation. We install it correctly, during installation we indicate what needs to be installed in the free space:
We indicate unallocated space. The installer will create the partition itself.
After installation, you will have two operating systems. You can create unallocated spaces or empty disks and indicate them for installation.
An example of using a program from AOMEI
Let's take as an example the first utility presented in the list (although almost all of them work according to the same principles and do not differ in particularly abstruse interfaces).
Here you just need to select the section of interest to the user, and then select the delete line in the menu at the bottom left. Everything seems to be simple. But the advantage of this application is that it will immediately offer two removal options: quick and complete. In the first case, the deletion will be carried out in such a way that after this, if there are appropriate programs for recovering information, anyone can access the files and folders previously stored in the partition.
In the second case, as stated, the information will be completely erased, and it will be impossible to restore it even with the most advanced software (the sectors in which the information was previously stored will have zero values). However, for many, the impossibility of data recovery in this case raises legitimate doubts.
Next, select the preferred method and click the “OK” button, after which the deferred task will be created. In the panel at the top, click the “Apply” button, and then after checking the correctness of the data in the confirmation window, click the “Go” button. After this, the selected partition will be deleted (the estimated time to complete the operation is displayed at the bottom of the window).
Deleting a partition
Let's say we need to delete a specific partition, for example /dev/sda4, from a specific hard drive, for example /dev/sda. First you need to go into command mode:
fdisk /dev/xvdb
Then enter d to delete the partition. After this, you will be asked for the partition number to remove from the /dev/xvdb disk. To delete partition number 2 (that is, /dev/xvdb2), you need to enter the corresponding number, 2. Then you need to enter the w command to write the table to disk and exit.
fdisk -l /dev/xvdb
As we can see, the /dev/xvdb2 partition has been deleted.
Warning: Be careful with this command because deleting a partition will completely destroy all data on it.