If you use a laptop, computer and several gadgets at once at home, it makes sense to connect the devices to the local network. This way you can view folders and files stored on another device on different devices. In this case, no wires are needed for connection. The manipulation can be performed via a WI-FI router. The main thing is to know how it's done.
I will try to tell you simply and without frills about the creation of a home group, and if during the course of the play you have any questions, then immediately write in the comments. Begin.
Why do you need a home group?
A local network is a network storage of information. You can, for example, view files on your smartphone that are stored on another phone or laptop. However, this is not its only purpose.
Within a homegroup, you can communicate from different devices. For example, you can play games together over a local network. You can connect a computer, laptop and gadgets connected to the same network to the printer at the same time. You will get a real home server.
Home local network and its topology
There are three main topologies for constructing a local network: bus, ring and star.
We are more interested in the “star” topology, since home local network devices will be able to directly (independently) connect to the router, which will allow data exchange with any of the network participants (computer, tablet, smartphone).
For two computers
Just a caveat - both computers must be connected through the same router to the same Wi-Fi network. All steps must be repeated on both PCs. And also let me remind you about safety! If your network is not password-protected and your freebie-loving neighbor hangs on it, after creating a local network, you risk that your files, photos, videos will become the property of your neighbor. Like this!
You can create a local network for two computers via cable and Wi-Fi. I will describe the second option. All settings are described using Windows 7 as an example, but are also relevant for other operating systems.
- Let's make sure that both PCs are working in the same group. How to do it? I'm telling you. Press Win+R and write the command sysdm.cpl. Click "Ok". We need the “Working Group” item. It is necessary that both computers have the same name. You can change it. Don't forget to do the same on the second computer.
- Through the control panel we need to go to the “Change advanced sharing settings” section. We look for the inscription “Current profile” and make the changes we need. In the window that opens, you will need to activate all the items that begin with the word “enable”. Except for the item at the bottom of this page – “Sharing with password protection.” Here we need to disable.
- Let's reboot. That's basically all the settings. You can check. Go to “My Computer”, then “Network” and you will see all the devices that are united by the home group.
I will write in more detail later.
For video instructions on creating a home network for two PCs, see here:
Setting up home LAN devices
The first thing you need to start with is to make the minimum necessary settings for the router, since this device is the central node (hub) of your local network.
Router
Connection and login.
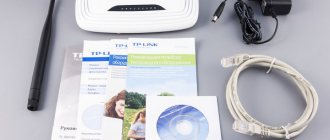
Connect the router to the computer with the special cable that comes with the package, power it from the mains and start it up. On your computer, you need to enter the router settings using the web interface. To do this, in the address bar of your browser, enter the IP address of the device (192.168.0.1 or 192.168.1.1, you can find out more in the instructions), after which you will see a login form asking you to enter a login/password, usually the default is admin/admin .
It is advisable to change the password! If your Internet provider has assigned you a fixed IP address, you can use a password to protect your home local network from unauthorized access from the global network.
DHCP protocol.
When organizing any local network, each device is assigned its own unique IP address, which is manually registered in the network card settings or the device receives it automatically. Since your home local network will consist of a sufficient number of devices, including those connected via the Wi-Fi protocol, you need the devices to receive IP addresses automatically. To do this, you need to enable automatic distribution of IP addresses in the DHCP settings of the router.
Wi-Fi hotspot.
To use the router as an access point, you must specify in the Wi-Fi settings that the router will be used specifically as an access point, and set a password for the Wi-Fi network.
The necessary router settings for organizing a home local network have been completed, now you need to configure Internet access.
Setting up an Internet connection.
Setting up an Internet connection is easy; consider two main types of connection: wired (PPPoE, L2TP...) and wireless (3G/4G modem). Since modern routers are quite “smart,” you shouldn’t go too deep into connection settings.
Setting up wired access.
To set up wired access on the router, use the connection wizard (Click'n'Connect) or go to the “WAN” section and click on the “Add” button. Insert the Ethernet cable into the WAN port of the router, select the “Manual” configuration option, then PPPoE connection type. At the next stage, specify the profile name, login/password (issued to you by your service provider) and check the boxes next to “NAT”/“Firewall” (firewall), then apply the settings (reboot the router). Once the router reboots, visit the “WAN” tab and make sure that your new connection is selected as the default connection gateway.
Setting up a 3G/4G modem.
To set up Internet access via a wireless 3G/4G network, install the modem in the USB port and open the “3G/LTE” -> “Information” tab. If the router sees the device, feel free to proceed with configuration (the “Click'n'Connect” or “WAN” tab). The further algorithm of actions is no different from setting up a wired connection, with one exception, you need to select the connection type “3G” or “LTE” (depending on the type of modem). In the new window, specify the profile name, access point in the APN field (an optional parameter, such as login and password) and select the network mode in which the modem will operate (“Auto”/“3G”/“LTE”), then save the settings and reboot your router.
Computer, laptop
TCP/IP protocol.
In order for a computer (laptop) to have access to your home local network, you need to configure the TCP/IP protocol of the network card.
To do this, you need to follow the chain “Control Panel” - “Network and Sharing Center” - “Change adapter settings”.
Then, right-click on the icon of your network card and select “Properties” from the drop-down menu, then select “IP version 4 (TCP/IPv4)” and also click “Properties”.
In the window that opens, you need to specify the IP address of the computer (192.168.0.X, where X is the unique serial number of the device on the network), subnet mask (usually 255.255.255.0), default gateway (router IP address: 192.168.0.1 or 192.168.1.1), the preferred and alternate DNS addresses are the same as the default gateway IP address.
If you have Windows 7/8/8.1/10 installed, and in the DHCP settings of the router you have allowed automatic distribution of IP addresses, I suggest not complicating the process and specifying in the TCP/IP protocol to automatically obtain IP and DNS addresses. A computer (laptop), like any other device, will automatically receive an IP address, and you can recognize it as part of your home local network by its network name.
Network name of the computer (laptop).
Changing the network name of a computer (laptop) is easy, right-click on the “My Computer” icon, select “Properties” from the drop-down menu, and in the “System” window that opens, opposite the computer name, click “Change settings”, in the new dialog box Click “Change” once and enter the network name of the computer. We confirm all actions and reboot the system. That's it, the network name of the computer (laptop) has been changed!
Tablet (smartphone) and other Wi-Fi enabled devices
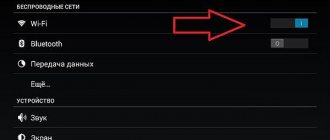
It is easy to connect this segment of devices to your home local network. All you need to do is start a search for Wi-Fi networks, select your access point from the list found and enter the password for the Wi-Fi network previously specified in the router settings.
Network storage.
Network storage has a fairly simple initial launch and configuration process. After unpacking and installing the device, connect it to your router using the special cable supplied, power it through the power supply and wait until the system switches to operating mode. You will find a description of the network storage indications in the instructions.
When you first start, the process takes some time, do not interrupt it under any circumstances.
After reading the instructions, you will find the IP address that is assigned to the device by default (for example: 192.168.0.96). Use this IP address to log into the device’s web interface and make the necessary settings.
Be sure to change your password to protect your personal files.
The home local network is almost ready. All that remains is to decide which drives (folders) on the computer (laptop) will be shared.
Your home local network is ready!
For multiple devices
The local network via a WI-FI router is configured in the same way for any operating system, as I said above. There is no difference in the procedure. The main thing is to follow the instructions, and then everything will work out.
The local network is configured through a router using a wireless connection or directly. All devices that you want to define as a homegroup must connect to the same router.
However, this does not allow you to fully enjoy the benefits. You will not be able to view folders on other devices and create a server with a printer. In order for the local network to start working, you need access to files and printers.
Let's start with how to create and configure a local network. Creating a home network via a WI-FI router is carried out as follows:
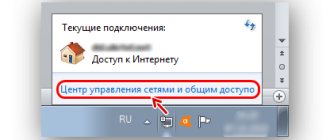
- enter the Network Control Center menu;
- redirected to the sub-point of the connection center;
- find the desired type of group;
- redirected to the home network subpoint;
- put icons on those elements that need to be shared with all devices and gadgets;
- click on the “Next” button;
- if no errors were made during operations, the homegroup password appears in the window that appears, which is recommended to be written down on a separate piece of paper;
- Click on the “Done” button.
Completion of the operation means that a home network between computers and gadgets has been created. After that, you can connect all devices to it via WI-FI. Knowing how to set up a home network between devices, you can quickly and easily do it yourself.
Change code
The password suggested by the system is difficult to remember. You have to keep a piece of paper with information at hand at all times. For this reason, it is easier to come up with your own code. To change the password, proceed as follows:
- enter the section for selecting a home group or click on the inscription indicating that you have joined it;
- in the window that opens, click on the “Change password” column;
- enter new data and save changes.
How to connect devices to the network?
Now let's move on to how to connect all computers and gadgets to your home network. Here you need to perform a number of steps listed below.
Computer
After creating a home network on Windows, you can connect other computers to the network. The operation will only take a few minutes. To connect, you need to view your active networks. An inscription in the home group should appear in the column about the opportunity to join it. You must click on the link.
If there is no such inscription, you should change the network to home. To do this, proceed as follows:
- log in to the tab: “Public Network”;
- go to the home group by clicking on the corresponding inscription.
Once the correct settings have been selected, you are ready to connect. They do it like this:
- go to the section: “Share access with other home computers”;
- click on the “Join” column;
- select all elements that need to be accessible from all devices;
- click on the column: “Next”;
- enter the password in the appropriate window;
- click on the column: “Next”;
- Click on the “Done” button.
If you need to connect several devices to your home network, this manipulation is performed on all devices.
Smartphone
To access your home network on your phone or any other gadget, you will need a special program. The easiest way is to use ES Explorer. To do this, you need to download it to your gadget, after which it is recommended to perform the following steps:
- launch the program;
- log in to the “Network” section;
- click on the “LAN” button;
- Click on the inscription: “Scan”.
After the operation is completed, access to the files will be open.
For wireless data exchange, you can also use the Asus Share Link utility. This program is available for installation on any Android device. To use the utility, perform the following manipulations:
- download the program to a computer or laptop;
- install the utility using the appropriate prompts;
- reboot the device.
After this, perform similar actions on the gadget:
- the program is downloaded to a tablet or phone;
- When the installation is complete, the utility is launched.
To share files, devices synchronize. To do this proceed as follows:
- The program is opened on a computer or laptop, as well as a phone or tablet;
- on one device, add files or drag and drop them with the mouse, and then click on the “Send” button;
- on another device click on the inscription: “Accept files”;
- add the device to the trusted list to accept files without confirmation.
You might also be interested in how to connect a printer to a homegroup:
Problems
The following issues may occur when setting up and connecting to your HomeGroup.
Devices from the local network do not appear
To fix this problem, you need to check the sharing settings on the devices, as well as the workgroup. To do this, perform the following manipulations:
- enter the conductor;
- go to the “Network” subsection;
- use the right key of the manipulator to click on the free space;
- Click on the inscription: “Update”.
This should resolve the issue. If this does not happen, you need to disable your antivirus program for a few minutes.
Another possible solution to the problem is to check the connection to the router, especially if the user is using a wireless connection.
No access to shared folder
To resolve this issue, it is recommended to check your shared folder access settings. Perhaps this is where a mistake was made. In some cases, you can also solve the problem by temporarily disabling the antivirus program.
Devices are not shown on the local network
To correct the situation, it is recommended to check for which profile the network is connected and the status of the home network. Most likely, the error is in these settings.
As you already understand, setting up a local network through a router is a simple procedure that does not require any special skills. To perform the manipulation, a router address or other similar information is not required. All you need is a connection to the router. There shouldn't be any difficulties. But if something doesn’t work out, write in the comments to this article. We will try to solve your problem together!
Thank you for choosing us! See you again!
Setting up a local network between PCs on Windows 7
After you connect both computers with a cable (twisted pair), you can begin setting up a Windows 7 local network.
Step one
We give all computers that will be on the network a unique name (in English letters). We leave the working groups unchanged.
- For example, the first device: Name – Home , group – work group .
- Second device: Name – Home 1 , group – work group .
- Enter “ Control Panel ”, “ System and Security ”, “ System ”.
- Now click on the “ Advanced system settings ” option.
- In the window that appears, you can change the name to whatever you want.
Step two
Set up shared access for the folders you select.
- Go to “ Start ”, “ Control Panel ”, “ Network and Internet ”, “ Network Sharing Center…. "
- On the left side is the very last line “ Change advanced settings…. "Click on it.
- A profile will appear: home , work and general . Everywhere we put dots opposite the line to include. The only thing is that you need to remove the password protection. We save and reboot. An example can be seen below.
Step three
We configure individual network settings on computers. The third step is performed in the same way as on Windows 10. Therefore, we will not re-describe how to do it. Action No. 3 above in the article .
Step four
If you need the first PC that is connected to the World Wide Web to also distribute the Internet, then take the following steps:
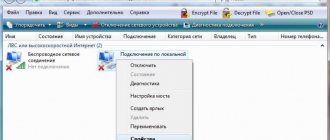
- To share access to the World Wide Web for a second PC, you need to go to “ Network Connections ”.
- Right-click on the icon of the configured connection, thanks to which you connect to the World Wide Web and click “ Properties ”.
- Go to the “ Access ” item and check the boxes everywhere. Click " Ok ".
Step five
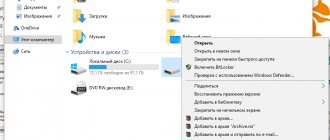
We share folders so that the second PC has full access to these folders.
Right-click on the folder you want to open for public access, select “ Sharing ”, “ Homegroup (reading) ”. We wait 30 seconds and it’s done, the folder is now available for the second computer.
If you need to see all available PCs on the network, then click “ Network ” in Explorer.
That's all, we showed how to connect your computers to a local network on Windows 7.