All modern versions of the Windows operating system, starting with the legendary Win XP, are equipped with useful functionality for working in local and Internet networks, which many computer owners are not even aware of. In this case, we are talking about organizing shared access to a folder for a certain group of people (devices) connected to a single local network.
This technical capability is used in many areas of activity:
- To ensure quick access for enterprise employees to general data, archives, information and other materials.
- To post and distribute secret corporate information within a narrow circle of senior management.
- For home use of multimedia and other files on several devices at once.
Today we will tell and show you how to share a folder in Windows 7 and 10 without resorting to using third-party software or network resources.
Allowing access to PC resources through the Toolbar
To share a folder, you need to configure your computer system properly. You must also specify the names of allowed users (or groups), and set a login password (if necessary). The setup process is almost identical for Windows 7 and 10.
We perform the following actions:
- Open the “Network and Sharing Center” menu by going to “Start/Control Panel/Network and Internet”. There is an easier option - click on the Internet connection icon and select the item mentioned above.
- Select the “Change advanced sharing settings” menu.
- Depending on the network you use, we make PC access settings. In our case, the “Home Network” profile is used.
After checking the boxes next to the indicated items, click the “Save Changes” button.
If you want to protect your data from strangers working on the network, enable password protection (the penultimate option). Your computer is now visible on the local network. To verify this, go to the “Network” menu through “This Computer” or “Computer”.
How to set up a network shared folder on Windows (SMB) without a password
Computers must be on the same local network
That is, if your devices are connected to the same router, then they will all have access to the shared folder.
If you are setting up in virtual machines, then in the “ Network select “ Network Bridge as the “ Connection Type :
Static IP
To configure an SMB shared folder, a static IP address of the computer where the folder will be located is not required. A shared network folder (share) can be accessed by computer name. However, if you are more accustomed to using IP, then you need to configure a static IP address for the computer that will act as a file server.
Computers must have the same workgroup
The computer with the shared folder, as well as all other computers that will have access to the shared folder via SMB, must be in the same workgroup.
By default, in the Windows operating system, all computers have the same workgroup named WORKGROUP .
To check the current group on your computer, open Explorer, find the “ This PC ” tab, click the “ Computer ” button at the top and click the “ Properties ” button in the menu that opens:
In the new window that opens, you will see “ Computer Name ” and “ Workgroup ”:
If you want to change these values, then click " Change Settings ".
Click the "Change" button to assign a new name to the computer:
Network folder settings in Windows
The SMB protocol in Windows enables not only network folders, but also the sharing of printers and other resources. Therefore, the settings for shared folders (network shares) are called “ sharing ”.
In Windows, when connecting to a new network, you may receive the following prompt:
Do you want to allow other computers and devices on this network to discover your PC? It is recommended to do this on your home or work network rather than on a public network.
If you answer “ Yes ”, then when you create a folder with network access on this computer, it will be visible on other devices on the local network.
If you answered this question a long time ago and don’t remember exactly how, then this is not a problem - you can find these settings elsewhere.
The next option is for those with a wired connection: next to the clock, tap on the network connections icon and tap on the network name:
In the window that opens, click on “ Change advanced sharing settings ”:
A universal option, suitable for those with a wired connection or Wi-Fi: right-click on the network connection icon and click “ Open Network and Internet Settings ”:
In the window that opens, click on “ Sharing Options ”:
If you want to go to these settings through the “ Control Panel ”, then the path is: Control Panel\Network and Internet\Network and Sharing Center\Advanced sharing settings
In the new window, the settings are divided into three sections:
- Private
- Guest or public
- All networks
The mark “ (current profile) ” means that this particular profile is currently in use.
We need to change the settings for that network, which is about, as well as in the “ All networks ” section.
Go to Private (current profile) :
First setting: Network discovery (If network discovery is enabled, this computer can see other computers and devices on the network and is visible to other computers). In it, select “ Enable network discovery ” and check the “ Enable automatic configuration on network devices ” checkbox.
Second setting: File and printer sharing (If file and printer sharing is enabled, then files and printers that are shared on this computer will be available to other users on the network). Here, select “ Turn on file and printer sharing .”
Further in the “ All networks ” section we are interested in one last setting:
- Password protected sharing
The description says: When password protection for sharing is enabled, only users with an account and password on this computer can access shared files, printers connected to this computer, and shared folders. To allow access to other users, you need to disable password protection for sharing.
Its essence is that to connect to a network folder you need to enter the login and password of the user that exists on the computer with this folder. I have never been able to connect if this option is enabled (perhaps the reason is that I do not set passwords for users, and users are not allowed to log in over the network without a password).
Therefore, select the “Turn off password protected sharing” option:
Optional: There are several versions of the SMB protocol and by default the first version is disabled on modern Windows systems. Samba uses version 1 for some functions, so if you have a mixed network with Linux, or have legacy hardware that only supports SMB 1, you can enable support for this version of the protocol. To do this, run cmd with administrator rights. Check:
dism /online /get-features /format:table | find "SMB1"
To enable SMB 1 do:
dism /online /enable-feature /all /featurename:SMB1Protocol-Server
If you want to disable them, then run:
dism /online /disable-feature /featurename:SMB1Protocol-Server
If you prefer a graphical interface, then type “ Turn Windows features on or off ” in the search:
How to create an SMB network folder
Create a new folder or use an existing one. I created a folder named Share C.
Open the context menu:
In the “ Access ” tab, click the “ Sharing ” button. In the drop-down menu, select “ All ”, click the “ Add ” button, switch “ Reading ” to “ Read and Write ” and click the “ Share ” button:
A window will open in which you can copy a link to a network folder; a link like Share (file://HACKWARE-MIAL/Share) . This link is INCORRECT, the correct link is file://COMPUTER-NAME/FOLDER or \\COMPUTER-NAME\Folder , for example, file://HACKWARE-MIAL/Share or \\HACKWARE-MIAL\Share .
Create a shared folder
After setting up the computer, we proceed to creating a network folder in Windows 7 and 10.
It looks like this:
- Create a new folder or select an existing partition. Right-click on the icon and select “Properties/Access”. Setting up sharing is done in two ways: through the “Sharing” menu or “Advanced setup”. We'll look at both options in turn.
- Go to the “Shared Access” directory. Here you need to select users who will have access to the folder and its contents. Also here you set permissions for actions with the section and attachment.
We select the “All” item and click “Add”.
After adding a new profile, give it read and write rights, and click “Share”.
A window will appear on the screen notifying you that you have successfully configured sharing of selected folders in Windows and indicating the path to the resource.
Activating and setting up sharing
It doesn't matter which folder you're going to share, the process will look the same. You can even open access to folders containing Windows system files, but this is not recommended, since a user connected to your local network could damage something there.
This is interesting: How to save a session in Mozilla - session manager for Firefox
Basic access settings are made through Explorer, and additional ones in the built-in Settings application and the taskbar.
Using a conductor
Through Explorer you can find any section. Once you have found the folder you want, do the following:
- Right-click on the folder and go to its properties through the menu that appears.
Open folder properties
- Expand the "Access" tab. First of all, you need to activate sharing of the element, so click on the “Advanced settings” line.
Click on the “Advanced settings” button
- Check the box to indicate that sharing should be enabled. Enter the folder name that will be displayed to other users and save the changes.
Check the box next to “Sharing”
- Returning to the “Access” tab, click on the “Sharing” button.
Click on the “Sharing” button
- Add accounts and users from your local network so they can access the folder.
Adding users with access
Done, once all the above steps are completed, other users will be able to access the folder. You may have to disconnect and reconnect to your local network for the changes to take effect.
A prerequisite for access is that network access is enabled. You can check its status using the instructions from the paragraphs “Using parameters” and “Using the control panel”.
Changing access level
If you want to limit or expand someone's rights to manage a folder, follow these steps:
- While in the advanced access settings (how to access them is described in paragraphs 1 and 2 of the instructions “Using Explorer”), click on the “Permissions” button.
Click on the “Permissions” button
- Select or add a new user to the list using the “Add” function, and then check the boxes next to the permissions you want to give him.
Specify the access level
There are three types of access: read - the user will only be able to view the content, change - will be able to change, full access - will be able to both read and change. Of course, when the “change” level is activated, reading is automatically enabled.
In addition to the main types of permissions, there are additional ones necessary for more detailed changes in access levels:
- While in the folder properties, select the "Security" tab. Click on the “Change” button to go to the access settings.
Click the “Change” button
- Check and uncheck the boxes next to the necessary and unnecessary permissions. Save your changes for them to take effect.
We indicate what rights the user has
Using parameters
The built-in Settings application allows you to manage system settings. In it you can allow access to shared folders and peripheral devices such as a printer or scanner, as well as set some home network properties.
- Using the system search bar, find the Settings program and expand it.
Open the "Settings" program
- Go to the “Network and Internet” block.
Open the “Network and Internet” block
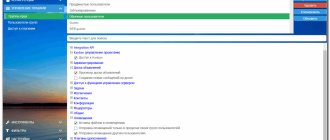
- Go to the Ethernet or Wi-Fi block (which one to choose depends on what type of protocol is used to connect computers on your local network), and then click on the “Change advanced sharing settings” button.
Click on the line “Change advanced sharing settings”
- Select the block with the connection type you are using (private, public, or "all networks" - universal). Set the conditions that suit you. If you want other users to have access to files that are shared through File Explorer, be sure to check the box next to “Enable file and printer sharing.” In the “All networks” block, you can activate the use of a password so that when trying to view the contents of a folder, a participant must enter a specific password to gain access.
Set permissions and enable a password if necessary
Using the control panel
If for some reason you cannot make the appropriate settings through the Settings application, use the Control Panel. It provides access to the same settings.
- Using the system search bar, find and expand the control panel.
Opening the control panel
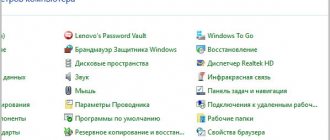
- In the built-in search bar, enter the query “shared access” and expand the found block.
Open the “Network and Sharing Center” section
- Click on the line “Change sharing settings”.
Click on the button “Change sharing settings”
- Select the block with the connection type you are using (private, public, or "all networks" - universal). Set the conditions that suit you. If you want other users to have access to files that are shared through File Explorer, be sure to check the box next to “Enable file and printer sharing.” In the “All networks” block, you can activate the use of a password so that when trying to view the contents of a folder, a participant must enter a specific password to gain access.
Activate network access
We open access to the section through “Computer” and “This Computer”
A network folder in Windows 7 and 10 can be created in simpler ways. Now we will do this directly in the “Computer” and “This Computer” menus.
On the Seven it looks like this:
- Open “Computer”, find the target partition on the hard drive, select it and click the “Sharing/Specific Users” button on the menu bar.
- In the list at the top, select “Everyone”, set the permission to “Read and Write” and agree to the changes using the “Sharing” button.
- In the tenth version of Windows it looks a little different. After selecting the folder, click on “Share” and select “Individuals”.
Oh and we agree with the changes made.
Windows 7 network folders as drives
So, how to connect a network drive? We already know how to create shared network folders (and about Windows 7), but it’s not very convenient to search for the desired shared folder in the network environment, especially if there are a lot of computers. It is much easier to have it appear as a separate drive that appears along with your “C” drive when the system boots.
Let's start with the Windows 7 desktop. Right-click on the “Computer” icon, which is located directly on the desktop and select “Map network drive...” from the menu.
If there is no such icon, then you can call up the “Start” menu and right-click on a similar link, or find “Computer” through Explorer.
In the window that pops up after this, select the letter for our future Windows network drive, for example “Z”. Next, using the “Browse” button, we find the folder on the network that will be it.
Here you need to focus on the fact that first you need to share this folder, that is, open general access to it so that it appears in the “Network” section inside one of the computers. I have already talked about how to do this (the link was given above).
After selecting the folder, leave the “Restore at logon” checkbox so that you don’t have to create it again every time you turn off the computer.
Now, when we go to “Computer” in Explorer, among others, we will be able to see the “Z” drive in the “Network location” section. You can get to it provided that the computer on which this network drive-folder is located is turned on.
Opening access to the folder via the command line
Probably the fastest method of creating a network partition is through the command line in Windows 7 and 10.
To do this we do the following:
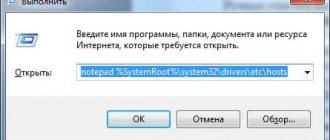
- Open “Start/All Programs/Accessories/Command Prompt” or write the command “cmd” in the search bar.
- In the console, enter the command: “net share files=drive letter:\folder name.” In our case, this is “net share files=d:\Business Documents” (without quotes).
Adding and removing network connections using net use
Using the net use , you can view your existing connections to shared resources:
net use
You can remove them all with the following command:
net use * /del
You can also delete a specific network connection with a command like:
net use \\COMPUTER\SHAR /del
For example, to delete a connection to the network folder \\hackware-server\Share-Server :
net use \\hackware-server\Share-Server /delete
You can add a new network connection as follows:
net use \\COMPUTER\SHARE /USER:USER PASSWORD /PERSISTENT:YES
For example, to save a connection to the \SHARE of the computer \\HACKWARE-MIAL with the user name Administrator and password 1234 , you need to run the following command:
net use \\HACKWARE-MIAL\SHARE /USER:Administrator 1234 /PERSISTENT:YES
We go to the network folder from another PC
After sharing our section on the local network, we move on to using it on another computer.
It looks like this:
- First, find out the IP address of the computer on which the open access folder is located. Launch the “Command Prompt” as indicated above and enter the command “ipconfig” (without quotes).
We are looking for an IPv4 address in the list. We remember our IP: 192.168.1.3 (you will have a different one).
- Let's move on to another computer that is already connected to your local network. In the search bar of the explorer, enter the IP address with two backslashes: “\\192.168.1.3”. The data folders you are looking for will appear in front of you.
How to disable network password entry?
To disable network password entry, go through a quick and easy setup.
- Initially, you need to click on the “Start” button, and then go to the “Control Panel”.
- In the search string field, enter the value gpedit.msc.
- Now the “Computer Configuration” section with the “Windows Configuration” item deserves attention.
- You need to go to “Security Settings” and “Local Policies”. All the basic information is in "Accounts: Restrict the use of blank passwords for console login only."
- The option you are interested in should be disabled.
At the same time, you can provide the option of automatic login. To do this, some additional settings are made.
- The path starts from the “Control Panel”.
- “Network” deserves attention.
- You should select “Regular Windows login” on the “Configuration” tab.
- When prompted to restart your PC, click “No”.
- In the next step in the control panel, you are interested in the “Passwords” icon. To log in automatically, you need to go to “Change passwords” and enter only the old combination. At the same time, you should not enter any numbers in the next two fields, namely “New password” and “Confirm password”.
- In the “Configurations” tab, you need to check the box next to “All users work with the same global settings and desktop settings.”
It is mandatory to restart the computer.
In most cases, it is advisable to save network credentials, as they guarantee a high level of security for using computer functions.
Become the owner of a network folder
In some situations, you may encounter problems working with a shared partition. If the new computer on the network does not have rights to use the resource, you will receive a message stating that you do not have access to the network folder. The way out of the situation would be to change the security policy by changing the owner. This can only be done with administrator rights.
To change the owner of a folder, do the following:
- Select the folder we are interested in, right-click and select “Properties/Security”. Then go to the “Advanced” menu.
- In this section, the user has access to precise settings for access to the folder and possible actions on it. Go to the “Owner” tab and click on “Change” at the bottom of the window.
- Now we must select our account. To ensure that access is extended to all attachments, be sure to check the “Replace owner of subcontainers and objects” checkbox.
When the settings are complete, click “OK” or “Apply”. If the owner has been successfully changed, the system will notify you about this in a notification window.
- In Windows 10 there are slight differences in the menu structure. Click the blue “Edit” link, where you select your profile from the list. Check the box to change the owner of attached files and folders.
We complete the setup with the “OK” button.
Features of settings
Credential Manager, which can be opened from the Control Panel, is responsible for all important settings. It is important to understand that connecting to remote computer resources requires the use of stored names and passwords. The classic scheme involves sorting passwords by password account name, with all information always stored in a shared Windows storage.
Each user who has access to the manager can add new information, view and correct saved information.
In order to add credentials, click on “Add windows credentials”, and then provide a username and password. To save, click OK.
To view or correct data, click on any entry. An append-like design avoids potential problems and inconsistencies.
Entering network credentials in Windows 10 is one of the best options for increasing the level of security, which is why many computer users actively use the provided function.