How to convert video to a suitable format
The first thing the user encounters is video conversion. This is necessary because the iPhone does not support all formats that are presented in the settings of many programs. As an example, iPhone does not support formats such as:
- AVI;
- FLV;
- WMV;
- MKV.
Among the most common and convenient formats for conversion are:
- MP4;
- M4V;
- MOV.
Only in these formats will it be pleasant to watch videos without freezing and various quality problems. What is each format intended for and how to choose the right one?
| Format name | Functions and purposes |
| MP4 | This format is the same specification as MPEG-4 audio formats. It contains several chronotopes and audio streams. There may also be animation, subtitles or panoramas. |
| M4V | One of the rarest formats for video compression. This format is loved by the company’s official store. iTunes always delivers files in it. |
| MOV | A specialized format developed by Apple. It is designed for the QuickTime application. Most users believe that this format is the most compatible for viewing on an iPhone, as it provides excellent quality and sound. |
Having determined the desired format, you need to select a program with which to carry out the entire conversion. This can be any user-friendly application. One of the most common is Wondershare. It supports over a thousand different formats. To convert from an iPhone, the above are enough.
Main requirements from the program:
- Support for the most famous and popular formats for iPhone;
- Fast video processing;
- Correctness in performance of work.
After downloading the program and selecting the desired format, you should upload the required video to the application and set the parameters. The parameters should be such that the video quality is not lost.
Use the best quality the program offers. As a rule, only with it the picture will not hurt the eye and the actions in the video will be smooth and accurate.
Some applications have special settings for the Apple operating system. Usually it is indicated in the program settings. Using this function, you can convert videos into exactly the format that will definitely open on the user’s phone.
All that remains is to wait for the time calculated by the application and enjoy the converted video in good resolution and quality.
There are also various programs on iPhone to convert video to PC format. The algorithm remains the same. Conversion on an iPhone may take more time and memory, so the user must calculate this moment.
But how can you transfer the video if the processing took place on a PC? Transferring data to an iPhone is different from transferring to an Android. It is much simpler, but for some, on the contrary, more confusing.
How to Transfer Photos from Windows to iPhone or iPad
If you haven't previously synced your device with iTunes, you won't be able to use the wireless Wi-Fi sync feature in iTunes and will need to connect your iPhone with a cable. First of all, make sure that you have installed the latest version of iTunes on your computer to proceed with this operation.
- Connect your iPhone or iPad to your Windows computer using the original USB to Lightning (or USB to USB C) cable and open the iTunes app on your computer.
- Click on the iPhone or iPad icon that is right next to the Music tab, as shown in the screenshot below.
- Now go to the Photos menu under Settings in the left panel and check the box next to Sync.
- Here you will notice that iTunes shows the folder from which it is copying photos. If your photos are not stored in this location, just click on the folder name - then “Select folder”. This action will open Windows Explorer.
- Select the location where the photos you want to transfer are stored and click Select Folder. Now just click "Sync" in iTunes.
- Next, iTunes will start the synchronization process and begin backing up the data on your iPhone. Depending on the number of photos and device memory, synchronization may take several minutes.
Go to the device page in iTunes
Photo synchronization must be enabled
Select the folder where your photos are stored
Now, if you go to the Photos app on your iPhone or iPad, you'll be able to access all the photos you've chosen to sync on your computer.
If you have photos in HEIC format, you may find this article useful on how to open it.
However, connecting an iPhone or iPad to a computer via wire is gradually becoming a thing of the past. If you don't want to rely on a USB to Lightning cable to transfer content, you can enable Wi-Fi sync in iTunes for wireless data transfer. However, for this to work, your PC and iPhone/iPad must be connected to the same Wi-Fi network.
How to transfer videos from PC to iPhone via iTunes
iTunes is a universal application from the famous company Apple. With it, you can not only download applications, control a computer device via iPhone, but also send video data from your phone to your computer! This application allows the user to perform all inaccessible operations very quickly and efficiently.
In order to transfer from PC to iPhone, you need to open iTunes on your computer and drag the converted video into it. You can do this in two ways:
- Drag from the desktop into the program;
- Open through the program menu.
For the first option, just send the converted video to your desktop, open the application and add the video by dragging and dropping. It will automatically go to the required section in the program itself.
In the second option you need:
- In the program, click on the button called “File” and find the section “Add a computer file to the library.”
- Next, select the video you want to transfer.
- If you add a video correctly, it should appear in the program in the “My Movies” section.
- After successful addition, you need to connect your iPhone via a USB cable. Synchronization via Wi-Fi is also possible. A phone icon will automatically appear in iTunes.
- Next, you need to go to the “My Movies” section and click on the “Synchronize all movies” checkbox.
- If you need to transfer only one video, then you should check the box next to it only. After this, you should look in the lower right corner and click on the “Apply” button.
Data transfer and synchronization will occur, after which this video can be viewed on the device via iTunes.
Transfer movies from PC to iPhone using apps.
With the MacOS update, iTunes became history and was replaced by Finder. In fact, the functionality turned out to be similar and visually nothing has changed radically. Through Finder you can download a movie to your iPhone.
How to do it:
- Open Finder on your Mac.
- Connect your smartphone to your laptop and it will appear in the left menu bar of the program.
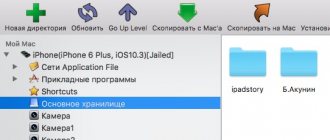
- Go to your Files folder in Finder. If you have already downloaded the player, then transfer the downloaded films to it. If not, then download AVPlayer and simply drag the movies from the folder on your PC into the AVPlayer folder that will appear in the Finder.
- The file will immediately appear in Finder.
In the same way, you can download data to your iPhone via iFunbox, iTools, iMazing. The functionality of these programs is similar, the interface is just different.
- For example, open the iFunbox program.
- Go to the "App File Sharing" → "AVPlayer" folder.
- Drag video from computer to iPhone.
- Once the download is complete, the video will appear on your smartphone.
Choose the program that you like best and use it to transfer data.
Please note that iTools, iMazing will offer you to buy the full version to be able to transfer data. Finder and iFunbox will allow you to do this for free.
How to transfer video from PC to iPhone using the cloud
The most famous cloud is Dropbox. Of course, there is a huge amount of storage where you can store files and transfer them from one device to another. As a rule, they use the most popular ones, so using this application as an example, we’ll look at how to transfer videos from a PC to an iPhone using cloud storage.
The cloud is a base where you can upload various files without clogging up the memory of your computer device. The only disadvantage of such applications is the memory limitation.
Having installed the cloud, in this case DropBox, on your computer and phone, you can start transferring video.
- First you need to open the program on your computer and then transfer the video file to it. This can be done by transferring it from the desktop to the application itself, or through the menu.
- Next, the user needs to wait for synchronization. Synchronization time depends primarily on the size of the downloaded file.
- Don’t forget that you need to open the application on your PC and iPhone, logging into the same account. Otherwise, synchronization simply will not work.
- The downloaded video will be displayed in the cloud on the iPhone if all the steps are completed correctly.
Using VLC to copy movies to iPad and iPhone via cable and Wi-Fi
There are third-party apps that allow you to transfer videos to iOS devices and play them on iPad and iPhone. One of the best free applications for these purposes, in my opinion, is VLC (the application is available in the Apple App Store https://itunes.apple.com/ru/app/vlc-for-mobile/id650377962).
The main advantage of this and other similar applications is the smooth playback of almost all popular video formats, including mkv, mp4 with codecs other than H.264 and others.
After installing the application, there are two ways to copy video files to your device: using iTunes (but without restrictions on formats) or via Wi-Fi on a local network (i.e. both the computer and the phone or tablet must be connected to the same router for transfer ).
Rip Videos to VLC Using iTunes
- Connect your iPad or iPhone to your computer and launch iTunes.
- Select your device from the list, and then under Settings, select Programs.
- Scroll down the programs page and select VLC.
- Drag and drop video files into VLC Documents or click Add Files, select the files you want, and wait for them to finish copying to your device.
Once the copying is complete, you can watch the downloaded movies or other videos in the VLC player on your phone or tablet.
We use the iFunBox application
iFunBox is a file manager with which the transfer of any files will happen quickly and without any hitches. Its advantage is that it is completely free and does its job efficiently.
- Download the application to your PC through official sources;
- We connect the phone to the computer via USB cable. The app will automatically display the connected device;
- Move the video for import to the “Recovery Music and Video” tab. This is done by dragging the necessary files from the desktop into the application;
- In this section, click on the image of a sunflower, the program will give us a choice in transferring the necessary files. Select the necessary files to import and click on “Save”;
- As soon as the copying to the PC occurs, you should close the application and check the transferred files in the standard phone folder.
Using iCloud cloud storage
There is another way to transfer files between Apple devices and a computer - using iCloud cloud storage. This method allows you to easily “drop” any files from one device to another without a cable.
Cloud data storage
– online storage in which files are stored on the servers of a company providing data storage services. The main advantage of cloud storage is the ability to open files from any device if you have access to your account.
iCloud is an Apple service designed to store music, videos in any resolution, including 4K, sounds, pictures, email messages, books from iBooks, PDF documents and other types of data. To access iCloud, you must sign in to your iTunes Store account with your Apple ID. This can be done from iPhone, iPad, iPod, Apple TV, as well as from laptops and desktop computers Mac and Windows. You can link up to 10 devices using your Apple ID so you can access your iCloud files from all your mobile devices and computers.
Learn more about your Apple ID
After you sign in to your account, you need to turn on iCloud Photo Library
.
On your iPhone, iPad, or iPod, go to Settings > Music
and turn on the switch for
iCloud Music Library
.
To enable iCloud on your computer, launch iTunes, go to the Settings
, On the
General
iCloud Photo Library
check box and click
OK
.
You can choose what data to sync to iCloud in Settings > iCloud
. Everything you mark in this section will be automatically copied to cloud storage.
Transferring videos via iTools
iTools is functionally identical to the iTunes application, only it is much simpler and files in it are handled using 2-3 buttons. A program with similar capabilities can transfer videos quickly and safely. All files will be saved:
- First you need to launch the downloaded application on your PC.
- After that, you need to find the “Video” block in it. This block contains a number of sections; we need the “Import” section. With its help, the video recording we need will be imported.
- After clicking on “Import”, the explorer menu will open, in which you need to select the video that the user wants to transfer. The application will ask you to confirm the import.
- After successful transfer of the video in the standard application on the iPhone, the video file that the user imported using the program will appear in the “My Videos” tab.
How to transfer files via mail and instant messengers
The most convenient and fastest option for exchanging data is using instant messengers. All you have to do is open a conversation and send any files from your phone. On iPhones, it’s convenient to use Telegram to add media files from the gallery or from iCloud. To work only with personal gadgets, there is a “Favorites” section; all downloaded information will become available in the messenger from any device, regardless of the OS. Storage is carried out in the cloud for a long time.
The second convenient method is email. To transfer data you need:
- Activate email on iPhone and click on compose letter.
- Enter your personal address, subject of the letter and click on the icon to attach files.
- The new menu will contain the device memory through which you need to select files to send.
- Click on the send icon.
- Open your email on your computer and click on the attached files to download. The described method works both for moving to a PC and for copying to a phone.
Some services set limits on the amount of information transmitted in a letter, so if you cannot send data, you need to check how much memory the information takes up.
We use a simple application WALTR 2
This application most often transfers audio files, but it also has the ability to transfer video. To do this you need:
- Download the application through the manufacturer’s website on both PC and iPhone. It is not sold in the official Apple store, so it is possible to purchase a license;
- Next, the program starts. It will automatically check if any device is connected, so the user should not forget about the connected device;
- After this, you need to upload the file to the application via PC. The conversion will happen automatically;
- The video will be displayed on all synced devices, including your phone.
Via Wi-Fi
To transfer a video over Wi-Fi:
- Connect your gadget to your PC. Subsequently, you will be able to transfer files without connecting to USB. But for the initial setup you need a cable.
- Open iTunes.
- Go to the device review.
- Scroll down the page.
- ABOUT.
- Click Apply.
After this, you can download the media file from your computer to your iPhone wirelessly (if the devices are on the same network). For this:
- Go to the gadget settings.
- Section "Basic".
- “Synchronization via Wi-Fi” item.
Sync with iTunes
- "Synchronize" button.
Everything that is in the iTunes library will be copied to the device’s memory. You can add new videos to it, even if your phone is far away.
If you don’t want to select one shortcut at a time, but copy a collection of films at once, in the “File” menu, click “Add Folder”. And specify the directory with media. They will be automatically copied to the iPhone every time you sync.
How to stream video over Wi-Fi using VLC
This method will only work if your computer and phone are connected to the same Wi-Fi network. Not every user knows that video files can be transferred over a wireless connection.
You can transfer not only various videos, but also others. For example, photos or audio files.
Transfer over Wi-Fi is not possible without the help of VLC. It is designed specifically for transferring files wirelessly. Its functionality is reminiscent of the above-mentioned programs, such as iTunes or iTools.
- To stream video over a wireless network, you need to make sure you are connected to the same Wi-Fi. After that, the VLC program is downloaded to the iPhone.
- The program launches quickly. The main menu opens. A menu is selected in the upper left corner. It has a section “Wi-Fi access”; make sure that the network address is entered correctly, otherwise the transfer will not occur.
- The network address points to the site in the browser that you want to access through your computer. After a successful transition through the PC, you need to select an identical menu icon on the computer in the site window. Explorer opens, where you need to select the required file to transfer, in our case, video.
- The program shows “100%” when the transfer was successful. You can easily and quickly transfer any file via a wireless network.
FTP for transferring video to a smartphone.
How else to transfer video from computer to iPhone?!
- Go to VLC player on your phone.
- Go to the “Network” section and enable Wi-Fi access.
- Connect a file hosting service that is convenient for you. This way, you can immediately watch movies on your iPhone from Google Drive or another cloud service.
- Enter 10.0.1.2 into the search bar of your computer browser. The download page will open. You can drag and drop videos from your computer directly into the browser and open them on your smartphone.
If your PC has a cloud service, for example, Yandex.Disk, then you can transfer data even faster.
- Find a video that is in the cloud. Or upload it to the cloud in advance.
- Click on it and copy the link.
- Open this link on iPhone. Your video will immediately open on your smartphone, and you can view or download it.
You can also install the cloud on your computer and smartphone, and view all files through cloud storage. If necessary, you can download the movie to your phone.
Choose the method that you like best. It is very convenient to transfer movies from your computer to your iPhone when you are going on a trip. You can download movies to your phone, save them to your camera roll and watch them on the go, and then delete them from your device. The files will be saved in the messenger or the cloud, you can also view them via the Internet without taking up the flagship’s memory.
Still have questions?
Call us
+7-978-773-77-77
Write to us
Come to us
Address and work schedule.
What's next?
How to protect your MacBook from water? Keyboard overlays and other solutions
How to Transfer Videos from Computer to iPhone Using FoneTrans
This is one of the direct ways to transfer video recordings. FoneTrans is an alternative to the famous iTunes application, with which you can easily transfer any necessary file. To do this, you need:
- Download the program through an official source on your PC. As a rule, the program automatically turns on and asks you to connect the desired phone. The software is designed in such a way that it automatically recognizes all devices in a close radius. The iPhone will automatically connect to the PC;
- Next in the program you need to find the “Photo” section in the left column, which contains not only photographs, but also video files. You need to transfer the video that needs to be imported into this section;
- After the successful completion of the operation, this video file will be reflected on the phone without any marks or erases.
It turns out that there are a huge number of ways to transfer video from a PC to an iPhone. The user is presented with a large selection. He can choose exactly the path that is convenient for him. Transferring videos is easy and simple even with the iPhone operating system.
Rate this article
Backup using iTunes and iCloud
If you wish, you can copy and save all information from your mobile device using backup. Having made a backup copy, you don’t have to worry that your data will be lost if you lose your iPhone or tablet. You can also easily transfer all your files when you replace your old Apple device with a new one. Backup is possible in both iTunes and iCloud.
Learn more about iTunes and iCloud backup
Now you know how to sync iPhone and iPad with your computer using iTunes and iCloud. You can learn more about transferring files from your device to your computer and other intricacies of working with iOS on the Apple technical support website https://support.apple.com/.
