Apple uses the Apple ID security system in its devices. Through user identification, one enters the Apple store, makes purchases, downloads content, manages personal data, settings, etc. The reliability of Apple ID is confirmed by the fact that, often, even the owner of an iPhone finds it difficult to unlink or log out of the account. But still, following the correct instructions, you can do this calmly.
Why delete the iСloud account of the previous user?
The biggest danger of not coping with the untethering of Athos is that when buying a phone from someone else, you can run into big problems. If iСloud is not unlinked, then the iPhone may soon be blocked. Without knowing the login information, the iPhone turns into a museum exhibit and can no longer be used.
Even if you have been using a purchased used iPhone for some time without any problems, after the first update the system will show a message about activating the iPhone. In this case, only the iCloud account with which the phone was initially set up is suitable. Resetting settings and flashing the firmware will not help in unlocking.
Advice: when buying an iPhone secondhand, find out how to remove the old owner’s Apple ID and do this before paying.
How to check if iPhone is linked to iCloud account?
The first step in checking for an active iCloud starts with the Home button. If, after pressing, the device requires you to log in to your Apple ID account or enter your Touch ID password, this is a clear sign that the iPhone is not unlinked. The second check option is to wipe your iPhone. For this:
- Login to Settings
- Basic
- Reset
- Clear content and settings
- Enter passcode
- Click Erase iPhone (twice)
- Enter your iCloud password.
Of course, this method requires the prior consent of the device owner. After all the steps, go to the iPhone settings and instead of the owner’s name, a window should appear asking you to log into your iCloud account.
Removing from iCloud service
The next step on how to unlink an iPhone before selling it is to unlink your account and device ID. The technique allows you not to delete the profile itself on the service, but only to eliminate synchronization with it. To complete the procedure, you will need Internet access at almost any speed and a browser.
- Initially, you should go to https://www.icloud.com.
- Provide personal login information for the previous owner.
- It is recommended to create a backup of data manually, if necessary, since automatic saving of information will now start, but there is a risk of losing some data.
- After logging into your account, you need to click on “Find iPhone”.
- At the top of the window in the center of the menu there will be a section “All devices”, you need to go to it.
- After expanding the list, select the desired item.
- A window will appear on the right where a number of actions will be indicated; select “Erase iPhone”.
- Confirm your intention using the ID password.
- Next they will ask for a SIM number or enter a message, but this is not necessarily possible by simply completing the action with the “Done” button.
The procedure will start after the last action is completed, but deletion will require constant access to the network, otherwise the process will appear in deferred action mode.
When the smartphone is untied, it can be synchronized with the new ID.
There is one more pre-sale preparation step that will prevent the theft of information by the previous owner. It is worth restoring the original settings.
Removing Apple ID from iPhone
Follow these steps to unlock successfully:
- Open Settings
- At the very top, the Apple ID section will be displayed indicating the owner’s first and last name. Let's move on to this section.
- At the bottom, click Logout
Important: the latest versions of iOS provide three options for logging out: Log out from iCloud and the Store, separately from iCloud, and separately from the Store.
- Select one of the exit options
- Enter the password to disable Find My iPhone
- Turn off (Off)
- Open the menu Settings – General – Reset – Erase content and settings.
- Click – Erase device.
After completing all the steps, the iPhone will be completely disconnected from iCloud. All data is deleted and the phone is reset to factory settings.
Unlinking Apple ID using a computer
To get started, sign in to iCloud on your computer.
- Select "Find iPhone"
- Re-enter the password
- Marking our device
- Click on “Erase iPhone”
An alternative option for deleting an Apple ID is to click on the cross next to your iPhone on the “All devices” tab. A pop-up window will ask for confirmation and also inform you that other users have linked their account.
How to remove iCloud from iPhone
If you are buying a used iPhone, you must make sure that the previous owner has deleted his account. To do this, go to “Settings” - “General” - “Reset”, here you need to select “Delete all content and settings”, and then confirm the reset. If, after resetting the old settings, the mobile device remains associated with Apple ID and iCloud, then you should not buy such a smartphone.
In this case, you can ask the seller to confirm the activation lock by entering your login and password. Be sure to disable Find My iPhone in your settings. After the reset occurs without prompting for a password, the device is completely removed from iCloud.
On the iPhone itself
You can uninstall iCloud on iPhone/iPad. This can be done in just a few steps.
- Click on settings, then scroll to the bottom of the page to find ICloud and open it.
- Scroll the page again to the very bottom until the line “Delete account” appears, click on it.
- Click “Delete” again, confirming your actions.
That is, you can delete your account in just three steps. After this, you can create a new Apple ID.
Before completely deleting your account from your mobile device, it is recommended that you back up your information.
Via iTunes
You can also reset iCloud using a computer using iTunes.
- Install and then launch iTunes on your computer.
- At the top of the screen, select the “Account” > “View” section. You may need to enter your Apple ID.
- Scroll to the iTunes in the Cloud section and click Manage Devices. After this, a list of all Apple devices associated with the account will appear on the screen. If there is no device associated with the ID, then this section will not exist.
To remove iCloud, you need to go to the settings of the desired device, click on iCloud. After that, select Turn off and confirm your intentions. You must first enter your account's Apple ID and password.
From computer
To disable iCloud on your computer, you must follow these instructions:
- Open the iCloud program on your computer and check the box next to the service that you want to disable. To save the changes, click on the Apply button.
- To completely disable iCloud for Windows, you should open it and then sign out of your account.
Before you remove that program from your computer, you should create a copy of all data.
For computers with the Windows 8 operating system and later versions, the algorithm of actions is slightly different.
- Go to the start screen, then click the mouse in the lower left corner and select “Control Panel”.
- Click the “Uninstall a program” link.
- Select iCloud > Delete. Confirm their intentions.
As you can see, removing iCloud does not take much time; everything is quite simple if you follow the instructions.
Complete account deletion
If you decide to completely delete your account, you will have to contact Apple support, since this option is not available to users. The algorithm of actions is as follows:
- Go to apple.com and deauthorize all Apple devices linked to your account. To do this, select the devices one by one and click on the Delete button;
- At the bottom of the page you need to create a PIN code for the support team to quickly confirm your identity if necessary;
- Contact the service with a request to delete your account. You need to prepare convincing arguments for support specialists to delete your account.
It is worth remembering that the more convincing the reasons for deletion, the faster you can expect complete deletion of your account.
Before completely deleting your account, you need to think carefully. Maybe the best option is to temporarily disable some features.
Complete account deletion
If you want to create a new iCloud account, then the best thing to do is delete all personal data on Apple's servers. A full account wipe will remove all personal information about the user without refund. All purchases on Apple services are void. The iCloud cloud will also be cleared.
To begin the process of deleting your account, you need to go to the Apple website in a special section - “Data and Privacy”. First you need to log into your account and answer a few questions. Next, select “Delete account”.
The removal process consists of several steps:
- Specifying the reason for account deletion
- Agreement to the terms of deletion
- Email address to receive supporting information
A 12-digit code will then be provided. The received code is the last opportunity to refuse account deletion. It will take up to seven days to confirm your request.
Case 3: you have a device linked to an Apple ID
When buying a device in person, make sure that it is necessarily unlinked from the credentials - it is better if the seller does the unlinking according to the above algorithm in front of your eyes. Otherwise, the device will become non-functional at the first update, not to mention the fact that the seller will be able to block it remotely.
If you find or purchase a device linked to someone else’s account, it is completely useless for you.
You may not install updates until a certain point, but the functionality will still be significantly limited.
In fact, for example, a found activated iPhone cannot be used, even if it is not yet locked remotely.
Not even Apple Support can help you here. Although, if the seller has given you a sales receipt for the purchase of the device and all the complete documentation, then it’s still worth trying to contact them - sometimes the iPhone can be unlocked with the help of support staff.
In all other cases, you need to look for the account owner and act together with him as described in the first or second section. However, finding such a seller is often very difficult; of course, there are cases when the former owner did not unplug the iPhone due to ignorance or inattention, but most often stolen devices are sold in this form, that is, the seller himself does not know the necessary information.
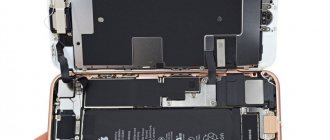
Rice. 14 Locked smartphone
Unlock request to Apple
To unlock an iPhone, the owner can send an unlock request to the company's specialists. This method is used by those who accidentally forgot their authorization data, or purchased a phone that requires entering someone else's iCloud. This will require proof of legal ownership of the device.
To request you need:
- Receipt for the purchase of the phone indicating the store address and serial number.
Important: The receipt is the most important evidence when submitting a request to Apple.
- Photo of the back of the device
- Photo of IMEI and serial number
- All files are packed into a Zip archive
- Create a personal Apple ID.
Advice: try to remember and indicate in a separate file the answers to the security questions that were asked when creating your account; this will make the task easier.
After collecting all the evidence, we contact Apple support. They will provide an email with a link to download the files. In addition, they may ask for additional photos of the phone or box. An approving answer will come when the support team contacts the store and checks the remaining evidence of ownership of the phone.
Advice: after all the procedures, be sure to check if the iPhone is untied.