Why delete iTunes: common reasons
iTunes removal occurs for the following reasons:
- The program is no longer needed. Alternative software for data transfer is much easier to use, because it allows you to export files from your computer without synchronization. In addition, such programs are not inferior to iTunes in terms of functionality.
- An earlier version of iTunes is required. Difficulties in mastering a new version are the main argument for returning to the previous one.
If iTunes installed on your PC crashes regularly, do not make a hasty decision to remove the program. Typically, updating iTunes to the latest version solves problems.
What you need to completely remove iTunes from your computer
Complete removal of iTunes assumes that all components that were installed simultaneously with the program will also end up in the Recycle Bin. These components include:
- Apple Software Update - responsible for updating Apple programs.
- Apple Mobile Device Support - allows you to synchronize Apple gadgets with iTunes.
- Bonjour is a module for automatically searching for software services, services, and network devices.
- Apple Application Support - Provides detailed instructions that your computer must follow to perform a function. In some versions of iTunes OS, iTunes creates two similar components at once: for 32-bit and 64-bit systems.
It is not recommended to remove components separately from iTunes or in random order . Also, do not restart your PC until the iTunes components are completely removed.
Removing iTunes from iPhone
iTunes is a program for organizing files contained in Apple mobile devices. Without this service, it is impossible to download music or videos to your iPhone. But when you need to remove this program, as mentioned above, it is not so easy to do. Still, how to remove iTunes from iPhone? And which of its components must be removed?
Close the iTunes program. Click the “Start” button and select “Add or Remove Programs.” We find our “iTunes” program in the list and delete it. If the system automatically reboots, then it’s okay. If you are asked to reboot, we agree.
We also remove:
- QuickTime;
- Apple Mobile Device Support;
- Apple Software Update;
- Apple Application Support;
- Bonjour.
Then you need to make sure that these applications are actually removed. Go to drive C and manually delete the following folders:
- C:\Program Files\Common Files\Apple\
- C:\Program Files\Bonjour
- C:\Program Files\QuickTime\
- C:\Windows\System32\QuickTimeVR
- C:\Windows\System32\QuickTime
Now we close all programs, and that’s it!
Step-by-step instructions for uninstalling a program on Windows
Step 1 . Close iTunes related processes. To do this, use the task manager (Ctrl+Alt+Delete). The following processes must be stopped manually:
- AppleMobileDeviceHelper.exe is a process responsible for the correct interaction of iTunes with Apple devices.
- AppleMobileDeviceService.exe is the process that allows iTunes to recognize Apple gadgets.
- iTunesHelper.exe is the process responsible for establishing communication between Apple gadgets and iTunes.
Before deleting iTunes, you need to close all processes associated with it.
Even if iTunes is not open, the listed processes are active in the background.
A complete list of iTunes processes in Windows is provided on the official Apple portal: https://support.apple.com/ru-ru/HT201999.
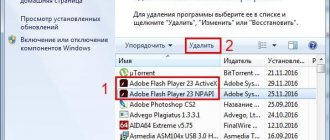
Step 2. Remove iTunes itself and its components. You need to get into the “Control Panel”: on Windows 7 it is located in the “Start” menu; on Windows 8 it is appropriate to use a search engine (query “Control Panel”). In the "Control Panel" you should go to the "Programs and Features" section - the "Uninstall a program" subsection.
You should uninstall iTunes through the “Control Panel”
Find iTunes in the list of programs, right-click and select “Uninstall”, then wait until the uninstallation process completes (Windows will not allow you to erase two programs at the same time). Also erase the remaining components exactly in the order in which they were presented above.
In the Programs section, you can organize components by publisher
To avoid wasting time searching through the entire list, it is recommended to organize programs by publisher. All iTunes components have a common publisher - Apple Inc.
Media files purchased from the iTunes Store are located in the Music library on drive C in the iTunes folder. Send this folder to the Trash if you want to get rid of all traces of iTunes.
Finally, go through your C drive and erase the folders from the following list (if you find them):
- C:\Program Files\iTunes\;
- C:\Program Files\Common FilesApple\;
- C:\Program Files\iPod\;
- C:\Program Files\QuickTime\;
- C:\Windows\System32\QuickTime\;
- C:\Windows\System32\QuickTimeVR\;
- C:\Users\UserName\AppData\Local\Apple\;
- C:\Users\UserName\AppData\Local\Apple Computer\;
- C:\Users\UserName\AppData\Local\Apple Inc\;
- C:\Users\UserName\AppData\Roaming\Apple Computer\.
Step 3: Clear your registry of iTunes entries. This procedure is unfamiliar to many Windows users, so we will pay special attention to it.
Click “Start”, in the “Search programs and files” field, enter regedit (on Windows 8, use the search engine).
On Windows 8 you can get to the registry through a search engine
Run the regedit.exe program.
Open the “Search” menu via Ctrl+F, and type iTunes in the “Search” field.
iTunes recordings should be searched through a search engine (Ctrl+F)
If, at the end of the procedure, entries appear in the search results, right-click on each of them and select “Delete.”
If a registry search turns up such entries, delete them
To quickly clean the registry, you can use special software - uninstallers. The most famous uninstallers are CCleaner (free program) and Uninstall Tool (paid).
When all three steps are completed, restart your computer - after this you can be sure that iTunes has disappeared without a trace.
Video instruction: removing iTunes and its components
Removing iTunes from the computer
On computers running Windows 10, iTunes can be installed in two ways - using the Microsoft Store or an executable file downloaded from the official Apple website. The second option, which is the only one available for previous versions of the OS, involves a slightly different, more complex uninstallation algorithm, since along with the main program, additional components are installed on the PC, which will also need to be removed. Let's look at all this in more detail below.
Method 1: Uninstaller programs
Most computer applications leave a lot of traces in the operating system during their operation, both files on the disk and entries in the system registry. If you want to completely get rid of iTunes traces, it is best to use one of the specialized uninstaller programs for this purpose. As an illustrative example, we will turn to the well-known CCleaner for help, but you can choose any other solution from the article provided at the link below.
Download CCleaner
Read more: Programs for uninstalling programs
iTunes from the Microsoft Store If you installed iTunes from the Application Store for Windows 10, removing it will not be difficult - no traces or additional components remain after such a program.
- Launch CCleaner and go to the “Tools” tab in its sidebar, and then select “Uninstall programs”.
- Find iTunes in the list that appears, select it by clicking the left mouse button (LMB) and use the “Uninstall” button.
No additional actions are required from you.
iTunes from the official website If iTunes was installed in the traditional way, using a file downloaded from the official website, your system will have five more (sometimes less) software components that will also need to be removed.
- Apple Mobile Device Support;
- Apple Software Update;
- Bonjour;
- Support for Apple programs (32-bit);
- Support for Apple programs (64-bit).
- Open the “Uninstall Programs” section in SeaCleaner and sort the list of items presented in this window by their publisher. To do this, click on the tab of the same name on the top panel.
One by one, uninstall all programs published by Apple (this is indicated to the right of their name).
In this case, iTunes should be removed last, so you can start with Apple Mobile Device Support,
and then just proceed in order of priority.
Only after you get rid of all additional software, perform “Uninstall” iTunes.
Read more: Cleaning your system of junk using CCleaner
Method 2: Programs and Features
Every version of Windows OS has a standard uninstaller, and it can be used to remove iTunes.
Note: Using the method described below, it is impossible to remove iTunes that was installed from the Microsoft Store in Windows 10 - applications from the store are simply not displayed in this section of the operating system.
- Launch Programs and Features. The easiest way to do this is through the “Run” window (pressing the “WINDOWS + R” keys to call), in which you need to enter the command below and press “OK” or “ENTER”.
In order to find iTunes and all additional software components from Apple in the list of installed programs, click on the “Publisher” button located on the top panel - this will order all elements of the list according to this criterion.
Uninstall all programs from Apple Inc one by one,
selecting them by clicking LMB and then clicking the “Delete” button on the top panel.
Uninstall iTunes last. In pop-up windows asking you to confirm the removal of the software, simply click the “Yes” button.
Method 3: Settings (Windows 10)
If you are a user of the tenth version of Windows and prefer to use its standard tools to solve certain OS maintenance tasks, in this case you can and should refer to the “Settings” section to remove iTunes.
iTunes from Microsoft Store
- Use the "WINDOWS+I" keys to open the operating system's "Settings" and navigate to the section called "Applications."
Scroll down the Apps & Features list a little and find iTunes. LMB click on this element, and then double-click the “Delete” button.
After a few seconds, the program will be removed from your computer.
iTunes from the official site
- Repeat the steps from the first point above, and then in the “Applications and Features” tab, arrange the list of programs presented there by the date they were installed. To do this, simply select the appropriate item in the “Sort by:” drop-down list.
This sorting will help us see together all the Apple software components that are installed on the computer, after which we can easily remove both each of them and iTunes itself.
Note: The list of all products from Apple Inc that need to be uninstalled is listed in the “iTunes from the official website” of the first method of this article.
To do this, simply LMB click on the first program in the list, and then click “Delete” twice.
Wait until the uninstall process completes, then move on to the next item in the list.
Lastly, uninstall iTunes.
This process usually takes about one minute,
but upon completion, you will get rid of all Apple products and the traces they left on the operating system.
How to remove iTunes from Mac OS
On OS X computers, iTunes is a pre-installed program—uninstalling it won't be as easy as with Windows. If the user tries to drag a program file to the Trash, he will see this unfriendly message:
It is not possible to delete iTunes by directly moving it to the Trash
In fact, iTunes is not as necessary for a Mac computer as Apple developers imagine. If the user selects a similar program for playing media files, he will not need iTunes at all.
Here's how to get rid of iTunes on Mac:
- Go to the Applications folder and find iTunes.
- Right-click on the icon and go to “Properties”.
- Click on the padlock icon and enter the administrator password.
- In the "Sharing and Permissions" section, select "Read and Write".
In the “Sharing…” section you need to set “Read and Write”.
Now you can get rid of the utility in the same way as owners of a Windows PC. Close the Properties menu, trash the app, and empty the Trash.
After deleting in this way, all music tracks and libraries with multimedia files will remain in place.
There is another way to remove iTunes from Mac, but it is suitable for more sophisticated PC users:
- Through Finder, launch “Terminal” (path “Go” - “Utilities” - Terminal).
You can find Terminal on Mac using Finder
- In the Terminal, type cd/Application and press Enter - this will take you to the application directory.
- To remove iTunes, type sudo rm -rf iTunes.app/ and press Enter again.
iTunes will be deleted past the Trash.
Using uninstallers to remove iTunes is pointless. For example, the Clean My Mac utility does not recognize this program at all.
Possible problems and ways to solve them
Windows Installer package error
The full error statement is: “Windows Installer package error. The program required to complete the installation cannot be started. Please contact support or package vendor."
This error occurs if iTunes was not installed correctly.
How to fix this error is described on the official Apple information portal. You need to go to the “Control Panel”, restore the iTunes program and only then try to remove it again.
Error 2330
A similar message appears if the iTunes software was not fully downloaded, or if the program's registry was damaged. The cause could also be a virus that has damaged Windows files associated with iTunes.
If this error occurs, you should check the disk using the built-in Chkdsk utility (Check Disk). Then you need to restart your PC and try installing iTunes over the existing data transfer program.
Requires iTunes.msi package
If during uninstallation an error appears with the text “The required file is located on a network resource that is currently unavailable. Click OK to try again, or specify a different path to the folder containing the iTunes.msi installation package,” you should use one of the third-party disk cleaning utilities (for example, IObit Uninstaller) or erase the iTunes folder from the root folder. You can also solve this problem by reinstalling Windows.
When uninstalling iTunes, it is also important to erase the components of this program from the PC, and in a strictly established sequence. Despite the need to clean the registry (an operation unfamiliar to many users), both Windows and Mac owners can easily handle the iTunes uninstallation procedure.
Windows Installer package error when installing iTunes: how to fix
How to fix Apple ID sign-in errors
The sequence of removing iTunes and its components from a Windows computer
As you may have noticed, at the same time as iTunes, other components are automatically installed in Windows, such as: Apple Software Update, Apple Mobile Device Support, Bonjour and Apple Application Support. They are needed to update Apple software, connect and sync iPhone, iPad and iPod Touch.
Uninstall iTunes and all its components in the Windows Control Panel in the "Programs and Features" menu in the following order:
- iTunes;
- Apple Software Update;
- Apple Mobile Device Support;
- Bonjour;
- Apple Application Support (32-bit);
- Apple Application Support (64-bit).
On some systems, iTunes may install two versions of Apple Application Support. This is expected behavior. If you have two versions installed, be sure to uninstall both.