Features of iCloud Drive
The iCloud disk is available to all owners of iOS devices and macOS computers. To view and edit files stored on it, just log in using your Apple ID data. Peculiarities:
- Automatic synchronization of user files and folders on all connected devices.
- Support for additional software for working with data stored in iCloud.
- Opportunities for collective access and editing of documents and media files.
- Access not only through the browser, but also desktop applications for PC Windows. macOS.
Before you transfer photos, videos and other files to disk, you must enable automatic synchronization in the settings of your iPhone or other iOS device. After that they will be available in the cloud.
Register on Mac
- Open the panel with the system “Settings” of the operating system;
- Select the “iCloud” section, click on the available menu item “Create Apple ID”;
- Proceed to fill out your personal information. Select your country, date of birth, fill out the text fields with your first and last name. Data, as in other cases, is important to remember!
- The next step is to generate a new e-mail in the iCloud service, then you will again select security questions and answers, and then specify a backup mailbox for communication and, as a tool for additional protection of personal data;
- The final step is to log in using the resulting account in the same settings.
Setting up iCloud Drive on iPhone
First, check for updates for iOS devices. If they are, then download and install them. This way you will avoid any mistakes. Detailed instructions for setting up an iCloud disk:
- On your smartphone, go to the “Settings” section. An item with your Apple ID account name will appear here. Click on it.
- If you can't find your Apple ID, try signing in to your account.
- Find the line “iCloud” in the list. A new page will open with all available options.
- At the very bottom of the list, opposite “iCloud Drive”, move the slider to the “Enabled” state.
Depending on the version of iOS and the model of the device used, the names of the items may differ slightly. But in general, the procedure will be the same everywhere.
Create iCloud on iPhone or iPad
Registration requires an active Internet connection.
It is advisable to connect your iPhone to a router or 3G network to ensure normal data transfer/reception speeds.
If you suddenly forgot your Apple ID password, then this is the place for you.
Now go to the gadget settings window and follow the instructions:
- Open the “Mail, calendars, addresses” tab;
Rice. 4 – start settings window in IOS
- The window that appears will display information about all synchronized accounts and notes. Since we need to create a new account, at the bottom of the window click on “Add account”;
Rice. 5 – synchronized accounts window
- Next, a page will appear with a list of service logos for which you can create/add an account. Select iCloud;
Rice. 6 – adding a service
- You can't create iCloud mail without an Apple ID. Therefore, next you need to click on the “Create Apple ID” button. You need to provide your date of birth and contact information. Please note that you should only enter accurate information about yourself. If you plan to make purchases in the app store in the future, it will be impossible to do so with fake data. Likewise, the support will not provide adequate support to non-real users.
Rice. 7 – creating an Apple ID
- After entering your name and date of birth, a page will appear to link your mailbox to your Apple ID. Select “receive email in iCloud” as shown in the picture:
Rice. 8 – getting a mailbox in iCloud
- In the new window, click on the text field and enter a name for the mailing address. The resulting string, for example, My, is the created identifier in the Apple ID system. The selected email name may already be taken. In this case, the system will automatically detect a match and notify you about it. It will be necessary to come up with a new name.
Rice. 9 – enter a new iCloud address
- At the next stage of registration in the iCloud system, you need to set a password to access your account. Remember that to reduce the likelihood of hacking, you should specify a complex password. The code word must be at least eight (8) characters long and contain numbers, lower/upper case letters and special characters;
Rice. 10 – creating an account password
The created email address and password will simultaneously be used as login information for both the Apple ID system and the mail service (cloud storage) page.
After registration is completed, the system prompts you to select three questions (from an existing list). For each question you must write a short answer.
This action is mandatory. If you forget your account login information, answering one of the questions correctly can instantly restore access.
Rice. 11 – creating security questions for iCloud and Apple ID
Don't forget to enter your recovery email address. This could be the address of any other email service that you have access to.
If you forget the answers to security questions or cannot remember your login, recovery information will be sent to the additional address you specified.
Rice. 12 – page for creating a backup email
If you want to set up automatic service updates, activate the corresponding slider in the “Updates” window that appears.
You'll receive the latest information from Apple along with the latest updates.
You can cancel your subscription at any time; the function is disabled in your iCloud account settings.
Rice. 13 – connecting automatic updates and news from Apple
Before completing the iCloud registration procedure, please read the user agreement.
Further use of the service implies full compliance of your actions with all established rules.
Rice. 14 – window with the text of the user agreement
After pressing the “Accept” button, iCloud will be created. Linking your account to your iPhone and synchronizing data will be performed automatically.
All that remains is to confirm the entered backup address. This way the system checks whether you have access to another mailbox.
An email will be sent to your backup email with a code that you must enter in the registration confirmation window. If everything is done correctly, the following message will appear:
Rice. 15 – confirmation of registration of iCloud
Registration is complete, however, the account is still inactive on your phone.
You need to enable the iCloud service in your iPhone settings to automatically synchronize your account with the gadget.
Go to the Settings-iCloud window. In the window that opens, activate all the items and processes to synchronize your account and phone.
Rice. 16 – activation of an iCloud account on an iPhone
Using the created account data, you get access to all official services from Apple, namely:
- App Store;
- iCloud Drive storage;
- Mail [email protected] ;
- Find My Phone function;
- Communication tools FaceTime, iMessage and others.
Using the iCloud email service as your Apple ID creates better information security.
The risk of profile hacking is minimal, and data recovery occurs instantly, however, without knowledge of unique information (answers to questions, backup email), it is almost impossible for an attacker to do this.
Setting up iCloud Drive on PC Windows and macOS
Once you have set up data synchronization on your iPhone or other iOS device, you can use the disk on your computer. For macOS there is no need to download additional software. If you are using a PC, the client is downloaded for Windows from the official Apple website. Procedure:
- On macOS. Go to the system settings section. You can find it in the Apple main menu. Here, click on the iCloud icon and log in using your unique Apple ID. Activate iCloud Drive. After this, a new iCloud section will appear in the Finder on your Mac computer.
- On Windows. Install the program distribution and run it on your PC. Sign in with your Apple ID account. It is important to use the same ID as your iPhone. After that, check the box next to the items you want to synchronize (iCloud Drive, photos, bookmarks, etc.) and click “Apply”.
This completes the setup of the iPhone Drive service. Photos, documents and other files will automatically sync between devices, but only if you have an Internet connection.
How to restore access to your account
If the user has not had to enter account information for a long time, he may forget his password. It is better not to try to guess it, since the account is blocked if the password is entered incorrectly repeatedly.
The most secure methods for restoring access are:
- answer security questions;
- use email;
- undergo two-step identification.
The last method is the most difficult. Therefore, when registering, it is important to indicate a valid e-mail and select security questions, the answers to which cannot be forgotten (this could be the name of the first pet or the name of the street where the owner of the device lived as a child).
If you still cannot unblock the entry, you can use the services of the site iforgot.apple.com.
Subscribe to our telegram channel to receive even more useful information on your smartphone
- Related Posts
- How to clear history in Yandex on your phone
- How not to lose several years of photos and videos when upgrading to a new version of the system on iPhone
- How to backup iPhone using iTunes
« Previous entry
How to use iCloud Drive
You can access your iCloud Drive on a Windows computer not only using special software, but also through a browser. To do this, log in to the iCloud website and go to the appropriate section. Other recommendations for using the service:
- If you allow synchronization of your media library when setting up the program for Windows, the iCloud Photos folder will appear in Explorer. Files are viewed and edited through it.
- If you enable the “iCloud Drive” item, then on Windows a folder of the same name will appear in Explorer. You can find it next to other system libraries (documents, videos, downloads). All files saved in this folder will be automatically copied to other devices.
- If you erase a file from iCloud Drive on one device, then after synchronization it will automatically be deleted from other computers, smartphones, and tablets.
- The files stored in iPad Drive are located in the cloud, so they do not take up space in the smartphone’s memory.
You can access files not only using the desktop version of the disk, but also through a browser. There you can edit photos, share them with friends or other devices connected to your Apple ID account.
Creation via computer
Creating an iCloud account for the Windows operating system begins on the official iCloud website:
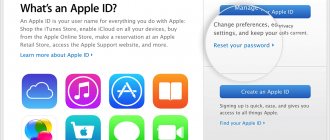
- On the main page at the bottom of the open browser window, you need to find the “Create Apple ID” button;
- An information block will immediately appear on the screen with a huge number of empty text fields, which, of course, will have to be filled in with truthful information (no one will check the entered data, of course, but if in the future the registered account becomes the main one, then you will either have to change everything in settings, or, in case of loss of access, prove your own right a thousand times to the Apple support service);
- First name, Last name, current location, date of birth – this is standard here. You are allowed to fill out each column either in Russian or in English, depending on your preference;
- With Apple ID, everything is also predictable - any name or nickname entered in English and separated by the dog “@” will do. The password is more difficult - you need to come up with a combination of 6-8 characters with uppercase and lowercase letters. For additional confidence in the security of personal data, it is worth thinking through everything to the smallest detail!
- The last part of registration is to select three security questions (there are a lot of options - the name of your favorite football club, school number, nickname of a yard cat, the main thing is to remember or write down the answers, because sometimes through security questions Apple allows you to confirm the fact of account ownership), check the boxes next to information subscriptions (announcements new products, recommendations for suitable entertainment content, etc.), and enter the characters from the captcha image.
All necessary actions have been completed. But access to the main iCloud services will not open until you log in to your iPhone, iPad, iPod or Mac using your registered account. Accordingly, registering on a computer will solve one problem - it allows you to save a lot of time when working with data and text (a physical keyboard is in every way more convenient than an electronic one!).