Method 1. Using an installation disk or recovery image
To do this, you will need a boot disk or flash drive with Windows, or a previously created recovery disk (this can also be a flash drive). If you may not be able to figure out the second one, since you are unlikely to constantly create fresh recovery disks, then the installation image can be downloaded from a large number of sites.
- Insert the disk or flash drive into the PC, and in the BIOS, mark the media as a priority when booting. This is necessary so that loading occurs from external media, and not from the built-in hard drive.
- Depending on the version of Windows, click Diagnostics - Advanced options - Command Prompt or System Restore - Next - Command Prompt.
- When the command prompt opens, add regedit and press Enter.
- Click on the HKEY_LOCAL_MACHINE section to highlight it, then click File - Load Hive.
- In the window that opens, go to C:\Windows\System32\config (if the system is installed in a different partition, the address will be slightly different) and open the System.
- Name the loading partition any name, for example, 555.
- In the registry editor, look in the HKEY_LOCAL_MACHINE\555\Setup section and find the CmdLine and SetupType parameters there. Double-click on each of them and change the indicators to the following:
- CmdLine - cmd.exe.
- SetupType - 0 change to 2.
- Select the 555 partition you created, then click File - Unload Hive.
- Take out the flash drive or disk, close all active utilities, select “Reboot” in the main window of the recovery wizard.
Select the HKEY_LOCAL_MACHINE section as shown in the figure
After restarting, when you log in, the command line will be expanded. With its help we will perform further operations.
Password reset
To reset your password, use this command:
net user login password
This command is relevant if you remember the exact spelling of the username. If you forgot, type the command net user, after which all accounts saved on the PC will be displayed.
Create a new account
If you do not have any administrator account installed, you will need to create one by entering a few commands. To do this, enter them one by one on the command line:
net user login password /add
net localgroup Administrators login /add
net localgroup Users login /delete
The first command first creates a new account, then assigns it to the administrators group, and then removes it from the users group. After applying all the commands, close the Command Prompt.
You now have an administrator account
Login
By creating a new account with a new password, you will be able to log into Windows without any problems.
Note! You won’t be able to find out your password this way, you can only reset it!
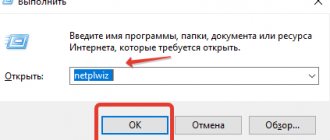
How to enable automatic login in Windows
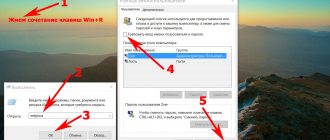
- Open the Advanced User Accounts program.
To do this in Windows 10, Windows 8, Windows 7, or Windows Vista, enter the following command in the Run dialog box (opened via WIN+R or from the Power User menu (in Windows 10 or 8)), then click OK:
netplwiz
In Windows XP, a different command is used: control userpasswords2
You can also open a command prompt and do the same if you want, but using Run is a little faster. On Windows 10, you can also simply search for netplwiz in the Start menu.
Technically, this program is called Advanced User Account Control, but it's not actually a Control Panel applet, and you won't find it in Control Panel. To make things more confusing, the title of the window simply reads User Accounts.
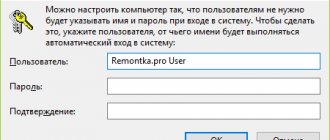
- Clear the Require username and password check box on the Users tab.
- Click OK at the bottom of the window.
- When the Auto Login window appears, enter the username you want to use to log in automatically and then the password in the next two fields. If you want to remove login password, leave the Password and Confirmation fields blank.
To sign in to Windows 10 or Windows 8 automatically if you're using a Microsoft account, be sure to enter the full email address you use to sign in to Windows in the User . By default, the name associated with your account may be used instead, rather than your actual username.
- Click OK to save and close open windows.
- Restart your computer and make sure Windows automatically logs you in. You may see the login screen, but not for very long, without having to enter anything!
Method 2. Using third-party utilities
Offline NT Password Editor
If the first method involved using standard Windows capabilities, the second suggests using third-party utilities that allow you to reset the Windows 7 administrator password. One of the most acceptable is Offline NT Password Editor, which allows you to gain full access to the OS system partition. You can either remove or change the password, or activate the administrator account. The utility does not provide a graphical interface, but nevertheless it is not at all difficult to understand. Each step is numbered and indicates what you need to do. So, what are the steps you need to follow to reset your password using this utility?
- On another computer or laptop, go to the developer’s website, in the Bootdisk section, scroll to Download and download the version you need. The file name consists of numbers and letters. If you want to create a boot disk, download the file with cd in the name, but if you use a flash drive, then usb.
- If you are using a disk, write the downloaded image using a burning program, and if using a flash drive, then perform the following manipulations:
- Copy the contents of the archive to a USB flash drive without creating any additional files.
- Expand Command Prompt as Administrator.
- Use the command f:\syslinux.exe -ma f:, where instead of f write the letter under which the flash drive is identified in Windows Explorer. If it doesn’t give any error, it means everything was recorded as expected.
- Insert your external media into the computer, set it in the BIOS as the first one to boot, and turn on the computer. The utility interface should start instead of the Windows Welcome window.
It’s not difficult to understand the application
Step 1
The first step is to select the hard drive partition on which Windows is installed. The program provides a list of disk partitions indicating their size, which is what you should focus on. If you remember that the system is usually installed on drive C, which is several times smaller than drive D, it will be quite difficult to make a mistake. Enter the numbers with the section number and press the Enter button.
Step 2
Next, you need to specify the path to the registry files. The program offers a default path, accept it and press Enter.
After this, the utility asks which part of the registry needs to be loaded. Select 1 - Password reset, press the corresponding number and confirm with the Enter button.
Step 3
Changing or resetting a password by editing user data in the registry. The utility will launch chntpw Main Interactive Menu, in which item 1 - Edit user data and passwords - is immediately selected. Confirm your selection by pressing the Enter button. If you need to change the password, select 2 - Edit (set new) user password.
In the menu that opens, chntpw Edit User Info & Passwords, all computer accounts are displayed, with their code designation in hexadecimal notation (RID column). We are interested in the administrator account; most often it is displayed first in the list and is selected by default. If the account name is displayed in English letters, type it in the input field under the table; if in Russian, then use the information from the RID column. The entry in the input field will be in the format 0xABCD, where instead of ABCD you need to put the value from the table. The selection is confirmed with the Enter button.
Next, the User Edit Menu is displayed with a list of actions that can be performed with the administrator account. Select 1 - Clear (blank) user password and confirm with Enter. The program should report a successful password reset.
Step 4
Saving the changes made (Step Four: Writing back changes). Press sequentially! and q to exit the previous menus, after which the utility will offer to save the changes by issuing the request “About to write file(s) back! Do it? Enter y, and at the next prompt type n.
To reboot, enter the reboot command or click on the small button on the computer system unit. The system will start you up without asking for a password. You can install it yourself in the account management menu.
ERD Commander
Another fairly advanced utility for resetting the Windows administrator password. First, you will need to create a bootable USB flash drive with the utility on your work computer. For this:
- Prepare a flash drive with a capacity of at least 1 GB, and also download the following four files: HPUSBDISK.zip, Ghost32.exe, Grub4dos.zip, ERD Commander image file in gho format.
- Insert the flash drive into the computer, then run HPUSBdisk.exe, select your drive in the Device window, select File system as FAT32, and then click the Start button. The flash drive will be formatted, so make sure you save the important information stored on it somewhere.
- Unpack the Grub4dos.zip archive and run grubinst_gui.exe, then select the flash drive in the Disk field and click the Install button at the very bottom. If the procedure completes successfully, you should see the following message: “The Mbr/bs has been successfully installed. Press to continue..." Now you can safely move on to the next stage.
- Run Ghost32.exe - click Ok - Local - Disk - From Image, then select the ERD.gho file and click on it.
- In the window that opens, select the flash drive, click Ok - Ok - Yes and wait until the bootable flash drive is completely created. This usually takes 10–15 minutes.
After loading, a window will appear to select the target Windows operating system
Now you have to work with the ERD Commander bootable flash drive. Here's what to do:
- After connecting the flash drive to the computer, set the boot priority through the BIOS so that the flash drive comes first, and turn on the PC.
- Select your version of Windows. If you confuse the system bit size, then it’s okay, just at the next stage the utility will give an error and you can repeat the procedure from the beginning.
- After waiting for the download, select the installed operating system, click Next - Microsoft Diagnostics - Password Change Wizard.
- You will see a window with a list of users and fields for entering a password. Select the administrator account, write down the new password and confirm it.
- Remove the flash drive from the USB connector, boot into normal mode and use the new password.
Note! You won’t be able to find out your password this way, you can only delete it or set a new one!
Method 3. Substitution of system files
You've probably heard about the sticky keys feature. Simply press the Shift button 5 times quickly and a window will appear asking you to activate the mode. The file sethc.exe, located in the Windows system partition, is responsible for it. Interestingly, you can even activate it in the password entry window when Windows starts. But since the situation is that the user has forgotten it, we need to replace it with the cmd.exe file, which is responsible for opening the command prompt. How to do it?
- Boot from external Windows media, in the installation window, click System Restore - Command Prompt.
- Apply the following commands sequentially:
- copy c:\windows\system32\sethc.exe c:\ - to create a backup copy of the sethc.exe utility.
- copy c:\windows\system32\cmd.exe c:\windows\system32\sethc.exe - to replace the sethc.exe file with cmd.exe.
- Restart your computer normally.
- When the password window appears, press the Shift button five times, which will open the Command Prompt.
- To change the password, type the command net user login password, then reboot again and now you will definitely be able to log into the system.
Use the net user command and restart your computer
Note! You will not be able to find out the password this way, only delete it!
How to reset a forgotten password using Ophcrack
Ophcrack is a unique utility that allows you to restore access to any account in Windows 7 in just a few minutes. Moreover, it works in any edition of the OS, starting with XP, and can function from a bootable USB flash drive. The program’s operating mechanism is somewhat different from the password selection algorithms of similar applications and includes several components:
- LM-hash algorithm - passwords in Windows 7 are stored in this format, the number of characters of which does not exceed 15;
- Rainbow tables - a mechanism designed to recover encrypted passwords by using hashes with a complex process of reverse decryption.
The program can also unlock complex passwords by extracting them from registry files and then decrypting them using completely new data processing methods, which reduces the load on hardware resources and increases the speed of guessing by orders of magnitude.
Using a bootable flash drive with Ophcrack
The algorithm below is relevant for computers that cannot be accessed for the following reasons:
- the password for one account is lost, but there are no other accounts;
- It is not possible to access any user profile on this computer.
If you encounter a similar case, you will have to follow the instructions , which boils down to the following: create a bootable USB drive based on a special version of Ophcrack and boot from this media to restore access to your account. In more detail, these instructions look like this:
- Follow the link https://ophcrack.sourceforge.net.
- Download Ophcrack LiveCD for your PC (ophcrack Vista/7 LiveCD).
- We create a bootable USB flash drive with the downloaded image recorded on it. To do this, it is recommended to use the latest version of Rufus if you want to quickly create a boot disk. In the settings, select the USB flash drive, indicate the path to the downloaded image and click . Everything is extremely simple.
- We restart the computer whose account you want to gain access to.
- We call the boot menu before the system starts booting from the hard drive (how to do this, see the instructions for the motherboard or laptop).
- Select the application launch mode.
For inexperienced users, it is recommended to select the first (graphical) operating mode of OphCrack: Ophcrack Graphic mode . But it should be taken into account that in graphical mode the program may not start, but in text mode it works flawlessly, although it requires certain skills in handling console programs.
If we consider working in a program with an interface in more detail in the next section, then we will dwell in more detail on using its console version. Although the only peculiarity here is the absence of windows and buttons. After launching the console version of the utility, it will automatically detect passwords for all accounts and display them in the “ Results ” section.
Removing a password from Windows
What to do if you forgot your administrator account password? Ophcrack program will also help here , but only if you have a network connection to download it. Let's consider the sequence of actions:
- We go to the software product support site and download the edition of the utility that is suitable for the bit level of your operating system.
- During installation of the application, be sure to check the “ Download & install Vista Tables ” option to download and install rainbow tables for this version of the operating system.
- We launch the installed program and install the loaded tables. The button will help you do this.
- Click the button and select the table file located in the “ tables ” folder in the directory with the product executable file.
- Press the button.
- Let's move on to password selection. Click " Load ".
- In the drop-down menu, select “ Load SAM with...samdump 2 ” to access data about all accounts on the computer.
- Select the user account of interest by clicking on its name.
- Click “ Crack ” to start the hash selection procedure.
After a few seconds or minutes, depending on the complexity of the combination of characters in the password, it will be displayed in the “ NT Pwd ” field.
How to find out your account password
In this paragraph, we will learn how to hack the administrator password or simply find out it. Indeed, in many cases it is simply easier not to reset the password, but to simply assume that it is forgotten. To do this, we need the Ophcrack utility, which has the capabilities we need. It is capable of working in a graphical and text interface and, according to the creators, is able to find out almost any password stored on your system. How to use it?
- Go to the official website and download the appropriate version: in the form of a program installation file if you can log into the system, or a Live CD to create bootable media if you can’t log into the system because you forgot your password.
- Run the installation file or boot from a flash drive or disk and select the graphical or text interface of the utility.
- Wait until the utility reads and displays the system passwords. Depending on the power of the computer, this may take different times.
To reset your password, download the Ophcrack utility program
That's all. As you can see, there is nothing complicated and if your password is not too complex, then the program will help you find it. You will then be able to log in again and enter your access code. Practice shows that if the password is very complex, consisting of a combination of large and small letters, as well as numbers, then the program may not cope.