Many users are asked the question: how can you remove the password on Windows 7, 8, 10? Some people think that they don’t need it. For some people it’s completely annoying or trivial, they forgot the password for their account and now they can’t log in to the system. It turns out there are a lot of reasons why people want to reset their Windows password or completely remove it. Therefore, we decided in this article to show you various options on how to reset or bypass your login password on various Windows operating systems.
A way to remove the password on Windows 10, 8, 8.1 during startup or locking of the PC
This option is simple and fast, and does not require much computer knowledge. Here you just need to uncheck one box and that’s it. So let's start reviewing.
- First, let’s launch the “ Run ” window. Win and R keyboard shortcuts .
- Enter “ netplwiz ” in the window and click “ OK ”.
- You will be taken to the “ User Accounts ” section, uncheck the “ Require username...” checkbox here. " Click " OK ".
- The system will ask for a password to confirm your actions, enter it twice.
- Be sure to reboot the PC. Done, let’s check if we succeeded, if not, move on to another method, which is described below.
Please note: you cannot remove the password this way on Windows 7, but you can bypass it on Windows 10, 8.
Windows 10: how to remove password when logging in using account settings
To remove the password when logging into Windows 10 using this method, you need to perform several simple manipulations:
- Open the Main Menu (window icon at the bottom, left), select “Settings”, then the section – “Accounts”, where in the left panel select “Login Options” and then, in the options panel, click on the “Password” item and click “Change” "
click "Edit" - In the dialog box that appears, enter your current password and click on the “Next” button.
Enter the current password - In the next window asking for a new password, simply do not enter anything and click on the “Next” button.
do not enter anything
With this action we simply reset the password, and now the system will not ask for it when logging in.
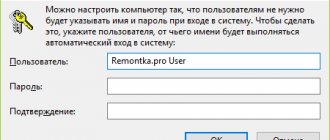
Another option to remove the password when logging in using your account settings is to enable passwordless auto-login in Windows 10, which is done as follows:
- call the “Run” window using the keyboard shortcut Win+R (the key with the window logo, on the keyboard at the bottom, left + the R key);
- enter the command in the dialing field netplwiz, press OK or the ENTER key;
netplwiz team - In the accounts window that appears, select your account name and uncheck the “Require username and password” checkbox.
uncheck
Click on “Apply” and confirm the action by double entering the current password in the verification window that appears.
confirm the action by entering the current password twice
How to remove or change your local password
Usually, when logging into the system, a local account is initially used, for which you will need to enter a key. You can easily change it or delete it, we’ll show you how to do it now:
- We log in to the panel where you can manage all accounts. Win – R keys alternately , copy and paste the “ netplwiz ” command.
- Next, you will see that in the panel that appears, it is written how to change the password: hold down “ CTRL with ALT and DEL ” at the same time. A blue screen will pop up where you will need to select the line “ Change password ”.
- We drive in the key that is currently relevant. Flood we register a new key with which we want to replace it. If you want the system to start when you log in without asking for a key, then enter one valid key and leave the other fields blank. Click " Enter ".
It is not necessary to restart the computer. That's all, now your computer will start with a new password or without it at all. It all depends on what you wrote in the lines.
Bonus section: How to disable the password requirement when resuming from sleep mode
As in the previous section, a method for disabling the requirement to enter a password when exiting sleep mode in Windows
, equipped with
the Settings
and without it, differ somewhat.
Therefore, below we will present a method for disabling a password using the example of the Windows 10
and
Windows 7
, using different system applications.
How to disable the password when waking from sleep mode in the Windows 10 operating system
“Settings” system application in the previously described way.
and go to the
"Accounts"
.
Then, in the left sidebar, select the “Sign-in Options”
, and in the right panel, in the
“Require Sign-in”
, check the
“Never”
.
Now, when resuming from sleep mode, you do not need to enter a password to boot the operating system.
Also, sometimes when users have computer-connected devices that have a limit to the permissible range of use (for example, connected to the computer using Bluetooth
),
Windows
may lock when such devices leave the connection area and require subsequent password entry.
Therefore, to eliminate this situation, use the scroll bar slider to find the “Dynamic locking”
and uncheck the selection indicator (
“checkmark”
“Allow Windows to automatically lock the device in your absence”
cell .
Additionally, it is worth checking the settings of the screen saver, the active position of the critical parameter of which can force the start of the welcome screen with the subsequent requirement to enter a passphrase.
Run dialog box as described previously.
and in the
Open
, type (or copy and paste) the following command:
"control desk.cpl,,@screensaver"
and then press the
OK
or the
Enter
on your keyboard.
This command initiates the opening of the Screen Saver Settings window.
, in which you need to remove the selection indicator (
“checkmark”
) in the
“Start from the login screen”
, and then click on the
“Apply”
and
“OK”
to save the settings.
How to disable the password when waking up from sleep mode in the Windows 7 operating system
To disable the constant requirement to enter a password when resuming from sleep mode, users on the Windows 7
You will need to use the system application
"Control Panel"
.
Open the application window in the previously presented way, move to the bottom of the window using the scroll bar slider, and select the “Power Options”
.
On the Select a power plan
in the line of the plan used by the user, click on the text link
“Set up power plan”
.
On the linked settings page for a specific plan, click on the text link "Change advanced power settings"
.
The Advanced Settings pop-up window will display all the settings responsible for managing the computer's power. Click on the text link "Change settings that are currently unavailable"
to access the full list of settings.
Then in the main window in the section “Require password entry on wakeup”
Set all sub-rows to
No
, and then click the
Apply
and
OK
to save changes to your computer's power settings.
Now the system will not require a password when exiting sleep mode and the transition to the working state will be performed automatically.
Resetting a password that you forgot
Often, many users, in pursuit of the security of their PC, come up with complex keys. It would be good if they wrote it down somewhere, but what if not? Then there is only one way, either you throw it off or restore it. Now we will show you methods on how to reset your password in Windows 10, 8, 8.1.
Resetting the code from a Microsoft account
To reset the key, it will be most convenient to contact the Microsoft online service. The company took care of the users and created a service where you can reset the code in case you forget it. Therefore, we turn on WiFi on the laptop and move on to considering the method:
- Since you are required to enter a password that you do not know, you will not be able to temporarily use your PC. Therefore, you need to use another computer, tablet, smartphone, depending on what is available, the main thing is that you have a browser.
- Go to this service “Recover your account”. We enter the phone number, mailbox, Skype, one of the listed options. The “ Identity Confirmation ” window will appear, enter the confirmation code that will be sent to you on the resource you specified.
- You will find yourself in the Reset Password . Enter your new password and re-enter it in the line below. Click “ Next ”.
- Well, that’s all, you will see the message “ Your account has been restored ”. If you click “ Next ” you will be taken to the account menu.
Do not forget that the laptop on which all manipulations are carried out is connected to the World Wide Web. Otherwise nothing will work. And also, to be on the safe side, when storing the new password you came up with on your PC, it is advisable to place it in a password-protected folder; how to do this, read the article: how to quickly password-protect a folder in Windows.
Resetting the local account password in Windows 7
On Windows 7, unlike other operating systems, there is one local account, which is in no way tied to the World Wide Web. Therefore, you won’t be able to reset it if you suddenly forget using the Internet. Let's consider another option, in which you must have access to the system.
- Click on “ Search in Windows ” and enter the command “ cmd ”. Right-click on the black window and select Run as Administrator.
- To enter a new key, enter the command “ Net user (account name) (new password) ”, for example net user xxx 336699.
- To reset, enter another command “ Net user (account name)'''' ”.
Now we try to log in by entering a new key. Or without a key, if you decide to reset it in Windows 7. Unfortunately, the method will not help everyone, but it’s worth a try.
Resetting the password on Windows 7
Due to the fact that you do not have access to your system at all, you will need an installation disk, a flash drive with any Windows operating system (7,8,10). If such media is available, we now proceed to step-by-step actions:
- Let's boot from our installation media. Click on the line “ System Restore ”.
- From the list, click on “ Command Line ”. A black window will pop up called the command line.
- Type the command “ copy c:\windows\system32\sethc.exe c:\ ”, press “ Enter ”. Thanks to this command, a backup copy will be created, which is responsible for sticky buttons in Windows on the root of drive C.
- Replace " seth.exe " in the System32 folder with the file " cmd.exe ", " copy c:\windows\system32\cmd.exe c:\windows\system32\sethc.exe ".
- We reboot the PC, press the “ Shift ” button many times, the command line will pop up. Change the code “ Net user (account name) (new password) ”.
In more detail, how to do this in Windows 7, thanks to the command line, is described above in the article.
conclusions
By using password disabling methods, you will have a system at your disposal that does not require entering a code.
However, if it is possible for others to access your computer, passwordless login is not safe.
And it’s best to leave the password, since saving a few seconds of time is not worth the violation of confidentiality.
If you have Telegram, you can now download any software or game through our bot, just follow the link and try it!
« Previous entry
Bypass the administrator password using the registry on Windows 10
Let's try the password bypass method through the registry. It is simple and does not require additional downloads and installations of software.
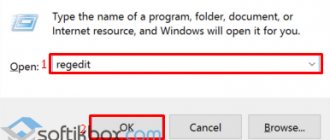
- Press the “ Win and R ” buttons and enter the “ regedit ” command in the window.
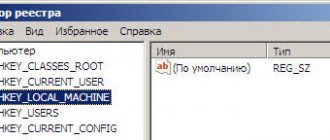
- “ Registry Editor ” will appear where you will need to expand “ HKEY_LOCAL_MACHINE ”, then “ Software ”, then look for “ Microsoft ”, “ Windows NT ”, “ CurrentVersion ” and click on “ Winlogon ”.
- Now, move the cursor over it and double-click with the mouse. In the “ Value ” line, enter the number 1 , “ OK ”.
- We change the file “ DefaultDomainName ”, also open it and change it in the “ Value ” item to the name of the local computer. You can see this name by right-clicking on the “ My Computer ”, “ Properties ” shortcut.
- If necessary, you can change “ DefaultDomainName ” to any other login.
- We reboot. After completing the steps, all that remains is to check whether it worked or not.
Disable the prompt for a Microsoft account
The methods described above allow you to get rid of password verification at login, but only when you work with a local account . However, Windows 10 allows you to log in to the system using a single Microsoft account . And it is no longer possible to remove the password from it. However, you can configure automatic entry of login information when starting this personal computer. This can be done in two different ways.
Account Settings
The first way to remove the check is simpler. However, unfortunately, it does not work on all computers. It is highly recommended that you try it first. And in case of failure, move on to the next point. To set up automatic entry without prompting, follow the instructions below:
- Use the Win + R combination to bring up the Run .
- In the empty text line of the window that appears, you need to enter or copy the netplwiz command and press Enter.
- The menu that opens displays a list of accounts on this PC. Select your Microsoft account.
- Uncheck the “ Require username and password ” option.
- Click Apply.
- You will then be prompted to configure your automatic sign-in settings . Write your username (may already be written), and the account code twice.
- Click on the OK button.
- Restart your computer.
In most cases, this is enough to log into the OS without asking for a password. However, if you are unable to remove the check, you will need to edit the registry manually .
Registry changes
The registry stores data that Windows 10 uses to operate. By changing existing entries and creating new ones, users can seriously change the way the operating system works. Therefore, all changes should be made with extreme caution , since any mistake can lead to incorrect operation of the computer.
Before starting work in the Registry Editor, it is strongly recommended to create a system restore point. If something goes wrong, you can easily roll back to the saved version of Windows 10 without having to reinstall.
Registry Editor
To enter the editor, users will need to do the following:
- Run dialog using Win + R.
- Type regedit and click OK.
- If the program requires administrator permission, click OK.
- On the left side of the editor there is a directory tree. Use it to find the directory HKEY_LOCAL_MACHINE\Software\Microsoft\Windows NT\CurrentVersion\Winlogon
- Look for an entry named " DefaultDomainName ". Double click on it to start editing. In the " Value " field you must enter the name of your local computer (or domain). To find out, press Win + Pause/Break and find the corresponding parameter.
- The value of the " AutoAdminLogon " parameter needs to be changed to " 1 ".
- IN "DefaultUserName» Enter your Microsoft account login.
- Right-click anywhere in the editor's working area.
- Select the " New " option, then " String Parameter ".
- Call it "DefaultPassword", and in its value enter your access code to log in.
- Restart your computer.
If you do everything correctly, Windows will not ask for a password when you boot.
Resetting your password using the Dism++ program on Windows 10
This is a multifunctional, free utility. Thanks to Dism++, it is possible to remove the local password on Windows 10, as well as clean the entire system of unnecessary garbage. We will now show you how to implement this:
- Make a boot disk on any other PC, or a USB flash drive, and unpack the archive with the Dism++ application there.
- Boot from this bootable media on the PC where you want to reset the password. Press the key combination “ Shift and F10 ” in the installation application. Specify the path to our Dism++ program on the command line ( for example: F:\dism\dism++x64.exe ). To accurately determine which letter the flash drive has, use the commands one by one: diskpart, list volume, exit (command number two will show which partitions are connected, as well as their current letters).
- The “ License Agreement for the Use of Dism++ ” window will appear, click “ Accept ”.
- An application will open where you need to select “ Windows 10...” at the top. ", then " Open session ".
- Go to “ Tools ”, “ Advanced ”, “ Accounts ”. In the window that appears, click on the user who needs to reset the password. Click “ Reset Password ”.
Everything is ready, you can close everything, and start the computer as you always do. That's all, we figured out how to remove the password in Windows 10. By
How to remove a password in Windows?
What to do if an “evil” student has set a password on the computer?
A little background:
One day a computer science teacher I know called me and said: “Damn!!! These kids are sick of it!!! Always fiddling with something on the computer!!! And now, imagine, I turn on the computers in the morning, but I don’t have access rights to load the OS, I have a password. And what to do??? I don’t know where to look for information on how to remove this password. I had to stay after class and reinstall Windows.”
Sound familiar?
I once, out of my stupidity, or rather ignorance, reinstalled the OS on 13 computers in the computer science classroom where I work. But there was and is a way out! And there is no need to go to extremes. Reinstalling the OS is the very last option.
I think you already understand what we are talking about. I want to tell you how to remove the password and gain access to work with the OS.
So, first, what needs to be done to set this password. Go to the control panel and select user accounts
Select the computer administrator account
And click create password
Enter the password and duplicate it
That's it, congratulations, now no one except you or the person who knows the password will be able to load the OS. And, thank God, if these actions were performed by you, and not your student.
And now about the antidote
When the computer boots naturally (normally), without knowing the password, we cannot enter the OS.
But there is such a thing as OS boot options. As soon as you pressed the POWER button and the computer began to boot, press F8 (for Windows XP) until a window appears in which we are asked to select the OS and its boot mode.
Select your OS and safe mode. The operating system will boot into safe mode.
We see that another new computer administrator appears. We log in, no password required.
Now again we go to the control panel and delete the account of the newly created administrator or simply his password .
After that, we reboot the OS and that’s it, now we just log in with administrator rights and don’t see that we are asked to enter a password.
This situation is possible when there is no access control. That is, many teachers create a password-protected administrator account and a separate account with limited rights for the student. And those that deploy a network based on a Windows server generally give everyone their own access. In this case, they are “insured” from changing the administrator password.
But, for example, I and many other computer science teachers I know prefer to give full access. And it is for people like us that this article will be especially useful and can save us from reinstalling the OS. And simply, this information will be useful to many, because when we know how to remove the password from the operating system, we feel more confident and know that this time we will not be tricked 
Thank you for your attention. As always, write additions, questions and comments in the comments.
| If you understand why a blacksmith needs a hammer, why a fisherman needs gear, why a woman needs a washing machine and a food processor, then I think you don’t need to explain why a computer science teacher needs the best and most modern tools for his work. |
We bypass the administrator key in Windows 10.
This method is for more experienced users; it requires a boot disk; an option with a flash drive is possible.
- We launch from a disk or flash drive, click “ Recovery ”.
- The next step is to select “ Diagnostics ”, “ Advanced ”, “ Command Line ”.
- Enter the command “ copy D:\Windows\system32\cmd.exe D:\Windows\system32\sethc.exe /Y ”. Drive " D " which is specified in the command, can be any drive except the system one.
- You will see " File copied: 1 " alerts. We're going to reboot.
- When the window where you need to enter the password appears, press the “ Shift ” button 6 times in a row. A console will pop up, in which you need to enter the command: “ net user admin2 /add ”, after entering which a second administrator will appear. Create a new entry, your new administrator is “ net localgroup Administrators admin2 /add ”. Thanks to the new entry, you can now delete the value of the previous one.
- We log in, press “ Win and X ”, “ Computer Management ” at the same time.
A window will appear, in it click on “ Utilities ”, “ Local users ”, “ Users ”. Click on the account for which you do not have a password and click “ Set password ”. Reboot the PC.
Removing the password when starting Windows without programs
Also, Password in the operating system in question can be unstuck without using the “Run” item, as well as various third-party applications. To do this, just use a special command line. In this way, you can avoid having to enter Password when you turn on the computer, as well as when it comes out of sleep mode.
Command line setup
In order to configure the command line, you need to use the Windows distribution disk. This method of setting up and resetting the access code is suitable if it is forgotten and it is not possible to start the OS otherwise.
First of all, you need to install it through the BIOS to boot from a CD or other device containing the distribution. After this, you should reboot and start the installation.
After this, the following actions are performed:
- A window for selecting language options opens, click “Next”;
- select “System Restore” -> “Command Line”;
- enter “regedit”
; - in the registry editor that opens, we find a section called “HKEY_LOKAL_MACHINE”
; - select it, click on the “File” menu, and select “Load hive”;
- select the disk where the OS is installed and open the file located at the address “disk name: windowssystem32SYSTEM”
; - you must enter a custom name for the selected section (for example, 999);
- go to the HKEY_LOKAL_MACHINE999Setup section and double-click on the parameters:
- CmdLine – enter cmd.exe;
- SetupType – replace parameter 0 with 2;
- select section 999 and click “Unload hive”;
- extract the distribution package and reboot the PC.
Resetting your password and login
After loading the operating system, the user will immediately see the command line window. To reset the password, you must enter the following command: net user username
If for some reason User has forgotten the account name, then you can simply write net user without parameters. This will allow you to display all available items and select the one you need.
If the new Password is not intended to be used, then it is sufficient to leave the field blank.
If you need to enter a new one, the command will look like this: disk name: Windowssystem32net user username new-key.
It is also often necessary to create a new account without an access key.
To do this, you need to run the following commands in strict order:
- net username_password /add;
- net localgroup Administrators name /add;
- net localgroup user name /delete.
These commands perform the following operations in strict order:
- creating a new User;
- adding it to the Administrator workgroup;
- removal from the Users group.
The reset method in question is quite complicated, but quite feasible even for not very experienced PC owners.