Microsoft created the Windows OS with the expectation that several people would work on one computer. To prevent users from interfering with each other, a so-called account system was developed. That is, each user has a personal account. All personal data is stored there. In this article we will talk about how to change the username in Windows 10, 7, 8 and other OS versions.
Why change the name?
There are many reasons why you might need to change your account name. Perhaps the most common one is a spelling mistake. For example, you spelled your name incorrectly, which is a real eyesore when logging in.
Another reason for changing the name is the encoding. Many users use Cyrillic characters in their account names. In this case, a folder with the user’s personal data is also created in Cyrillic. The problem is that many programs use encodings that do not support Russian letters. As a result, an error occurs due to which the utility does not work correctly. To fix the problem, you need to know how to rename a user folder in Windows 10.
How to change administrator username in Windows 10
Windows 10 includes a built-in administrator account that is often targeted by computer hackers and malware with malicious intent. Therefore, it may be a good idea to rename the administrator on your Windows system. It will also be useful for system administrators when there are several of them in the company and they work in shifts and ranks, i.e. There is an Enikey employee, an intern, who needs to be given admin rights, but at the same time limit them a little.
- Press Win + R and enter gpedit.msc
- Next, go to Computer Configuration > Windows Configuration > Local Policies > Security Options > and on the right, look for Accounts : Rename the Administrator account . Double-click on it and rename the name in the new window that appears.
See also:
- How to enable or disable a user account in Windows 10
- Failed to create or add a new account
- How to Create a Local User Account in Windows 10
- How to create a Microsoft Account for Windows 10
- How to disable and delete your Microsoft account
comments powered by HyperComments
Create an entry
Instead of changing the name of your old account, you can create a new account with the name you want. This is done very simply. All you need to do is:
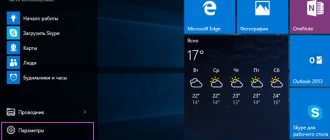
- Click on “Start”. A menu will open in which you need to select the name of the current account. In the drop-down list, click on the item responsible for changing parameters.
- A dialog with account configurations will appear. We are interested in the left sidebar, which contains the item “Family and other users”. Go to this section, then add a new user by clicking on the corresponding button.
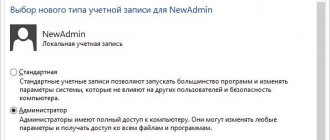
- A dialog will open to create a new user. The system will ask you for your mailbox. If you specify an E-mail, the OS will be linked to your Microsoft account. To avoid this and create a local account, indicate that you do not have email by clicking on the appropriate hyperlink.
- The system will prompt you to register on the company’s official website. We refuse by clicking on the item that allows you to add a user without a Microsoft account.
- After carrying out the above manipulations, you will be taken to a dialogue with account parameters. Enter your username, password and hint to log into your account. After this, click on the “Next” button.
Using Registry Editor to Rename a User Folder in Home Edition
Let’s make a reservation right away that this method is only suitable for the home version of “ten”. In addition, after completing the procedure, some programs will need to be configured again, since some of the configuration files will simply not be visible to them.
- We log into the system under an account with administrator rights (if the changes affect another profile) or activate the standard Administrator profile provided by the system.
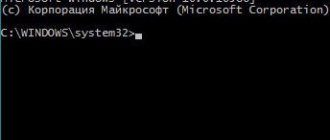
- To activate the Administrator account, go to the Start context menu by pressing the Win+X keys and launch the command line as administrator.
- Next, write the system command “ net user Administrator /active:yes ”, with which we will perform activation, and press Enter.
- To end the current session, go to Start and click on the appropriate button. After the lock screen appears, go to the profile called “Administrator”. If for some reason this account is not present on the screen, you need to restart the computer.
- We go to the system directory with all user folders at C:\Users . Rename the user's folder name through the context menu or by pressing the F2 key.
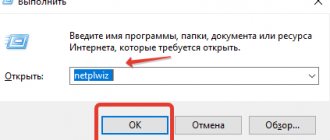
- Launch the “Run” window by pressing the Win+R keys. In the window that appears, write the system command “regedit” to launch the registry editor.
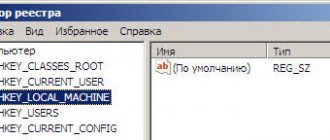
- Open the “ProfileList” folder, the full path to which is as follows: HKEY_LOCAL_MACHINE\SOFTWARE\Microsoft\Windows NT\CurrentVersion\ProfileList .
- Having expanded the directory, we need to find exactly the folder that belongs to our account. This will not be so easy to do, since the folder names contain dashes and numbers. So you will have to expand each of them, paying attention to the value of the “ProfileImagePath” line inside, which indicates which profile the folder belongs to.
- For the next step, we just need the found string “ProfileImagePath”. Double-click on it to open a window in which we enter the updated path to the user directory. Confirm the action by pressing the OK button.
- Now you can close the Registry Editor and all that remains is to disable the Administrator profile. We launch the command line as an administrator, where we write the command “ net user Administrator /active:no ” and press Enter to execute it.
- We restart the system and log in to the account for which the changes were made.
Computer name
Before you change the computer name to Windows 7, you need to open a dialog called “System”. To do this, launch the Start menu. In the drop-down list, right-click on the “Computer” item. Now, from the list presented, select the “Properties” option. Then follow the following instructions:
- Go to the dialogue called “System”. Pay attention to the left sidebar. Click on the hyperlink that is responsible for additional network settings.
- The above steps will launch a dialog called “System Properties”. In it you need to go to the “Computer name” tab and click on the “Change” button.
- Change the computer name in the appropriate window. For the changes to take effect, you must click “OK” and restart the PC.
Important! The name must consist of Latin letters (the use of a hyphen is allowed). Do not use Cyrillic or special characters in the PC name. Otherwise, your computer will become inaccessible to other users on the network.
How to make changes in Enterprise and Pro versions
- First, we need to log into a profile with administrator rights, which can be created by following the algorithm of actions described earlier, or activate the Administrator profile, again referring to the instructions above.
- Then open the Start context menu by pressing the Win+X keys and click on “Computer Management”.
- Go to the “Local Users” section, then open the “Users” subsection. Select a field with a custom name that you want to rename, right-click on it and select “Rename”.
- We correct the name, and then click on any free space in the open window to save the changes.
- Open Explorer in any convenient way (for example, by pressing the Win+E keys) and change the name of the user directory, which is located at C:\Users .
- Now go to the registry editor (how to open it is described in the example above for the home version of the OS) and go to the list of profiles along the path: HKEY_LOCAL_MACHINE\SOFTWARE\Microsoft\Windows NT\CurrentVersion\ProfileList . Find the folder with the desired account. This is done by searching through all the fields in a row, focusing on the line with the ProfileImagePath value.
- Double click on this line to open the window for changing parameters. After setting the new path for the location of the user directory, confirm the action by clicking OK, close all windows and complete the work.
- We deactivate the Administrator account through the command line with administrator rights by writing the command “ net user Administrator /active:no ”.
- The procedure for changing the name of the user directory can be considered completely completed. Now you can log out of the Administrator account and log into the one for which all the steps have been completed. If everything was done correctly, there will be no system errors after launching the account.