Causes of error code 0x80070035
This problem can manifest itself on almost all modern versions of Windows OS. It is usually caused by the following reasons:
- The PC's antivirus or firewall is blocking access to the desired network resource;
- Shared network access is not provided to the required drive (folder);
- There is a physical malfunction of the router or damage to the network cables;
- Windows OS services responsible for the operation of network components are disabled;
- There are other incorrect network connection settings.
On Win 10, the problem may be caused by one of the early updates that prohibits the use of empty passwords when accessing required network resources.
Error 0x80004005 - reasons for occurrence
An error can occur in completely different situations. Most often this can happen in cases like this:
- When trying to access the Internet, especially when it is provided not directly from the provider, but through a proxy server installed on the network.
- When changing file properties, especially when the “hidden file” attribute changes from hidden to visible.
- While burning a disk image. Moreover, in this case, both standard Windows tools and additional programs can be used.
A similar error can be observed in the most modern Microsoft operating systems at the moment, which continue to be supported by company specialists: Windows 7 and Windows 10. And it appears even despite regularly released update packages.
Error 0x80004005 appears. Most often the error will appear as:
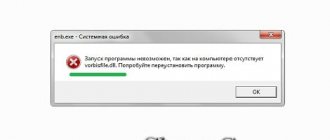
..Unable to enable sharing. Error 0x80004005: Unidentified error
In addition to this inscription, the user can see the inscription:
“Security Update for Internet Explorer Flash Player for Windows 10 for x64-based Systems - Error 0x80004005”
In most cases where the error occurs, the operating system protection service is to blame. In Windows 7, the Firewall is responsible for this. In the Windows 10 version of the OS, this powerful tool is also supplemented by the somewhat “evil” Windows Defender, which often blocks even products developed by Microsoft itself, which are distinguished by an old release or a slightly modified appearance for the sake of the performance of games and programs. Accordingly, when correcting such an error, you should first turn to these services, ensuring their configuration and appropriate actions when problems are detected. Individual exceptions should be considered after services are configured.
Temporarily disable your antivirus and firewall
The most common cause of dysfunction is the network connection to another PC being blocked by the system antivirus or firewall. Temporarily disable the latter to ensure that they are not causing the problem.
Procedure:
- For a firewall, this is done by launching the “Control Panel” and going to “System and Security”.
- Next, select “Windows Defender Firewall.”
- Click on the option on the top left "Turn firewall on or off...".
- Select the options to disable the firewall, and restart your PC.
Also disable firewalls of third-party programs, the Comodo Firewall level and similar ones.
Make sure your drives are shared
Non-shared PC drives may cause the “Network path not found” error. To fix the problem:
- Open Explorer, hover over the desired drive, right-click the mouse, and select “Properties”.
- Go to the “Access” tab, and if the status is “No sharing,” then click on “Advanced settings” and activate the “Share…” option.
- Click on “Ok”, then reboot the system.
Activate sharing of the desired drive (folder)
This may be useful: File system error 2147219196 in Windows 10 how to fix.
Windows cannot access network folder
When setting up a local network on Windows 7,8 and 10, you need to correctly assign user access and configure services. Otherwise, a network error with codes 0x800070035, 0x80004005, or 0x800704cf occurs and a message appears that Windows cannot access the desired network folder, drive, device, or file.
The error message, depending on the OS version, may look like this:
- Windows cannot access a computer on the local network. Network path not found. Error code:
- Windows cannot access a network folder/drive/other location on the local network.
- Windows cannot access *Folder or file*. There is no permission to access *Folder Path*. Contact your network administrator to gain access.
[Update] It is possible to quickly fix errors with code 0x80004005 (and sometimes with others) with just one registry entry:
- Open Start -> Run, type regedet and press Enter.
- In the HKEY_LOCAL_MACHINE registry key, go to the path Software Policies Microsoft Windows LanmanWorkstation.
- RMB create a new parameter name AllowInsecureGuestAuth type REG_DWORD Enabled Value 1 (value 1 is enabled). Restart your PC.
Contents of the article:
Enable Enable NetBIOS over TCP/IP
In some cases, it is necessary to introduce automatic activation of the protocol to work in NetBIOS local networks. For this:
- Click on Win+R and enter ncpa.cpl there.
- Select your active network connection, hover your mouse over it, right-click, and then select “Properties”.
- Find the IP version 4 component and double click on it.
- A window will open in which at the bottom click on “Advanced”, then go to the “Wins” tab. In the "NetBIOS Settings" option, enable the "Enable NetBIOS over TCP/IP" option.
- Restart your PC to save the changes.
Enable the specified option
I also recommend checking if the NetBIOS service is running. Click on Win+R and type services.msc. In the list of services that open, find “NetBIOS support module over TCP/IP”, double-click on it, and in its properties set the startup type to “Automatic”, this will help solve the error code 0x80070035.
Set the appropriate launch type
Remove hidden network adapters
In some cases, hidden virtual network adapters may block correct network connection to another PC. We need to remove them, to do this:
- Press Win+R, type devmgmt.msc and press Enter.
- In the list of devices, click on “Network adapters”.
- Then at the top, click on “View”, and then on “Show hidden devices”. If any are found (they have a faded tint), then move the cursor over them, right-click, and select “Delete device.”
- Reboot your PC to save the changes.
Clear cache and reset settings
One of the most effective solutions is to clear the DNS cache and reset the network settings. To clear the cache, launch a command prompt (type "cmd" in the Windows search box) and enter the following command here:
ipconfig /flushdns
Press Enter and wait for the operation to complete. After this you also need to disable DNS caching:
- Launch Task Manager;
- On the Services tab, look for the Dnscache line;
- Right-click it and select Disable.
Restart your PC and check if clearing the network settings helped get rid of the error.
Enable network discovery option
Go to “Control Panel”, then “Network and Internet”, then to “Network Sharing Center”. On the left, select “Change advanced settings...”, and activate the “Enable network discovery” option. Save the changes you have made, this may help get rid of the problem with code 0x80070035.
Enable network discovery
How to fix error 0x80070035
Error 0xc000007b when starting the game - how to fix it in Windows 10 64 Bit
As mentioned above, the solution depends on the malfunction that caused the error code 0x80070035 in Windows 10 or seven. It is difficult to immediately understand what the cause is. Moreover, it is almost impossible for a beginner, so it is recommended to perform a series of steps that will be described in detail below.
Advice! If code 0x80070035 is accompanied by another notification, you should carefully study it. This may make troubleshooting easier.
Checking drivers
The very first thing you need to do is check all network drivers. They must be installed correctly and work smoothly without any glitches. To do this, follow the steps from the following instructions:
- Go to the standard Start menu and find the “Device Manager” application in the search bar. You can also launch it by pressing the Win + R key combination by entering the command “devmgmt.msc” without quotes.
- Select the found utility, then wait for it to launch and automatically load the list of drivers.
- Find the “Network adapters” section and expand it.
- Find the driver you are using (usually it has the word “Realtek” in the name) and right-click on it.
- Select the desired item called “Properties” from the context menu that appears on the screen.
- View driver information in the General tab.
Important! If it says “The device is working normally,” then everything is fine. It is also important that no “alarming” icons with exclamation marks are displayed near the name of the adapter in the “Device Manager”. If there is none of this, then move on to the next step.
Checking the driver operation
Setting up sharing
Very often, the error in question appears due to the fact that OS sharing is not configured as needed. It is advisable to check this, since searching for errors, even if they are not in this section of the configurations, will never hurt in any case.
The general step-by-step instructions for Windows 7, 8 and 10 are as follows:
- Go to Explorer in any convenient way. The fastest way to do this is by pressing the Win + E key combination.
- Find the directory that causes an error when opened from a remote computer.
- Right-click on it and select the “Properties” context menu item.
- Go to the “Access” tab and click on the “Advanced Settings” button.
- Check the box next to the “Share this folder” option.
- Save the changes and go to the “Control Panel” through the “Start” menu or otherwise.
- Set the view mode to “Small Icons” and find the “Network and Internet” section.
- Click on the sharing configurations link, which is located on the left side of the window.
- Activate all the items that relate to granting rights to access data (check all the boxes where it says “Enable”, except for the item with the password).
All that remains is to apply and save the settings. At the end, you need to restart your personal computer or laptop and check access.
Important! Sometimes combining computers into one home group under the “Private” or “Home” profile can help. This can be done in the same network settings by clicking on the “Public Network” link.
Enable guest login without authentication
If the ban on access to the directory is based on disabling guest access, then it must be activated. To do this, follow these instructions:
- Go to the “Run” window by pressing Win + R.
- Enter the command “gpedit.msc” and click “OK”.
- In the Group Policy window, find the computer configuration section and the administrative templates subsection.
- In the subsection, click on the “Network” item and the “Lanmann Workstation” subitem.
- On the right side of the window, guest entrances are included.
- Reboot and check access.
Checking sharing
Adding IPv4 over TCP/IP
Sometimes activating the IPv4 network protocol helps. It may be disabled by default, so you should enable it. To do this, follow very simple instructions:
- Go to “Network Control Center”. You can do this from the Start menu or Control Panel.
- Click on the link “Change adapter settings”.
- Find the properties of this network connection.
- Move to the “Network” tab and find IPv4 in the list. It must be turned on.
- If it is not enabled, then click on the “Install” button, selecting the protocol.
- Select the “Protocol” item and click on “Add”.
- Select the item “Reliable protocol...” and click on the “Ok” button.
Finally, restart the PC and check the functionality of the device.
Disabling the IPV6 protocol
According to the developers, the new IPv6 protocol should not cause any problems. This was fixed in the new Windows 10 operating system, but after update 1809 the annoying error began to appear again, to the dissatisfaction of many users. For some, in such cases, only completely disabling IPv6 helps.
In order to do this, you must:
- Go to “Network and Sharing Center”. You can do this from the Start menu or Control Panel.
- Click on the “Change adapter settings” link.
- Find the properties of this network connection.
- Move to the “Network” tab and find IPv6 in the list.
- Remove the checkbox from it if it was standing.
- Click on the “Ok” button and reboot.
Clearing the DNS cache
Clear DNS cache and reset network settings
Clearing the DNS cache also helps get rid of Microsoft's shortcomings. For this:
- Go to the command line window in any way.
- Enter four commands in turn: “ipconfig /flushdns”, “ipconfig /release”, “netsh winsock reset”, and “netsh int ip reset”.
All that remains is to close the console window and reboot.
Set up passwords in Credential Manager
Go to “Control Panel”, in the search bar at the top right, enter “Credential Manager”, click on the result found. Here, click on “Windows Credentials”, and then on the inscription “Add Windows Credentials”. Sequentially, one by one, enter the user name and password for each machine connected to the network. Make sure that each username and password you type is used to log into the correct PC (or network location).
Enter data for each PC
Problems with Windows Update
If the error persists, then it is most likely related to Windows Update. If so, try to fix it using the troubleshooter:
- Type “Troubleshooting” into the search engine and click on the result.
Enter “Troubleshooting” into the search engine and click on the result.
- Find “Windows Update”, click on it and run the troubleshooter.
Open the “Troubleshooting” tab, under “Windows Update” click on the “Run the troubleshooter” button
- Troubleshooting will begin. You can then choose to apply the fix automatically or skip it.
Click on the link “Apply this fix”
- This will open a log with information about fixed or unresolved issues.
Select one of the options “Send feedback to this troubleshooter” or “Close the troubleshooter”
If the above method does not work, try running Windows Update repair manually.
Important note! Although the following procedure will not harm the system, it will delete the update history log. If this method does not solve the problem, try restoring the log by renaming the “Catroot” and “SoftwareDistribution” folders back.
- Click the Start button and scroll down to the Utilities folder.
In the Start menu, open the System folder
- Launch Command Prompt (preferably as administrator).
Click on “Command Prompt”, then “Advanced”, select “Run as administrator”
- Enter the following commands, pressing "Enter" after each:
- net stop wuauserv;
- net stop bits;
- net stop cryptsvc;
- ren %systemroot%System32Catroot2 Catroot2.old;
- ren %systemroot%SoftwareDistribution SoftwareDistribution.old;
- net start wuauserv;
- net start bits;
- net start cryptsvc.
Enter the commands from the list one by one, pressing “Enter” after each
Make sure that all commands are entered without errors. If something goes wrong (for example, authorization is denied), try changing the file permissions or ownership, and then continue running the commands.
Once you do this, close the Command Prompt window and check if the updates can be installed.
A number of more custom solutions
According to user reviews, the following methods can also help:
- If network users have Russian names (written in Cyrillic), change the user account names to their Latin counterparts;
- Uninstall update KV3172729;
- Check the functionality of your router. Turn it off for a couple of seconds and then turn the device back on.
Recommended reading: Your Windows 10 license is about to expire, what to do.
The third solution to the problem “Network path not found”
Sometimes error 0x80070035 occurs due to Russian network usernames . In this case, the solution will be very simple: you need to contact the owners of PCs connected to your network and ask them to change their login using the Latin alphabet. The problem may also be that the connected computers use different versions of Windows OS.
The following algorithm of actions will help solve the problem:
- Launch the command line cmd.exe.
- We release the network interface from the DHCP lease, which requires specifying the command: ipconfig /release.
- We update the network interface and reconnect the IP address from DHCP by specifying the ipconfig /renew command.
Reboot the PC, the problem should disappear.