Free up disk space
One of the common reasons is lack of space on the disk where Windows is installed. Temporary files during copying cannot be saved for further installation and the user will receive error 0xC1900101. There must be at least 20 GB of free space on the disk at all times. If you don't have enough of it, you can try cleaning the disk from unnecessary files. Refer to the guide below if you don't know how to do this.
- Clear drive C of unnecessary files
Causes of error 0xC1900101
- Damage to installation files of the Windows 10 operating system.
- Incompatibility of update files with drivers installed on the system.
- Insufficient user disk space.
- The presence of various problems with the disk related to file system errors, partitions, etc.
These were the most common reasons for error 0xC1900101 to appear. Having understood the reasons, let us now move on to the methods by which you can fix this error in various places where it appears.
Make services automatic
The Windows 10 system has services that are responsible for the installation and update processes of Windows 10. Let's switch them to automatic start mode. To do this, open a command prompt as an administrator and type and type the command below:
- sc config wuauserv start=auto
- sc config cryptSvc start=auto
- sc config bits start=auto
- sc config trustedinstaller start=auto
Restart your computer and try updating the system.
When might an error occur?
In some cases, this error may occur even before the Tens update is installed. In this case, it is advisable not to proceed with the update, but to perform a clean installation. To do this, an operation consisting of several steps must be carried out.
There is one easy option for preparing your system for a clean boot. In this case, navigate to the following path: \Software\Distribution\Download. It is necessary to eliminate all files present in the last root directory. After this, you need to remove the item called “$Windows. ~BT." It can be found in the “tree” of the main PC drive.
The preparatory stage should be completed by activating the UEFI boot mode in the BIOS.
To enable the option, reboot your device and go to the BIOS menu. Typically, in many PC models, the F12 button is responsible for calling up the menu. Another important point is that if the processor has been “overclocked,” then it is necessary to return all settings to the factory state.
After completing all the previous steps, you can proceed directly to the installation process. Microsoft employees recommend performing this process via removable media. At the time of installation, it is advisable to disconnect from access to the Internet.
After launching the “tens”, the error should not occur. The process of clean installation of Windows 10 is described in detail in a separate article, which you can also find on our website.
5. SoftwareDistribution and Catroot2
The SoftwareDistribution folder stores all system updates, including early downloads and installations. This can all get confused with versions or corrupted files that didn't load well and produce error 0xC1900101. Let's create a new folder to extract this version from the culprits. Launch Command Prompt as an administrator and enter the following commands one by one:
- net stop wuauserv
- net stop bits
- net stop cryptSvc
- net stop msiserver
With the above commands we will stop the services associated with the update center so that they do not prevent us from renaming the folder below.
Next, enter the following two commands to change the SoftwareDistribution and catroot2 folder as a backup.
- ren C:\Windows\SoftwareDistribution SoftwareDistribution.old
- ren C:\Windows\System32\catroot2 catroot2.old
Now we start the stopped services back:
- net start wuauserv
- net start bits
- net start cryptSvc
- net start msserver
Restart your computer and check if error 0xC1900101 is resolved.
Note: If you experience any problems with this method, try doing it in Safe Mode.
Error updating to Windows 10 - WindowsUpdate_C1900101 and WindowsUpdate_dt000
I finally decided to upgrade my SONY VAIO laptop from licensed Windows 7 Home Basic to Windows 10 of a similar edition.
But it was not there! The download process was successful, but then towards the end, at about 60-70%, a blue screen of death popped up and the laptop rebooted, and then the rollback procedure to Windows 7 began. The update center displayed the error “WindowsUpdate_C1900101” “WindowsUpdate_dt000” or 0xc1900101-0x40017 . The solution was found on the website in questions and answers, where all the error codes that occur during the upgrade to Windows 10 are listed in detail. In particular, for this and similar errors, it is recommended to disable or delete everything connected to usb, except for the mouse and keyboard. Then, if Nvidia drivers are installed on the laptop, you need to update them to the latest version. The problem may also be in the antivirus, so it needs to be removed or disabled.
What did I do?
I removed all the “left” and unused software, namely:
- Kaspersky Internet Security 2020 was a trial version that ran in parallel with the installed free Microsoft Security Essentials, which was not disabled.
- All Windows Live components
- All software from Acronis
- Radmin Server
- Various plugins and Active X components for Internet Explorer
- Other suspicious software
I fixed the size of the paging file, after which the amount of free disk space became about 30 GB. The upgrade requirements indicate that 20 GB of free space is sufficient.
After downloading and installing again, the Windows 10 upgrade process was completed successfully. After which I saw the Windows 10 welcome screen prompting me to enter the password for my local account.
For those who find nothing helps, I recommend trying the following:
- Update all drivers for the current system; to do this, go to the official website of the device manufacturer.
- Perform a clean boot of your operating system. Instructions at.
- Try updating to Windows 8.1 first, and then to Windows 10.
- If you also own a VAIO laptop, then go to the next section, where we enter your model and look at compatibility with Windows 10.
- If this does not help, then a clean installation from the image is an option. Download from here.
After the update, the impressions from the system are only positive: the loading speed and responsiveness of the system have increased, a new nice interface design, even compared to Windows 8.1, and of course a normal start menu in the right place, although the mouse cursor is already out of habit in the lower right corner looking for parameters and the shutdown button 
After the update, let's pay attention to the amount of free space on the disk, which has decreased by exactly the same amount as the current windows directory. This is due to the fact that the old version of Windows is still located on the disk in the windows.old directory. In order to remove it correctly, run cleanmgr or find the “disk cleanup” program, then select the disk, then click the “Clean up system files” button and oh. Click “Delete”.
And finally, a recommendation that will allow all paranoids and opponents of the regime of total control and surveillance of ordinary users by global corporations to sleep peacefully. I'm talking about the privacy settings of Windows 10, which have already caused a stir in the media!
So, immediately after installation\update, go to Start\Settings\Privacy and, depending on what device you are working on, turn off everything that you don’t like. I turned everything off
Damaged system files
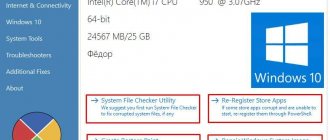
If the system files are damaged, then error 0xC1900101 may be due to this. Let's run two commands that will check if there are damaged system files, and if found, it will fix them automatically. Run a command prompt as an administrator and enter the commands one by one, waiting for the process to finish after each one:
- sfc /scannow
- DISM /ONLINE /CLEANUP-IMAGE /RESTOREHEALTH
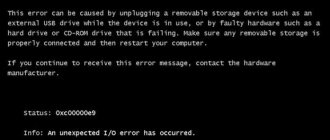
Disk errors
If the disk has bad sectors, then copying temporary files will not be successful, which may result in error code 0xC1900101. Run Command Prompt as an administrator and enter a command that will check the disk and fix bad sectors:
- chkdsk c: /f /r /x
Where c: is the partition of the disk where Windows is located.
Disable components
Some enabled components on the system may interfere with update services. This is especially true when error 0xC1900101 occurs during a major update, for example from 1909 to 2004. Run a command prompt as an administrator and enter:
dism /online /disable-feature /FeatureName:SMB1Protocol-Server dism /online /disable-feature /FeatureName:SMB1Protocol dism /online /disable-feature /FeatureName:MSMQ-Server dism /online /disable-feature /FeatureName:MSMQ-Container dism /online /disable-feature /FeatureName:WCF-Services45 dism /online /disable-feature /FeatureName:WCF-TCP-Activation45 dism /online /disable-feature /FeatureName:WCF-Pipe-Activation45 dism /online /disable-feature /FeatureName:WCF-MSMQ-Activation45 dism /online /disable-feature /FeatureName:WCF-TCP-PortSharing45 dism /online /disable-feature /FeatureName:WAS-ConfigurationAPI dism /online /disable-feature /FeatureName:WAS-WindowsActivationService dism /online /disable-feature /FeatureName:WAS-ProcessModel dism /online /disable-feature /FeatureName:IIS-RequestFiltering dism /online /disable-feature /FeatureName:IIS-Security dism /online /disable-feature /FeatureName:IIS- ApplicationDevelopment dism /online /disable-feature /FeatureName:IIS-NetFxExtensibility45 dism /online /disable-feature /FeatureName:IIS-WebServerRole dism /online /disable-feature /FeatureName:IIS-WebServer dism /online /disable-feature /FeatureName: NetFx4-AdvSrvs dism /online /disable-feature /FeatureName:NetFx4Extended-ASPNET45
Restart your PC and try updating the system. If you want to enable a feature back, enter enable-feature instead of disable-feature.
Additional Tips
- If you have a third-party antivirus like Avast, then try disabling it for a while.
- If you have third-party encryption programs like CryptoPro, then remove them.
- Disable BitLocker encryption if it is enabled.
- Run the update several times.
- Update your drivers if there is a yellow exclamation mark in Device Manager.
- Remove the battery from the PC for 4 minutes to reset the BIOS to default.
See also:
- How to fix Error 0xc1900101 0x20004 when installing Windows 10
- How to remove, disable, roll back and update device drivers in Windows 10/8/7
- SFC and DISM: Checking and Repairing System Files in Windows
- CHKDSK: Checking and repairing your hard drive in Windows 10
- How to fix Windows Update errors 10
comments powered by HyperComments
Other ways to resolve error c1900101
If none of the methods listed above helped solve the problem, most likely the error is due to a malfunction of computer components (possibly their drivers) or their incompatibility with Windows 10. You can try the following options:
- Launch the BIOS on your computer and disable Secure Boot. This method helps if error c1900101 has an index of 0x20017 indicating that there was a problem installing SAFE_OS in the BOOT operation.
- Remove the video card driver and applications that relate to it;
- Check the system drive using built-in Windows utilities or third-party programs.
It is impossible to say for sure why error c1900101 occurs on a specific computer.
( 431 votes, average: 4.55 out of 5)
CRITICAL PROCESS DIED error in Windows 10: how to fix it
Error: We were unable to configure Windows updates