Installing the .NET Framework on Windows Server
If your Windows Server has direct Internet access , you can install .NET Framefork 3.5 in several ways:
- Via Server Manager;
- Using DISM: DISM /Online /Enable-Feature /FeatureName:NetFx3 /All
- Using PowerShell: Install-WindowsFeature NET-Framework-Core
This downloads all the required .NET 3.5 files for your version of Windows Server from the Windows Update servers. For this installation method to work, you need to make sure:
- The server is not configured to the local WSUS server to receive updates (check the update settings in group policies or directly in the registry);
- Proxy and firewall settings should not restrict access to Windows Update servers.
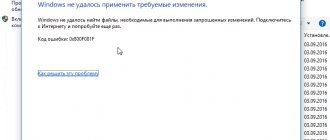
If your server does not have direct access to the Internet , then when you try to install .NET 3.5 on Windows Server through the Server Manager console (Add Roles and Features -> Features -> Net Framework 3.5 Features, the installation ends with error 0 x 800 f 081 f ( The source files could not be found) or 0 x 800 F 0950 .
Although the .NET Framework 3.5 is present in the Windows Server 2016/2019 feature list, its binaries are not actually present in the Windows Feature Store (Features on Demand concept). This is done to reduce the size of the OS on disk. You can check for the presence of .NET Framework 3.5 in the local Windows Server component store using the command:
Get-WindowsFeature *Framework*
As you can see, the status of the NET-Framework-Core component is Removed .
To install NET-Framework-Core, you will need a Windows Server 2016/2019 distribution kit in the form of an iso file, DVD, or unpacked in a network folder. Mount the iso image with the distribution kit into a separate virtual disk (for example, drive D:). You can install the component from the GUI or using PowerShell.
Net Framework 3.5 for Windows 10 x64 download
NET Framework is a programming model created by Microsoft in order to create software with good quality, an attractive interface, and sufficient security. This is an integral part of some applications, which has functionality for launching them. The main idea of this platform is the compatibility of various programs that were written in different programming languages. And also, what was written for netframe can be used in other environments besides Windows.
Microsoft NET Framework consists of 2 parts:
1. The performer's environment. The multilingual Common Language Runtime (CLR) is the core of the platform and the main component of the system that manages the execution of user programs.
2.The Framework Class Library (FCL) which gives programs access to the runtime environment. It has a lot of elements for managing networks, databases, files, and interfaces. Developers need all this for programming.
Many users are interested in how to download NET Framework versions 3.5 for Windows 10 and why they can’t do it. And as usual, it’s worth paying attention to the computer requirements; the newer the framework version, the more specifications it needs.
NET Framework 3.5 includes new builds to enhance the capabilities of earlier NET platforms. It also has Service Pack 1 (SP1), which updates assemblies located in the platform itself.
In principle, all versions can be installed regardless of those that came out later, and each version automatically adds earlier versions if you have not installed them yet. You can also see in version 3.5 the Client Profile installation package, which includes assemblies of used client applications.
Windows 2000 does not work with the 3.5 framework and with a standalone installation.
Additional features in the .NET Framework, version 3.5:
- Using Windows Communication Foundation (WCF) technology, support for applications on portable devices has been expanded.
- Adding language tools (LINQ, new APIs)
- Added new compilers for C#, Visual Basic, C++ and J#;
- Improve debugging with diagnostic tools
- You can now add graphics to controls
- ClearType font support
- It is now possible to change the BackColor property of read-only controls
- Maintaining SelectionStart and SelectionLength properties
- And much more
How to install NET Framework
If you have a Windows OS, then you most likely already have some version of the NET Framework installed. But not version 3.5, it is not installed automatically and you need to download it yourself.
This can be done in two ways:
- Download the installation file, which will download files from the Internet for installation. Moreover, its weight will be only 2.8 MB. And the file size depends on your OS.
- If there is no option for online installation, then try downloading the full package, its weight is decent, about 200 MB, but you can install it offline.
Installing .Net Framework 3.5 using the Server Manager graphical console
You can install the .Net 3.5 component from the Server Manager graphical console. To do this, select the .Net Framework 3.5 Features component, but before clicking the Install , click the small link at the bottom of the wizard - Specify an alternative source path .
In this window you need to specify the path to the component store in the Windows Server distribution. If you mounted the distribution in a virtual drive, this may be the path D:\sources\sxs. It can also be a network folder where you previously copied the distribution kit (for example, \\server1\distr\ws2016\sources\sxs). Click OK.
All that remains is to run the installation.
How to install NET.Framework
“I can’t install the NET Framework” is a phrase that many users hear. The combination “I can’t” simply filled thematic forums. Fortunately, there are programmers who, thanks to their excellent knowledge and practical skills, are able to find various options for eliminating errors. In addition, they do not hide their ingenious “finds”, but are happy to share with everyone, so on the forums you can often find valuable advice that allows even absolute “dummies” to solve problems.
Algorithm of actions focused on installing the platform
To install NET.Framework on Windows 7, you must first remove previous installation traces of all versions. It is quite difficult for inexperienced users to perform such manipulations, since Microsoft has quite tightly intertwined the system folders with the platform folders. For this reason, the previous version may be very difficult to remove, or, in general, there is no way to “get rid” of it.
This step cannot be ignored either, since during a new installation of the platform on Windows 7, an error may occur again.
In order for the entire process of uninstallation and subsequent installation to be successful, it is important to follow all the recommendations of experienced users. First of all, it is recommended to download the dotnetfx_cleanup_tool.zip file. Next, it should be opened and then immediately removed, since it is archived.
In the folder in which all the extracted files are located, you need to find the cleanup_tool file with the exe extension. This is what should be launched. A new window will immediately appear asking permission for all subsequent actions. By clicking on the “Yes” button, the user agrees with everything, so the program continues to perform all other actions.
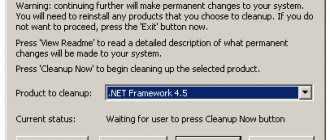
At a certain point, a window will appear in which you will be offered the right to select the Microsoft product that you want to remove. Among the proposed list there is the line “NET.Framework - all versions”; after selecting it, all you have to do is click on the “Clear” button.
However, such an application is not omnipotent, since it will not be able to remove NET.Framework 2.0, since this version of the platform is defined by Microsoft developers as an integral part of the operating system.
After cleaning is completed, the computer must be restarted. Microsoft developers make such requirements for many important procedures associated with the installation and uninstallation processes.
After starting the operating system, you should install several versions of Microsoft.NET.Framework sequentially. Initially, version 1.1, then proceed to install versions 3.5 and 3.0, then you will again need to restart the computer.
Finally, all that remains is to enable Windows Update and after that safely install Microsoft.NET.Framework 4.
Despite the fact that you will have to spend some time performing all the indicated actions, the user can definitely be proud of the result obtained. New knowledge, supported by practical skills, is always considered as a “golden treasure” that can be useful many more times.
So, every user can install the NET.Framework 4 platform on a computer, despite some difficulties, if they believe in their own abilities and follow the recommendations of experienced users.
Installing the .Net Framework 3.5 using DISM and PowerShell
It is much easier to install Net Framework 3.5 Features from a command prompt or PowerShell console running as an administrator. Just run the command:
Dism.exe /online /enable-feature /featurename:NetFX3 /All /Source:D:\sources\sxs /LimitAccess
Where D:\ is the disk with the Windows Server 2020 distribution.
LimitAccess parameter prevents DISM from connecting to update servers to obtain component installation files. Only files in the specified directory are used.
You can also install using the Add-WindowsFeature command:
Add-WindowsFeature NET-Framework-Core -Source d:\sources\sxs
Once the component installation is complete, a server reboot is not required.
You can also manually copy 2 cab files microsoft-windows-netfx3... from the sources\sxs directory of your distribution. In this case, to install .Net 3.5, just run the command:
dism /online /Add-Package /PackagePath:C:install\net35\microsoft-windows-netfx3-ondemand-package~31bf3856ad364e35~amd64~~.cab.
Hello everyone, today I want to tell you about how to install net framework 3.5 for Windows 10 redstone, we will look at three installation options for this component, and you can use each of them for a specific situation in your infrastructure. Let's move on to practice.
How to install net framework on windows 10, graphical method
Previously, we performed a clean installation of windows 10 redstone, and we will do everything on it. I won’t torment you with definitions of what net framework 3.5 is, but let’s get straight to the point, the first method will be the easiest for most people, since it is completely graphical.
Right-click on the start button and select Control Panel.
Go to Programs and Features.
Next, to install the net framework on Windows 10, select Turn Windows features on or off.
Open the plus sign on the NET Framework 3.5 folder and activate it without additional subfolders.
The operating system does not have this distribution, but will offer you to download it through the update center from the Internet, select Download.
The download of the distribution will begin, it will take a couple of minutes, with a normal Internet connection.
Then the application of this update will begin.
As you can see, the Windows 10 redstone operating system has successfully installed the NET Framework 3.5 component.
How to install net framework on windows 10, command line
In this method, we will use the old and familiar DISM utility, which has been under the hood of this operating system since the days of Vista. You and I need to open the command line, to do this, right-click on Start and select Command Prompt as Administrator from the context menu.
Now you need to mount the installation disk in Windows 10 into your cd-rom, if you don’t have it, you can follow the link from the Yandex cloud. Once you have mounted the disk you need to remember its letter. For me this is drive D:. Next enter the command:
Dism /online /enable-feature /featurename:NetFx3 /All /Source:D:\sources\sxs /LimitAccess
Where D:\sources\sxs is the path to the folder on the cd-rom disk.
How to install net framework on windows 10 via powershell
And of course, installing net framework 3.5 for windows 10 redstone is also possible via powershell. Open it and enter the same command and path to your mounted installation disk.
Install-WindowsFeature Net-Framework-Core -source D:\sources\sxs
Then you can check the installed components with the command
Get-WindowsFeature
Popular Related Posts:
- How to remove net framework, correctly and completely
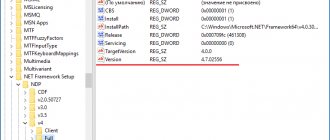
- How to find out the net framework version in a minute
- How to update PowerShell version in a minute
- Installing roles in Windows Server 2019
- How to install Russian language in Windows Server 2016
Configuring Windows Component Installation Settings Using GPOs
Using the Specify settings for optional component installation and component repair (located under GPO Computer Configuration -> Administrative Templates -> System ), you can configure specific settings for installing Windows components from a local source or Windows Update, even when using WSUS.
Here you can specify that when installing or repairing Windows components, you should always download files from the Internet from Windows Update servers instead of local WSUS (option Download repair content and optional features directly from Windows Update instead of Windows Server Update Services - WSUS ). You can also specify the path to the directory with Windows Server components (or wim file) to be used during installation (specified in the Alternate source file path ).