Programmers are known to be lazy people, like most people. When a program is developed, exceptional situations must be worked out, for example, a file is accidentally deleted/damaged, there is no access to the Internet, the mouse, keyboard, encoding are broken, new devices, connectors, Friday the 13th... whatever.
And for each case, programmers need to write a window or in some other way notify the user that something went unplanned, and also make sure that the error is correctly understood by the user (But we already have problems explaining to users programmers).
We all understand perfectly well that such an activity is very tedious and you can make a mistake; you can simply not take into account the probability of the coincidence of several events or the emergence of new devices.
This is the kind of mistake, if you can call it a mistake, that the developers of the Windows 7 installation process made.
What did they do and what did they forget?
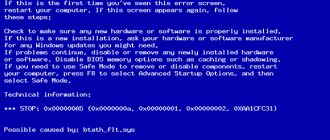
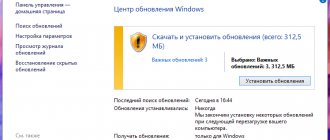
They created an incorrect message for the user about what happened wrong. Instead of writing a message saying that there is no necessary driver for the device from which you are trying to install the Windows operating system. The one who wrote the driver error message thought that everyone would install Windows 7 only from an optical disc. But what about the ability to install from a USB flash drive? But what about those users who install from a card reader and other external devices? What's the result? And in the end this is what:
Error: optical drive driver not found when installing Windows 7 from a USB flash drive
But, starting with Windows 8.1, the developers corrected themselves and this error window was slightly redone.
The required driver for the optical drive was not found in Windows 8.1 and Windows 10
But again, in what form should this driver be? And where can I get it?
If during the installation of Windows 7, and most likely in later versions, you encounter such a message during installation, then here is what you need to analyze first:
- What device is the installation from? Possible options CD\DVD, Flash, Usb-HDD (External HDD via USB)
- If it is a USB device, what USB port is it plugged into? Possible USB 2.0 options. or USB 3.0. (More details about USB 2.0\3.0 connectors below.)
What to do if the required driver for your optical drive is not found
If you encounter a problem where the required driver for the Windows optical drive is not on your computer, there are several solutions available. Depending on the conditions when Windows is installed via a drive or CD-ROM, the ways to resolve the error will vary.
When installing Windows 7 from a USB flash drive
The advantage of using bootable flash drives is that not every computer has a floppy drive by default. Netbooks or laptops without disk drives, the absence of a CD-ROM in the case of a desktop computer, in fact, ties the hands of the user who needs to update the system. Bootable flash drives come to the rescue in such situations and greatly simplify the installation process. As we wrote above, the reason for the error when starting from a drive is the lack of drivers for the connector to which it is connected. To get around this situation in the simplest way, do the following:
- Change the 3.0 connector to a connector with the 2.0 parameter, therefore, change the entry location of the flash drive (Figure 2). Why is this necessary? When you first install Windows, drivers are missing only for connector 3.0, which differs from other ports by a bright blue or dark blue plastic insert. Its technical difference is that it is directly connected to the motherboard. If moving the drive does not help, use the following methods;
Figure 2. Appearance of the differences between USB 3.0 and USB 2.0 connectors
- Write additional drivers for the connector to the bootable USB flash drive. They can be downloaded from the official website of the dealer of the laptop model (or motherboard, if it is a desktop PC) that you use. Basic recommendations for recording: Use the functionality of your work computer (the most important thing is that it passes an antivirus scan and the system is protected, otherwise you can transfer viruses to the drive);
- Download only the official “firewood” in “.exe” format and run it on your work PC;
- Launching is necessary for the so-called unpacking, as a result of which system folders containing documents in the “.sys” format appear. These files should be copied and sent to a bootable USB flash drive. Thanks to them, when reinstalled again, the 3.0 connector will work smoothly and all the necessary information from the drive will be read.
When installing Windows from CD-ROM
CD-ROM is the oldest and most popular way to download and install any software. Unlike booting from a drive, problems with the drive occur much less frequently and are most often associated with physical problems with the device itself. First, let's look at what types all disk drives are divided into:
- Built-in . Mounted into a PC or laptop case by default. In the case of a desktop computer, replacement and repair are easy.
- Portable . Portable and plug-in drives are used to run programs from a CD drive if there is no drive by default (in fact, this is a more complicated version of a flash drive). This reading method is indispensable if the drive contains valuable and unique information that has no analogues either on the network or on other devices.
Note : Another reason why portable CDs are used is that the drive cannot be read.
Figure 3. External differences between built-in and portable CD-roms
Errors occur in disk drives of any model, so we will look at ways to eliminate them for the most popular manufacturers: Asus and Hewlett-Packard. Each manufacturer has a number of configuration features, but their general principle for solving the problem of failure to load a CD ROM driver is the same:
- Check the integrity of the drive and drive through another device. If there is mechanical damage, the drive should be replaced or taken for repair and proceed to starting the system from a flash drive (Figure 4). CDs cannot be restored after obvious physical impacts, since scratches on the surface lead to the complete destruction of memory sectors. Unfortunately, the CD drive cannot be repaired at home and you will have to look for an alternative way to boot the system;
- When loading files onto a CD (if you are burning on another computer), write down the optical drive driver for Asus models and the driver for HP optical drives. The same can be done with a flash drive by loading the necessary “firewood” onto it. Unpacking should be successful;
Figure 4. Repair of mechanical damage on the sidir
Create another bootable USB flash drive with a Windows distribution
Not in all situations it is possible to interrupt Windows even using complex methods. What to do if none of the above measures helped and you were unable to reinstall Windows? There is another more radical measure, for which a second computer is required. To permanently resolve the issue where the optical drive driver is required, create a new system recovery flash drive. There are two ways to carry out this operation:
- Through a special utility UNetBootin, designed specifically to create a disk image. Filling the bootable flash drive with information is carried out without installing the utility itself on the computer in the following way: Download the .iso image with Windows from a trusted site;
- Connect the drive to your computer, remember its name (for example, “G” or “K”).
- Launch the application and wait for it to load;
- In the window that appears, select “ISO...”, and in the “Media” item, specify the name of the drive where the information will be saved;
- Click on the button opposite “Disk image”, which is designated as “…” and specify the path to the archive with Windows, therefore, the folder where the image was downloaded;
- To upload files to the drive successfully, click on “OK”, do not launch other applications and do not remove the drive (it is better not to touch it at all, so that the contacts do not come loose and the unpacking process is not disrupted);
- When the bootable USB flash drive is filled, safely remove it from the PC and proceed to reinstall Windows on the computer you are interested in (Figure 5).
Figure 5. Appearance of the main screen of the UNetBootin application
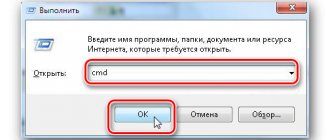
- Via the command line. This method is more complex, but it will allow you to create an image of the Windows that you use on the computer from which the flash drive is being filled. This is done like this: Go to “Start” and enter “cmd” in the search bar. This combination of characters will open the command line;
- Enter the value “diskpart” without quotes and spaces, which will activate drive management, press “Entr” to activate it in this and subsequent situations;
- Write the combination “list disk”, which will open a list of all connected devices, and look in it for the name of the flash drive connected to the PC, onto which the download will be made. It is important to remember that you can accidentally use a hard drive instead of a drive, so be careful;
- Enter “select disk” and indicate next to it, separated by one space, the digital value that indicates the required drive (for example, “3”, “2”). Ultimately it will look like this: “select disk 4”;
- Format the drive using a simple “clean” command and proceed to creating a Windows image;
- Enter one by one: “create partition primary”, then “select partition 1” and “active”;
- Next, format the device in accelerated mode with the command: “format fs=NTFS QUICK” (Figure 6);
- When formatting is complete, assign a random new name to the drive “assign”;
- We leave the command line by entering “exit”;
- The system opens the main folder of the drive, where you just need to copy the archive with the Windows image, after which it is safe to remove the device and proceed to reinstall it on another computer.
Figure 6. Window for formatting a hard drive using the command line
In this article, we looked at how to install the optical drive driver in different ways and the reasons why problems with missing “firewood” arise.
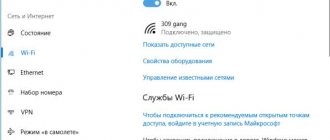
What is the difference between USB 2.0/3.0?
To distinguish these two USB connectors, just look at the picture below. We emphasize that USB 3.0 is usually highlighted in blue, in contrast to the white USB 2.0.
Visual difference between USB 2.0 and USB 3.0
If the laptop or computer does not have USB 2.0 connectors (and if they do exist, it is better to insert the installation flash drive into them), and all of the available ones are USB 3.0 connectors, then you need to download the driver for the latter, since at the time of the release of the Windows 7 operating system, driver support in There was no installation image.
To download the required driver, you first need to determine the motherboard model. After that, go to the drivers section on the manufacturer’s official website, find your board there and download the USB 3.0 driver and you may need an ACHI driver. (hard drive controller).
Selecting the official website of the motherboard to download the necessary drivers
You can, of course, try downloading a more recent version of Windows 7 with the latest updates; perhaps they added support for USB 3.0 drivers to the installation image itself.
Problems installing Windows 7 and higher.
When installing, Windows asks for a hard drive driver, regardless of its model or version? It is quite possible that at the moment you are installing Windows 7 or 8 from a flash drive or disk , and the program is complaining due to the lack of those same drivers. In this case, you will need to download the storage technology driver.
Don't forget to indicate the required OS version, as well as its bit capacity , when you are looking for the optimal software for the screw. The process of installing fresh drivers will begin during the main installation of Windows. First of all, unpack the downloaded archive onto the flash drive from which you plan to install Windows, or if you are installing from a disk, then simply insert the flash drive into any free slot. Then, as soon as the installation program asks the user to work with hard drive partitions, click on “download”, and you will need to specify the path to the downloaded file, which, as you already understand, is on the flash drive.
The program will no longer ask for firewood, Windows installation will continue as usual. Now, the system will not ask for additional software, with the exception of installing basic drivers after Windows is installed. Good luck!
Do you have a driver? What should I do?
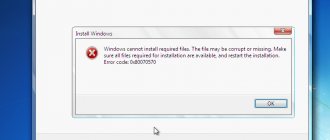
If you managed to find the drivers, then you need to unpack them, write them to any flash drive, insert them into USB and indicate them in the “Load driver” window using the browse button. But here, too, it may not be possible without adventure. You will most likely first be pleased with this message:
Error loading driver during windows installation
Then click “OK” and then click the “Repeat search” button.
Then select “…. USB 3.0 Root HUB…..” click next and the installation should proceed further.
Specifying a USB 3.0 driver when installing windows
What to do if all of the above does not help?
If the above does not help, then you can:
- Try using a different device for installation, try burning to another disk (It is recommended to use DVD-R, CD-R and it is better not to use rewritable RW disks to install Windows at all), write installation files from the image at minimum speed.
- When installing from a flash drive, try inserting it into all USB connectors. It's very likely that one of them will work.
- Check the integrity of the installation image, download again, take another image.
- Use verified operating system images. It is recommended to use official images downloaded from official sources.
- Format the flash drive according to the Windows installation recommendations.
- Use another program to burn the image to the drive (For example, Novicorp WinToFlash or Windows USB/DVD Download Tool )
- For those who install an operating system via a DVD or CD drive, in some cases cleaning the disk drive laser helps.
- You can try switching Ahci/IDE modes
- If you have a laptop made in 2020 or later and you are trying to install Windows 7 on it, then most likely you will not be able to do this using any of the methods described above, simply because it is optimized to run only Windows 10 and most likely the 64-bit version .
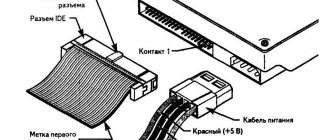
The disk is not detected by the OS
If the disk does not appear in the device manager, you need to check whether it is visible in the BIOS. A user may encounter this problem if he decides to install an SSD. To improve hardware compatibility, manufacturers enable IDE mode on motherboards by default. Any HDD can work with it. Even connected via a SATA connector, it will not create problems for the user. The SSD requires unconditional use of the more modern AHCI mode.
We go into the BIOS and on the main tab look at the presence of disks in the system.
Go to the next section to check the connection mode. Select the marked item.
We are looking for the parameter responsible for the operation of the controllers.
As you can see, the mode switch is in the IDE position. For this reason, the computer does not see the hard drive in the BIOS. Use the arrows to move to the desired item and open the internal menu by pressing Enter. Change the mode to AHCI.
We return to the Main tab and make sure that the BIOS sees our drive. It appeared in the list of connected SATA devices. We record the changes made by pressing the corresponding function key and exit the BIOS.
We have solved the problem where the hard drive is not detected in Windows and is not visible in Device Manager. You can boot into the graphical mode of the OS and perform the actions described in the first section.