Content
- Introduction - What should I do if there is an error during installation?
- Damaged Windows 7 image. What does this mean and how to identify it?
- Replacing the image did not help. Less common general problems: "Windows 7 cannot be installed (GPT standard)" (Windows Setup unexpected error)
- Driver error when installing Windows 7
- Error 0x80070570
1.
Media problem
If the installation of Windows 7 starts, but suddenly breaks down, or does not start at all, it is also worth checking the condition of the optical disk, flash drive or external HDD - in a word, the media on which the distribution is recorded. As a rule, minor damage to the surface or microcircuit allows the installation to be completed, but if irreparable damage is caused to the device, the simplest solution is to re-write the Windows 7 bootable USB flash drive.
When using an optical disc as the installation source, you should:
- Carefully inspect the working surface of the media. If it is smooth, without specks of dust or scratches, proceed immediately to the second step. If there is micro-contamination or damage, clean the disc with a dry cloth or napkin. If the scratches are deep and/or extend across the entire recorded surface, your best bet would be to burn a new DVD and try installing Windows 7 again.
- Next, check the quality of recording to the disc using any suitable program. For example, CDCheck is a convenient, shareware tool: in a few minutes it will help you identify the problem that is causing Windows 7 to not install, or switch to the following solutions. After downloading and installing the program, the computer owner must click on the Check button.
- Select your optical drive from the drop-down list.
- Click on Continue in the lower right corner.
- And wait until the verification process is completed; Depending on the amount of recorded information (for Windows 7 this is usually about 5 gigabytes) and the characteristics of the equipment, the program can take from five minutes to half an hour or more.
- During the scan, information about detected errors and inconsistencies will be displayed in the lower information panel.
- And at the end the user will receive a detailed verification report.
If, as shown in the example, the only problem is a hash mismatch, the user may continue to look for reasons why Windows 7 won't install; if bad sectors are detected, you should, as already mentioned, rewrite the distribution onto a new optical disk.
Flash drives and removable hard drives can be checked using the lightweight, free software Check Flash. After downloading and installing it, a user whose Windows 7 installation does not start must:
- Launch the application and select the verification method “As a physical device”.
- Indicate in the drop-down list which USB flash drive with Windows 7 you want to check.
- Click on the “Start” button.
- And wait for the procedure to complete. The test results are color coded on the Legend tab in the left sidebar.
- Ideally, all memory sectors should be colored blue.
- Upon completion of the scan, the user will see information about the errors found on the “Log” tab.
If no errors are found, great - the flash drive is working properly, and you can move on to the next test option; otherwise, the owner of a computer who is unable to install or reinstall Windows 7 is recommended to write the bootable media again - for example, using the convenient UltraISO program.
What should I do if there is an error during installation?
When installing Windows 7, various problems may arise: the process may be interrupted at various stages and at specific steps (when copying/unpacking files, formatting HDD/SSD, etc.).
If you cannot understand the reason for a particular error, be sure to start by checking the image of your copy of the OS for integrity.
If after at least two attempts you are unable to successfully complete the system installation, pay attention to the error code that appears during installation. The rest of the article discusses the most common of these errors, as well as methods for correcting them.
2.
HDD
Sometimes the cause of all the troubles can be the simplest hard drive error. In fact, there are several options here, one of which is unlikely to please users. So, let's start with the simplest and most common result.
This is nothing more than a banal lack of space on the hard drive. When you do this, you will receive an error message. It occurs when users decide to install several operating systems or save some data from their previous Windows. Here you only have to format the selected hard drive partition. And only then carry out the installation. By the way, this process can be done perfectly using the Windows 7 installer. After selecting the “clean installation” option, just click on the disk partition, and then click on “format”. A few seconds and the problem is solved.
Things get worse when Windows 7 is not installed on the hard drive due to hardware failure. That is, if your disk itself is in a faulty state. For correct diagnosis, as a rule, it is worth taking the computer to a service center and explaining that during the installation of the operating system you are experiencing a hard drive error. Only changing this “spare part” can help here. After this you can think about reinstalling.
Damaged Windows 7 image. What does this mean and how to identify it?
Let's start with
the obvious signs:
- The file size of your OS image does not match the file size of the image downloaded from the network;
- The image cannot be opened/mounted using WinRar
,
Daemoon Tools
; - When reading or copying an image using a program to write a system file to a disk or flash drive, errors occur.
But even the absence of all these signs does not provide a 100% guarantee of the overall integrity of the installed system. This is because the size of even a broken file can completely correspond to the size of the whole one, and the recording program (its specific version) simply turns out to be inoperative. There is a more reliable way to determine the integrity of the image - checking the MD 5 checksum of our installation image. MD5 hash sum is a unique 32-character code that is obtained by adding the “contents” of all files into one line and applying a special MD5 algorithm. If, when writing Windows 7 to disk, at least 1 character is damaged and written incorrectly, then you will get another unique string of 32 characters (this string is called MD5 hash sum). Thus, by checking the MD5 checksum, we determine whether there are any errors in the recorded Windows 7 image. For this check, we will use the MD5 Checker program (the download file is attached at the end of the article). It's simple
: download the desired version, unpack it to any place (for example, on the Desktop), open it.
Now we just need to transfer our Windows 7 image into the program window, where we compare the MD5 of the downloaded file with the initially correct MD5, which is usually indicated on the page of the selected original system assembly.
We check the executable file of the program for integrity:
As you can see in the image below, the value from the Current MD5
fully complies with MD5 on the website.
Figure 1. Checking MD5 with the original.
Consequently, our file is “not broken” and the content fully corresponds to the original image of the installation disk, i.e. its original content. Now that we are confident that our image is intact, we can re-write it.
Preferably on another drive and with a minimum speed (in the case of a CD) to completely eliminate the problem with installation files. It is also strongly recommended to try another image of the OS of interest (Operating System (our Windows 7)).
This point may help:
- Solve errors with unpacking and copying files from a possibly non-working flash drive or damaged CD ;
- If some other problems occur during the initial stages of the wizard (optical drive driver error, absence of HDD in the installation menu, etc.).
Return to contents
3.
Windows 7 cannot be installed from a flash drive/disk
Here you should make sure that the information on the media is correct. This problem is very common, as it occurs due to the use of defective or inappropriate programs to create an installation flash drive. You need to use another application, here are the ones that should work: WinSetupFromUSB or UltraISO.
Usually, if there were any failures during the recording process, then you will not see the flash drive at all as a launch medium or various errors will arise during the process: the absence or malfunction of some files.
Replacing the image did not help. Less common general problems.
3.1.
"Windows 7 cannot be installed (GPT standard)" (Windows Setup unexpected error)
New models of computers (mostly laptops) may have drives—no matter SSD or HDD—with markup that
is incompatible with the installation program of a number of builds of 32-bit versions of Windows. The most reasonable solution in this situation would be to download and then install Windows 7 x64. So, if your computer has more than 2GB of RAM, it is recommended to install a 64-bit OS. But if you need exactly the x32 version of the system (for example, when transferring a new HDD to an old computer), you need to change the disk from GPT to MBR . change the layout of an HDD/SSD drive (with a capacity of less than 2 TB) only after it has been completely formatted. This will result in complete data loss. So, before proceeding, make sure that all important data is transferred to the backup storage. How to find out what markup is on your drive? Very simple. For this you will need:
- CMD command line by pressing the key combination Shift + F 10 (after an error in the window for selecting a disk for installation);
- Enter “diskpart ”
→ press
“Enter”
→ then
“list disk ”
(see below);
Figure 2. Working with the CMD console. The GPT column will contain an asterisk “*” if the corresponding drive has GPT markup.
As you can see in Figure 2, none of the drives have this marking, and therefore the following steps DO NOT NEED ! In this case, the problem should be looked for elsewhere. But if you still see an asterisk next to the drive you are interested in, go to step 3.
- Now we need to determine the disk we are interested in by volume, select it with the command “select disk 0” (in your case this may be a different number);
Figure 3. Entering commands into the DISKPART utility, open in the command line (cmd.exe)
- Type the command “clean ”
(see figure above), thereby formatting the drive; - Enter " convert mbr".
Ready.
Now a 32-bit system can be installed on your PC. Return to contents
3.2.
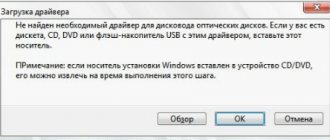
Driver error when installing Windows 7
This error can be caused by one of two problems:
- The required media driver was not found;
- The required driver for the optical drive was not found.
Solution to the “media driver not found” error:
Figure 3. Entering commands into the DISKPART utility, opened in the command line (cmd.exe) The simplest thing you can do if there is no media driver is to move the USB flash drive with Windows 7 from the USB 3.0 port (blue) to the USB 2.0 port (gray -black color). Usually after this the installation proceeds without problems. There is another way in which you need to download the drivers for your motherboard (or chipset driver) from the manufacturer’s official website and drop them into the root of the flash drive in unpacked form. Then, when re-installing, when this error occurs, you must click on the “Browse” button and select the flash drive on which the unpacked files are located.
Figure 5. Window for selecting a disk with drivers.
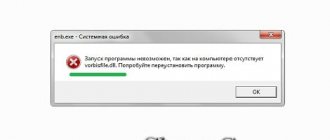
The drivers will be installed automatically (if suitable) and the process will continue. Solution to the error “no driver found for the optical drive” :
Figure 6. Error window about missing optical drive driver.
This problem may occur if you are using a CD with a system image stored on it. The main possible reasons for this error are:
- The installation disk with Windows 7 is poorly written;
- The DVD drive does not read the disc well.
Therefore, you should make sure that the CD, as well as the drive itself, is working properly.
You can try again with another medium (for example, a working USB 2.0 flash drive) or you can try burning another system image onto a new DVD. When burning a new disc, pay attention to the following points:
- Be sure to check the installation image, as described in the chapter Damaged Windows 7 image;
- Use a low (preferably minimum) disc writing speed, because... The CD drive may malfunction at particularly high burn speeds.
If you find it difficult to burn a disc yourself, detailed instructions can be found on our website:
- burning a Windows 7 image to disk;
- writing a windows 7 image to a flash drive.
Return to contents
4.
Introduction to the situation
It's 2020, and, surprisingly, not everyone still knows how to reinstall Windows. So my friend encountered such a problem and asked for help with this procedure. Nothing complicated do you think? If…
Netbook from ASUS, model R540L, without optical drive, 1 USB 3.0 input and 1 USB 2.0 input.
announcements and advertising
2080 Super Gigabyte Gaming OC for 60 rubles.
Compeo.ru - the right comp store without any tricks
RTX 2060 becomes cheaper before the arrival of 3xxx
Ryzen 4000
series included in computers already in Citylink
The price of MSI RTX 2070 has collapsed after the announcement of RTX 3xxx
Core i9 10 series is half the price of the same 9 series
The price of memory has been halved in Regard - it’s more expensive everywhere
I always have several .iso files for such requests or personal needs. If they are usually divided into groups, then they are: Windows 10 Pro, Windows 7 Ultimate SP1, Windows 7 Professional. In principle, nothing extraordinary, but everything you need is at hand.
Problems with specific error codes
4.1.
Error 0x80070570 when installing Windows 7
This error can be triggered in several cases:
- Faulty image (how to check, see heading No. 1);
- Problem with the HDD connection and/or in the drives themselves;
- Problem with the sticks (one/all) of RAM.
Step 1: Check the Windows 7 image as described above (What to do if there is an error during installation?).
Step 2:
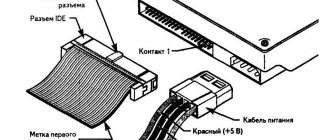
First of all, be sure to check all connections and cables of your HDD and SSD mounts, after unplugging the computer from the outlet. After all, SATA cables (especially inexpensive ones) tend to wear out, fray, i.e. break down and become unusable.
Next, if this does not help, you need to check the surface of the hard drive: first with the built-in chkdsk , then (as a last resort) with the Victoria or MHDD programs (see the paragraph on checking hardware).
Step 3:
Check the hardware of the disk or computer as described in the chapter Quick hardware check (Chkdsk, Memtest, Victoria (MHDD)).
Return to contents
4.2.
Error 0x80070017 when installing Windows 7
Diagnosis of this problem is done in exactly the same way as shown in the example above.
But code 0x80070017 can also appear after failures in the Update Center on an already fully installed system.
And if the methods described above did not help for error 0x80070570, we try to solve the problem by restarting Update Center through the command console. To launch the command line (cmd.exe), you need to do the following:
- Click on the start button in the lower left corner of the screen.
- In the window that opens, enter “cmd” in the search bar.
- The search results will be displayed in the window. You need to select the “cmd.exe” program found by clicking on it.
To do this, enter the commands presented below sequentially:
- net stop wuauserv ;
- CD %systemroot%\SoftwareDistribution ;
- Ren Download Download.old (make sure the Internet is connected);
- net start wuauserv .
Ready.
The update error has been fixed. Return to contents
4.3.
Error 0x80070057 when installing Windows 7
The main methods to solve this problem:
- Disable backup of the BIOS image to the system drive (instructions for disabling are described below);
- Perform a hardware check (see chapter Quick hardware check (Chkdsk, Memtest, Victoria (MHDD))).
To disable BIOS image backup to the system drive:
- Restart your computer and enter BIOS . To do this, in the Setup you need to press a certain key (Delete, F2, F1, F12 depending on the motherboard) ;
- Find the option “ Backup BIOS image to HDD”
; - Change the Enabled value to
Disabled
(
if possible) →
Save changes → Restart your PC.
Done. Don't forget to enable backup after successful system installation!
Return to contents
4.4.
Error 0x8007025d or 0x8007045d when installing Windows 7
If these errors occur, you should also not rush to fully check the hardware of your PC. The main methods to solve this problem:
- You need to make sure that there is free space on the future system disk for installing Windows (preferably about 20 GB);
- Use the chkdsk
command with the error correction option enabled. In most cases this will solve your problem. Instructions for this process are here: quick hardware check (Chkdsk, Memtest, Victoria (MHDD)) - disconnect unnecessary equipment from the system unit (laptop), including unnecessary HDDs, peripherals, etc.
And only after this can you begin a full diagnosis.
Return to contents
4.5.
Error 0x80300024 or 0x80300001 when installing Windows 7
"
Windows installation cannot be performed in this location
" These errors can occur in two cases:
- The drive already contains an old copy of Windows 7, and the installation is performed on an incorrect partition ;
- SATA controller mode in the BIOS is set incorrectly
Method for solving the error for the first case :
It is necessary to delete the partitions created on the HDD/SSD, set the OS to “Unallocated space” (see the figure below): Attention. The following steps involve entering a command to wipe the drive. Make sure that all important data is transferred to backup storage.
Figure 7. Removing disk partitions.
Ready. Now you will need to reinstall the operating system again. Second case: You need to go to the BIOS.
- Restart your computer and enter the BIOS.
To do this in the menu Setupyou need to press a specific key (
Delete, F2, F1, F12
depending on the motherboard). More details on how to enter the BIOS can be found here; - Go to the “ Advanced”
; - Select the item “ System Configuration”
by pressing
“Enter”
; - Switch the “ SATA”
to
“ IDE”
(
“ Compatibility”
, if you have a laptop) in the line
“SATA Controller Mode”
→ Save, reboot.
Attention! On your PC or laptop, SATA Controller Mode may well be located in a different place or may not be present at all.
All information needs to be clarified on the forum of your motherboard manufacturer.
In most cases the problem will be resolved. Otherwise, check the hardware (see chapter Quick hardware check (Chkdsk, Memtest, Victoria (MHDD))).
Return to contents
4.6.
Error 0x000000a5 when installing Windows 7 (accompanied by a BSOD or blue screen of death)
This problem is mainly related to the BIOS or computer hardware and occurs mainly due to a non-working RAM stick (or all of them at once). Therefore you need:
- Update the BIOS (for instructions, see the forums of your motherboard manufacturer);
- Check the RAM for errors (see chapter Quick hardware check (Chkdsk, Memtest, Victoria (MHDD)))
If no hardware problems are found, try using a different installation OS image.
Return to contents
4.7.
Error 0xc00000e9 when installing Windows 7
This error is related to computer peripherals. It is possible that while working with the installation wizard, you accidentally touched the flash drive, and it came out of the USB port for a short time, interfering with the process. In this situation, the first thing you need to do is:
- Disable unnecessary hardware in BIOS;
- Move the boot drive to another USB connector (preferably 2.0, i.e. a gray USB connector).
Only if the problem persists, perform a hardware check as described below.
Return to contents
4.8.
Error code 0x0000000a
Error code
0x0000000a
can occur both during the installation of Windows 7, and simply during the operation of already installed Windows.
A detailed description of the solution to the problem with this error is included in a separate article:
Error with code 0x0000000a.
Return to contents
5.
Underwater rocks
But don't rush. There are several other reasons why you cannot install Windows 7 on your hard drive. In truth, our next problem arises from the carelessness of users.
The first thing to consider is the "+" and "-" signs on the disks containing your operating system. If you have an old disk drive on your computer, then it simply may not read CD/DVD-R (CD/DVD+R) or CD/DVD-RW (CD/DVD+RW). Here everything is eliminated very quickly - change the disk to a suitable one, record everything again and get to work.
With a flash drive everything is a little more complicated. The thing is that if you can’t install Windows 7 (64) (or another bit level), then most likely your hardware is simply too new. That is, the flash card comes with a 3.0 connector, which does not allow installation. In this case, just change the connection socket to 2.0 - the problem will go away by itself.
What you need to install Windows 7
Windows 7 installation media (DVD or flash drive)
Installing Windows 7
is the process of deploying operating system files to the computer's permanent storage device - a hard drive or SSD (depending on what device the computer is equipped with).
Installation requires special installation media that contains operating system files. Most often this is an installation DVD
.
If your computer does not have a laser disc drive, you can transfer the installation files from the disc to a USB drive and install Windows 7 from a flash drive. The procedure for installing Windows 7
from a flash drive is almost the same as installing from a disk. In general, the type of installation media is not of fundamental importance. It does not affect the operation of the operating system after its installation. Read detailed instructions on creating a Windows installation flash drive here. DVDs with Windows 7 can be purchased at a specialty store. Virtual images of Windows 7 installation disks are illegally available for download on the Internet (easy to find via Yandex or Google). Officially, Microsoft, which is the developer of this operating system, does not offer Windows downloads via the Internet.
Windows copy activation code
The truly valuable thing is not the installation disk itself or its image, but the activation code for the copy of Windows
(five groups of characters of five characters each).
Owning an activation code is proof of ownership of a licensed copy of Windows. Even if the installation disk you purchased becomes unusable, you can install Windows from any other disk and activate the system with your activation code (serial number). If you have such a code, do not share it with others
.
Important
.
There are several versions of Windows 7, differing in functionality: Starter, Home, Home Premium, Professional, Ultimate. The activation code is not universal and is only suitable for one version. That is, it is impossible to activate Windows 7 Ultimate with a serial number from Windows 7 Home or vice versa. It is possible to install Windows 7 without an activation code, but the operating system will not be activated. She will not be able to receive updates over the Internet. Many programs in it will work in a limited mode or not work at all. In addition, the computer will periodically remind the user that their copy of Windows is not activated. Where to get a Windows activation code
: • When you purchase a Windows installation disk in a store, the activation code comes with it (usually on the box). The cost of a licensed copy of Windows 7, depending on the version, ranges from 50 to 200 dollars. USA; • if the computer was purchased with Windows 7 already installed and you simply decided to reinstall the operating system, the installation disk along with the activation code should come with the computer. The sticker with the code can be located on the system unit of the computer or on the laptop (usually from the bottom). It looks like this (instead of xxxxx there will be code):
• if there is no sticker, the serial number of the installed Windows 7 can be found using one of the special programs, for example,
Speccy
.
•Speccy
:
⇒
Speccy must be installed on your computer, launched, wait for the analysis process to complete and go to the “Operating System” section (see screenshot, the last group of characters is overwritten for obvious reasons).
After installation, you can activate Windows 7 without an activation code, using all kinds of
free activators
and “crash programs”. Finding them on the Internet is not difficult. This method, of course, does not require any financial investment, but no one has canceled the saying about free cheese in a mousetrap. First of all, it's illegal. Secondly, there is a big risk of installing some kind of Trojan or spyware on your computer along with the activation program. As a result, attackers will be able to secretly take possession of any files belonging to you or use your computer without your knowledge (including to harm third parties). Breaking the law or purchasing a license activation code is everyone’s personal choice. I warned about the possible consequences of using “cracker programs”.
Drivers for devices included in the computer
After installing Windows 7
, you will need to install drivers for the devices included in it on your computer.
A driver
is a file or a set of files containing unique “instructions” for Windows on how to handle one or another device (video card, sound card, network card, etc.).
Without the appropriate driver, the device will not work correctly or may not work at all. Where to get drivers:
• usually when purchasing a computer or laptop, all the necessary drivers come with it (on CD or DVD);
• if you do not have such disks, drivers can be downloaded from the Internet (from the official website of the manufacturer of the laptop or devices included in the computer); • if the first and second options are not suitable, but Windows 7 is already installed on the computer (you just need to reinstall it), all the necessary drivers can be taken from the old operating system. Driver Genius
program will help in this matter (it is paid, but you can use it for free for 15 days).
• Driver Genius
:
⇒
You must first create a folder on your computer into which the drivers will be copied. Then install Driver Genius and run it. In the program window, click “Backup”, check the boxes “Currently used drivers” and “Original Windows drivers” (see screenshot), and then click the “Next” button. In the next window, click the “Browse” button, point to the folder to copy the drivers, click “Next” and wait until saving is completed. The driver folder must be copied to a USB flash drive.
• if you were unable to obtain the necessary drivers using one of the above methods, but the computer on which Windows will be installed has a fast Internet connection, do not be discouraged and install Windows 7 without drivers. After installation, this operating system will be able to independently download the drivers it needs. All you need to do is run the automatic update and wait a bit. But more on that later. Please also note that device drivers for Windows XP, Windows Vista and Windows 7 are different things. They are not interchangeable. Therefore, if you decide to install Windows 7 on an old computer designed for Windows XP or an earlier version of Windows, be prepared for the fact that for some devices on this computer it will be very difficult (or even impossible) to find a suitable driver.
Problems with the distribution
Even if the Windows 7 installation image is perfectly recorded on a flash drive or optical disk, this does not guarantee the absence of errors, especially if we are not talking about an original product, but about an amateur modification. The easiest way to make sure that the image does not contain errors is to calculate the hash and compare it with the original one; however, as you might guess, it only works with unmodified content from Microsoft.
A truly universal solution is the freely distributed WimVerify program, which allows you to, if not identify all errors (this is only possible in full testing mode), then at least make sure that the WIM distribution, the main core of the installation image, is working. The owner of the computer on which Windows 7 is supposed to be installed will need:
- Download (link - blog.simplix.info) the executable file, saving it to any directory on your hard drive.
- Unzip the Windows 7 installation image and copy the newly downloaded program to the same folder.
- Run the program and wait for the WIM check to complete.
- As usual, the process can take from a couple of minutes to half an hour or more. As a result, the user will see a report - a notification that no problems were identified during the scan.
- Or that the WIM is damaged.
In the first case, the user who does not install Windows 7 should continue to search for possible reasons; in the second, look for another, working image of the operating system.