Check the box in the symbols window
How to check a box in Word? The easiest way for a novice user is to use a window with symbols in the program itself. However, this method requires time, so read the article to the end to choose the method that is right for you. Well, in the meantime, we go directly to the instructions on how to insert a checkmark in Word using the symbols panel.
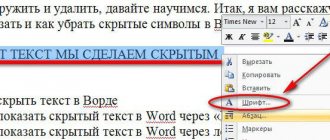
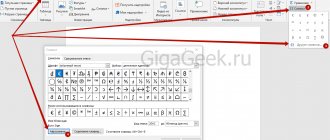
After opening the program, you need to go to the “Insert” tab. Now on the toolbar, find the “Symbols” button, click on it and select “Other symbols” in the drop-down menu - the window we need will appear.
Unfortunately, you won’t be able to find a checkmark in the default character set; you need to select Wingdings in the “Font” drop-down list. Now in the field with symbols you can find the one you need. It is often located at the very bottom, so lower the slider below, find the checkmark, and then click the “Insert” button.
Search in the menu
- Find the “Insert” tab and select the “Symbol” column in it;
- In the window that appears, find “Other symbols”, and then the line “Fonts”. Select Wingdings/Wingdings2;
- Among the symbols that appear, look for the required one and click on it;
- Click on the “Insert” button - a check mark appears in the desired place in the text.
If you insert an icon this way, it will automatically be included in the previously used symbols. Subsequently, the check mark will be much easier to find - now it is located directly under the inscription “Symbol”. True, if you insert a large number of other symbols through the menu, the checkmark will eventually disappear from the list, and you will need to look for it again in the corresponding field.
Selecting a check mark symbol in Microsoft Excel is similar to selecting it in Word: using the “Insert” - “Symbol” tabs.
Check the box using hexadecimal code
We have discussed the first way to check a box in Word, but, as mentioned above, it is not the last. Now let's talk about hexadecimal code. Although the wording may terrify an inexperienced user, there is nothing complicated about it; now let’s take a closer look.
From the title it becomes clear that we will be dealing with code. In this case, the code for the checkbox is 221A. Knowing it, you can quickly place the symbol in the right place without resorting to a table with symbols.
So, place the cursor where the symbol should be. After this, enter code 221A (in Latin). Next, without pressing any other keys, press ALT+X. Your code has now been converted to the desired symbol.
This method is performed quite quickly compared to the previous one, but many may forget this code, so it’s up to you to decide whether to use it or not.
How to Check a Box in Microsoft Word Using the Keyboard
In this case, we will still need to search for the tick symbol using the previous algorithm in order to determine its digital code in the general list.
After the symbol is selected, remember the number in the “Character code” column.
Place the cursor at the desired location. Press the Alt key on the keyboard and, together with it, type the code number on the numeric keypad. The selected character should appear at the cursor location, but most often this does not happen.
There is another way:
- In the “Symbol” window, press the “Keyboard shortcut” button;
- In the “Keyboard Settings” window that opens, enter the cursor in the “New keyboard shortcut” column and DO NOT TYPE, but type Alt and any character on the keyboard. For example: ъ;
- The word “No” should appear in the “Current assignment” line (this means that this key combination is not yet in use);
- Click “Assign” and now when working with text using the Alt+ъ key combination, you can put the “bird” in the right place.
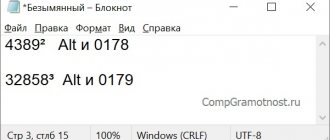
Check the box via ALT code
Now let's talk about how to check a box in Word using ALT code. This method is practically no different from the previous one, it just uses a different code and a different method for entering it, but first things first.
The code we will use is quite easy to remember - it is 251. However, this time you need to enter it differently. You should initially hold down the ALT key, and then, while holding it down, press the numbers 2, 5 and 1 in sequence on the right numeric keypad. After you release ALT, the character will be entered in the specified location.
Now you know another way to put a “tick” symbol in Word. By the way, this method can be used not only in the program; it works properly in all input fields, but only in the Windows operating system. For example, in UBUNTU the code will remain the same, but the key is different - it is assigned manually by the user in the settings.
HTML special characters
| symbol | html code | decimal code | description |
| non-breaking space | |||
| narrow space (en-width as letter n) | |||
| wide space (em-width as letter m) | |||
| – | – | – | en dash (en-dash) |
| — | — | — | em dash (em dash) |
| | | | soft transfer |
| A | ́ | stress is placed after the “stress” letter | |
| © | © | © | copyright |
| ® | ® | ® | registered trademark mark |
| ™ | ™ | ™ | trademark sign |
| º | º | º | spear of Mars |
| ª | ª | ª | mirror of Venus |
| ‰ | ‰ | ‰ | ppm |
| π | π | π | pi (use Times New Roman) |
| ¦ | ¦ | ¦ | vertical dotted line |
| § | § | § | paragraph |
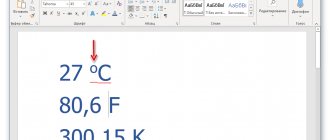
| ° | ° | ° | degree |
| µ | µ | µ | micro sign |
| ¶ | ¶ | ¶ | paragraph mark |
| … | … | … | ellipses |
| ‾ | ‾ | ‾ | overlining |
| ´ | ´ | ´ | accent mark |
| № | № | number sign | |