Possible reasons
There are a number of reasons why the hard drive may not be visible in my computer. Often this problem occurs with new devices that are just connected to a PC. These reasons are often:
- No letter specified.
- Wrong format.
- Initialization failed.
- Cables and wires are damaged.
- BIOS settings failed.
- Weak power supply or cooling system.
- Motherboard failure.
- Bad sectors (BAD blocks).
- Malfunction of internal mechanics.
To avoid complications, let's take a closer look at each problem when the hard drive does not open, its cause and an effective solution.
No letter specified
When connecting for the first time, a new HDD, whether external or internal, may not be recognized by the system. It will not appear like other local drives, but will be fully functional and intact.
The fix is quite simple:
- Press the combination “WIN+R”, enter “compmgmt.msc” in the free field of the window that opens and click “OK”.
- Find “Disk Management” in the left column and click it.
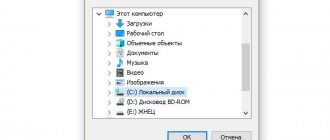
- In the middle of the window all connected hard drives will be listed, including the new one, which is not visible on my computer.
- Find it, right-click and select “Change drive letter”.
- In the new window that opens, click “Change”.
- Next, select any desired letter from the drop-down list.
- Click “OK” and restart the computer.
After the system boots, it will begin to detect the new hard drive in the “My Computer” folder, and you can work with it.
External storage won't connect
The user came to the conclusion that he did not have enough memory, but at the same time chose a removable drive that is connected via USB. To some extent, this is more convenient, because you can carry it with you instead of a flash drive. I came home and the hard drive I bought didn’t work. In this case, is it worth going to the store and arguing with the seller, or may the reason not be a breakdown? In fact, there are several reasons why an external hard drive may not work.
- The first option is that the USB connector does not provide enough power for the drive, this is especially true if it is large. It is recommended to try connecting via other USB, it is best to choose 3.0, its “tab” is colored blue.
- The drive may be formatted in a format that is incompatible with the laptop's file system. In this case, by connecting to another gadget, you need to format it in the correct format. By the way, it happens that different devices format the memory “for themselves”, and it is not displayed in other devices. This often happens when working with TVs. Correctly format the drive through a computer or laptop and select NTFS; this is the most universal option, which is usually readable by any device.
- If the memory is not displayed, then you should go to: control panel - computer management - disk management. We update the configuration, if the drive appears, then the problem is probably in the letter assigned to it. Open the context menu and select “change drive letter/path”.
- The last option that can help fix the problem is to look through the “device manager” to see if the drivers have been installed on the new memory.
If all of the above methods did not help, then the problem lies directly in the drive, and not in an OS failure.
Wrong format
However, what to do if when you call up the menu there is no “Change drive letter” option. This is usually caused by a file system mismatch. For normal operation in the Windows operating system, it must be in NTFS format. That is, in order to start the hard drive, it must be reformatted.
For this:
- Repeat steps 1 and 2 from the above instructions.
- Right-click on the disk and select “Format”.
- A window will appear in front of you where you need to select NTFS and click “OK”.
- After formatting is completed, reboot the laptop.
After the system boots, the drive will be displayed and available for full operation.
Working with the software
If, after updating Windows 7/8.1 to Windows 10, the operating system no longer sees the second hard drive, then below are the best steps to fix the problem. This instruction will also help if the user has installed an HDD or SSD in the system unit, but only the BIOS sees it and does not display the operating system explorer. And if the BIOS does not show it, then you need to analyze the correctness of the equipment connection.
“Turn on” the second hard drive correctly
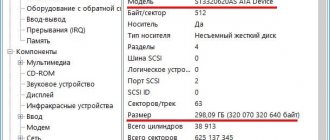
You need to press the + R keys to bring up the “Run” menu and type diskmgmt.msc. Next press Enter. The Windows 10 Disk Management utility will launch. At the bottom of the window there will be an area where the drives are listed; examine the following information about them:
- “There is no data. Not initialized” - this will be written if the physical hard drive or SSD is not displayed;
- Are there parts of the disk where it says “Not distributed”? This is when there is no partition on the virtually partitioned space;
- In the absence of the above, the RAW partition and NTFS or FAT32 partitions are displayed; they are not visible in Windows and the volume letter is not assigned. You need to right-click on it and click “Format” (if RAW) or “Assign letter”.
- Right-click on the name of the area and click “Initialize”.
In the menu that appears, determine the partition structure - MBR (in Windows 7) or GPT (GUID). For Windows 10, GPT is better.
Next, you need to right-click on the unallocated part and select “Create a simple volume.”
Follow the step-by-step instructions for creating a volume: select a letter, determine the file system (preferably NTFS) and the number of gigabytes of space. If you do not specify how many gigabytes there will be, then it will take up all the unallocated space.
Once you complete these steps, the second drive will appear in Windows 10, ready for use.
Initialization
As we said above, new HDDs sometimes do not work the first time they are connected. However, there is nothing to worry about, since if the drive does not initialize on its own, then this process must be carried out manually.
We do the following:
- We repeat steps 1 and 2 from the first instructions again.
- Find the desired hard drive, click on it and select “Initialize disk”.
- In the window that opens, mark the disk that is no longer displayed, select MBR and click “OK”.
- Right-click again, only on the initialized hard drive, and click “Create a simple volume.”
- The Volume Creation Wizard will launch, click “Next”.
- Next you need to specify the volume size. By default, the maximum size is set; it is not recommended to change the number set by the system. Click “Next”.
- Select a letter and click “Next”.
- We find the item “Format this volume ..”, and in the “File system” field we set NTFS. Leave the remaining fields as is and click “Next”.
- The last window will open in front of you, in which all the specified parameters will be displayed. If you agree with them, click “Done”.
After this, the disk that was installed earlier will be initialized, and all you have to do is restart the computer and begin full-fledged work.
How to "Enable" a Second Hard Drive or SSD in Windows
All we need to fix the problem with a disk that is not visible is the built-in Disk Management utility, which is present in Windows 7, 8.1 and Windows 10.
To launch it, press the Windows + R keys on your keyboard (where Windows is the key with the corresponding logo), and in the “Run” window that appears, type diskmgmt.msc and then press Enter.
After a short initialization, the Disk Management window will open. In it, you should pay attention to the following things at the bottom of the window: are there any disks there, the information about which contains the following information.
- "No data. Not initialized" (in case your physical HDD or SSD is not visible).
- Are there areas on the hard drive that say “Not allocated” (in case you cannot see a partition on one physical disk).
- If there is neither one nor the other, and instead you see a RAW partition (on a physical disk or a logical partition), as well as an NTFS or FAT32 partition, which is not displayed in Explorer and does not have a drive letter - just right-click on it on such a partition and select either “Format” (for RAW) or “Assign a drive letter” (for an already formatted partition). If there was data on the disk, then see How to recover a RAW disk.
In the first case, right-click on the disk name and select the “Initialize disk” menu item. In the window that appears next, you need to select the partition structure - GPT (GUID) or MBR (in Windows 7 this choice may not appear).
I recommend using MBR for Windows 7 and GPT for Windows 8.1 and Windows 10 (assuming they are installed on a modern computer). If you are not sure, choose MBR.
Once the disk initialization is complete, you will get an "Unallocated" area on it - i.e. the second of the two cases described above.
The next step for the first case and the only one for the second is to right-click on the unallocated area and select the “Create simple volume” menu item.
After this, all you have to do is follow the instructions of the Volume Creation Wizard: assign a letter, select a file system (if in doubt, then NTFS) and size.
As for size, by default the new disk or partition will take up all the free space. If you need to create multiple partitions on one disk, specify the size manually (less than the available free space), and then do the same with the remaining unallocated space.
Once all these steps are completed, the second disk will appear in Windows Explorer and will be usable.
Unallocated area
It happens that due to periodic failures in Windows or system errors, part of the HDD disappears and becomes inaccessible. This is why the explorer simply does not see the hard drive.
The fix is quite easy:
- You need to go to the “Disk Management” interface, as described in the previous paragraphs.
- Find the unallocated part, right-click on it and select “Create simple volume”.
- Immediately after opening the wizard, click “Next”.
- We indicate the size. It is recommended not to change the Windows OS setting.
- In the next step, select a letter.
- Next, set the option “Format this volume...” and select “NTFS” as the file system, indicate the desired volume label, leave everything else as default and click “Next”.
- To start the process, click “Finish”.
After you restart the computer, Explorer will begin to see it.
However, if this partition contained the data you need, you can restore it without any loss.
Enable display of external hard drive on PC
What to do in a situation where Windows does not see the external hard drive. I recommend following the following procedure:
- Try simply restarting your computer, sometimes this may work;
- You need to use a different USB connector to connect your device (perhaps the previous one is simply damaged and does not work correctly);
- It is necessary to use a different cord, perhaps the previously used one is damaged;
- Make sure your external drive is turned on (if it has battery power);
- Assign the correct letter to the external drive;
- Click on the Start key, type diskmgmt.msc in the search bar and press enter.
Enter diskmgmt.msc
A disk management window will open in front of you, which should display your disk. Hover your cursor over it, right-click, select “Change drive letter...”, and assign your drive a letter that is not used on your system. This must be done to display the external hard drive in My Computer;
- If the disk is new and not formatted, you should format it (formatting will lose any data on it). To do this, enter the disk management menu as described above, right-click on this disk and select the “Create simple volume” option;
- If your disk is not visible in the disk management menu, then it is either physically inoperable, or there are no drivers for it in Windows . Go to Device Manager (click Start, type devmgmt.msc in the search bar and press enter), and check if there are any unidentified devices with a yellow exclamation mark in the list. If there are any, you need to install drivers for it.
To do this, do the following:
A) Click on the “Action” option at the top and select “Update hardware configuration” there;
B) Use special programs for automatic installation of drivers (DriverPack Solution level), which will automatically select the necessary driver for your device and install it on your PC;
C) Use the device's unique identifier to search for drivers for it on the network. Go to Device Manager, right-click on the unidentified device and select “Properties”. In the properties menu, go to the “Details” tab, select the “Hardware ID” property, copy the longest lower value and try to search for the driver by entering this value into the search engine;
D) Run the command prompt as administrator, and there enter:
set devmgr_show_nonpresent_devices=1
Then go to Device Manager, click on “View” and select the “Show hidden devices” option. If your device appears among such devices, try right-clicking on it and selecting “Delete.” Then turn off your computer, unplug your devices, turn your PC back on, let the system boot, and then try connecting your device again;
D) If you are having problems connecting the USB, then go to Device Manager, remove all devices under the “USB Controllers” option, and then reboot the system. These controllers will be reinstalled, and it is quite possible that the OS will see your external drive.
- Check your computer for viruses. Tested antivirus tools of the Dr. level will do. Web CureIt!, Trojan Remover, Malware Anti-Malware and a number of others;
- Try to roll back the system to the restore point at which this disk was displayed correctly (if you have used its functionality before). Click on the “Start” button, enter rstrui there, select the correct restore point and perform a system rollback. This may help solve the problem when the external hard drive is not accessible;
- Try cleaning the system registry (tools like CCleaner, RegCleaner and a number of analogues are suitable).
- Next, connect your hard drive to another computer. This will allow you to figure out whether the problem is with the hard drive itself, or with your PC.
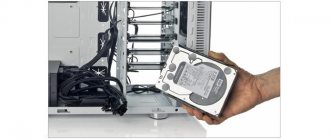
Contacts and cable
When connecting the drive, you need to be as careful as possible. Your computer may not recognize your new hard drive due to a faulty or damaged cable. If there is no apparent reason why it does not work, then you need to take a similar wire with identical connectors and use it to connect the hard drive to the PC.
This problem, when cables fail and need to be replaced for normal operation, can affect both external and internal storage. Also, do not exclude the possibility that, due to inexperience or carelessness, you simply connected the HDD to the computer incorrectly, and therefore it does not find it. Be sure to check the connection and make sure that the contacts are not coming loose.
Hard drive is not detected in BIOS
The hard drive may not be accessible in Explorer or Device Manager, but it should be visible in the BIOS. If it is not detected in the underlying I/O system, it may indicate a hardware problem. Consistently check the correct connection of the cables, make sure that they are in good condition (you can try replacing them). Pay special attention to the quality of the contacts, see if there are any traces of oxidation on them. The disk itself may also be faulty. The easiest way to find out if everything is okay with it is to connect it to another computer.
On computers with two physical disks, you should pay attention to a special connector located on the HDD case between the power and data connectors. If you look closely at it, you can see four pairs of contacts and a special jumper that closes one of the pairs. This jumper is used to change the priority of the hard drive. If the disk is the main one, the jumper must be set to the Master position; if it is an additional one, it must be set to the Slave mode. Setting this jumper to the same position on both media will most likely prevent the BIOS from recognizing them correctly.
Note: the jumper for switching between priority modes is not available on all hard drive models.
All of the above mostly applies to ordinary prefabricated PCs, but with laptop computers everything is a little more complicated. If the laptop does not see the hard drive, and you suspect that it is due to hardware problems, you may have to limit yourself to checking the contacts of the drive, the corresponding connectors of the motherboard and the drive itself. It is not recommended to disassemble a laptop without the appropriate knowledge and experience; in such cases, it is better to take the device to a service center.
If everything is in order with the hardware, check the settings of the BIOS itself - the SATA and IDE controllers should be enabled. In different BIOS versions, the names of the settings you need may have slight differences, but usually they always mention the word SATA (ATA) or IDE. If this is an Ami BIOS, the required setting will most likely be located in the Advanced – Onboard Device Configuration section. Go into it and find a controller whose name mentions SATA or IDE. Make sure it is set to Enabled.
In the Award BIOS, you need to go to the Integrated Peripherals section and make sure that the On Chip Primary PCI IDE and On Chip Secondary PCI IDE parameters are Enabled, and the On Chip SATA Mode parameter is set to Auto.
As a last resort, you can try resetting the BIOS to factory settings. There are six reset methods in total, but only two will be available to you. Here's the first one. With the power turned off completely, find the Clear CMOS jumper on the motherboard, switch the jumper from pins 1-2 to 2-3, wait 20 seconds, and then return it to its original position.
And here is the second way. After turning off the power, find the CR2032 battery on the motherboard, remove it, also wait a minute and reinsert it. The BIOS will be reset. You can reset the BIOS on laptops in the Exit – Load Setup Defaults section, but this is only possible if the manufacturer does not have password protection installed, otherwise the device will have to be disassembled so that the battery can be removed.
BIOS Settings
If you connected a hard drive, but the computer does not see it, then the problem may be related to the BIOS settings. There are several possible causes of problems. Let's take a closer look at each of them and find an effective solution.
Download priority
If you connected a hard drive, but the computer does not see it, then it is possible that the device boot priority is incorrectly set in the BIOS settings. That is, we need to put the new hard drive in first place, so that when the computer starts, it boots first from it.
Let's take a closer look at how to do this:
- When loading the OS, press the DEL or F2 key to open the BIOS. Sometimes other combinations are used.
- Next, go to the Advanced BIOS Features section.
- We find the option with the word “Boot”, in this example it is called “First Boot Device” and put the HDD we need in first place.
- Press F10 to save the changes and exit the settings.
Thus, after the system boots, the drive will be available for normal operation, and the problem when a new hard drive is connected, but the computer does not see it, will be solved.
Menu items may differ in different BIOS versions. Therefore, if the specified parameters are missing, you should look for the most suitable ones by name.
SATA operating mode
It is possible that my computer does not see the HDD due to the fact that the IDE-compatible operating mode is not specified in the BIOS. To fix this you need to:
- Go to BIOS.
- Find the Main, Integrated Peripherals or Advanced menu, depending on the BIOS interface.
- Next, find the settings Configure SATA As, SATA Operation or Onboard Sata Mode.
- Among the available options, select IDE or Native IDE, save the changes with the F10 button and confirm your actions with the letter Y.
Afterwards, the system will boot in normal mode and will be able to recognize and open the hard drive.
Resetting BIOS settings
If you installed a hard drive, but even the BIOS does not see the connected hard drive, then most likely the reason for this is a settings failure. This reason can arise either as a result of incorrect user actions, or due to viruses in the system and power outages. This type of problem is indicated by the system date - if it is not accurate, then it is a failure. To correct the situation, you will have to perform a reset and return to factory settings.
There are two ways to do this. Let's look at the first one first:
- Turn off the computer and unplug it.
- Open the case and find the motherboard.
- Find the Clear CMOS jumper on it, located near the battery.
- Move the jumper from one pin to the other.
- After 30 seconds, return it to its original position.
This way, the BIOS settings will be reset and the system will be able to detect the hard drive and start working with it.
The second option takes a little longer:
- Turn off the computer and turn off the power.
- We find the motherboard and remove the round silver battery
- After 30 minutes we insert it back.
After this, the problem where Explorer does not see the hard drive should be resolved. I would also like to add that both options may require changing the download priority, as described in the instructions above.
Settings problems
Events such as sudden power outages often lead to significant operational disruptions. In this case, the operating system shuts down in abnormal mode and this leads to a failure in the settings of not only Windows, but also the BIOS.
- If the laptop does not see the hard drive, most likely the operating system will not boot.
- If you try to start the computer, tests will appear, you can enter the CMOS settings, you first need to see if the device is detected by the Bios. It is possible that it was accidentally disabled at the BIOS level. Then you just need to change disabled to enabled.
- The reason for invisibility may also be its incorrect configuration in the BIOS.
If this does not help, you need to try resetting the BIOS settings, then restart the computer. If the problem was with the Bios, the hard drive will appear and Windows will start loading.
For deeper violations, reinstalling the operating system may help solve the problem. Modern models sometimes have the option to return the system to factory settings. If not, use the installation DVD or bootable USB flash drive.
A bootable USB flash drive can also be created in advance using a special function and stored just in case, because a Windows boot disk may not be included with the laptop.
Sometimes the reason for the invisibility of the hard drive can be in the device manager. In this case, you need to disconnect the hard drive connector. Then turn on the laptop and clear the device manager of all memory drives. Then reconnect the hard drive and wait until the system detects it itself. After this, you just need to confirm the connection of the new equipment. If after disconnecting and connecting the device is not detected, you need to force it to be found by updating the shoe configuration.
Lack of power or cooling
If the hard drive is connected and working, but is not visible in Windows, then you should listen to the sounds it makes. For example, a buzzing indicates a change in cycles, and most likely the problem is a lack of power from the power supply.
You need to act according to the circumstances:
- Buy a more powerful power supply.
- Disable an unused device.
Of course, it is recommended to replace it to prevent future problems.
If you have a laptop and its cooling system is faulty or works extremely poorly, then it is likely that the hard drive in the My Computer folder is not displayed due to overheating. There is only one solution - clean the cooler or replace it with new ones.
Other problems with HDD
Sometimes the visibility of a device by the operating system is periodic: it is sometimes available, sometimes it is not. The reason for this phenomenon may be a weak computer power supply - replace the unit, and everything will return to normal.
As an alternative, you can disconnect some power-hungry device from the power supply - this will lead to the same effect. If two disks of the same brand are installed on the same machine, this can also lead to conflicts. Such drives need to be connected and configured one by one.
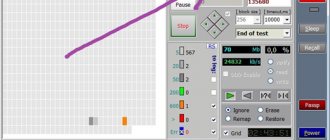
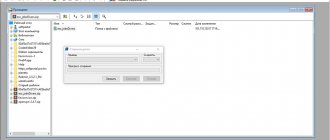
There is another way to correct the situation when the BIOS sees the hard drive, but the Windows OS does not. Open the “Disk Management” snap-in from the “Start” menu => “Control Panel” => “Administrative Tools” and try to “play” with parameters like volume and partition labels. Here it is - an explanatory drawing for this alternative:
Well, if none of the above helps, you will have to contact computer repair specialists. It's not that expensive these days.
Motherboard failure
If the hard drive is detected by the system, but does not open, perhaps the reason lies in a malfunction of the motherboard, namely in the “south bridge”. It is he who is responsible for the correct operation of IDE/SATA devices.
To check this, connect the hard drive to a laptop or any other device, if it starts working, then we have found the “culprit”.
Unfortunately, you won't be able to fix the problem yourself. It is necessary to replace the motherboard or take it in for repair.
Damaged sectors
Inaccessible sectors (or so-called “BAD” blocks) are a common reason why a connected hard drive is not visible to the computer.
Before you start checking and eliminating errors, you should know that bad problems are divided into 2 types:
- Logical – system errors. Most often they occur due to incomplete read/write to the sector. They can be fixed programmatically.
- Physical – appear when the magnetic layer ages, overheats or physical damage to the magnetic plate. This screw can only be replaced.
You can fix logical problems using the free program Victoria or MHDD.
They are quite light and easy to use.
Mechanism malfunction
If the hard drive does not open, but the computer sees it, then most likely it has simply failed. This mainly happens due to a fall, impact, shock, overheating or wear of the mechanism.
In this case, third-party sounds, knocks, clicks, noise, buzzing, and system freezes may appear when connected to a PC or laptop.
If the above methods did not bring any results, then the only correct solution would be to take the HDD to a service center before it completely fails.