The very first thing we see after turning on the computer is the desktop with icons of various programs and documents located on it. This is a completely ordinary view on the monitor screen, and therefore it does not attract special attention. However, this time everything is different: you eagerly peer at the screen, trying to find the usual screensaver with many shortcuts on it and... you don’t find it. The desktop is empty - it has simply disappeared! What to do?! First of all, don’t panic, everything can be fixed. Secondly, try to return the “Desktop” to the desktop using one of the following methods, described in detail in the article.
Reasons for loss
Before taking active measures to eliminate this annoying problem, you need to find out its causes. They can be reduced to two main ones - serious and frivolous. In the case of the latter option, the “loss” may be the result of a banal joke played by someone in your household. Then it is very easy to return the “Desktop” to the desktop of your computer. Find an empty space (this will not be difficult to do) and right-click on it. A menu will open in which we are interested in the “Arrange icons” item - click on it. In the list that opens, Fr. We wait for some time (usually no more than 10 seconds) and rejoice at the result.
If the attempt is in vain, then a virus has probably entered your computer. He stole your table. If this is the reason, then you will have to tinker longer, but don’t worry - the situation can be fixed. Before trying the methods described below, check your computer with an antivirus (we hope you have one installed). Otherwise, all your efforts may be in vain. If any infection has been identified, remove it. Now you can start solving the problem.
What should those who do not have system restore work do? Method No. 3 - “restoration”
So, boot the operating system in safe mode. That is, during the initial boot stage, press the “F8” key several times and activate the “Boot in Safe Mode” item.
Please note: on some computers the optional boot menu may be accessed using a different key - you may want to read the article for all the information you need - click here ).
- If the graphical desktop shell has loaded, so to speak, in its original form - great!
- Go to the “Start” menu and enter the command “regedit” in the search check box.
- Open the registry key (HKEY_LOCAL_MACHINE).
- Next, navigate to the following final folder of the displayed list: SOFTWARE\Microsoft\Windows NT\CurrentVersion\Winlogon.
- In the right area of the editor's working window, look for the line “Shell”.
- Here everything should look as shown in the figure above; if you see a discrepancy in your registry, change the parameter by double-clicking on the “Shell” item with the left mouse button. After entering the correct value, click OK.
- Check the next line of this thread “Userinit”, it should also contain the corresponding entry.
- Otherwise, you should edit the parameter (you already know how to do this from what was written earlier).
- Now go to the next registry key - “HKEY_CURRENT_USER”.
- Follow the path: Software\Microsoft\Windows\CurrentVersion\Policies\Explorer.
- If there is a “NoDesktop” item on the right side of the registry editor, select the line and simply click the “Delete” button to delete this entry.
- In the branch “HKEY_CURRENT_USER\Software\Microsoft\Windows NT\CurrentVersion\Winlogon\”, the value “Shell” should be empty. Found something extra? Delete!
Launch the Explorer process
The system file explorer.exe is responsible for the correct display of the desktop. That's what we need to find. Procedure:
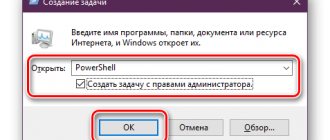
- Hold down the key combination Ctrl+Alt+Del and call up the “Task Manager”. Open the “Applications” tab and click the “New task” button.
- A window for creating a new task will appear. Enter the name of our file in the “Open” field and click “OK”.
- Reboot the system.
As a result, the problem may or may not be resolved. If you can’t return the “Desktop” to your computer’s desktop, move on to the next method.
Algorithms for solving the problem
1. The first step should be to restart your PC. Practice shows that in most cases, this helps to restore the functioning of software elements. If after re-enabling the miracle does not happen, you need to go to the task manager using the key combination “Ctrl+Alt+Del”. In the window that appears, select “Run a new task”, which is located in the FILE section. Next in the line you need to enter “explorer.exe” and click OK. This will restart the Explorer service.
2. When using the registry during the recovery process, the following algorithm will help:
- The combination “Win + R” gives the user access to the RUN snap-in, where you need to enter regedit and click OK.
- Next you should go to: HKEY_LOCAL_MACHINE/SOFTWARE/Microsoft/WindowsNT/CurrentVersion/Winlogon.
- In the column on the right you need to find two parameters and make sure that the necessary entries are present or enter them personally: the Shell should contain the entry “explorer.exe”, and UserInit – “C:\Windows\System32\userinit.exe”.
- After recording the relevant data, you should apply the changes by restarting the PC.
3. Sometimes the computer automatically switches to Tablet mode after a failure, which somewhat changes the styles of behavior of Explorer elements.
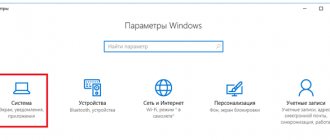
You can disable this function through the standard System Settings window. The combination “Win+I” allows you to access this window. In the SYSTEM section, activate the TABLET MODE tab and move the two sliders to the “Off” position.
4. In the event of a serious system error, when the user is blocked from accessing most Windows functions, a complete OS recovery procedure will be required. But this can only be done if there are restore points, that is, the service must be activated. In the Options window, there is a section called UPDATE & SECURITY, which contains a tab called Recovery. To start the wizard, click the “Start” button and select one of the two options as desired.
To enable the service, you need to type “Recovery” in the search bar on the taskbar and go to the Control Panel snap-in. Next, you will need one of the “Settings” items, select the required disk and click the “Configure” button. You can not only enable protection, but also tell the system the size of the reserved disk area.
Restoring the system
Second way to solve the problem:
- Similarly to the steps described above, we create a new task and in the corresponding field we write the path to the document we are interested in: SystemRoot/System32/Restore/rstrui.exe. Click "Ok". A system recovery window should appear.
- Select “Restore the desktop to an earlier state” and click “Next”.
- We select the day of the checkpoint in the calendar: the one when the “Desktop” was in place (yesterday, 3 days ago, etc.).
Your system should return to normal. If it turns out that there is no control point, then the option to create it is disabled. Let's move on to the next point.
Launch Explorer
If all the icons on your computer have disappeared, and along with them the taskbar, then, most likely, there was a failure when loading the system and Explorer, the program responsible for guiding the user to the necessary files and directories, simply did not start. In this case, to return the usual Windows desktop, you will need to run this application yourself:
- Simultaneously press the “Ctrl”, “Alt”, “Delete” keys.
- In the window that pops up, select “Task Manager”.
- Go to the “Applications” tab and select “New task...”.
- In the window that appears, enter “explorer.exe” (without quotes) in the line and click open.
After this, after a few seconds, the Windows desktop will boot again. If the restoration was successful, then all existing icons and files and the taskbar will return to their place. But it’s worth considering that to perform the same operation in Windows 8, you need to select “File” and “Run a new task” in the menu bar at the top (click the more details button below). Just repeat all other steps.
Editing the registry
You can return icons to your desktop by editing the registry of your computer system. This is what we will do:
- We follow the steps we already know: open the “Task Manager” and create a new task in the “Applications” tab. The command will be like this - regedit. Click the “Ok” button. The Registry Editor window will appear.
- Open the HKEY_LOCAL_MACHINE folder, in which we find the Image File Execution Options section in the internal CurrentVersion folder. The path to it lies through the Software/Microsoft/Windows folders. Here we need the explorer.exe section/file. If you find one, delete it (right-click on the icon and click “Delete” in the menu that opens).
- Now let's move on to another section, also located in the Current Version folder. It's called Winlogon. Click on it once with the left mouse button. We look in the left column of the editor - there should be a Shell parameter there.
- Open the menu for the specified parameter and select “Change”. A window for changing the string parameter will open, in which the name of the explorer.exe file should be written. If the entry in the field is different, then clear it and enter the line we need. Click “Ok”.
- We are also interested in the Userinit parameter. Let's open it. The field should contain the entry C:\Windows\system32\userinit.exe. Everything written besides this line is deleted.
Save the changes and restart the computer. The system and desktop should return to normal. If this does not happen, you can try another method.
Access via Taskbar
An alternative way to get to the desktop is to use the features of the standard taskbar, which is pinned to the bottom of the interface by default and allows you to access the tray, task manager and Notification Center. A separate feature is the function of interacting with open windows. The taskbar allows you to hide unnecessary elements and display the desktop in two ways:
1. Button - if you move the cursor to the left of the tray and all statistical information in the lower right part of the interface and click on the highlighted rectangle with the left mouse button, then all windows will immediately disappear, and a desktop screensaver with a series of shortcuts and directories will appear on the screen.
If you right-click, a modest quick access panel will appear, where you can choose between “Collapse” or go to “Options” for displaying the desktop on hover.
2. Context menu - in addition to searching for the tray and “rectangles,” the developers offer to directly interact with the taskbar through the context menu (called with the right mouse button), where the “Show desktop” item is already available on the computer screen. .
As is the case with the other methods described above, windows that have already been minimized can be returned back by repeating the procedure in the same order, and even by selecting the same item from the context menu, but with a new name “Show all windows”.
How to reduce desktop icons in Windows 10: using system tools or a program
How to make a slideshow on the lock screen and desktop of Windows 10
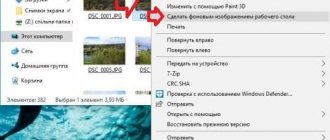
How to put a picture as a background on the Windows 10 desktop
How to make a window on top of all windows in Windows 10
Methods that require Internet access
How can I get my desktop icons back, as well as the control panel displayed on it, the Start menu, and other attributes if the above steps did not help? You can turn to the Internet for help.
Let's run the reg file:
- We call the “Task Manager” that is already familiar to us and create a new task. Enter the address for calling the standard Windows browser in the field: C:\Program Files\Internet Explorer\iexplorer.exe. Click “Ok”. A browser window will open.
- Enter the following address into the address bar: kompsecret.ru/problem/puscproblem.html. Go through it by pressing Enter.
- We need the file nodekstop.reg - run it.
- He must make the required changes to the register, we agree.
- Reboot the computer. The desktop should appear.
If this method did not help you return the “Desktop” to the Windows desktop, then there is one more option - it can be used as an alternative to the previous method. We perform the following steps:
- We look at the steps described above (restoring the desktop using the Internet) and repeat the first two steps.
- The third step is to find a script called xp_teskbar_desktop_fixall.vbs. Let's launch it.
- Reboot the computer.
We hope you were pleased with the result this time.
Working with the registry
If the System Restore function does not help (or has simply been disabled), you will have to do a little work with the registry, checking and, if necessary, correcting some of the entries responsible for starting the Windows 7 graphical shell.
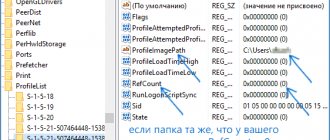
In the Registry Editor you need to check several branches. First, follow the path HKEY_LOCAL_MACHINE→SOFTWARE→Microsoft→WindowsNT→CurrentVersion→Winlogon.
Check the "shell" parameter - it should be set to "explorer.exe".
As you can see in the screenshot, in this case the value of the parameter is different, so instead of the graphical shell, the system launches a malicious application located in the “temp” directory.
If you launch the “Task Manager” and carefully read the “Processes” tab, then, among other running applications, you can easily find the malicious program that was found in the registry.
Then check the "userinit" parameter - the value should be "C:\Windows\system32\userinit.exe". In the presented screenshot, you can see that the system accesses the “temp” folder, launching a malicious application.
To correct these shortcomings, it is necessary to return the values of the “shell” and “userinit” parameters to normal. The resulting entries should look like this:
The next registry branch that needs to be checked is HKEY_CURRENT_USER→Software→Microsoft→Windows→CurrentVersion→Policies→Explorer. If you see the NoDesktop option here with a value of 1, change it to 0 or simply delete it.
Finally, you can search by the name of the virus that you found in the values of the “shell” and “userinit” parameters.
Press the combination Ctrl+F in the registry editor and run a search by entering the name of the malicious application in the line.
If you find a “shell” parameter on the HKEY_CURRENT_USER→Software→Microsoft→WindowsNT→CurrentVersion→Winlogon branch, which will have some path specified in the value, edit it. By default, the value of the "shell" parameter should be empty.
Registry recovery
In order not to manually correct entries, you can use the Windows 7 registry repair function. If you save a working registry configuration in advance in a special file with the *.reg extension, then, if necessary, you can easily return all the correct settings.
But even if you have system recovery disabled and you have not made copies of the registry, you can use standard Windows tools that allow you to return entries to their original state.
Every 10 days, the registry is automatically saved in the form of several files, which can be found in the “RegBack” folder.
Now you need to delete the registry files from the “Config” directory and copy the backup copies from the “RegBack” directory in their place.
As a result, the registry will take its normal, working form, in which no malicious applications will interfere with the correct display of the desktop.
Bringing back individual desktop icons
There are also less serious problems when not all icons disappear, but only some specific ones. In this case, returning them is usually much easier. Let's look at the situation using the example of how to return Skype to the desktop. If there is a program on the computer, but the shortcut from the desktop has disappeared, then the following steps will help:
- Open drive C (or another, depending on where the program is installed) and in the Program Files folder we find the desired name (in our case, Skype).
- Find it in the Phone folder and use the right mouse button to create a shortcut.
- Drag the shortcut to the desktop. Now the program starts from it.
These steps are suitable for any application/program whose shortcuts have disappeared, but they themselves are installed on your computer.
Restoring shortcuts
The problem may be simpler than we thought. Perhaps all the shortcuts have simply disappeared from the desktop, but the desktop itself is not damaged and is working normally. Usually, if the problem is with shortcuts, the Start menu is functional.
First, go to Windows settings (Win+I), go to the “System” section and to the “Tablet Mode” tab. Set all markers to off.
On the desktop itself, right-click on an empty area, select “View” from the context menu, and then set the marker to “Display desktop icons.”
In search of the missing picture
In addition to the problem associated with the disappearance of icons and the Windows control panel, there may be a less serious, but still annoying problem. The image you set as your background has disappeared - it has changed to something else. And you liked it so much, and you don’t want anything else. How to return the desktop picture to its place? Will seek:
- First, you should check the folder where recent documents are stored. Here is the path to it: on drive C we find Documents and Settings/user/recent. Perhaps the picture will be there somewhere.
- Look in the “My Pictures” folder or in the folder into which all new files are downloaded by default (you can find it in the settings of the browser you are using).
- Check your desktop settings. Right-click on it and select Properties. The drop-down list should display all the pictures you previously had. Probably the one you need is also among them.
To ensure that in the future you don’t have questions about where the desktop image went and where to look, do the following. In the browser settings, opposite the “Download path” item, uncheck the box and o. We hope these tips will help you find the picture and prevent similar incidents in the future.
Extreme measures
If the presented options did not help restore the missing desktop, then it is recommended to seek help from professionals. But if you don’t have time, or there are no specialists, then you can try to edit some sections of the Windows registry yourself at your own risk. It is worth taking into account that such operations are dangerous for the “health” of the entire computer.
To launch the Windows Registry Editor, you need to open/run a new task (see above) “regedit”:
- In the new window, follow the path HKEY_LOCAL_MACHINE/SOFTWARE/Microsoft/WindowsNT/CurrentVersion/Image File Execution Options/.
- Here you need to find the sub-items “explorer.exe” and “iexplorer.exe”, and then delete them.
- If the parameters were not found, then go to the next step.
- We follow the path HKEY_LOCAL_MACHINE/SOFTWARE/Microsoft/WindowsNT/CurrentVersion/Winlogon/.
- We are looking for the “Shell” parameter.
- We remove it from the Change string parameter window if something is written there.
- Save all changes and restart the computer.
Tip: Before editing the Windows registry, export a copy of it to disk. In case of serious problems, you can restore it.
If the described measures did not allow you to restore your desktop, then it is recommended that you contact a service center, where they will definitely be able to help you.