Why is my desktop blinking?
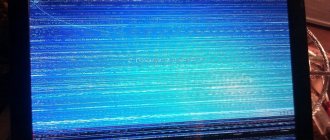
Below I have given you a video that shows how the Windows 10 desktop is constantly updated. The spectacle is funny at first, but then depressing, since in most cases you will not be able to get a working desktop with shortcuts, they will just constantly jump and not clickable, and if you have the opportunity to launch something, it will be very difficult.
In most cases, the desktop is updated every second for a number of reasons, which we will discuss below:
- The most common option, also my favorite, is due to a new update, there are a lot of such problems, and they happen with every major Microsoft update, a recent example with Windows 1809, which has already been recalled, is a non-working Internet or missing sound, in a word fun.
- The second option is problems with Windows services
- Third point. this is a problem with device drivers
- System files and their dependent files are damaged
- Well, don’t forget about physical problems or equipment incompatibility
Windows 10 updates failed to complete due to duplicate user profiles
Another, little described cause of the problem “Unable to complete updates. Cancel changes. Don't turn off your computer" in Windows 10 - problems with user profiles. How to eliminate it (important: what is below is at your own risk, you can potentially ruin something):
- Launch Registry Editor (Win+R, type regedit)
- Go to the registry key (expand it) HKEY_LOCAL_MACHINE\ SOFTWARE\ Microsoft\ Windows NT\ CurrentVersion\ ProfileList
- Look through the subsections: leave those with “short names” alone, and in the rest, pay attention to the ProfileImagePath parameter. If more than one section contains an indication of your user folder, then you need to delete the extra one. In this case, the one for which the parameter RefCount = 0 will be superfluous, as well as those sections whose name ends with .bak.
- I also came across information that if you have an UpdateUsUser profile, you should also try to delete it, I have not personally verified it.
Install the Windows 7 start menu in Windows 10
Once the procedure is complete, restart your computer and try installing Windows 10 updates again.
What to do if the desktop is updated?
And so, if your Windows 10 desktop is blinking, then follow these steps. The simplest option is to reboot (as with error code 19), no matter how simple it may sound, 99% of Microsoft problems are solved this way, and when the desktop flashes, it’s no exception.
If the problem persists, then we try to restart such services that for some reason are not behaving correctly. In order to do this, you need to go to the services snap-in, to do this, open the Run window, using the Win and R key combination, entering the word services.msc in it
If, due to the screen blinking, you can’t press anything on the desktop, then press the magic key combination CTRL+ALT+DELETE , you will see a window with additional parameters. Select "Task Manager".
Go to the Services tab where you should find two services
- Problem Reports and Solution Control Panel Support
- Windows Error Report Service
We right-click on any of them, and from the context menu select “Open services” to open the main equipment, with more functionality.
We also find services here:
- Problem Reports and Solution Control Panel Support
- Windows Error Report Service
Right-click on each of them and select “Stop” from the context menu. After this, the screen and desktop in Windows 10 will stop flickering.
There may be a situation where the services are initially turned off, but you still have a flashing desktop on your computer, in this case, you turn these services on and off, and be sure to restart the computer, sometimes you can try pausing, then stopping and rebooting.
In 80% of cases, this helps to correct the situation that the Windows 10 desktop is updated, but unfortunately not 100%. Our next method will be to remove possible programs.
Via Task Manager
Two services have become known as the reason for the screen flickering:
- Control Panel Item Support...
- Windows Error Logging Service.
Typically these components are disabled. You can easily verify this by opening the services snap-in.
But at the very beginning, when everything was just getting started, both lines worked. So start here.
- Ctrl + Shift + Esc to launch Task Manager.
- Go to the Services tab.
- Right click on any line and select to launch the snap-in.
- In the window that opens, we immediately sort by name if there is another type of ranking. Otherwise, finding what you need will be difficult.
- Click Stop service for each of the two mentioned above (in the list).
The flickering should stop immediately. Just in case, restart your PC. In general, the same thing can be done from the Task Manager from the tab mentioned above. But if the user does not find what he is looking for, then in any case he begins to rush around and comes to the equipment.
Fixing a flashing desktop by removing programs
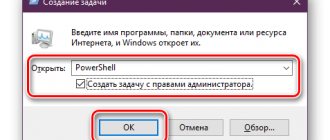
If your system responds, then go to the “Programs and Features” item in the control panel; if not, then in the task manager, which we called earlier, click the menu item “File - Run a new task” at the top.
write in the execute window the magic word appwiz.cpl.
In the list of programs to remove that are causing your desktop screen to blink, you can highlight
- NortonAntivirus, Nod32, Other antivirus programs
- iCloud utility
- IDT Audio (faulting module IDTNC64.cpl)
Select the desired item in “Programs and Features” and click “Uninstall”, after which you can restart your Windows 10 operating system.
Troubleshooting Windows 10 Update
Windows 10 has built-in diagnostic tools to help fix update problems. Just as in the previous case, two situations may arise: the system boots or Windows 10 constantly reboots, all the time reporting that the update setup could not be completed.
In the first case, follow these steps:
- Go to the Windows 10 control panel (at the top right in the “View” field, put “Icons” if “Categories” is set there).
- Open "Troubleshooting" and then, on the left, "View all categories."
- Start and run two troubleshooters one at a time - Background Intelligent Transfer Service (BITS) and Windows Update.
- Check if this solves the problem.
The second situation is more difficult:
- Follow steps 1-3 from the section about clearing the update cache (go to the command line in the recovery environment launched from a bootable USB flash drive or disk).
- bcdedit /set {default} safeboot minimal
- Reboot your computer from your hard drive. Safe mode should open.
- In Safe Mode, at the Command Prompt, enter the following commands in order (each will launch the troubleshooter, go through one first, then the other).
- msdt /id BitsDiagnostic
- msdt /id WindowsUpdateDiagnostic
- Disable safe mode with the command: bcdedit /deletevalue {default} safeboot
- Restart your computer.
Maybe this will work. But, if the second scenario (cyclic reboot) has not been able to fix the problem by now, then you will probably have to use a Windows 10 reset (this can be done while saving the data by booting from a bootable USB flash drive or disk). More details - How to reset Windows 10 (see the last method described).
How to Install Windows 10 on Mac
Recovering system files when the Windows 10 screen is blinking
If your desktop is still blinking in Windows 10 and the first two methods did not help you, try scanning your operating system for damaged system files. This is done very simply, you launch the command line as an administrator and enter commands in it, you can also run it in the task manager window, as in the case of “Programs and Features above, enter only cmd”.
dism /online /cleanup-image /restorehealth (Wait for it to complete, then run the second one) sfc /scannow (also wait for it to complete)
How to fix it?
First you need to find out what the problem is.
To do this, press Ctrl+Shift+Esc and open Task Manager. Look at the elements located in the window. If they blink, like the shortcuts, you have a problem with the video card or its driver package. If the flickering stops or continues only on the desktop, the problem is in the service or incompatible program. Depending on the symptoms detected, proceed to the required item.
Reinstalling the driver
Outdated or corrupt drivers affect the display quality of the graphical user interface. To eliminate flickering, do the following:
- Go to “This PC” – “System Properties”. On the left, click on "Device Manager".
- Find the video adapter, expand the sublist and right-click on the field with the name of the video card model. Select Properties.
- Click the "Delete" button.
Attention! Download drivers only from official sites!
- Download the latest video driver. If you don't remember the exact name of the graphics adapter, look at the unique physical address (ID) value. To do this, go to the “Details” tab and in the “Property” field select “Hardware ID”. Search by the value of the first or second field.
- Install the driver following the prompts of the installation wizard.
- Restart your computer.
Attention! If reinstallation does not help, then the graphics adapter is likely broken at the hardware level. Contact a specialized service center.
Removing incompatible components
If the driver is not involved in the flickering, then you need to look for a defective software component. To successfully search, do the following:
- Press Win+R.
- Enter compmgmt.msc in the text field and confirm your entry with the Enter key.
- In the window that appears, go to “Event Viewer” – “Windows Logs” – “Applications” and “System”.
- Study the information provided in the logs and identify the application that causes a large number of errors.
- Open “This PC” – “Uninstall or change a program”.
- Find the program you need and uninstall it.
- Restart your computer.
This method should solve the problem with the flashing desktop. However, there is another method designed for particularly difficult cases. For this:
- Right-click on the Start menu icon.
- Select "Command Prompt (Admin)".
- Type the command sfc /scannow and press Enter.
- Follow the prompts that appear on the screen.
- If the scanning process does not find any problems, enter dism /online /cleanup-image /restorehealth and click Enter.
- After completing the procedure, close the window.
- Restart your computer.
Advice! To prevent such situations, update Windows 10 regularly.
This concludes our instructions. On several forums, users write that disabling the following components helped them: “Windows Error Logging Service” and “Problem Reporting and Resolution.” Therefore, in case of failure, it is recommended to resort to this option. Now you know what to do if icons are blinking in Windows 10.
Disabling the “Flash simulation” option
When icons or shortcuts on the Windows 10 desktop blink, you can try turning off visual sound alerts. This is done very simply, you press the Win and I hotkeys, as a result, the system parameters will open, you go to accessibility, then to the sound tab, and find the “Visualize sound alerts” option there, select the option without visual alerts.
Problem with Explorer in general: check your theme settings
The most common malfunction is that the open Explorer window itself returns the user to the top of the open window with a slider. Next, I offer several solutions that I personally encountered, and each of them solved the problem. In my own way. Check each one.
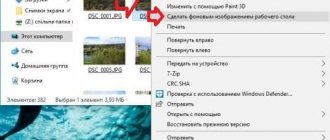
- Automatic theme change . Depending on what Windows theme is used. This is often caused by the user-selected slide show mode for displaying themes as the desktop background. And whenever the desktop theme changes, Windows Explorer keeps restarting. Try canceling the automatic background change ( turn off the slide show ) and set a static picture. I admit, in those cases where the unintentional reboot of the explorer was stopped in this way, I no longer delved into the reasons. But let's try. In the menu of additional commands (right mouse) on the Desktop, find the Personalization item:
Change Slideshow to Photo:
- Dynamic theme color adaptation . The solution to the problem lies in the same plane: when changing the background, Windows Explorer constantly restarts, forcing explorer.exe to update the theme settings. To resolve the problem, return to the Personalization options from the Desktop and select the Color settings:
Uncheck the Auto-select main background color box. Check again. Didn't work? Go ahead.
Manipulations through safe mode
If you are so lucky that your desktop is still flickering, then most likely you have a problem at the driver level. To fix this, we can use the Windows 10 safe mode, which I already talked about, look at the link on how to get into it. The only thing is to select the option “Enable safe mode with loading network drivers”
Open Device Manager. And you try to reinstall the drivers or the device itself. To do this, right-click on the video adapter and delete it
After that, we update the configuration and check. If this does not help, then I advise you to update all the drivers for the motherboard and video card; you can download everything from the official website, or use the SamDrivers driver pack to automatically update all equipment.
If the situation is the opposite, and arose after installing fresh drivers on the video card, then we also try to roll them back.
If there are 2 video cards, then disable them one by one and try to boot in normal mode. The problematic driver will be the one that is disabled at the time of successful loading. After all manipulations with the drivers, do not forget to reboot the system to apply the settings.
Video adapter driver problem
If flickering appears after the video driver has been installed or updated automatically through the Update Center, you should do the following:
- remove the installed software and all its components using the integrated uninstaller or Driver Display Uninstaller;
- download a new edition of the software for your video card that matches the edition of the installed operating system from the official page of the driver developer;
- install the latest program through the installer and restart the computer.
Under no circumstances should you trust third-party applications for searching and updating drivers, and especially the Update Center, to perform this task.
After the reboot, if the problem still persists, update Windows 10.
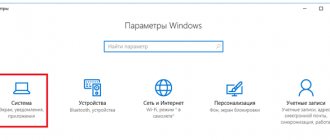
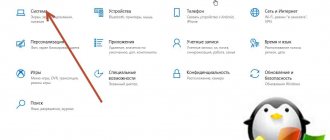
1. Press Win+I to bring up “Options”.
2. Go to the last section of the new menu, which is responsible for receiving updates.
3. Click on the button to search for updates and install them after it is completed, refusing to update the graphics driver.
4. Reboot and check for a problem with image blinking.
And finally, some useful tips, the first of which could have been placed at the beginning of the article, but updating the software has never harmed anyone (although in the case of the “ten” the issue may be controversial):
- check the reliability of the connection of the cable transmitting data from the video card to the monitor;
- reinstall monitor drivers;
- We try to connect the output device through a different interface.
Booting from Last Known Good Configuration and Safe Mode may also be useful if the driver cannot be reinstalled normally.
Additional methods to eliminate screen flickering
Additionally, I can highlight several points:
- In safe mode, install all possible updates on the system
- Try plugging the video card (if it's a desktop computer) into a different port on the motherboard
- If your desktop blinks, on the contrary, after installing fresh updates, then you need to roll back the system to the last working configuration before this installation. Select "System Restore". If there is no restore point, then try to select the item
Select "Remove latest fix". Then we try to boot in order to check whether the desktop in the system is blinking or not.
- In the same safe mode, try downloading a third-party antivirus, for example, Dr.Web CureIt and scan the system for viruses, maybe the Joke:Win32/ScreenFly virus
- If the + shortcuts on the Windows 10 desktop are blinking, then try editing the registry. To do this, open the Windows Registry Editor and go to the branch:
HKEY_LOCAL_MACHINE\SYSTEM\CurrentControlSet\Control\Update find UpdateMode there, change the value of the UpdateMode parameter to 0, reboot
I hope that these methods were useful to you and your desktop is no longer flickering. Ivan Semin, author and creator of the IT blog pyatilistnik.org, was with you.
Clearing the SoftwareDistribution folder (Windows 10 update cache)
All Windows 10 updates are downloaded to the C:\Windows\SoftwareDistribution\Download folder and in most cases, clearing this folder or renaming the SoftwareDistribution folder (so that the OS creates a new one and downloads the updates) allows you to fix the error in question.
There are two possible scenarios: after canceling the changes, the system boots normally, or the computer restarts endlessly, and you keep seeing a message that Windows 10 updates could not be configured or completed.
In the first case, the steps to solve the problem will be as follows:
- Go to Settings - update and security - recovery - special boot options and click the "Restart now" button.
- Select "Troubleshooting" - "Advanced options" - "Boot options" and click the "Restart" button.
- Press 4 or f4 to boot into Windows Safe Mode
- Run the command prompt as Administrator (you can start typing “Command Prompt” into the search on the taskbar, and when the required item is found, right-click on it and select “Run as administrator.”
- At the command prompt, enter the following command.
- ren c:\windows\SoftwareDistribution SoftwareDistribution.old
- Close Command Prompt and restart your computer normally.
No activation of Windows 10 / are there any restrictions
In the second case, when the computer or laptop constantly reboots and the undoing of changes is not completed, you can do the following:
- You will need a Windows 10 recovery disk or an installation flash drive (disk) with Windows 10 in the same bitness as that installed on your computer. You may need to create such a drive on another computer. Boot your computer from it, you can use the Boot Menu for this.
- After booting from the installation drive, on the second screen (after selecting the language) at the bottom left, click “System Restore”, then select “Troubleshooting” - “Command Prompt”.
- Enter the following commands in order
- diskpart
- list vol (as a result of running this command, look at what letter your system drive has, since at this stage it may not be C. Use this letter in step 7 instead of C if necessary).
- exit
- ren c:\windows\SoftwareDistribution SoftwareDistribution.old
- sc config wuauserv start=disabled (temporarily disable automatic start of the Update Center service).
- Close the Command Prompt and click Continue to restart your computer (boot from the HDD, not the Windows 10 boot drive).
- If the system boots successfully in normal mode, enable the update service: press Win+R, enter services.msc, find “Windows Update” in the list and set the startup type to “Manual” (this is the default).
Install the Windows 7 start menu in Windows 10
After that, you can go to Settings - Update & Security and check if the updates download and install without errors. If Windows 10 updates without telling you that updates could not be configured or completed, go to the C:\Windows folder and delete the SoftwareDistribution.old folder from there.
Uninstalling an incompatible application
There are three applications that most often cause screen flickering in Windows 10 : Norton AV, iCloud and IDT Audio.
In most cases, the problem can be resolved by simply uninstalling the application. If you have one of these apps installed, uninstall it using one of the following methods.
Removal via “Settings”
- Open the Settings panel by pressing the Win + I keys on your keyboard. If this doesn't work, click the Start button, and then click Settings.
- Select System → Apps and features. After a while, a list of applications will appear.
- Scroll down the list to find the uninstall app. Select an application, and then select Uninstall. If you are prompted to confirm your selection in the User Account Control dialog box, click Yes. The application may be uninstalled automatically, or a separate uninstaller may appear that requires you to take additional steps to remove the application.
Uninstalling an application from the Start menu
- Open the Start menu by pressing the Windows logo key on your keyboard (or select the Start button in the lower left corner of the screen).
- From the Start menu, select All apps.
- Scroll down the list to find the uninstall app. Right-click the application, and then select Uninstall. If you are prompted to confirm your selection, click Yes. The application may be uninstalled automatically, or a separate window may appear requiring you to take additional steps to uninstall the application.
Note: To continue to use the Norton AV, iCloud, or IDT Audio app on Windows 10, visit the app manufacturer's website for more information about updates, as well as compatibility with Windows 10.