Applying a simple texture to a photo
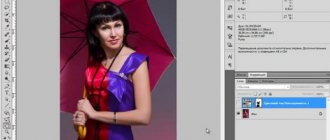
Let's try to improve this photo of a guy and a girl by adding a water drop texture to them. To find photos, you can search through Yandex or Google images. Just enter something like “Texture of water drops”. Once the images are prepared, we load them one by one into Photoshop.
- If the picture with water drops is smaller than the photo of people, then select the layer with the drops and press CTRL+T . This will allow you to enlarge the picture with the texture to such an extent that it completely covers the photo of the guy and the girl. But if the difference in resolution is too big, then you shouldn’t stretch it as far as possible. Better make the photo resolution lower.
- Once you have everything in place, you will need to select the most appropriate blending option. To do this, go to the layers panel and start selecting the appropriate one from the drop-down list of overlay options. You can do everything by trial and error. I personally found the “Overlay” and “Soft Light” modes most suitable.
- And as a finishing touch, let's reduce the layer's opacity so that the background texture doesn't obscure our photo too much. 60-70 percent transparency will be quite enough.
As you can see, the effect is amazing. The photo immediately looks much more alive.
Applying a complex texture to a selected area
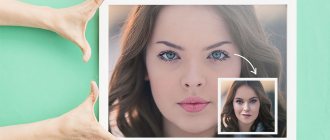
If in the previous example we overlayed a translucent photo to achieve a certain effect, now we will have to work a little. The fact is that now we will completely change the coverage of the object using the example of a car. Remember how we replaced color in Photoshop? So we have to work in a similar style, only instead of color we will make a new pattern. Let's say I take this photo of a car and this water texture.
- Load both images into Photoshop, just make sure that the water texture layer is higher than the car. And be sure to rasterize the water layer. To do this, right-click on the water layer and select “Rasterize Layer”.
- Now, you can make the water layer invisible by clicking on the eye. At this stage, he will only hinder us.
- Next, we need to select the car itself with any convenient tool. I prefer to work with the rectangular lasso. Try using it too. First, select the entire car except for the wheels. Don't forget to zoom in ( CTRL and + ) to make the selection more precise.
- There will probably be some details that do not need texture overlay. We will need to remove the ear. To do this, in the “Magnetic Lasso” mode, look for the “Subtract from selected area” function in the tool properties.
- Now let’s calmly select unnecessary objects inside, such as glass, door handles, bumpers, etc. Do not worry. You won't lose anything.
- Next, right-click inside our selected area and select “Copy” to a new layer. A new layer will be created right above the car layer with only the car body, which we have selected. The selection can now be removed by pressing CTRL+D .
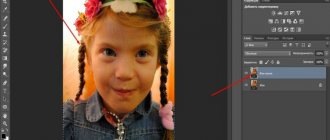
- Now, we will need to make the body copied to a new layer black and white. It is important. To do this, you can use any of the methods known to you. But I recommend that you go to the menu "Image" - "Adjustments" - "Black and White". As you can see, the body has become B/W, but everything else remains the same.
- Now, let's activate the selection of our body. To do this, go to the layer with the black and white detail and, while holding down the CTRL , click on the layer thumbnail. When you hover, your cursor should change.
- And now the image of water comes into play. Without removing the selection, click on the eye, activating the display of the texture. After that, invert the selection by pressing the key combination SHIFT+CTRL+I . After a successful operation, you should see a selection around the perimeter of the canvas.
- Now, being on the water layer, press the DELETE to delete everything that is not included in the selected area. Then you can remove the selection ( CTRL+D ). As you can see, water now covers the body, but it looks somehow unnatural. This is decided.
- You will need to select Overlay or Soft Light in the Blending Options. Then you will be surprised how your machine has changed.
Looks like the real thing.
Moreover, if you play with the brightness or color tone ( CTRL+U ), you can consider various interesting variations of the transformation. Just check the “Toning” mode and move the sliders.
You can do similar overlay effects not only with cars, but also with any other items and objects.
How to apply a texture to an object in Photoshop
The algorithm for this procedure is identical. But, since the text is for absolute beginners, I will show an example of implementation for it too. The actions are essentially the same, only at the beginning we add not the text, but the object you need (a form or, for example, ). After that, place the texture above this layer and create a clipping mask (Control + Alt + G).
Then you adjust the result to your needs: move the texture if necessary, add an adjustment layer and change the blending mode. In principle, there is nothing complicated about this, and the effect is very interesting. The texture mapping method in Photoshop can be useful for creating various kinds of illustrations, pictures, posters, etc.
Texturing is a process that many beginning (and not only!) modelers puzzle over. However, if you understand the basic principles of texturing and apply them correctly, you can quickly and efficiently texture models of any complexity. In this article we will look at two approaches to texturing: using the example of an object with a simple geometric shape and using the example of a complex object with a non-uniform surface.
Let's assume you already have 3ds Max installed and are ready to start texturing an object. If not, use the link below.
Simple texturing
1. Open 3ds Max and create several primitives: box, ball and cylinder.
2. Open the Material Editor by pressing the "M" key and create a new material. It doesn’t matter whether it’s a V-Ray material or a standard one, we create it only for the purpose of correctly displaying the texture. Assign the “Checker” card to the “Diffuse” slot by selecting it in the “standard” rollout of the list of cards.
3. Assign a material to all objects by clicking the “Assign material to selection” button. Before doing this, activate the “Show shaded material in viewport” button so that the material is displayed in a 3D window.
4. Select a box. Apply the “UVW Map” modifier to it by selecting it from the list.
5. Let's proceed directly to texturing.
— In the “Mapping” section, put a dot near “Box” - the texture is correctly located on the surface.
— Below you can set the size of the texture or the repetition step of its pattern. In our case, the repetition of the pattern is regulated, since the Checker map is procedural, not raster.
— The yellow rectangle framing our object is a “gizmo”, the area in which the modifier affects. It can be moved, rotated, scaled, centered, snapped to axes. Using the gizmo, the texture is placed in the right place.
6. Select a sphere and give it the “UVW Map” modifier.
— In the “Mapping” section, set the dot opposite “Sperical”. The texture took the shape of a ball. To make this easier to see, increase the cell pitch. The parameters of the gizmo are no different from the box, except that the ball gizmo will have a correspondingly spherical shape.
7. A similar situation for the cylinder. Having assigned the “UVW Map” modifier to it, we set the texturing type to “Cylindrical”.
This was the easiest way to texture objects. Let's consider a more complex option.
Texturing with a sweep
1. Open a scene in 3ds Max that has an object with a complex surface.
2. By analogy with the previous example, create a material with the “Checker” card and assign it to an object. You will notice that the texture is not laying correctly, and applying the “UVW Map” modifier does not give the desired effect. What to do?
3. Apply the “UVW Mapping Clear” modifier to the object, and then “Unwrap UVW”. The last modifier will help us create a surface sweep for applying texture.
4. Go to the polygon level and select all the object polygons that you want to texture.
5. Find the “Pelt map” icon with the image of a leather tag on the scan panel and click it.
6. A large and complex development editor will open, but we are now only interested in the function of stretching and relaxing surface polygons. Press “Pelt” and “Relax” alternately - the scan will be smoothed out. The more accurately it is smoothed, the more correctly the texture will be displayed.
This process is automatic. The computer itself determines how best to smooth the surface.
7. After applying “Unwrap UVW” the result became much better.
So we got acquainted with simple and complex texturing. Practice as often as possible and you will become a real 3D modeling pro!
Making a photo interesting and original using texture overlay is not that difficult. You just need to know the basic techniques.
For such a photo you will need: Adobe Photoshop, an original photograph and, of course, the desire to create.
First, let's open the original photo. We will process it ourselves. Moreover, the processing will be carried out efficiently!
Then you need to open the texture in Photoshop. We will put it on top of the photo itself.
After opening the texture, press Ctrl+A
. This will highlight the entire image and create a thin frame around it.
Send the image to the clipboard using the combination Ctrl+C
.
To adjust the texture size, press CTRL+T
and transform it.
Now you need to set the blending mode for the texture layer. Apply either “Soft light”
, or
“Overlap”
. The blending mode will determine the intensity of the texture display.
For best results, the texture can be desaturated by pressing SHIFT+CTRL+U
. This technique will neutralize the tones in the image and improve its display.
The last step will be to reduce the opacity of the texture. There is a necessary item on the layers tab. There the opacity level is shown in % (one hundred% is a completely opaque texture).
Thus, in this lesson you have gained initial skills in working with textures. This knowledge will significantly improve the level of your work in Photoshop.
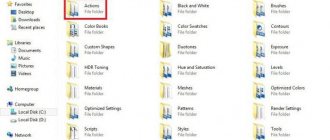
In this mini-lesson I will tell you... Textures for Photoshop are in .pat format. If you downloaded the texture in this format, then everything is simple: put it in Program Files\Adobe\Adobe Photoshop CS5\Presets\Patterns.
After that, in Photoshop, go to Edit -> Preset Manager and select the Patterns tab. In it you will see the current set of textures. Let's say I copied a texture named Lesson_textures. To find this set, click on the arrow and select it from the list:
That's it, now you can use these textures anywhere. Here's an example using textures in a layer style:
You can also select a texture without loading it into your Photoshop folder. To do this, click on the arrow and find the Load Patterns item:
You will be prompted to select a texture from any folder on your hard drive.
I think that's sorted out. But what if the texture is in .jpg or .png format, that is, it is an ordinary picture? Everything here is also very simple, let's figure it out.
Applying textures to text
But to apply a texture to text in Photoshop, you need to do completely different things. You don’t need to download any pictures, but a set of patterns would be nice. But in Photoshop there are several standard sets. Therefore, first we will look at them, and then we will learn how to download new ones.
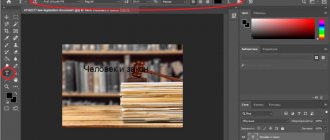
- Grab the Type tool and write something. Just preferably choose a bolder font so that the texture is more clearly visible.
- Next, go to the layer styles by double-clicking on the thumbnail and select “Pattern Overlay”.
- After this, we will need to select the pattern itself. There are not many of them by default, but they can be downloaded additionally. First, let's choose something from the standard arsenal.
As you can see, it turned out quite interesting.
But not everyone knows that this is not the whole set. If you click on the gear when choosing a pattern, you can select one of the existing sets. The choice there is much more interesting. Plus, you can zoom in and out of the pattern to see what works best.
For example, I put a natural pattern.
How to upload a new pattern?
Naturally, you won’t get by with standard patterns, so we’ll upload new ones. For this we need so-called sets in PAT . They are not difficult to find. It’s enough to type something like “Download patterns for Photoshop pat” into any search engine. Well, if you're lazy, you can take them from here. There are a lot of interesting sets here.
- After we have downloaded the set with patterns, unpack the archive.
- Next, go to Photoshop and select the menu “Editing” - “Presets” - “Manage Presets”.
- In the window that opens, select “Patterns” from the “Set type” drop-down menu. After that, click on the “Download” button.
- We will be presented with a file selection in Explorer in the “Adobe Photoshop/Presets/Patterns” directory. For greater convenience, I recommend saving the downloaded sets in this folder. After that, select the file with the set that you downloaded.
As you can see, there are now many more different patterns. And the most important thing is that you can apply these textures directly to the text in the same way as we did above.
Creating a new texture in Photoshop
Open your picture, I took this one:
Go to Edit -> Define Pattern and give the texture a name.
Click OK and that's it! Your texture will now appear in the Preset Manager:
To save it into a separate .pat file, click the Save Set button. You can also save multiple textures, thereby creating your own sets, to do this, simply select several textures and click the same Save Set button.
That's all, now you know how to install a texture in Photoshop .
Using textures in Photoshop allows you to quickly and efficiently stylize various images, for example, backgrounds, text, etc. The program allows us to load our own textures for use with various tools. In this tutorial we will tell you how to do this.