Why do you need a computer icon?
Unusual appearance of icons on the main screen, menus and unfamiliar names of OS elements are a common reason why users do not upgrade to the latest versions of the operating system.
If you haven’t used 10 before and weren’t interested in its interface, you should know that there won’t be a computer icon on your desktop. He returns there in a few simple steps.
In different versions it was called:
- My computer
- Computer
- This computer
Use the name you like. I’ll explain how to do this.
Basic approaches to placing an icon on the main computer screen:
- Through setting operating system parameters
- By editing the registry
Restoring the Start button to work
Sometimes users are faced with the situation that after debugging the functioning of the desktop, the “Start” button does not function, that is, it does not respond to clicks. Then it needs to be restored. Luckily, this can be done in just a few clicks:
- Open Task Manager and create a new PowerShell task with administrator rights.
- In the window that opens, paste the code Get-AppXPackage -AllUsers | Foreach {Add-AppxPackage -DisableDevelopmentMode -Register “$($_.InstallLocation)\AppXManifest.xml”} and press Enter.
- Wait until the prerequisite installation process completes and restart your computer.
This leads to the installation of missing components required for Start to work. Most often they are damaged due to system failures or virus activity.
Read more: Solving the problem with the Start button not working in Windows 10
From the material presented above, you learned about five different ways to fix the error with a missing desktop in the Windows 10 operating system. We hope that at least one of the instructions given was effective and helped you get rid of the problem quickly and without any difficulties.
To Home screen
The icon can be placed not on the desktop, but on the start screen. This means that it will appear as one of the tiles in the main menu. I recommend starting with this method. The habit of placing everything on the desktop is outdated.
Click the OS logo button in the lower left corner. The main menu will open. Find the "Search" line.
Open it.
In the input field, type “this computer” as shown in the illustration below. You need an application with that name on your local PC, not results from the Internet.
Right-click on it and a list of available actions will open. These include the ability to pin a software tool:
- From the Home screen
- On the taskbar
The first option is needed, but the user may prefer the second if he finds it more convenient for himself.
The program is now available to the user in the Start menu.
How to return My Computer to the Windows 10 desktop when the version of the system is not activated
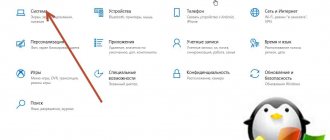
Microsoft allows everyone to install the Windows 10 operating system on their computers for free. After installation, the user receives a non-activated version of the system, which can be activated by purchasing a license key. Not everyone activates Windows 10, but the trial version of the system does not have access to some functions that the user may need. In particular, on the version of Windows 10 without activation, you cannot launch the “Personalization” settings using standard methods.
To get to the “Show or hide common desktop icons” menu, you can use the Control Panel. To do this, right-click on the “Start” button and select “Control Panel” in the window that appears. In the menu that opens, at the top right in the search, write the word “Icons”, and based on the search results, click on the required item.
There is an even easier way to get to the settings that allow you to return My Computer to the Windows 10 desktop. To do this, you need to enter a command in the “Run” menu that will immediately take you to the required settings page. To make this happen, do the following: press the Windows + R key combination on your keyboard, and in the “Run” menu bar that opens, enter the command Rundll32 shell32.dll,Control_RunDLL desk.cpl,,5 to go to the settings item “Show or hide regular icons” on the desktop."
To place the My Computer shortcut on the desktop in Windows 10, you need to spend literally a minute if you know where to look for the necessary settings. The described methods for a non-activated version of Windows 10 are also excellent for the activated version of the operating system, and the “Run” window is the easiest and fastest way to get to the required settings.
( 427 votes, average: 4.50 out of 5)
How to reset Windows 10 to its original state
How to delete a folder that won't delete
Related Posts
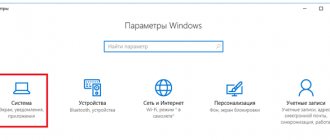
Through Personalization
The first action is to right-click on any icon-free area of the operating system desktop. Go to the bottom of the context menu items - “Personalization”.
On the left side of the window there is a list of categories of settings for the appearance of the operating system. You need the “Themes” item.
Scroll to the right side of the window until the “Related Options” settings category appears. In this case, you need a link to the desktop icon settings. Go along it.
Navigating the GUI is not the only way to open the settings you need. A universal approach to accessing Windows 10 utilities is the Run software tool. With it, the user can open:
- Internet resource
- File
- Catalog
An alternative method to go directly to the desktop icons window:
- Press the "R" and "Win" keys
- In the input field type: “desk.cpl,5”
- Click "OK"
The second command to open the icon display settings window: “rundll32.exe shell32.dll,Control_RunDLL desk.cpl,,0”
In an additional small window, the user is prompted to place on the desktop icons for quick access to a number of operating system functions:
- Computer
- User files
- Net
- Control Panel
The Recycle Bin icon, into which files are placed for later deletion, is present on the desktop by default.
You can:
- Place “birds” to the left of the elements that need to be placed on the desktop
- Remove the “bird” to the left of the “Trash” so that it no longer appears on the main screen
- Change interface element icon
To confirm user-changed settings, an “Apply” button is provided. Located in the lower right corner of the window.
Return the My Computer shortcut to the desktop in Windows 10 through the Personalization menu
The Windows 10 operating system allows each computer owner to customize literally everything, from the background image to the location of mini-tiles in the Start menu. Users can also return the My Computer item through standard Windows 10 tools. The fact that the familiar shortcut is disabled by default does not indicate Microsoft’s desire to force users to abandon it completely, it just decided that it would be more convenient.
To return the My Computer shortcut to the desktop in Windows 10, you must:
- Right-click on the desktop in any free space and select “Personalization” from the drop-down menu.
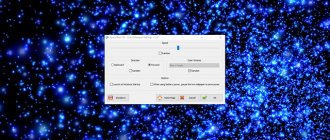
- In the window that appears, go to the “Themes” tab, and here select “Desktop Icon Settings”.
- This item allows you to configure desktop shortcuts and, among other things, activate standard elements - “My Computer”, “User Files”, “Network”, “Control Panel” and “Trash”. Also in this menu you can configure the appearance of shortcuts on the desktop, but this can be done later directly in the shortcut properties.
After completing all the desired settings, the user will see that a standard My Computer (This Computer) shortcut, familiar from the oldest versions of Windows, has appeared on his desktop.
Don't change icons for new themes
I would like to draw the readers' attention to additional important changes that may be made here.
For those who like to customize the interface. After applying the new theme, the icons on your desktop will also change. If this approach is not convenient for you, disable the option that allows themes to change icons. To do this, left-click in the box marked in the illustration. The bird will disappear from it. Afterwards, click the “Apply” button.
Change desktop element icon
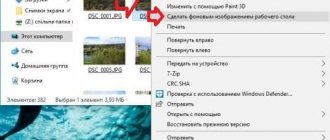
I don’t like the way the computer icon or something else looks. Can be easily changed. Select the icon you want. Click the button prompting you to change it.
In the icon change window, select the one you like best. Click OK.
Apply the changes by clicking the appropriate button.
Close or minimize all windows. The desktop now has a computer icon in the user-selected design. It's called "This Computer".
In the OS registry
This method involves displaying all system icons on the desktop. It will work in cases where other GUI approaches have not been used. Designed for experienced users and those who want to improve their computer literacy. Remember that there are easier ways to achieve the same result.
The methods discussed above are simpler. But it is also possible to edit the registry so that the computer icon returns to the desktop. To go to editing:
- Press "R" in combination with "Win" on your PC keyboard
- Type: "regedit"
- Click "OK"
- Allow the program to make changes to your computer (“Yes”)
- Remember that it is easy to damage the OS if you use Registry Editor incorrectly. If you have the slightest doubt, refuse to use this method (“No”).
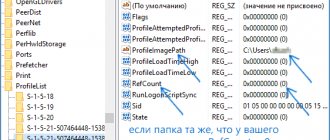
In the left window of the software tool, expand the “HKEY_CURRENT_USER” list. Next, expand the subfolders sequentially:
- SOFTWARE
- Microsoft
- Windows
- CurrentVersion
- Explorer
- Advanced
On the left side of the window you need the “HideIcons” parameter.
Right-click on it - select “Change...” - a window will open. In it you need to assign a zero value to the parameter. Click OK.
To apply the changes, you need to restart your laptop or desktop PC.
Instructions for Windows 10 virtual desktops
Hello. The Windows 10 operating system provides users with a lot of new features that were not available in previous versions of the OS or were implemented using third-party applications. Such functions also include Windows 10 virtual desktops, which will be discussed in this article.
Why use them?
It’s worth noting that similar things have been used by MacOS and even Linux for a long time. Therefore, the technology should not be considered a revolutionary breakthrough by Microsoft. In addition, there is something similar on Android, where you can scroll through “workspace” screens with different content. But the “ten” has some differences and advantages.
The Windows 10 Virtual Desktop makes your workflow more comfortable, especially if you're used to opening a ton of windows in Explorer and running multiple applications at the same time.
For example, on one you can place documents for office purposes, on the second - gaming applications, on the third - multimedia shortcuts and folders with photos, videos, on the fourth - tools for communicating on the Internet, browsers. In this way, you can hide certain information from prying eyes by simply switching to another.
How do Windows 10 virtual desktops work?
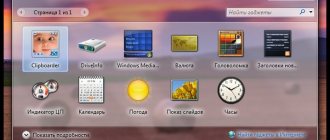
To switch to Task View mode, just click on the icon with a rectangle on the taskbar (near the Start button):
A window with open applications and folders will appear, and on the right you will see a plus sign, which is responsible for adding a new virtual desktop:
Simple, would you agree?
You can add any quantity - as much as you see fit. As a result, you will see the following picture:
Attention! The primary content (shortcuts, folders, files) will automatically be transferred to the newly created ones - except for taskbar items. That is, all programs (active windows) will remain tied to a specific location.
We already know how to create a virtual desktop for Windows 10. But this is not enough. There are some other interesting possibilities.
Moving objects
Let's say you want to move a window from one table to another. Nothing could be easier! Just right-click on it and select the item with the appropriate name. And then we indicate the name of the new one in the list:
Please note that there is an option in the menu to display on all desktops. It can be useful!
Removing items
If you need to close an unnecessary “canvas”, then just move the cursor to it and click on the cross that appears:
As soon as you do this, all active windows will automatically “move to their neighbor”.
"Quick" keys
You can speed up control and navigation of virtual workspaces by using the following keyboard shortcuts:
- Win + Tab - similar to clicking the Task View button;
- Win + Ctrl + D – add;
- Win + Ctrl + F4 – delete the currently active table;
- Win + Ctrl + arrows (right or left) – move from one element to another.
Flaws
So far, this technology does not fully meet the expectations of most users. And that's why:
- Windows 10 virtual desks are rigidly fixed, which prevents them from moving or changing position;
- There is no option to rename elements;
- When you restart your PC, the previously created “surfaces” will disappear;
- Support for multiple monitors is not implemented;
- You cannot set different wallpapers or set a different location of shortcuts in individual cases.
How do you feel about these innovations in Windows 10? Do you like the functionality or do you think it needs to be improved? Share your opinion in the comments.
Sincerely, Victor
it-tehnik.ru
The usual name of “My Computer”
If it is important for the user that the similarity with familiar operating systems is complete:
- Right click on the icon
- Item for renaming a desktop element
- Entering a common name
- "Enter"
A user-defined icon name can be used. In combination with the ability to change the icons of desktop elements discussed above, this is a convenient option for customizing devices for those users who have several computers.
The user can use those names of desktop elements that are more familiar or understandable to him. Knowing about this feature is useful if you are setting up an older user's PC.
virtual desktop, its configuration and use (video)
For many years, users of Mac OS X and various versions of Linux have used virtual desktops for comfort and convenience. Today, Microsoft developers have decided to please their users: in Windows 10, a virtual desktop is commonplace; Using such a desktop ensures high speed of work and increases its efficiency.
Windows 10 was presented on September 30, and the very next day everyone had access to the Technical Preview - a version that demonstrates the main capabilities of the system software. A new menu was created, but this was not the main feature of the tenth generation OS. The main innovation was the virtual desktop. Anyone who has ever worked with Mac or Linux knows for sure how convenient it is. Virtual desktops allow you to systematize work with a large number of programs.
How to use
Want to take advantage of new technology? Then carefully remember how to make virtual desktops in Windows 10 32bit without much effort. By the way: virtual desktops in Windows 10 64 are practically no different from 32. Let's start from the very beginning:
- In the Russian interface the function will be called “Task View”, but in the original it sounds like “Task View”. In order to use it, you need to click on the icon, which is located on the left of the taskbar and is the first one.
- After you click on it, a menu of applications that are currently open on your computer will open.
- In addition, in the lower right corner there will be a button to add additional space. So we move directly to setting up a virtual desktop on Windows 10. After you click on the plus, a new workspace will appear in front of you. If you want to switch between them, it's worth using Task View.
- Thanks to the new interface, it's easy to open many different programs in different tables, and simply switch between them, without waiting for one program to collapse and another to take its place.
- There are situations when a program or application needs to be moved from one virtual desktop to another. In order to do this, you need to right-click on its thumbnail and then move it to the virtual desktop tab, which will become the future location of the application or program.
Important! Desktops cannot be swapped. If you accidentally close one of them, all open applications will move to the next table.
Hotkeys
Given the modern age of virtual desktops, it would be foolish to believe that keyboard shortcuts weren't invented for virtual desktop users. Of course, in the Task View itself, switching can be done using regular arrows, but to ensure the most comfortable work, the following hotkeys are used:
- Win + Ctrl + left/right arrow – switch between desktops;
- Win + Ctrl + D – create a new one;
- Win + Ctrl + F4 – close the current one.
There are no reviews for Windows 10 virtual desktops yet: the system software will be publicly available only at the beginning of August. Its price will be about $100. But today a virtual desktop video is available for Windows.
Conclusion
Of course, first of all, we should thank Microsoft, which finally listened to the requests of users and introduced virtual desktops. Those users whose work involves constant interaction with the computer will now be able to complete tasks many times faster. We are looking forward to the general release of Windows 10 so that we can quickly try out all the modifications of the new software.
WindowsTen.ru
You need to get used to the new OS
Before changing the settings, I recommend using the “ten” for several days without changing its parameters. It is possible that you will like the interface and will no longer want to return to your previous desires.
The yellow icon on the bottom panel is the File Explorer file manager. By opening it, the user gains access to files and directories. The tool replicates the functionality of My Computer.
On the left side of the screen you can go to your “Computer”.
Think about whether you need duplicate functionality and an additional icon on your desktop.
Windows 7 support is ending. What to do
Support for the "seven" ends on January 14, 2020. Users of this OS will have to prepare for this event and make a decision for themselves:
- Upgrade to new version
- Continue using unsupported
Previously, I wrote about how to upgrade to Windows 10 in 2019. From the material you will find out whether your PC is ready for the new operating system.
For a clean installation, you can download the Tens ISO image. I also discussed in detail the features of the download process using phones, Mac and Linux computers.
Do you prefer to get used to the new system interface or configure it so that there are as few differences as possible compared to the past?