The traditional PC usage scenario involves you walking up to the computer, sitting down in a chair, and making physical contact with the device. However, there is another option - setting up Windows 10 RDP and using a remote connection. This method has many advantages: you don’t need to waste time getting to your workplace, you can perform tasks on a more powerful computer from a weak device, or even ask a more competent specialist to connect and provide assistance.
Enabling access and adding users
The first setup step is to adjust the Windows 10 settings to make connecting via the Internet using RDP possible in principle. Open Start and click on the Settings gear.
Open the system settings section.
View detailed information (you can immediately open this screen using the Win-Pause or Win-Break combination).
Remember what name is specified for the computer. Next, proceed to setting up remote access.
If the system is configured to automatically hibernate, a warning will be displayed.
Click Power Options and then circuit settings to remove interference with the use of RDP in Win 10.
Select "Never" from the list if you want the PC to be always available.
An alternative way is to activate the enhanced performance mode, then the computer will not turn off.
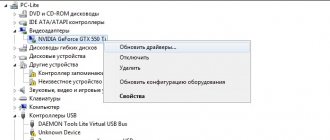
In the Remote Desktop subsection, allow connection to the computer.
If you wish, you can configure Windows 10 RDP for multiple users by clicking the button just below the switch.
By default, access is given to administrators, but you can add an arbitrary user (for example, specially created for this purpose).
Enter his name in the system.
The user will appear in the RDP permission list.
Depending on the OS version, the procedure may differ slightly. For example, the official guide suggests going to the desktop settings directly in the “System” subsection or opening the address “ms-settings:remotedesktop” in the browser.
Connecting to another computer via the Internet (Team Viewer)
Let's look at how to set up and connect to a remote Windows desktop of another computer using the popular Team Viewer program. Go to the website to download the program itself. Install Team Viewer on your and the remote computer. Select settings for how you want to use the program.
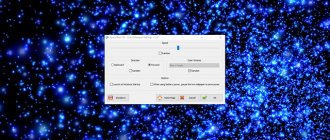
- 1. This is your ID and password. You may need it if you need to access your desktop from another computer.
- 2. Partner ID. Must indicate the details of another (remote) computer. The data of the remote (second) computer will be written in the same place as you have in point 1.
Click the Connect to partner button, after which the following window will appear where you will have to enter the password of the remote partner.
See also:
- Live video wallpaper for windows 10 desktop
- How to calibrate your monitor in Windows 10
- How to clear data usage in windows 10
- How to restore open programs on reboot
- How to change Windows 10 automatic maintenance time
comments powered by HyperComments
IP Configuration and Management
IP is often used instead of computer name. To view it, right-click on the current connection icon and bring up Network Sharing Center.
Next, click directly on the Internet connection channel (for example, Ethernet) to view the status.
In the status view, click Details.
Detailed information will be displayed from which you need to remember or record the IP.
If the address is issued dynamically, then when you turn on the PC again, it may change, and then you will need to learn it again each time. Instead, sometimes a static address is configured that remains unchanged across reboots.
Important! If your network has a responsible administrator, check with them to see if this setting is acceptable. However, this also applies to allowing remote access in general.
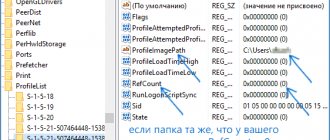
In the status view, go to properties. Next, select the IPv4 protocol and open the detailed view.
Specify the address as a value that is not within the range used for dynamic use. The corresponding setting can again be found in the router.
Traditionally, the mask is specified as 255.255.255.0, so the IP must differ from the gateway address (we do not change it) only in the last number.
As DNS, you can specify the values used in your network or use public services: 8.8.8.8 from Google, 1.1.1.1 from Cloudflare, and so on.
If you use a fixed address and a direct connection (that is, your PC has a “white” IP, check this information with your provider), it can also be viewed using external services like https://2ip.ru .
What are the pros and cons of using the RDP protocol?
Let's start with the pleasant - with the pros. The advantage is that this tool, which is more correctly called
RDP
Client , is available to any Windows user, both on the computer from which the remote control will be managed, and to those who want to open remote access to their computer.
Through a connection to a remote desktop, it is possible not only to see the remote desktop and use the resources of the remote computer, but also to connect local disks, printers, smart cards, etc. to it. Of course, if you want to watch a video or listen to music via RDP, this process is unlikely to give you pleasure, because... in most cases you will see a slide show and the audio will likely be interrupted. But the RDP service was not developed for these tasks.
Another undoubted advantage is that the connection to the computer is carried out without any additional programs, which are mostly paid, although they have their advantages. The access time to the RDP server (which is your remote computer) is limited only by your desire.
There are only two minuses. One is significant, the other not so much. The first and essential one is that in order to work with RDP, the computer to which the connection is being made must have a white (external) IP, or it must be possible to “forward” a port to this computer from the router, which again must have an external IP. Whether it is static or dynamic does not matter, but it must be.
The second disadvantage is not so significant - the latest versions of the client no longer support the 16-color color scheme. Minimum – 15bit. This greatly slows down RDP when you connect over a stunted, dead Internet with a speed not exceeding 64 kilobits per second.
Setting up the RDP port
If the system to which the RDP connection is made is located behind the router, then the port may need to be configured. To do this, connect to the router via the web interface in the standard way (the address used for this must be specified in the equipment instructions). Next, find the Port Forwarding section in the settings. You will need to add a rule to it with the following parameters:
- the name can be arbitrary;
- select 3389 TCP as the port;
- Enter IP from your PC;
- also enter the local port as 3389;
- select TCP protocol from the list.
After this, it will be possible to connect remotely and work with the PC.
Remote Desktop Connection in Windows 10
After configuration, you can use a standard program to connect in RDP mode.
The minimum requirements for connection are to specify the name or IP of the target computer.
Next, the system itself will request your account login information. Use one of the accounts that you added during the setup stage. You can check the box so that you do not have to enter them again in the future.
If a notification about the absence of a certificate is displayed, it is acceptable to ignore it (you are confident in your PC, right?).
Also in the connection window you can expand detailed connection parameters:
- are common;
- for the screen;
- resources;
- interaction opportunities;
- and an additional tab where you can disable certificate verification.
Important! Unlike setting up RDP on Windows Server 2020, only one user can work here at a time, regardless of whether directly on the computer or remotely. So if you try to connect to a system where someone is already logged in, a warning will appear. You can either disconnect the active user or connect later.
If you need to set up a concurrent RDP, move to server OSs such as Windows Server 2012 r2.
After this, a window with the remote system will open. By default, the mode is full screen, and the connection panel is shown at the top.
If you click the cross on it, the user will remain logged in to the remote system.
To completely exit the Start menu of the remote machine, select Disconnect.
Find out also:
- How to open a RAR file on Windows 10,
- Setting up a router using My.Keenetic.