Cases of installing Windows from a flash drive
When is the best and most convenient time to reinstall the system from a flash drive? Yes, almost always. As mentioned above, the time has passed when recording an operating system (OS) on CDs and DVDs was relevant. Recording at minimum speed, only through specialized utilities - how familiar this is to many. All this is a thing of the past, and it is only advisable in cases where the BIOS refuses to boot from a flash drive due to its characteristics or the “curvature of the user’s hands.” For example, in some older Gigabyte motherboards, loading is not very convenient and clear, and some prefer to boot from a blank without “dancing with a tambourine” using the old proven method. In other cases, the first place, of course, is the Flash drive. The advantages are obvious and there is no point in describing them.
Let's sum it up
To install Windows 10 from a flash drive, you must first write the operating system image onto the media using any convenient program. Then, set the boot priority in the BIOS and once again make sure that all important documents are copied to an external hard drive or to a directory on a separate hard drive. The installation process and subsequent configuration can take from half an hour to several hours; The license key can be entered either directly during installation or after it is completed.
Where to get ISO distribution of Windows 10
It’s no secret that there are a lot of “repacks” of Windows 10 on the Internet, in particular on torrent trackers, but today we’re not talking about them. Anyone can download the “castrated” assembly at their own peril and risk, but here the instructions cover the use of original images from Microsoft.
The easiest and most reliable way to find them is to use a proprietary utility from the operating system developers themselves. The utility is small, and is called appropriately: “Media Creation Tool” (or “ Installation Media Creation Tool ”). You can find this program by going to https://www.microsoft.com/ru-ru/software-download/windows10:
After which we will all need to accept the agreement to install the software, which we are all accustomed to.
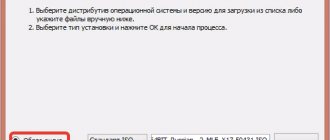
In the “What do you want to do?” step. Perhaps comments are unnecessary.
This is where it is important to indicate that we need the ISO file for further work.
The final step is to indicate the required bit depth of the system, its language and release. Afterwards, all you have to do is click “Next” and select a location to save the future image.
Image received! You can move on to the next step.
Booting from a flash drive via BIOS or BootMenu
In order for a computer or laptop to see the installation flash drive when turned on, you need to put it in first place as a bootloader. This can be done in two ways: through BIOS or BootMenu settings. BootMenu - The easiest and fastest way that even a novice user can handle. We will take him as an example.
For those who want to put the flash drive first in the BIOS.
Step 1 . If you pulled it out, insert the created Windows 10 installation flash drive into the USB port of your computer or laptop. Restart your PC and when it boots you will see what you need to click. In my case, BootMenu is the F11 , press it continuously until the boot loader selection window appears. You may need to restart your PC a couple of times to see and remember the button.
You may have another button, look for the word Boot Menu and the button associated with that line. Usually this is F12, F11, F2 or F8.
Step 2 . When you see the BootMenu for selecting a boot loader, select your installation USB flash drive with Windows 10. After selection, I advise you to immediately press F1 so that the flash drive starts reading. You will see the message “Press any key to boot from CD or DVD” and press F1 at intervals of 1 second. This is not always required.
How to make a bootable USB flash drive for Windows 10
Of course, it won’t work if you simply copy the image or its contents to a flash drive. Although, in part, this is true. If the motherboard is not very old, then most likely it has a UEFI boot interface. This means that simply copying the contents of the image is quite enough for the computer to “see” the flash drive. You can extract everything you need from the image using any available archiver (usually WinRAR or 7-Zip). Or mount the image into a virtual drive using emulator programs (UltraISO, Daemon Tools and similar programs). A couple of “nuances”: the flash drive must be formatted in the FAT32 file system, and only in it, and, of course, the corresponding option must be enabled in the UEFI interface itself, allowing booting from such a flash drive.
Another option is to turn to Microsoft developer software again. Why not? Moreover, the utility needed is the same one that was used to download the original image - “Installation Media Creation Tool”.
As you might have guessed, at the media selection step we simply select the first item.
Further comments are probably unnecessary.
After this, file recording will begin, requiring only to wait a certain time.
Let's not ignore owners of old computers. Previously, as you know, there was no UEFI, and everything was managed by the BIOS. Many people still have such machines as their main workstations - and this is normal. You can install Windows 10 from a flash drive on them too.
As a rule, in such cases it is most advisable to use the Rufus . It is free and familiar to many. Suitable for owners of old BIOS and boards with UEFI.
In both cases there will be a FAT32 file system, “Quick Format” is the default here, let it remain that way. Particular attention should be paid to the sections “Partition Scheme” and “Target System”. For partitions, owners of old boards with BIOS should select “MBR for PCs with BIOS or UEFI-CSM”, and those with UEFI should select “GPT for computers with UEFI”. There’s probably no need to explain where and how to select the image and the required drive; the program is already very simple and understandable in itself. There is no need to touch the remaining settings; after clicking “START” everything will be ready, installing Windows 10 is now possible.
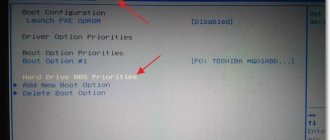
When everything is ready, there is one more nuance left for older boards - find the boot menu in the BIOS, set the boot priority for the drive and you can install the system. For each motherboard, these menus are called a little differently, and their location varies, but everyone has something similar with “Boot” or “Boot Priority”, you just have to carefully delve into the settings. For a USB storage device, “USB-HDD” is what you need.
Starting a computer from a flash drive
To reinstall Windows 10 from a flash drive, you need to boot from the installation drive. Depending on the input and output utility you are using, the setup instructions will vary.
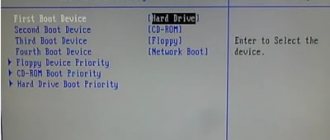
BIOS setup
Entering the BIOS is carried out at the stage of computer startup, when information about the hardware appears. You must press a hotkey, which differs depending on the model of your computer or laptop. The most common are F9, F8, Del, F12, F11 and Esc.
There are two main types of input and output utilities: Award and AMI, the rest are modifications. To set the launch priority to Award, after entering the BIOS you must:
- Go to the Advanced BIOS Features section.
- Select Hard Disk Boot Priority and press Enter.
- In the menu that appears, move the name of the flash drive to the first position.
- Return to the home screen, select Save & Exit Setup.
In the BIOS AMI version, setting the startup priority is as follows:
- Go to the Boot tab.
- Select Hard Disk Drives.
- Select the line 1st Drive, press Enter.
- In the menu that appears, select the name of the USB drive.
- Press F10 and confirm the action.
UEFI setup
It is possible to boot into UEFI using the same keys as the BIOS. After launching using the mouse cursor, you need to drag the flash drive to the first position in the Boot Priority section. Settings are saved when exiting UEFI.
Once you've configured your startup, you can begin installing or reinstalling Windows 10.
Windows 10 installation process step by step
There's almost nothing new here. Not much has changed in the installation program since Windows 7, but why not touch on this topic too.
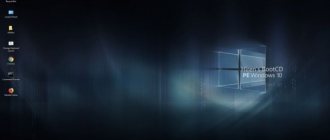
After connecting the drive, we reboot and wait for the message “Press any key to boot from CD or DVD”, press anything, and this starts the installation process.
Languages, time formats, layouts - nothing unusual.
Afterwards, a window will appear with one single “Install” button.
Activation window. Everything is simple here: if Windows 10 was purchased, you need to enter the product key, but if not, “I don’t have a product key.”
Bit depth. Lately, the 64-bit Windows 10 Pro system has been the most popular, but here it comes down to taste and color.
Then a window will appear with the license terms, the now standard condition of accepting the agreement and so on. As usual, “Accept.” After this, a choice of installation type will appear. Naturally, “Custom”, “Update” is rarely used, and here it is of no use.
Installation location of the operating system. Here it may also be a little different: there may be already created small partitions with the types “Recovery”, “System” and “MSR”. These are system partitions, and we are not interested in them. A section with the “Main” type is just what you need. As a rule, the one on which the old system is now is already selected. This is the partition on drive C (by default), and it is this that needs to be formatted to install a brand new system. Well, if the hard drive is already completely formatted and without partitions, as in this case, it’s okay, creating a new partition of a suitable size will not be difficult. Clicking the Next button will finally begin installing Windows 10.
Usually, even on very old laptops and desktop computers, Windows 10 and all its system files do not take long to install. After installation, the final setup will be performed, preparing various parameters, which, by the way, also takes more than a couple of seconds.
What happens next is something similar to the initial setup of an Android phone or tablet: you need to enter the user's country and keyboard layout.
Now the long-awaited account creation. Here you can create an “Offline Account” that is not tied to Microsoft, but if there is no network connection at the moment, it will be created as such.
Then there will also be an offer to set a PIN code, as well as set up cloud storage - here at your own discretion.
The next step is much more important. This is confidentiality. The same famous surveillance from the creators of the “ten” . You can turn off literally everything for the sake of your anonymity. Unfortunately, even disabling all these parameters will not provide complete relief from telemetry and all sorts of tracking services - it’s better to talk about this in a separate article, but it still provides the lion’s share of benefits.
After clicking "Accept", the final settings will begin, after which you can finally see the desktop.
The system is installed and configured. Nothing too complicated.
Installing Windows 10 on a computer or laptop
After selecting the flash drive as the priority media for starting the computer, the main installer window will appear, in which you need to select the language of the future system and click Next. Then you need to click on the Install button and follow the following instructions:
- Accept the license agreement by checking the box next to the appropriate line.
- At the stage of selecting the installation type, click on the “Custom” item.
- If there are previously created partitions on your hard drive, select each one one by one and click “Delete”, confirm the action by clicking OK.
- Select the line “Unallocated space”, click Create.
- Determine the space allocated for the partition (at least 40 GB) and click on the Next button.
The OS reinstallation will begin, after which the computer will reboot. You will need to configure user data.
Possible errors and problems during the installation process
As you can see, there are no difficult moments in installing the “ten”. However, they still happen, and quite often. The first thing you may encounter is that the computer refuses to boot from the flash drive, or does not see it at all. If the bootable USB flash drive was created correctly, but there is no expected boot, it won’t hurt to thoroughly understand the features of the motherboard. For example, on older Gigabyte boards, at the very beginning of loading and checking the equipment, the launch from the required media is carried out using the F12 key. Also, the BIOS settings on various boards are not entirely clear. Perhaps such downloading is prohibited, or interfering parameters are enabled. All these subtleties need to be learned specifically for your motherboard. On boards with UEFI, such problems occur much less frequently.
The second thing that can happen is a very unexpected and unpleasant moment. The very installation step in which you need to select a partition, format it and use it for the location of the future “ten” sometimes turns into such a surprise:
Fortunately, the problem can be resolved immediately without leaving the installation process. To do this, right here, without closing this window, go to the command line using the key combination “Shift + F10” (sometimes “Shift + F10 + Fn” on laptops). Now you need to enter the commands one by one, after each one, pressing Enter:
- Diskpart to launch the built-in disk utility;
- list disk to open the entire list of available disks;
- select disk N where N is the number of the required disk for installing the future system;
- clean cleans this disk;
- convert mbr conversion;
- create partition primary partition creation;
- active
- format fs=ntfs quick
- assign
- exit
By the way, if you suddenly need to do the opposite, from MBR to GPT, the commands are the same, only in the line instead of “convert mbr” write “convert gpt”.
Rating: 4.9, Votes: 20
Creating a bootable USB flash drive
First of all, prepare an 8 GB USB flash drive and move ALL important files to other drives. Next, download the UltraISO program from the official website. We will use it to record the system. We will also need a Windows 10 image, preferably in ISO format. You can also download it from the Internet.
Download UltraISO, install it and launch it.
The program is paid, but fortunately the trial period will allow you to use it for free for 30 days. To install Windows 10 from a flash drive, we need UltraISO only once.
When you launch UltraISO, click the Trial button.
The flash drive should already be inserted into the computer.
Now in the UltraISO program, click the File – Open menu.
In the window that opens, indicate where the Windows 10 image is located on the computer and click Open.
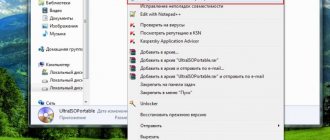
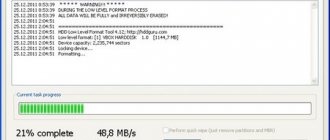
The image files were successfully opened. Now click on the Boot menu – Burn hard disk image.
In the window that opens, it is important to make sure that in the Disk Drive item the flash drive we need is selected. If this is not the case, then select it manually from the drop-down list. There is no need to change anything else. Click the Burn button to begin creating a bootable USB flash drive.
Recommendations on this topic:
How to burn a Windows 10 image to a USB flash drive?
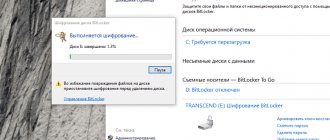
Writing Windows 10 to a flash drive usually lasts about 10 minutes. When finished, close all unnecessary windows and let's move on to the next step.