Greetings! In the age of information technology, no one is surprised by the presence of many gadgets in the house: computers, laptops, tablets, smartphones, etc. And if there may be several voiced gadgets and devices, then, as a rule, there is only one printer.
In most cases, there is no particular point in purchasing several printers for home use, and therefore it would be a good idea to set up shared access on the local network so that you can print the necessary materials from all computers and devices that are available and connected to your home local network.
This material is intended to tell you how to set up a printer for sharing on a local network.
Preliminary setup of a computer with a printer
1) Naturally, you must first have configured the local network (LAN) itself - computers connected through a hub or router must be part of the same workgroup, etc.
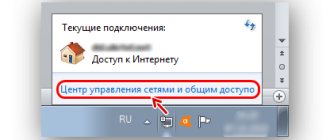
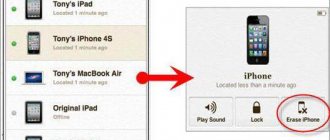
2) Check if other computers connected to your local network are displayed in the system window Network . The posted image shows what it looks like. In this case, of course, in your case the names of computers and their number of computers will be different.
3) On the main computer to which the printer is directly connected, the driver for the printer must be installed and the operation of the printer itself must be configured. In other words, the printer must be ready to print.
We make shared access if the installation was without it
In this case, you need to open it.
- LiveJournal
- Blogger
Fig.1. To do this, open the folder with the equipment through “Start”
- LiveJournal
- Blogger
Fig.2. On the desired device, right-click and open its properties
- Where all the necessary checkboxes are checked.
- LiveJournal
- Blogger
Fig.3. The lower one will allow all computers to see the print queue, so as not to overload memory with tasks
Sharing settings must be checked even after a “clean” installation of the device.
Sharing access to the printer (sharing the printer)
To share a printer, go to the menu Control Panel -> Hardware and Sound -> Devices and Printers .
You can also immediately open this window as follows: press the key combination Win + R , in the Run window that opens, enter control printers, and then click OK .
In this window you will see all the printers installed in the system. Right-click on the printer that you want to share so that you can print to it from other computers on the network. From the context menu that appears, select Printer Properties .
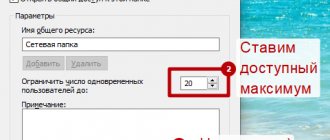
In the printer properties window that opens, switch to the Access . There, first click the Sharing settings , and then check the box next to Sharing this printer .
If you wish, you can also change the printer name that appears on other computers.
Now go to the Security . Here, in the Groups or users block Everyone and allow printing for them by checking the appropriate box. Uncheck the remaining printer control items.
If you are at a loss, then look at the image and make the adjustment exactly.
After making changes, press OK to save the settings.
At this point, sharing the printer can be considered complete. Now let's move on to setting up the computer(s) from which printing will be done.
First of all, connect the printer to the computer using a USB cable into any working port on the computer. When choosing a computer into which the printer will be connected, you must take into account that the computer should not operate at the limit of its capabilities, i.e. be constantly loaded, also keep in mind that the network printer will only be available when the computer is turned on.
After that, on the computer to which we connected the printer (while turning on the printer itself), click “ Start ” - “ Devices and Printers ”.
In the window that opens, click “ Add a printer ”.
In the Add a Printer window, select “ Add a local printer ”.
In the next window, select “ Use an existing port ” and select a USB port.
The next step is to select drivers for the printer; often they are not in the list of drivers; in this case, click “ Have from disk ” and indicate the path where your drivers are located. Printer drivers can be found either on the disk that came with the printer, or on the Internet (if you download drivers from the Internet, keep in mind that they are free and if any site offers to pay for downloading, I recommend finding another site, it is best to download the drivers from the printer manufacturer's website).
The next step will ask you to enter the name of the printer, as it will be called on your computer.
After this, the printer will be installed on your computer, after which a window will appear with the opportunity to configure the printer for sharing. To do this, you must select “ Allow shared access to the printer so that others can use it ,” enter the name of the printer that will be used online and optionally include comments.
After completing all the settings, you will be asked to choose whether to use the default printer (if you are using one printer, leave a checkmark) and to check the printer’s functionality, click the “ Print test page ” button.
After this, you will see the connected printer in the list of devices.
Now it’s time to configure this printer on other computers on the network, but some difficulties may arise here, in particular, when you start connecting this network printer to another computer, a window for entering your login and password will appear.
To avoid this, you need to click on the Network connection .
In the Network and Sharing Center window that opens, click on “ Change additional settings for a share .”
And in the profile you are using (home, work or general) make the necessary changes, namely:
— Enable network discovery;
— Enable file and printer sharing;
— Disable password-protected sharing.
Now let's go to the computer to which we want to connect a shared, network printer. Click “ Start ” - “ Devices and Printers ”.
In the connected devices window, select “ Install a printer ”.
In the next window, select “ Add a network, wireless or Bluetooth printer ”.
The search for a printer on the network will begin, after you see the printer you want to connect, click on it and the “ Next ” button.
While installing the printer, a driver installation window may appear; if the window appears, click “ Install driver ”.
After this, a window for successful installation of the printer will appear, click “ Next ”.
Then, in the next window, you will be able to select the default printer to connect and print a test page to check the operation of the printer.
At this point, setting up a network printer can be considered complete.
I really hope my article helped you! Please share the link with your friends:
Setting up the computer(s) from which you will print
Before directly configuring the remaining computers, the following conditions must be met:
- the computer and the printer connected to it must be turned on and ready to print
- settings must be made as described above
If these conditions are met, then proceed to setup. To do this, open the system window Devices and Printers . The fastest way to do this was discussed above.
Add printer button located there .
The process of searching and adding printers will begin. If in your case several printers and other printing devices are detected, then select yours and click Next .
In the subsequent process of installing the printer and drivers for it into the system, corresponding requests will arise - answer them in the affirmative.
Possible problems you may encounter at this stage:
1) If the printer was not detected during the installation process, try restarting all computers and try again.
2) The printer may not be detected also because different generations of operating systems are used, for example, Windows 7 and Windows 10. And you are guaranteed to encounter a problem if you try to share the printer on a computer with outdated Windows XP for printing with Windows 7, 8, 10 on your local network.
Solution: Stop using Windows XP and install the latest version of Windows on your computer.
3) Even if you are using an operating system of the same generation, but their bitness (how to determine the bitness of a system - 32 or 64 bit?) is different, then problems may also arise - the appropriate driver will be requested.
Solution: try to independently search for drivers with the required bit depth, if none were found and installed by the system automatically.
I hope that you will not encounter these problems and everything will be installed automatically.
When finished, the system will display your printer, to which you can print documents and other materials, as if it were directly connected to your PC.
The only caveat: the computer to which the printer is directly connected must be turned on at the time the data is sent for printing. Otherwise, the documents will not be printed.
How to connect a USB printer over a network
07/23/2014 12:49 Administrator
Let's look at several ways to connect a USB printer over a network
For example, we have 2 or more PCs on the network, and a printer (Canon MF 4400) is connected to one of the PCs (for example, a server) via USB.
The task is to connect this printer to another PC over the network
1. The printer connected to the server must be “shared” (enable sharing); to do this, in the printer properties, select the “Access” tab and check the box next to “Share this printer.”
You also need to check if file and printer sharing is enabled
In Windows XP, “Network Connections” - “Properties” - “Microsoft Networks File and Printer Sharing Service” must be installed and checked
In Windows 7 "Network Center" - "Change advanced sharing settings"
2. On the computer where you need to install a printer over the network, you must select “Devices and Printers” from the “Start” menu (for XP OS “Printers and Faxes”), and in the window that appears, select “Install a printer”
3. Next you need to choose to install a network printer
4. In the “Search for available printers” window, you must select the desired “shared” printer
Important
If the printer is not detected, then you need to click “The printer you want is not in the list” and in the window that appears, select “Select a shared printer by name” and enter the computer name and printer name in the field, for example:
\\server\\Canon MF4400 Series UFRII LT and click “Next”.
5. In the next step, click the “Next” button
6. At the last step of installation, you need to make sure that the printer is installed; to do this, click the “Print test page” button; if the page is printed, then the printer has been installed successfully.
If it doesn’t work out, then you can ask the Chat GPT Neural Network
Setting up sharing services in Windows 10
For your Windows 10 1803 computer to function correctly as a server that shares its folders and printers with other devices on the local network, you need to configure some network services.
We described all these settings and services in detail in the article Computers with Windows 10 are not visible in the network environment.
In Windows settings (on both computers) you need to go to Settings -> Network & Internet -> Your_network_connection (Ethernet or Wi-Fi) -> Change advanced sharing options (Settings > Network & Internet > Ethernet -> Change advanced sharing options).
Then, in the Private network section, enable the options:
- Turn on network discovery
- Turn on file and printer sharing
In the All networks , enable the options:
- Enable sharing to allow network users to read and write files in shared folders
- Disable password protection .
As a rule, password protection on your home network can be disabled, because... you trust all devices on your network). In a small office local network, you can enable password protection. In this case, you can log in when accessing the resources of another computer (using a user account and password from a remote computer), or use the same account with the same password on all computers.
Check the following conditions:
- All computers on your local network use unique names and IP addresses.
- The network type is set to Private network (more about network profiles).
- If there are older versions of Windows (XP, Vista) on your network, for them to work correctly on Windows 10 you will have to enable support for the SMBv1 protocol and also allow network access under a guest account (see article).
- Set the Function Discovery Resource Publication and Provider Host services to start automatically. Otherwise, when accessing network resources, you may receive error 0x80070035.
The same settings must be made on another Windows 10 computer, which will be used as a client and access shared resources over the network.