For what?
At first glance, it may seem strange that someone is trying to run an operating system on a mobile device that, in principle, is not designed to work with a small screen and without a sufficiently precise manipulator (mouse) and keyboard. However, you should not make hasty conclusions. A Linux distribution can give a smartphone owner quite a lot of advantages, including a set of old proven tools such as command line utilities, advanced editors, FTP and SSH servers, networking tools and application development tools. By running Linux without a graphical shell on a smartphone with a hardware keyboard (Motorola Droid, for example), you can use all this quite comfortably on the go without having to leave Android itself. All tools are available at any time, and the smartphone continues to be a smartphone, allowing you to receive calls and listen to Internet radio.
The second argument for installing Linux on a smartphone is the ability to use it as a portable workstation that can be connected to any PC and immediately access the terminal using an SSH/Telnet client or a VNC/RDesktop client. This is by definition better than flash drives with Linux installed, since there is no need, firstly, to reboot the machine, and secondly, to drive data back and forth; the results of your work will be available immediately after you disconnect your smartphone from the computer.
Finally, Linux gives the greatest benefit on tablets, the screen of which allows you to work more or less tolerably in a graphical environment, and the ability to connect a mouse and keyboard via an OTG cable generally gives the chance to turn the tablet into a full-fledged workstation. At the same time, there is no particular difference between installing a Linux distribution on a tablet and a smartphone.
Google Nexus 4
This smartphone from Google does not come with Ubuntu Touch by default and it was released quite a long time ago, but it is officially supported by developers from Canonical. Thus, even smartphones that do not come by default with Ubuntu can work perfectly with this operating system. It is hardly possible to officially buy a Google Nexus anymore, since it has been discontinued, but you can still buy a used model second-hand. For that time, the smartphone had very good characteristics - a quad-core Qualcomm Snapdragon processor, two gigabytes of RAM and an eight-megapixel camera, standard for devices of that time. The smartphone looks just great, the body is made of high-quality materials, and Gorilla Glass 2 is used as a protective glass.
Characteristics
- Processor: Quad-core Qualcomm Snapdragon S4 Pro 1.5 GHz
- GPU: Adreno 320
- Built-in memory: 16 GB
- RAM: 2 GB
- MicroSD support: no
- Main camera: 8 MP
- Front camera: 1.3 MP
- Screen: 4.7, WXGA IPS, 1280 x 768, 320 ppi
- Battery: 2100 mAh
- Dimensions: 133.9 x 68.7 x 9.1 mm
- Weight: 139 g
How?
It's really easy to port Linux to Android and the Linux kernel plays a major role here. Any Linux distribution is a set of applications and libraries that run on top of the Linux kernel, and since Android itself is based on an almost unchanged Linux kernel, these applications and libraries can be run inside the Android environment without any problems. You just need to find a distribution for which there is a port to the ARM platform (don’t forget that 99% of all Android devices run on ARM), install it using an ARM emulator on a virtual hard disk (that is, to a file), drop this file on SD card of the device, open a terminal, mount the image as a loopback device and chroot it inside. All! It's as simple as running an FTP server in a chrooted environment - a simple method that's been proven for decades.
The only stumbling block when you decide to run a Linux distribution inside Android is the graphical environment. While there are no difficulties with accessing the console thanks to the presence of a full-fledged terminal emulator, problems begin with graphical applications - there is no native X server for Android, and it is impossible to run a regular X server within the distribution itself due to fundamental differences in the graphics architecture green robot subsystems. Despite the fact that it uses a standard Linux Framebuffer on top of which you can run an X server, the exclusive right to use it initially belongs to higher-level Android libraries, so you are left with either loading a Linux distribution instead of Android (which is completely impractical) or coming up with workarounds .
Applications for Ubuntu Touch
Ubuntu Touch did not follow the Android path and use virtual machines - although this increases fragmentation (and, as you know, one of the advantages of virtual machines is that applications are not tied to different types of processors), but in the end we get fast-running and lightweight applications - Surprisingly, applications on Ubuntu Touch can be 300 KB in size, and sometimes even less.
Application development for Ubuntu Touch is carried out using Qt and QML - well-known libraries for C++, which provide the opportunity to develop a cross-platform interface. Additionally, you can use the above-mentioned Ubuntu SDK libraries. By the way, the system itself also “drives” on pure “pluses”.
The system does not exclude the possibility of using HTML5 Web applications, which is why the application store is clogged with meaningless nonsense in the form of completely crooked web viewers. Sad but true. Because of this, it’s impossible to call the app store itself anything other than a dump: for every 2-3 useful apps there are a dozen pieces of various rubbish.
In addition to all of the above, Ubuntu Touch has recently supported programs on X11 - that is, real applications from the PC version. However, Canonical has not yet officially documented this due to the instability of the layer. However, judging by the latest developments in Ubuntu Touch, it won't be long before we see this innovation in action.
Checking the operation of the necessary modules
Keep in mind that support for loopback devices and ext2/ext3 file systems required to mount the image is not available in all Linux kernels installed on Android smartphones. You can check for support using the lsmod | grep -e loop -e ext2.
Enthusiasts got out of this situation by using a simple method of “remotely” connecting to the desktop using any VNC client available for Android. Inside the chroot environment, the Xvnc X server runs and all applications run under its control. The user just has to install the VNC client, enter the local address - and voila, a full-fledged desktop appears on the screen.
The only bottleneck when using Remote Desktop is performance. Even when working locally, VNC cannot provide the proper level of power, which would be enough for smooth scrolling or moving windows without lag. It has not yet been possible to solve this problem; projects to develop a native X server that would use the Android graphics subsystem are still very crude and cannot be used to run full-fledged graphical environments. However, no one forbids using them; for example, X Server from Darkside Technologies Pty Ltd (goo.gl/ap3uD) is quite suitable for running simple software.
Initially, Linux for Android existed only in the form of an image with an already installed system, as well as explanatory instructions on how to connect and use this image. Then scripts appeared that automated the process of connecting the image and starting Linux, but they also required some brain work. Finally, recently there have been installers available on Google Play (for example, goo.gl/RSA1j), which to some extent automate the process of launching the distribution, although, in essence, this is still the same installation guide, but interactive, with direct links to downloading images and scripts.
Alternative options
I already mentioned above that the Linux distribution can be loaded instead of Android, thanks to which it will be possible to use Framebuffer for direct access to the video adapter and significantly speed up the operation of the graphical interface. However, doing this on a smartphone is almost pointless - Linux is unsuitable as the main system on small screens, and it will be impossible to receive calls and use the Internet. But on a tablet Linux will look quite decent.
Typically, the so-called native version of the Linux distribution is installed on a device that initially runs Android as follows. An additional partition is created on the internal NAND drive of the tablet, onto which the Linux distribution is copied. The U-Boot boot loader (used by most tablets) is then configured to use this partition as the boot partition. As a result, the tablet will automatically boot into the Linux system after turning on the power.
To leave the possibility of booting Android, the U-Boot boot loader is reconfigured so that the partition with the Linux system is not the main one, but serves as a “recovery partition” (Recovery Mode), accessible by turning on the device with the volume key held down (the same one which is used to flash the device and perform various recovery operations). This way you can get a dual-boot device: Android by default and a Linux distribution when booted into recovery mode. Recovery Mode itself remains accessible only with the help of special tools.
If the NAND memory is not enough to accommodate a full-fledged Linux system, parts of it (usually the /usr partition) are moved to an image or partition on an SD card. By the way, the ext2 partition on the memory card can also be used to install Linux running in a chroot environment.
Installing a native Linux distribution is more difficult than installing one running in a chroot environment, but it's worth it if you have a tablet and an OTG cable with which you can connect a keyboard and mouse.
Practical lesson
As I already said, only distributions ported to the ARM architecture are suitable for running Android. First of all, these are Ubuntu and Debian, and the first, for obvious reasons, is of much greater interest among robotics. You can also install Gentoo and several specialized distributions, such as Backtrack. Let's consider the most typical case, that is, installing Ubuntu according to the standard scheme, without using any automated installers or anything else.
BackTrack running on a tablet
Other articles in the issue:
Hacker #164. Iron colander
- Contents of the issue
- Subscription to "Hacker"
First, we need a hard disk image with the distribution installed. You can create it yourself using the QEMU emulator, however, due to the fact that the installation procedure is absolutely standard and typical, I will not describe it, but will simply direct you to the address goo.gl/9nvBi. Here is an archive with an image on which Ubuntu 12.04 with the LXDE graphical environment is preinstalled (it would be unwise to run Unity/Gnome on a phone/tablet). The archive should be unpacked and the ubuntu.img file should be placed on the memory card.
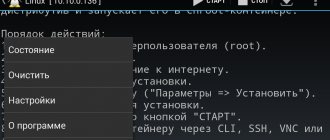
Next, you need to mount the image and chroot it into the distribution environment. To do this, you need root rights, firmware with support for block loopback devices, and busybox installed (search the Market for “busybox installer”; CyanogenMod has it by default). Sequencing:
- Open the terminal emulator in Android (if not, you can install Terminal Emulator from the Market) .
Or we connect the smartphone/tablet to the computer and access the terminal using adb: $ cd path-to-Android-SDK/platform-tools $ sudo ./adb shell Don’t forget that the debugging mode in this case must be enabled: “Settings” -> For developers -> Debugging Android." - We get root rights: $ su
- We create a block loopback device, connect a disk image to it and mount it: # mknod /dev/block/loop255 b 7 255 # mount -o remount,rw / # mkdir /mnt/ubuntu # mount -o loop,noatime -t ext2 \ /sdcard/ubuntu.img /mnt/ubuntu
The contents of the image should appear in the /sdcard/ubuntu directory. Check that this is the case. - We connect all the virtual file systems necessary for the distribution to work: # mount -t proc proc /mnt/ubuntu/proc # mount -t sysfs sysfs /mnt/ubuntu/sys # mount -o bind /dev /mnt/ubuntu/dev
- We configure it so that you can get full access to the Network from the chroot environment: # sysctl -w net.ipv4.ip_forward=1 # echo “nameserver 8.8.8.8” > /mnt/ubuntu/etc/resolv.conf # echo “nameserver 8.8.4.4" >> /mnt/ubuntu/etc/resolv.conf # echo "127.0.0.1 localhost" > /mnt/ubuntu/etc/hosts
- Let's go to the chroot environment: # chroot /mnt/ubuntu
Actually, this is where the installation ends. Now you can launch console software, update the system, start network services and do almost everything that can be done with a regular desktop Linux system, not forgetting, of course, that some software that directly interacts with hardware and various specialized pseudo-devices will not work. Also, do not forget that virtual FS should be unmounted after completion of work.
Now we need to install and run the Xvnc X server, which exports display and input devices using the VNC protocol. TightVNCserver is already in the presented image and is even configured, but so that you can better understand the process and be able to solve any problems that arise, I will describe in detail the process of installing and launching it.
- Update and install TightVNCserver: # apt-get update # apt-get install tightvncserver
- Create a file /root/.vnc/xstartup and write the following into it: #!/bin/sh xrdb $HOME/.Xresources xsetroot -solid gray export XKL_XMODMAP_DISABLE=1 icewm & lxsession
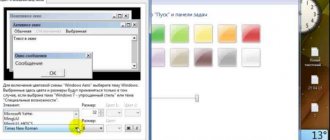
The third command is needed here to fix problems that may arise due to the physical absence of a keyboard on the device. - We launch Xvnc using the vncserver wrapper with root rights: # export USER=root # vncserver -geometry 1024×800
As a result of executing the last command, a request for a password to access the VNC server will be displayed on the screen, it is better to specify something simple like “123 " You can set virtually any resolution, but it is better if it matches the physical resolution of the device screen. - Install the AndroidVNC application on your smartphone, launch it, specify the IP address and port 5901, and connect. The LXDE desktop should appear on your screen.
In order not to bother with manually entering all the commands, you can use the ubuntu.sh script, located here: goo.gl/xSpK4. Just put it and the ubuntu.img image in the ubuntu directory on the SD card and run the script with the command sh ubuntu.sh, and after 5-10 seconds connect to the desktop using AndroidVNC. Keep in mind that the script mounts the image to the /data/local/mnt directory.
AndroidVNC - connect to the desktop
A stunning gallery for your digital life.
Gallery is a stylish native Ubuntu app that lets you organize and share your photos. An excellent example of engineering and design thought. One app works on phone, tablet and PC and is equally beautiful and useful in any environment. You can create albums, Ubuntu will help organize access by date or according to your criteria. All your photos are available in your cloud and therefore on all your devices, including iOS, Android, Windows. Share with one touch!
Installing Gentoo on an ext2 partition
So, we installed Ubuntu using an image with a file system and tricks with a loopback device and a chroot environment. This turned out to be easy to do, and with the use of scripts it is generally very easy, but what if we go further and install a more hardcore distribution, and not using images, but on a dedicated ext2 partition on the memory card? This way we can solve the problem of some firmware and kernels without support for loopback devices and, moreover, we can enjoy a normal distribution installed according to all the rules.
The Ubuntu for Android project in action
Let's take Gentoo as an experimental system. To install it on an ext2 partition, we need a memory card with a capacity of at least 2 GB and a rooted smartphone with busybox installed. The sequence of actions is as follows.
- We make a backup of the data from the memory card and create an additional partition on it, with a capacity of at least two gigabytes . This can be done using any disk partitioning program, but keep in mind that if you want to continue to use the SD card for its intended purpose, then you should create a FAT32 partition at the beginning of the card, so that it becomes the first one, and an additional partition for installing the distribution should be the second one.
- Format the SD card partitions: $ sudo mkfs.vfat /dev/sdc1 $ sudo mkfs.ext2 /dev/sdc2
- We take the phone, go to “Settings -> About phone” and look at what processor is installed. Next, go to the page goo.gl/PRfux and download stage3 for the desired architecture, for example stage3 for ARM v7 is in the current-stage3-armv7a directory.
- We mount the ext2 partition of the memory card on the computer and unpack the contents of the resulting archive into it: $ sudo mount /dev/sdc2 /mnt $ sudo tar -xxpf stage3-*.bz2 -C /mnt
Immediately edit the configs and everything you need, to your taste , including editing /etc/resolv.conf according to the example from the previous section. - We launch the terminal emulator (or run the “adb shell”), mount everything we need and go to chroot (almost the same as in the case of Ubuntu): # mount -o remount,rw / # mkdir /mnt/gentoo # mount /dev/ block/mmcblk0p2 /mnt/gentoo # mount -t proc proc /mnt/ubuntu/proc # mount -t sysfs sysfs /mnt/ubuntu/sys # mount -o bind /dev /mnt/ubuntu/dev # sysctl -w net. ipv4.ip_forward=1 # chroot /mnt/gentoo
Access to the desktop is done in the same way as in Ubuntu, except that now you have to build a bunch of software directly on the phone :). However, you can set up an environment for cross-compilation on your computer, but this is a topic for a separate article.
Ubuntu on Galaxy Tab 10.1
Native installation
Having launched Ubuntu using a VNC server, you will notice the slowness of its operation, which is associated with the VNC protocol overhead for transmitting images “over the network”. To avoid this problem, you can install Ubuntu as the main system next to Android so that it can use the video adapter directly. Unfortunately, there is no universal way to do this. Each device is unique in its own way, including different partition tables of the NAND memory on which it is installed, various devices and drivers for their operation.
Native X server for Android
Fortunately, the process of installing the native version of the distribution is well described for many devices in Russian-language forums, so finding instructions will not be difficult. However, it is worth immediately paying attention to several features of this type of installation:
- Separate or main NAND partition. The Linux distribution can be installed either in a pre-created partition in NAND memory or in the main boot partition. In the first case, the firmware developer usually leaves the option of loading Android using a special script or by loading a Linux distribution in recovery mode; in the second, it will be installed instead of Android, and to return the ability to boot the robot, you will have to reflash the device again.
- Dual boot capability. If the Linux distribution is installed on a separate partition, the developer can leave the option to boot Android. However, you should immediately pay attention to how this download occurs: using recovery mode or a script launched from a regular computer. Still, the second method will be inconvenient on the road.
- Hardware support. The original Linux kernel of the Android firmware already includes all the necessary drivers that may be needed for the operation of a full-fledged Linux system, but not all Linux firmwares will start everything by itself. Problems often arise with the Wi-Fi adapter and the touch screen, which does not respond adequately to touch. Therefore, before installing the firmware, you should carefully read about possible complications.
In any case, be prepared for the fact that during the installation of the Linux distribution all your data will be destroyed. There is no way without this.
Starting Ubuntu using the startup script
The final
Based on what is stated in the section Prerequisites for closing Ubuntu mobile version projects , we can summarize the article as follows:
- Due to the “gallop across Europe” approach, Canonical never released anything more or less worthy of attention for mobile devices.
- Due to the cessation of Canonical's support for projects, groups of enthusiasts are often unable to cope with the tasks that could bring the distribution into the competitive OS segment.
- Commercial offers on the mobile industry market are always more complete, supported, and have a huge number of applications for all occasions.
- The mobile version of Ubuntu is only suitable for use by a true fan of desktop Ubuntu, and then only as a toy.
Although, we cannot rule out the fact that debit will somehow converge with credit, and Canonical will find the truly right direction of development, there will be investors, and mobile phone manufacturers will tenaciously grasp the capabilities of the new OS.
At this stage of development, the mobile version of Ubuntu cannot compare with the success of the desktop version.
On the other hand, what can you expect from products whose development is based on the pure enthusiasm of the developers? Ubuntu itself, one might say, turned out that way - solely thanks to the support of the community. Perhaps, if everyone stubbornly installs the Ubuntu mobile OS for themselves, contributing in every possible way to its development, then things would get off the ground. Do OSes such as KDE Plasma 5, MeeGo, Mer and Tizen exist and are being developed? Now, if Canonical changed their approach...
What's next
A Linux distribution installed next to the original Android system can become a very convenient working tool, but at the moment “Linux inside Android” is considered more of a toy and a way to show off to friends than a serious solution. I am sure that soon, when a full-fledged implementation of the Wayland graphical server appears for Android, the situation will begin to change and we will see distributions with an interface adapted for small screens, as well as full-fledged Linux applications distributed in the form of regular APK packages. Also, do not forget about the “Ubuntu for Android” project - within its framework, work is underway on an official port of Ubuntu for Android, which will allow you to use your smartphone as a portable system unit connected to any monitor.
Other Linux smartphones
PinePhone Braveheart Edition and UBports Community Edition are not the only smartphones with Linux support. In July 2020, CNews reported on the capabilities of the Purism Librem 5 smartphone based on the Debian distribution with the GNOME Shell, adapted for touch displays.
Purism Librem 5 is positioned as one of the most secure smartphones in the world - it is equipped with three hardware breaker buttons that turn off all communication modules along with cameras and microphone. The smartphone is not much more powerful than the PinePhone Braveheart Edition (3 GB of RAM, 32 GB of internal memory, 3500 mAh battery, screen resolution and processor parameters are identical), but it costs not $150, but $650 (40 thousand rubles).
In January 2020, the premium industrial smartphone MIG S6 debuted, authored by the Russian company Mobile Inform Group. The device was created for use in extreme conditions, and you can install the Russian Linux distribution on it - Astra Linux. MIG S6 is available for order on the manufacturer’s website, but if at the time of the announcement it cost 69.4 thousand rubles, then on April 3, 2020 its price was already 79.9 thousand rubles.
- Energy complex: video surveillance to improve security and automate business processes
- Short link