How to change the computer name in Windows 7
Performing these actions is not difficult and is done quite quickly. It is worth noting that for this you need to have administrator rights .
In addition, the use of Cyrillic characters and special characters is not provided. To rename a PC running Windows 7 you need to:
- Click on “ Start ” and right-click on the “ Computer ” section;
- As a result, a context menu will open, at the bottom of which you need to click on the “Properties»;
- the corresponding section “ Control Panel ” will appear on the screen, where you need to go to “ Advanced system settings ”;
- here you need to open the “ Computer name ” tab and find the “ Change ” button;
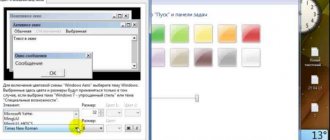
- After this, a window called “ Changing computer or domain name ” will appear, where you need to enter a new name in the input field.
The use of Latin characters and hyphens is allowed Russian letters and other special characters should be avoided. The new name will become active the next time you turn on the device.
Properties of the system
It's easy to change the system name of your computer or laptop.
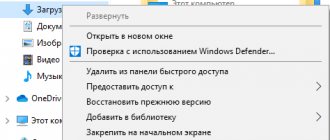
- Open the properties of the “My Computer” object through its context menu.
If the directory icon is located on the desktop, it is not necessary to expand this drop-down menu.
This window is also called in another way.
- Open the “Control Panel”.
- Click “System” if the elements are displayed as icons.
- Otherwise, click on the “System, Security” link.
- In the window where basic system information is displayed, click “Change settings”.
To gain access to the dialog in which a new network name for the computer is specified, you must have administrator privileges.
The first two steps can be replaced by running the command “sysdm.cpl” in the command interpreter window (launched by the combination Win + R.
- In the window that appears, click “Change...”.
Another window will open. There you can already enter a new computer name.
- Write the desired name in the text form.
Please note that it must consist only of Latin characters, hyphens and numbers. Spaces and special characters are not allowed. If you try to do this, an error will appear saying that the name entered is invalid, listing characters that should not be in it.
Entering an underscore and Cyrillic characters in the name of a PC may result in it no longer being visible to other network participants if they do not use a DNS server from Microsoft.
- Press Enter.
- If necessary, we reboot, saving the work progress in all open applications.
Until you do this, the previous network identifier will be used on the computer, and a corresponding notification will appear in its properties.
If you are working under an account with limited rights, you will be asked to confirm the operation or to enter a password.
How to change name in Windows 10
Through system settings
One solution is to use " Options ". To open the required settings window you need to:
- click on “ Start ” on the left side of the taskbar and go to the corresponding section, indicated by a gear;
- select the first item “ System ”;
- At the bottom of the navigation panel on the left, click on the “ About the system ” link;
- then click on “ Rename this PC ” in the right window that opens;
- Enter a new name in the form that opens.
The changes will take effect after is rebooted , of which the user will also be notified by the system.
Through system properties
The settings menu, designed specifically for Windows 10, is not the only place where you can set a new device name. To use more familiar interfaces you need to:
- go to the “ Control Panel ”, which can be opened using the search;
- Next you need to go to the “ System ” section and select “ Advanced system settings ” on the left side of the screen;
- A small window will open where you will need to enter a new value in the “ Computer name ” tab.
- At the bottom of the window there will also be a message stating that the changes will take effect after restarting the PC.
How to Create a Microsoft Account on Windows 10
Renaming via the command line
Changing this parameter is also available through the console. To do this, in cmd with administrator rights, you must enter the command “% computername%” call rename name = “New computer name” . To avoid problems, it is recommended to use only Latin letters. After restarting the device, its name will be changed.
Registry Editor
Below are instructions from which you will learn how to find the computer name in the registry editor and replace it with a new one.
- Execute “regedit” in the search bar or the “Run” window.
- Go to the section with global HKLM parameters.
- In the “SYSTEM” folder, expand the directories: “CurrentControlSet”, “Control”, “ComputerName”.
- Open the “ActiveComputerName” folder.
The “ComputerName” key stores the current name of your machine. We don't touch it under any circumstances. In the “ComputerName” directory there is a similar key with a new name if it has been changed. Otherwise, the values of the entries will be identical.
- Open the parameter editing window in “ComputerName”, for example, through the context menu.
- Set a new name, click “OK” and reboot.
We looked at what a computer name is in "Seven", where to find it and how to change it in different ways: through the command line, the registry editor and system properties.
Change in Windows 8
The override of this parameter in this version of the operating system from Microsoft is somewhat different from previous ones. This state of affairs is caused by a differently constructed interface logic.
To change your name in Windows 8, you will need to follow these steps:
- use the keys Win + I , as a result of which a set of tools will appear on the right side of the screen;
- follow the link “ Change computer settings ”;
- this will allow you to get to “ PC Settings ”, where you should select the first section – “ Computer and devices ”;
- in the new menu that opens, click on “ Computer information ”;
- A special window will appear with an input field for the new name. The old name will be displayed slightly higher:
Now the device will contain in its parameters a different identifier assigned by the user. This is especially useful within a local network, when it becomes obvious who the owner of the device is. You should avoid identical names within the same node, otherwise there is a high probability of network conflicts.
Changing the computer name via cmd
If you use the command line, then change the PC name using it. Simple syntax will be used.
1. Open the Windows 7, 8 command line with elevated rights.
2. Copy the structure into it:
wmic computersystem where name="%computername%" call rename name="new-name"
3. In the “new-name” space, enter the desired name and press enter. After successful renaming, you will see the status of the operation (shown in the image).
4. Use the reboot command from cmd or reboot with the button.
Changing the computer name on Windows 7, 8 is quite simple if you have the appropriate rights. The only annoying thing is that the window where this is done is deeply hidden. It’s easier with cmd if you have somewhere to quickly copy ready-made commands, but entering them manually will take a lot of time.
Changing the PC name
First of all, let's find out which name can be assigned to a computer and which cannot. The PC name can include Latin characters of any register, numbers, and a hyphen. The use of special characters and spaces is excluded. That is, you will not be able to include the following characters in the name:
@ ~ ( ) + = ` ? ^! $ « “ . / , # % & : ; | { } [ ] * №
It is also undesirable to use letters from Cyrillic or other alphabets other than Latin.
In addition, it is important to know that you can successfully complete the procedures described in this article only by logging in as an administrator. Once you have decided what name you will give to your computer, you can proceed to changing the name. There are two ways to do this.
Method 1: “System Properties”
First of all, let's look at the option where the name of the PC changes through the system properties.
- Click "Start". Right-click (RMB) on the panel that appears on the name “Computer”. Select “Properties” from the list that appears.
In the left area of the window that appears, move to the “Advanced options...” position.
- How to change username in Windows 10
In the window that opens, click on the “Computer name” section.
There is also a faster option to go to the PC name editing interface. But to implement it you need to remember the command. Type Win+R and then type:
sysdm.cpl
Click OK.
The already familiar PC properties window will open right in the “Computer name” section. The current device name is displayed opposite the “Full name” value. To replace it with another option, click “Change...”.
The window for editing the PC name will appear. Here in the “Computer name” area, enter any name that you consider necessary, but adhering to the previously stated rules. Then click "OK".
- How to make a username in English. How to change your username in Windows
After this, an information window will be displayed in which it will be recommended to close all open programs and documents before restarting the PC to avoid loss of information. Close all active applications and click “OK”.
You will now be returned to the System Properties window. In its lower area, information will be displayed indicating that the changes will become relevant after restarting the PC, although the new name will already be displayed opposite the “Full name” parameter. A restart is needed so that other network participants can also see the changed name. Click “Apply” and “Close”.
A dialog box will open in which you can choose whether to restart your PC now or later. If you select the first option, the computer will restart immediately, and if you select the second, you can reboot using the standard method after you finish your current work.
After restarting, the computer name will change.
Method 2: "Command Line"
You can also change the name of the PC by entering an expression in the “Command Line”.
- How to change the name of a computer running Windows 7
- Click “Start” and select “All Programs”.
Go to the “Standard” catalog.
Among the list of objects, find the name “Command Line”. Right-click on it and select the option to run as administrator.
The Command Line shell is activated. Enter the command using the pattern:
wmic computersystem where name=”%computername%” call rename name=”new_name_option”
Replace the expression “new_name_option” with the name you see fit, but, again, adhering to the rules stated above. After entering, press Enter.
The rename command will be executed. Close Command Prompt by clicking the standard close button.
Next, as in the previous method, to completely complete the task we need to restart the PC. Now you have to do it manually. Click “Start” and click on the triangular icon to the right of “Shut down.” Select the “Restart” option from the list that appears. The computer will restart, and its name will finally be changed to the option you assigned.
Lesson: Opening the Command Line in Windows 7
As we found out, you can change the computer name in Windows 7 in two ways: through the “System Properties” window and using the “Command Line” interface. These methods are completely equivalent and the user decides which one is more convenient for him to use. The main requirement is to perform all operations as a system administrator. In addition, you need to remember the rules for creating the correct name. We are glad that we were able to help you solve the problem. Describe what didn't work for you. Our specialists will try to answer as quickly as possible.