Linux Mint is one of the most popular Linux distributions. Optimal for beginners, convenient, beautiful and contains everything you need. This guide takes a detailed look at the Linux Mint installation process. We discuss how to install Linux Mint on a blank disk, how to create partitions, and also how to install Linux Mint next to Windows.
This guide can also be used to install other Linux distributions, since the installation of most Linux distributions is similar.
Linux Mint comes in three editions, which differ in their desktop environment:
- Linux Mint Cinnamon
- Linux Mint MATE
- Linux Mint Xfce
Installation of all editions is performed the same way. This guide covers installing Linux Mint Cinnamon. If you have never used Linux before, you can start with Linux Mint Cinnamon.
How to install Linux Mint
Installing Linux Mint is quite simple. You download the distribution image (a file with the .iso extension), write it to a flash drive or disk, and boot from the flash drive (disk) into the Live system. Inside the Live system, run the installer and follow the installer's instructions. Installation is relatively quick.
The most important step at the installation stage is disk partitioning or selecting a disk (disk partition) on which the system will be installed. If you are installing the system next to Windows, then you need to be careful not to accidentally format an existing disk partition (if there is one) on which important data is located. Below we walk you through the disk partitioning process step by step, so don't worry.
Before starting the installation, I recommend reading this manual first so you have an idea of what you'll be doing.
Installing Ubuntu from a USB flash drive
To install Linux from a flash drive, you need to start the flash drive when the computer accesses the specified device.
Important! The instructions describe the Legacy installation process, not UEFI.
- Restart your PC.
- When passing the POST test (at the moment the motherboard logo or text about testing computer components appears), click the button to select the primary device to boot. Most often, this is F11 or F12 (depending on the BIOS model).
Advice! The required button is written on the screen below during the POST test.Alternative option: enter BIOS → in the Boot section, select “USB-HDD” as the primary boot device.
- Use the arrows to select the USB flash drive from Linux → “Enter”.
- While the window with the keyboard icon is displayed, press any button on its physical counterpart.
- Select the installation language “Russian” → “Continue”.
- Press "Enter" on the "Install Ubuntu" option.
- Specify the language of the system to be installed → “Continue”.
- Select the desired layout. It will be added after installation along with the English → “Continue”.
- Check the box next to “Download updates” and “Install third-party software” if the Internet connection is active and select “Normal installation” → “Continue”.
- Select the installation type “Other option” for manual marking → “Continue”.
Important! Be careful not to accidentally overwrite another partition.
- Specify the desired drive. If it is empty, click "New partition table...".
- Confirm the action.
- Double-click on the “free space” line or select it → click “+”.
- Create a root directory with the following parameters: "Partition" - 15000, "New Partition Type" - Primary, "Location" - Start, "Use As" - Ext4 Journaled File System, "Mount Point" - / → "OK".
Advice! If you have 6GB+ RAM, then skip to step 16.
- From the remaining free space, create a swap partition, the size of RAM (in megabytes), of Boolean type at the beginning of the space → “OK”.
- In the remaining space, make the mount point /home at the beginning of the space with a boolean type, using Ext4 → "OK".
- Make sure that the bootloader is set to the drive on which the system is being installed → “Install now”.
- Confirm the action.
- Select your time zone by indicating the city closest to you on the map or writing its name in English → “Continue.”
- Create a new user by entering the required information. Specify “Log in automatically” so that you will not be asked for a password when logging in → “Continue”.
- Wait for the installation to complete → “Reboot”.
- Remove the USB flash drive when prompted → “Enter”.
Download Linux Mint image
Download the ISO file containing the Linux Mint distribution image. To do this, go to https://linuxmint.com/download.php and at the bottom of the page from the table, select the version you want to download. Versions are available for 32 and 64 bit processors.
When you click on the appropriate version, a new page will open on which you can select the server closest to you to download or use a torrent file to download.
The image file has a name like: linuxmint-19.1-cinnamon-64bit.iso (may differ depending on the version).
Porteus Linux
This Linux distribution is less than 300 MB in size. Porteus is available in both 32-bit and 64-bit versions. Like Slax, Porteus is also modular. Precompiled modules can be activated or deactivated before booting this Linux distribution. The user can select the default software and select applications like browser, office, etc. Even Skype can be set as the default application. The user has the opportunity to select suitable drivers. Finally, the user can configure the system password and OS boot mode.
Main characteristics:
- Size - 300 MB
- RAM - 256 MB
Installing Linux Mint next to Windows
If you already have Windows installed on your computer and you want to install Linux Mint next to it, then it is advisable to first allocate space on the disk that will be used for Linux Mint. This can be done using standard Windows tools. If you are not installing Linux Mint next to Windows, then proceed to the next step.
Before proceeding with the steps below, as well as further installation of Linux, it is highly recommended that you back up your important data. It is advisable to make a copy on removable media.
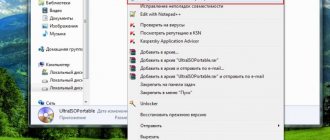
Let's look at how to allocate disk space in Windows for a future installation of Linux Mint. Via the Start
find the
Computer Management
.
A utility for setting up your computer will open. In the list on the left, select Disk Management. A table will appear with a list of disk partitions. In the screenshot below (example for Windows 10) you can see that the main partition is drive C
.
From this we will cut off the space that we will need to install Linux. Click on the C
and right click on it. From the pop-up menu, select Shrink Volume
In the window that opens, in the Size of compressed space field, enter the size that you want to cut off from the disk. For Linux, it is advisable to allocate a minimum of 40-50Gb (although less is possible, depending on how you plan to use the system). I cut off only 20Gb, since this is a test system. Enter the desired size in the field and click the Shrink button.
The result will be the following markup. We see that an unallocated (empty) area of ~20Gb has appeared on the disk. We will use this area to install Linux Mint.
Creating a bootable USB flash drive in Linux
There are several ways to create a bootable USB flash drive. One of the most common methods involves using a terminal. To accomplish this task, you will need the standard “dd” copy utility. More details about this command are written in another article.
The second method involves installing the operating system directly onto a USB drive.
Method 1
Let's look at the basic steps that need to be taken when creating a bootable USB flash drive:
Initially, you need to download the required operating system image in iso format and place it in a convenient folder, for example in distrib.
Most popular images:
- ubuntu
- debian
- Centos
- Mint
- Astra Linux and others.
For example, to download the Ubuntu distribution, you need to go to the official website https://www.ubuntu.com/download/desktop, then click on the “download” button.
Official website in English
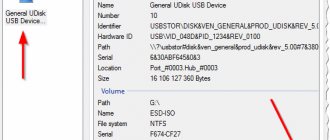
Next, we connect the flash drive to a personal computer, the system determines the name of the drive. Most often it looks like “/dev/sdb2”, but it can often be different. To verify the data received, you will need to examine all connected devices by using the "fdisk" command with the "-l" argument.
fdisk -l
Your monitor screen will show information about the system in which the drive operates (most often ntfs or for new exfat flash drives) and the size of your USB flash drive.
IMPORTANT! The flash drive should be empty; format it if necessary.
Next, you need to start copying the image to the flash drive using the “dd” command.
dd if=/home/ya/distrib/ubuntu.iso of=/dev/sdb2
Here:
- /home/ya/distrib/ubuntu.iso - full path where the image is located.
- /dev/sdb1 - flash drive address.
At the final stage, you simply need to wait for the bootable USB flash drive to be created. It is now ready to use.
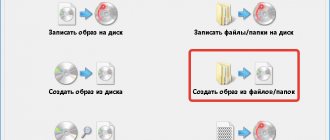
Let's watch a video on how to create a bootable USB flash drive in Linux using a graphical shell.
Method 2 - installation on a USB flash drive
Performing such a procedure is not as difficult as it might seem at first glance. In the Linux OS you can do almost everything that the user needs. There will be no problems installing the system on a flash card.
Let's look at installing Linux OS using Ubuntu as an example.
Initially, you must complete everything that was required during the classic installation. As soon as you reach the section where you can see the disk size, you need to select the “other option” partitioning method.
Next, on your monitor screen, in the window where the disk layout is indicated, two disks that are connected to the system will be presented. One of them will be the hard drive, and the second will be your flash card. Determining the purpose is not difficult. Size varies significantly.
Compared to a classic installation, the process of creating a bootable Ubuntu USB flash drive does not require the use of a swap partition. It is contraindicated here, since it involves frequent overwriting of data. This way you will significantly extend the life of your USB drive.
There is no need to divide the main partitions as with the conventional installation method. It is enough to create a root partition that has an ext2 file system. It is worth giving preference to this particular file system; it will significantly reduce the amount of information written to the disk.
In the future, the installation process is organized in the same way as usual. The bootable USB flash drive will be created successfully, but after all processes are completed, some adjustments will need to be made. The settings are introduced with one main goal - reducing the number of writes to the disk in the future.
It is worth noting that for all kinds of sections it is recommended to add specialized functions called “noatime” and “nodiratime”. It would also be useful to connect folders containing hidden/temporary files to the RAM type. To achieve these goals, you will need to open the “/etc/fstab” file and add certain lines to it.
After that, in all sections that are on the flash drive you are using, the options we described earlier are indicated. For example, initially it was “/dev/sdb0 / ext4 errors=remount-ro 0 1”, and later it will become “/dev/sdb0 / ext4 errors=remount-ro, noatime, nodiratime 0 1”. When there are no plans to install additional programs, the root of the folder is converted to read-only mode.
The methods described above are the simplest, allowing you to create a bootable flash drive in the shortest possible time. With the help of our recommendations, you can easily make a bootable flash card, and you can place a full-fledged Linux operating system on a storage device in literally a matter of minutes.
Loading LiveCD
Now you need to boot from the flash drive (disk) you created. To do this, you need to set the BIOS/UEFI settings of your computer to boot from external media. To do this, you need to restart your computer and open the BIOS. On different computers, you can access the BIOS in different ways.
On modern computers that use UEFI mode, to enter the BIOS/UEFI you need to hold down a special key when turning on the computer. The key may be different for different manufacturers. Typically this is: F2, Del, F10, Esc, F11 or F3.
On older computers that use a classic BIOS (legacy BIOS), to enter the BIOS you need to press a special key when the computer boots at the very beginning, when the motherboard logo appears. The key may be different for different motherboards. Usually this is one of the keys: Del, F1, F2, F8, F10 or some other, or even a key combination. Details: Setting up the BIOS to boot from a CD/DVD or USB drive
Example of BIOS setup for booting from a USB flash drive:
Save the BIOS settings and reboot the computer. Don't forget to connect the flash drive to your computer first.
The download from the flash drive will begin. A window with a timer will appear. You can press any key or wait until the timer ends.
The boot menu will appear. You need to select the first item - Start Linux Mint to start loading the Live system.
In some cases, the boot menu may look like this:
conclusions
It turned out to be not at all difficult to write Linux Mint to a flash drive, just follow the instructions. And if you mark up a persistent partition when creating a LiveUSB, then when booting from such a flash drive you can save OS settings and user files, and install additional programs. To Russify the OS, a few clicks are also enough, because Mint is a friendly and easy-to-use system that natively supports the Russian language.
Related posts:
- How to update Linux Mint 17.3 to 18
July 7, 2016
- Optimizing Linux Mint
June 29, 2017
- Installing Skype on Linux Mint
January 23, 2018
- How to Install Programs in Linux Mint
April 3, 2018
Disk selection and disk partitioning
Selecting a disk and partitioning the disk is the most important installation step, which usually causes difficulties for beginners. At this step, you need to choose which disk or disk partition to install Linux Mint on. And also, if required, partition the disk yourself, that is, create the necessary disk partitions on which the system will be installed.
A few words about disk partitions for Linux
Before we move on to disk partitioning, just a few words about why Linux needs any partitions at all.
Any disk can be divided into several partitions. Partitions can be of different sizes, have different file systems and different purposes. For example, when Windows and Linux are used on the same computer, different partitions are created for them on the disk.
If you already have Windows installed, then you already have several partitions created on the disk, or in the simplest case there may be only one partition. But usually this is at least three partitions: an EFI partition, a recovery partition of about 500Mb in size, and a partition allocated for drive C
.
Any Linux system (not just Linux Mint) has a certain directory structure. Linux can be installed not on one disk partition, but on several. In this case, each partition is used for specific purposes (for a specific system directory).
For example, a user can create the following partitions:
| EFI | EFI partition. This section must be created for computers running in UEFI mode. If you already have Windows installed on your computer (working in UEFI mode), then the EFI partition should already exist and you do not need to create it. |
| / | Root partition. This is the main partition, which contains all the system directories, except those located on other partitions. |
| /home | Home section. This is the section where user data is located. It is in the /home partition that the user creates his personal files. If we draw a distant analogy with Windows, then the /home partition is something like the Users directory in Windows . Each Linux user has his own personal directory in the /home directory, for example, /home/vasya, in which he creates his files. |
| swap | Swap partition. Used by the system if there is not enough RAM. Previously, it was usually always created, but now, instead of a swap partition, a swap file is more often used, so we will not create it. |
| /boot | Boot section. This section houses the GRUB boot loader, which boots the system, and other components that are required to start the system. This section is usually used for more, let's say, advanced installations. When you plan to configure RAID, full disk encryption, and so on. |
For the simplest Linux installation, it is enough to create one root partition “/” (not counting the EFI partition).
But sometimes it is useful to create another /home
chapter.
If you create /home
partition, then user data will be placed on a separate partition.
And if, for example, you need to reinstall the system, then during the reinstallation you will be able to use the existing /home
partition with your data (but not format it), and your data will remain intact (if you are not sure what you are doing, then back up everything create equally).
Below, when manually partitioning the disk, we will create partitions: root “/”, /home
and for computers running in UEFI mode, also an EFI partition, if it has not yet been created.
The following are the options for installing Linux Mint (they are marked in different colors so you don't get confused):
- Installing the system on a “clean” disk (automatic creation of partitions). This option is worth choosing if you are dedicating a separate disk for Linux Mint and do not plan to create partitions yourself. In this case, the installer usually creates only one root partition and one EFI partition (for UEFI mode).
- Automatic installation of Linux Mint next to Windows. The Linux Mint installer will detect that you already have Windows installed and will offer to create disk partitions automatically.
- Independent disk partitioning (creating partitions), as well as disk partitioning when installing Linux Mint next to Windows . In this case, the user himself creates the desired sections.
Installation on a blank disk (full disk formatting)
This is the simplest case - for Linux Mint you allocate a separate disk, which will be automatically formatted, and on which the installer will automatically create the required partitions. For this installation option, select Erase disk and install Linux Mint and click Install Now.
The following warning will appear. From this warning you can see that 2 partitions will be created on the disk: an ESP (EFI) partition and one root partition.
For systems with a classic BIOS, the ESP (EFI) partition is not created, that is, only the root partition will be created.
Automatic installation of Linux Mint next to Windows
If you already have Windows installed, the installer will detect this and offer you to install Linux Mint next to Windows. In this case, the installer will automatically shrink the partition on which Windows is installed and create a root partition for Linux. Let's look at how to do this. Select Install Linux Mint next to Windows Boot Manager.
The following window will appear. In it you must indicate how much space you plan to cut off from the partition on which Windows is installed in order to use this space for Linux. To do this, move the separator left or right with the mouse. In my case, on a test system for Linux Mint, I allocate 15.1Gb. When everything is ready, click the Install Now button.
The following warning will appear. Think again whether you did everything correctly and whether you backed up your data. If yes, then click Continue.
Another warning will appear. It shows that the installer will create one root partition and format it with the ext4 file system. Click Continue.
Self-partitioning of the disk (creating partitions)
Now let's look at how to create disk partitions ourselves. To do this, select Other option and click Continue.
A utility for creating disk partitions will open. It presents a table with disks and disk partitions.
If you have a blank disk with no partitions, you will see the following window. Your disk is designated as /dev/sda
, it is presented in the list of sections. If you have several disks connected to your computer, they will also be displayed in the list and will have the names /dev/sdb, /dev/sdc, and so on.
If you install Linux next to Windows, the list of partitions will look something like this. At the bottom of the list we see free space
. This is the location we have allocated for installing Linux. You will also notice that an EFI partition has already been created (it is signed as Windows Boot Manager).
If you have a completely empty disk, you must first create a partition table on it. Click the Create Partition Table button. The partition table may already exist on the disk, in which case there is no need to create it. A warning will appear. Click Continue.
The partition table will be created. The installer creates a GPT partition table for computers running in UEFI mode. If UEFI is not used, then, as far as I know, an MBR table is created (for disks up to 3TB). Now we can see the free space on our disk.
We will create three sections:
- EFI partition. It only needs to be created for computers running in UEFI mode. This partition is formatted in the FAT32 file system. It is recommended to specify the EFI partition volume as 512Mb.
- Root "/". It is recommended to allocate at least 30-50Gb for the root partition. File system EXT4.
- /home
section.
For the /home
partition, you can use the rest of the remaining disk space. File system EXT4.
Let's create an EFI partition (if it doesn't exist). This step needs to be completed only if you are using UEFI mode and if you have not already created an EFI partition. In the table, click on the line that says free space and click the button with the plus symbol “+”. A window with the settings of the new section will open. Specify the following settings:
- Size. Specify the partition size in megabytes - 512Mb.
- New partition type: Primary.
- Location of the new section: The beginning of this space.
- Use as: EFI system partition .
If suddenly, during the process of creating partitions, a line of free space of 1Mb in size appears above or below any partition in the table, do not pay much attention to it. This is due to the alignment of partitions on the disk.
Now the partition table will look something like this (this is only if you previously had an empty disk):
Let’s create a root partition “/”. Again, click on the free space row in the table and press the “+” button. Specify the settings:
- Size. Specify the partition size in megabytes. A minimum of 30-50Gb is recommended. I specified only 10Gb, since I am installing a test system.
- New partition type: Primary. If you have a disk with an MBR partition table, then it is better to select Logical.
- Location of the new section: The beginning of this space.
- Use as: Ext4 journaled file system.
- Mount point: /
Let's create /home
chapter.
Click on the free space line and press “+”. Specify the settings:
- Size. Since we plan to use all the remaining free space under the /home
partition, we leave the size that is already specified. - New partition type: Primary. If you have a disk with an MBR partition table, then it is better to select Logical.
- Location of the new section: The beginning of this space.
- Use as: Ext4 journaled file system.
- Mount point: /home
As a result, my list of sections looks like this. Or like this if you install next to Windows.
Also note that there is a drop-down list at the bottom of the window. This is the selection of the drive on which the GRUB boot loader will be installed. To install the bootloader, you specify not a disk partition, but the entire disk. In my case, the bootloader is installed on the /dev/sda drive, on which I install the system, and which is set in the BIOS as bootable.
Review the list of sections carefully again. If you need to change something, you can delete the sections and create them again. In fact, at this step no partitions are physically created on the disk; you are only specifying the settings for now. If everything is ready and you are sure that you did everything correctly, then click the Install Now button.
A warning will appear indicating a list of partitions that will be created. Click the Continue button
Step-by-step installation of Ubuntu on a computer as a second or main operating system
In fact, installing Ubuntu on a computer (I’m not talking about its subsequent configuration, installing drivers, etc.) is one of the simplest tasks. Immediately after booting from the flash drive, you will see a prompt to select a language and:
- Launch Ubuntu without installing it on your computer;
- Install Ubuntu.
Select “Install Ubuntu”
We choose the second option, not forgetting to first select Russian (or some other language, if it is more convenient for you).
The next window will be called "Preparing to install Ubuntu". It will ask you to make sure that your computer has enough free space on your hard drive and is connected to the Internet. In many cases, if you do not use a Wi-Fi router at home and use the services of a provider with an L2TP, PPTP or PPPoE connection, the Internet will be disabled at this stage. It's OK. It is needed in order to install all Ubuntu updates and additions from the Internet at the initial stage. But this can be done later. You will also see an option at the bottom that says “Install this third-party software.” It has to do with codecs for MP3 playback and is best noted. The reason why this point is made separately is that the license for this codec is not completely “Free”, and Ubuntu uses only free software.
The next step will require you to select an Ubuntu installation option:
- Next to Windows (in this case, when you turn on the computer, a menu will be shown in which you can choose whether you are going to work in Windows or Linux).
- Replace the existing OS with Ubuntu.
- Another option (represents self-partitioning of the hard drive, for experienced users).
For the purposes of this guide, I'm choosing the most commonly used option - installing a second Ubuntu operating system, leaving Windows 7.
The next window will display the partitions of your hard drive. By moving the separator between them, you can specify how much space you allocate to the Ubuntu partition. It is also possible to partition the disk yourself using the advanced partition editor. However, if you are a novice user, I do not recommend contacting it (I told a couple of friends that it was nothing complicated, they ended up without Windows, although the goal was different).
When you click “Install Now”, you will be shown a warning that new disk partitions will now be created, and old ones will be resized, and this may take a long time (Depends on how busy the disk is, as well as its fragmentation). Click Continue.
After some time (different for different computers, but usually not for long) you will be asked to select regional standards for Ubuntu - time zone and keyboard layout.
The next step is to create an Ubuntu user and password. There's nothing complicated here. After filling out, click “Continue” and the installation of Ubuntu on your computer begins. You will soon see a message stating that the installation is complete and asking you to restart your computer.
Creating a user
At this step, you need to specify the details of the user who will be created in the system and on whose behalf you will work, and also specify the computer name.
You need to fill in the following fields:
- Your name - enter your name in a free format.
- Your computer name - The computer name (hostname) is used to identify a computer on the network. You can use something like mylaptop
or
vasyapc
.
I specified pingvinushost
. - Username - The username under which you will work in the system. I recommend specifying a not very long name. You can simply indicate your name, for example, vaysa
,
petya
.
I specified pingvinus
. - Password and Repeat Password - You must specify a password that will be used to log in to the system and perform administrative tasks. Be sure to remember or write it down.
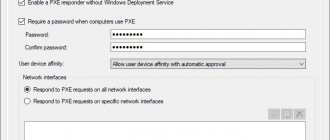
Just below, select Log in automatically if only you plan to use the computer and do not want to enter a password to log in. But I recommend selecting Require a password to log in. You can also set the Encrypt my home folder option. For beginners and most users, this is not necessary. When all the settings are specified, click the Continue button.
Installation process
Now the installation process will finally begin. It may take several minutes. You don't need to do anything, just wait for it to complete.
Installation completed
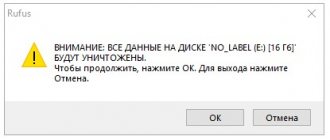
When the installation is complete, a warning will appear. Click the Restart button to restart the computer.
Another warning will appear. Disconnect (remove) the flash drive or disk from the computer and press the Enter key.
The computer will restart and Linux Mint will begin loading.
After installing Linux Mint
If everything goes well, you will be prompted to enter your user password. Enter the password you provided during installation and press Enter.
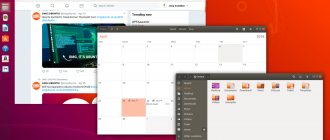
The Linux Mint desktop appears and the Welcome to Linux Mint welcome window opens. To prevent this window from appearing every time you boot, uncheck the box in the lower right corner of this window.
Switching the default keyboard layout is done using the combination Shift+Alt.
If you installed Linux next to Windows, then by default you will boot into Linux. To boot Windows, you need to select the item: Windows Boot Manager (may be called differently) in the Grub boot loader menu when booting your computer.