Configuring PXE roles on the SCCM server for a network installation of Windows
The PXE (Preboot Execution Environment) functionality in modern computers allows you to perform a network installation of an operating system without using any media. In SCCM, its configuration occurs in the distribution point role properties window (you need to select Properties in the context menu) and check the following boxes:
- Enable PXE support for client;
- Allow this distribution point to respond to incoming PXE request;
- Enable unknown computer support;
- Require a password when computers use PXE.
It is also advisable to select Allow user device affinity with automatic approval from the drop-down list.
After enabling these settings, the Windows Deployment Services integrated with SCCM will be installed on the server.
Content
- 1 Loading PXE code
- 2 Launch the OS boot loader
- 3 Loading the operating system
- 4 Literature
- 5 Background information
Article about Booting a computer over a network
Booting a computer over a network is a hardware and software mechanism that ensures loading of the operating environment
over the network without using local media.
Network booting
relies on running a preboot runtime environment (
PXE
).
Typically, booting consists of several stages: first, the PXE code is run, for example from the ROM of the network card; then it downloads the operating environment loader
; The loader ensures the formation of the menu, loading and transfer of control to the executable file of the kernel of the operating environment; and finally, the kernel creates the file system and starts the operating system itself.
Diskless computer booting, which can also be called PXE booting, provides the ability for thin clients to
connecting to
a terminal server
, operating environment installers, performing installation over the network or, in general, creating a menu with
PXE tools
.
Create a customized Windows 10 master image
The next stage is preparing a reference image with Windows 10, which will be installed on other computers. The easiest way is to take a standard computer and install Windows 10 on it. Install the latest security updates, disable unnecessary services, remove built-in applications, install drivers. Customize Windows 10 to suit your needs. This computer does not need to be added to the AD domain.
Launching the OS bootloader
The OS loader is a program that generates a menu and ensures that the kernel of the operating environment is loaded and control is transferred to it. Launching the operating system loader is the second stage of booting a computer over the network.
.
The OS loader can be individual (special) bootloaders or special versions of well-known bootloaders such as:
- special PXE version of the Grub2 grub2pxe
- special PXE version of the Syslinux pxelinux
- iPXE
/
gPXE dedicated PXE bootloaders
The OS loader generates the menu, ensures the selection and loading of the operating system kernel and transfers control to it. An example of the implementation of such a PXE menu is given in the article PXE tools
.
Creating a boot image to capture the Windows 10 reference image
By default, SCCM contains Windows PE images (Windows Preinstallation Environment, these are Boot image x86.wim and Boot image x64.wim), which are necessary to configure the operating system during “capture”.
First you need to add the Boot image x64.wim to your SCCM distribution point. To do this, go to Software Library-> Operation System-> Boot Images, select Distribute Content in the context menu, then distribution point and OK. The color of the state will change from gray to yellow, and finally to green.
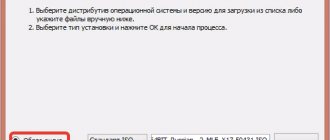
Now you need to create and have boot files to “capture” the reference operating system over the network. To create them, go to Software Library-> Operation System -> Task Sequences and select Create Task Sequence Media from the context menu. The window that appears offers 4 options for creating an image:
- Stand-alone media - creating a stand-alone image for installing the OS (local installation, without using network boot);
- Bootable media – creation of a bootable image, for distribution of which using the Configuration Center infrastructure;
- Capture media – creating a boot image to capture a reference image of a computer;
- Prestaged media - creates a preliminary image for a new hard drive, which includes an image of the operating system. Used for older cards that do not support PXE boot.
Select Capture media and follow the installation wizard prompts. Specify the location to save the iso file, select Boot image x64.wim and distribution point, Next->Next->Close. The process lasts about 1 minute.
Next, the created resulting image for capturing the OS must be connected and launched on the prepared PC (LaunchMedia.cmd file). Specify the location to save the resulting Windows 10 image.
The entire capture process lasts approximately 40 minutes. Upon completion, you receive a reference wim image approximately 4.5 GB in size, which needs to be copied to the SCCM server. Next, you need to add it to the distribution point. To do this, go to Software Library -> Operation Systems -> Operation System Images, select Add Operation System Images in the context menu, and in the settings wizard, specify the UNC path to the storage location of the created wim file with the reference image.
From the context menu, select Distribute Content to copy the image to your SCCM Distribution Point.
Installing Windows 7 over a network using Microsoft Windows AIK
Not long ago I came across a situation that, in principle, does not cause any particular problems for system administrators. There was a need to update the OS on numerous computers of the organization, which in turn nevertheless caused a number of problems, the solutions to which had to be assembled in parts, as well as finishing most of the whole process myself, which is what I actually want to tell you about. These problems were the limitations of having one DVD-ROM drive, one day of free time, as well as about twenty computers on which it was necessary to install Windows 7 with the entire set of necessary drivers, programs, etc. When searching for information on Google on this issue, I did not find anything that would work without errors or work at all. But let's start in order.
Preparing an operating system image
To simplify the preparation of the combat OS, the latest version of Oracle VirtualBox, as well as Windows 7 x64 Professional, were taken as the basis. The first thing you need to do is install and configure Windows 7 on a virtual machine. To do this, during the process of adding a VM, we create two virtual hard disks. One for installing and configuring Windows 7 on it, the second for subsequently saving the image of the configured system on it. You also need to install the Virtualbox guest OS add-on - Virtual Machine Additions and create a shared folder for further copying the created image to a physical machine. After installing all the stuffing on the VM, we move on to the stage of preparing the system using the sysprep
, located in the system root of our VM: %windir%\system32\sysprep\sysprep.exe To prepare the system for creating a customized image, you need to set the parameters to the utility:
- Go to the system welcome window (OOBE) - this mode will be activated the next time the system starts. Starts the computer in Welcome screen mode.
- Check the “Preparing for use” box—prepares the Windows installation before creating the image. The security identifier (SID) is reset, system restore points are reset, and event logs are deleted.
- Shutdown options “Shutdown”—once the utility completes its work, the system will shutdown.
You should not start the OS before saving the system image, since the next time you start the computer, a specialized configuration step begins to work. A new security identifier (SID) is created and the Windows activation clock is reset.
The utility also removes installed drivers. To save them you need to run sysprep
from the command line with the parameter:
/unattend: specifies the path to the answer file. In the answer file, you must specify the PersistAllDeviceInstalls parameter (starting with Windows 8, there is also a DoNotCleanUpNonPresentDevices parameter): true After cleaning, the system will automatically shut down. Let's move on to the next stage.
Installing and configuring Windows AIK + PE
Download and install the Windows Automated Installation Package (AIK) for Windows 7. After running setup.exe, select “Install Windows AIK”. There shouldn't be any problems during installation.
Creating and configuring a Windows PE image
Windows PE
is a preinstallation environment used to prepare for OS installation.
Using Windows PE, we will capture the system volume into a wim image using the imagex
and save it to another partition of the hard drive. In this case, we consider creating a disk with a 64-bit version of Windows PE. If you are creating a disk with a 32-bit version of Windows PE, you will need to change the architecture (amd64 to x86) in all commands.
From the Start menu, run All Programs > Microsoft Windows AIK > Deployment Tools Command Prompt
- all subsequent commands will be entered into this command line window.
Requires running as administrator. Copying Windows PE image files copype.cmd amd64 d:\winpe_image To change the copied Windows PE image, you need to connect it with the command dism /Mount-Wim /WimFile:d:\winpe_image\winpe.wim /index:1 /MountDir:d:\winpe_image \mount Now that we have mounted the image, we can install packages into it and add our own files. imagex
utility to our image .
xcopy “%ProgramFiles%\Windows AIK\Tools\amd64\imagex.exe” d:\winpe_image\iso\ You can also immediately prepare a list of exceptions - files and folders that will not be included in the saved image. Create a Wimscript.ini file in any text editor and specify in it the files and folders that you want to exclude from the image. The Wimscript.ini file is located in the same folder as imegex. By default, imagex
uses the following exceptions: [ExclusionList] \$ntfs.log \hiberfil.sys \pagefile.sys "\System Volume Information" \RECYCLER \Windows\CSC [CompressionExclusionList] *.mp3 *.zip *.cab \WINDOWS\ inf\*.pnf Now you need to save the image with the command: dism /unmount-Wim /MountDir:d:\winpe_image\mount /Commit All preparatory work was carried out with the winpe.wim file, and for the Windows PE boot disk the boot.wim file is used, located in the winpe_x86\ISO\sources folder. Therefore, it is necessary to replace the boot.wim file with the winpe.wim file, while renaming it. xcopy /yd:\winpe_image\winpe.wim d:\winpe_image\ISO\sources\boot.wim To create an image, run the command: oscdimg -n -bd:\winpe_image\etfsboot.com d:\winpe_image\ISO d:\winpe_image \winpe_image.iso
Creating a Windows 7 image
It is necessary to save the image of our OS using the imagex
.
We boot into the VM from the winpe_image.iso image that we created earlier. After a successful download, a command line window opens in front of us, and this is where we will work. Capture and save the image using one command: F:\imagex.exe /capture E: D:\install.wim “Windows 7 x64” /compress maximum /capture E:
- capture partition E:
D:\install.wim
- location and name saved WIM file.
“Windows 7 x64”
is the name of the image.
The name must be enclosed in quotation marks. /compress maximum
- compression type for files in the image (optional).
/compress
parameter allows values of
maximum
(maximum compression),
fast
(fast compression), and
none
(no compression). If the parameter is not specified, fast compression is used. Maximum compression reduces the image size, but capture takes longer than fast compression. The speed of image decompression is practically independent of the compression type. All you have to do is wait 20-30 minutes and the image will be ready.
After saving the image on the second disk of the virtual machine, for further work it needs to be transferred to the physical OS. We start the virtual machine again and complete the Windows installation that was interrupted at the OOBE stage. If you have already installed Virtual Machine Additions, then you now need to copy the file from the virtual machine to the physical one using a shared folder, which can be specified in the virtual machine settings.
Setting up a Windows 7 boot image
At this stage, run the “Deployment Tools Command Line” again and copy the Windows PE image files: copype.cmd amd64 d:\winpe Mount the image imagex /mountrw winpe.wim 1 mount Windows PE is mounted and in the d:\winpe folder you can find the file winpe.wim.
Configuring autorun Windows installation.
To avoid manually creating a virtual disk and running the installation manually, you can edit the startnet.cmd and startnet2.cmd files.
They are located d:\winpe\mount\windows\system32. startnet.cmd
wpeinit %windir%\system32\startnet2.cmd startnet2.cmd chcp 1251 netsh interface ip set address name="Local Area Connection" source=dhcp chcp 866 pause net use z: \\192.168.0.1\win7 /user:install install cd /d Z:\sources setup.exe The net use command connects to a computer with IP address 192.168.0.1 (our server computer) to a shared directory named win7 with install user rights and the same password. You can create the user we need with the following command in cmd net user install install /add /passwordchg:no Follow the following instructions:
- On the server computer we create a root directory for downloading (for me it is d:\win7\), and in it the boot folder.
- We share the win7 folder, that is, we give general access to it to all users.
- Copy the entire sources folder from the Windows 7 installation disk to d:\win7.
- Replace the install.wim file in the d:\win7\sources directory with the file that was copied earlier from the virtual machine (ready-made Windows 7 image)
Now you need to copy additional files to install Windows 7. Mount the WinPE image: imagex /mountrw winpe.wim 1 mount Copy: xcopy d:\winpe\mount\windows\boot\pxe\pxeboot.n12 d:\win7 xcopy d:\winpe \mount\windows\boot\pxe\bootmgr.exe d:\win7 xcopy d:\winpe\winpe.wim d:\win7\boot xcopy d:\winpe\iso\boot\boot.sdi d:\win7\boot Unmount the image with the command: imagex.exe /unmount d:\winpe\mount
Next, you need to create a BCD (boot configuration data) file in the d:\win7\boot directory. To simplify this process, we will use the createbcd.cmd file. Create a file d:\winpe\createbcd.cmd and enter into it:
bcdedit -createstore %1\BCD bcdedit -store %1\BCD -create {ramdiskoptions} /d “Ramdisk options” bcdedit -store %1\BCD -set {ramdiskoptions} ramdisksdidevice boot bcdedit -store %1\BCD -set {ramdiskoptions } ramdisksdipath \boot\boot.sdi for /F "tokens=2 delims={}" %%i in ('bcdedit -store %1\BCD -create /d "MyWinPE Boot Image" /application osloader') do set guid ={%%i} bcdedit -store %1\BCD -set %guid% systemroot \Windows bcdedit -store %1\BCD -set %guid% detecthal Yes bcdedit -store %1\BCD -set %guid% winpe Yes bcdedit -store %1\BCD -set %guid% osdevice ramdisk=[boot]\Boot\winpe.wim,{ramdiskoptions} bcdedit -store %1\BCD -set %guid% device ramdisk=[boot]\Boot\winpe. wim,{ramdiskoptions} bcdedit -store %1\BCD -create {bootmgr} /d "Windows BootManager" bcdedit -store %1\BCD -set {bootmgr} timeout 30 bcdedit -store %1\BCD -set {bootmgr} displayorder %guid% Run the command with administrator rights: createbcd.cmd d:\win7\boot If you have problems with drivers, you can also add them in the “Command line of deployment tools”: Mounting an image to add drivers dism / mount-wim /wimfile:winpe.wim /index:1 /mountdir:mount To integrate drivers into an already mounted image, use the command dism /image:mount /add-driver /driver:< After all work with the image is completed, it must be unmounted dism /unmount-wim /mountdir:mount /commit
Setting up TFTP and DHCP server
To create these servers you need to download the TFTPD32 program.
The task of the DHCP server is to provide information to the remote computer about a free IP address, network mask, as well as the name of the downloaded file and the address of the TFTP server where this file is located. The task of the TFTP server is to ensure the transfer of files necessary for downloading to a remote computer. We launch the program and first select the d:\win7 folder, and a little lower - the IP of the network card. In my case the computer has IP 192.168.0.1. Go to the settings (Settings button in the middle at the bottom) and gradually fill in the tabs:
- GLOBAL tab - check only the boxes next to TFTP Server, DHCP Server and Enable IPv6.
- TFTP tab - select the folder d:\win7.
- TFTP Security - Standard.
- TFTP configuration - leave it as is.
- Advanced TFTP Options - the following checkboxes should be checked: Option negotiation, Show Process bar and Translate Unix file names.
- DHCP Tab
- IP pool starting address specifies from which IP address to start issuing addresses. In my example, the issuance of IP addresses will start from 192.168.0.2.
- Size of pool specifies the number of IP addresses that will be dynamically allocated. I set the value to 30.
- Boot File tells the remote computer the name of the file to use as the bootloader. Set the value to pxeboot.n12.
- Mask, specifies the network mask. In our case it is 255.255.255.0. We leave the remaining parameter values at default.
- Ping address before assignment - uncheck the box (if you have a computer-to-computer connection without switches and routers).
Now you need to enable booting from the network card in the BIOS and boot from it. After this, an IP address will be obtained via DHCP and pxeboot.n12 will be executed - which will launch Windows PE from the winpe.wim file. Immediately after loading Windows PE, the win7 directory will be automatically mounted and the installation will start from there. Next, the installation proceeds exactly the same as from a disk.
Creating a Task Sequence for a Windows network installation
The SCCM task sequence provides step-by-step execution of commands and actions to install the OS, software, drivers, and updates. To create it, go to Software Library -> Operation System -> Task Sequences and select Create Task Sequence in the context menu. In the window that appears, the wizard offers several options:
- Install an existing image package – creating a task queue for an existing wim image;
- Build and capture a reference operating system image – capture a reference image;
- Create a new custom task sequence – creating a new empty task (configuration is done manually). There is no default task queue.
Since you already have a reference wim image, select the first item. Next, the wizard offers to make a large number of settings step by step, but you can specify only the minimum necessary parameters:
- Specify the name of the task and select the boot PXE image Boot image x64.wim;
- Select the Windows 10 reference image you created earlier;
- Set the local administrator password (you can automatically change the password after adding the computer to the domain using LAPS);
- Configure the settings for automatically joining an AD domain by selecting the domain and OU in which you want to place the new computer;
- Select the user under which you will add to the domain;
- At the State Migration step, clear all the checkboxes (Capture user settings and files, Capture network settings, Capture Microsoft Windows settings).
The task sequence has been created, but it requires you to adjust and review it. Go to Task Sequence editing mode by selecting Edit from the context menu.
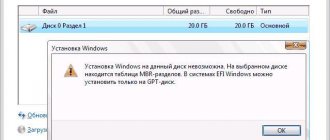
The tree on the right contains a list of actions that will automatically be performed on the computer when installing Windows 10 over a network. At steps 2 and 3, the parameters for partitioning disks into partitions are specified. In step 2, you can delete all default hard drive partitions if you are not using them to restore Windows. Next, create a new partition, name it “C:”, select the Primary type, set a fixed size to 50 GB (or another size) by selecting the Use specific size option. Select that the disk needs to be formatted in the NTFS file system (Quick format checkbox).
Next, create a second disk, name it “D”, select the Primary type. To make it take up all the remaining unallocated space, select the Use a percentage of remaining free space option, select the value 100, the NTFS file system and the Quick format checkbox.
This way, you will have a C: drive created with a fixed size, and all the remaining space will go to the D: drive (if the hard drive is large, you can split it into more partitions), which will be formatted automatically.
The 3rd step in our example is removed because We have computers with BIOS. For computers with UEFI, you need to configure disk partitions in point 3.
At the next step - Apply Operating System - you need to select a partition to install the operating system. Check for the presence of a reference image, and at the bottom of the window select install Windows on:
- Specific disk and partition - specific disk number and partition number;
- Specific logical drive letter – specified logical drive;
- Logical drive letter stored in a variable —
For example, there will be a second item and drive C:.
Check the remaining steps for errors. At the Apply Windows Settings step, you need to specify a license key (you can specify a KMS activation key), administrator password and time zone. Domain (network) settings are adjusted in Apply Network Settings, and Apply Device Drivers allows you to add drivers to the installation.
Next, the new task needs to be published. To do this, in the context menu, select the Deploy item, in the first step of the wizard, select the All Unknown Computers device collection, in the 2nd step, set the Purpose parameter to Available (Available - available for selection, Required - forced installation), in the Make available to the following parameter, select Configuration manager clients, media and PXE, the remaining steps can be left as default.
The SCCM All Unknown Computers collection includes all computers about which there is no information in SCCM. These PCs may be new or not connected to a domain.
This completes the main steps for preparing the reference image and configuring SCCM.
Direct installation.
So, let's go. First of all, it is vital to download a kit for auto-installing the Windows of your choice - the AIK kit. By the way, there is no need to check the authenticity of Windows, and this is somehow parallel to the program itself. After this, we must make a choice - which operating system is best to install? Omitting the “jewelry” details, we note that the process of initially setting up servers and, in fact, your machine is the same for all versions of Windows. Only the installation process will differ, about which many songs have already been sung.
In short, I propose to consider the contents of the “installing Windows over a network” section using 7 as an example. This is a classic of our days, so let's start with this example. Download or buy a distribution kit of this program. In further actions, we must use a machine with a properly working system.
We will need to work a little with the virtual image of 7 , so find the appropriate program that can quickly mount ISO images. One could use Daemon Tools, about which legends are still made and songs are sung. However, for our purposes we will have to use Windows® (AIK). Mount the 7 image in this program, after which you need to start the installation process itself. By the way, the main AIK working window looks like this.
Open the Start menu. In it you will need to find the Microsoft Windows AIK section, and next to it - “Command Prompt” or something like that. Basically, you have to select this menu and then the console will appear on the display.
In a new window with a bunch of strange symbols and Egyptian hieroglyphs, enter a couple of simple commands. As an example, I will show a template according to which you, dear users, can then do this with your machines. So, let's enter:
copype.cmdx86 x:\winpe
Then press ENTER and enter the following line:
imagex /mountrw winpe.wim 1 mount.
The letter X here denotes the name of any local disk on your computer.
The mounted system image is now located in the X:\winpe\mont directory. This image is called Winpe.win.
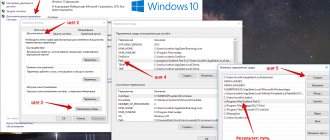
Installing Windows over a network in the next step will require you to disable the mechanism for manually mapping a network drive and launch the application with your own fingers. In short, this problem can be solved after a small adjustment to the startnet.cmd command file. If you do not know how to use search in Explorer, then look for this file in the x:winpe\mont\windows\system32 folder. Open this file and examine its “internals”, they should look like this:
Now let's translate all this into Russian. The computer from which system files will start loading will have the following address - 192.168.1.1. If you find another address there, then enter this value. Then, connect another computer to the working machine, where Windows will be installed over the network. We will need to create a user in advance to use this system with the name install and the password install. We use the command:
Net user install /add/passwordchg:no
The installation of Windows over the network continues, now you need to unmount the systems by entering the command:
Imagex.exe /unmount/commit mount
Next, grab the mouse, after which we create a folder from which the distribution files will be copied over the network. Let’s not worry about the name, let’s take the name x:\upload. Inside the network folder you need to insert another directory called boot. This is where the download files for installation via the network will be located.
Now we take and copy the sources folder from the disk on which Windows 7 is stored into the created directory. After this, we go to the console again and fill the boot folder, simultaneously processing the network boot files. They must be executable. Enter the following in the console:
1) imagex.exe /mount x:\winpe\winpe.wim 1 x:\winpe\mount. 2) xcopy /ey x:\winpe\mount\windows\boot\pxe x:\upload 3) xcopy /iy x:\winpe\mount\windows\boot\fonts x:\upload\boot\fonts 4) copy / yx:\winpe\ISO\boot\boot.sdi x:\upload\boot 5) imagex.exe /unmount d:\winpe\mount
Next, copy the winpe.win image to the x:\upload\boot folder. You can use the command:
copy /yd:\winpe\winpe.wind:seven\boot.
Access to the folder with the image must be open to all users. Now we are creating a storage for boot parameters; the createbcd.cmd script is attached to help, which should be in the x:\winpe\ folder. The contents of this script should look like this:
At this point, installing Windows over the network is not yet complete; only half the job is done. To continue, enter the command:
Createbcd.cmdx:\upload\boot
After this, we set up the operation of the tftpd32 program. Detailed instructions are presented in the following figures:
Adding drivers to the Windows boot image
The steps discussed above will be sufficient to automatically install Windows 10 on new modern miniature system units or all-in-one computers. In the case of classic system units and external network cards, downloading over the network may not work. In this case, it is necessary to add drivers for the network adapter models used to the boot image.
To add a driver to the SCCM site database, go to Software Library -> Operation Systems -> Drivers and select Import Driver in the context menu. Next, the wizard will help you fill in the required fields. You need a UNC path to the directory with the driver and set the Specify the option for duplicate drivers parameter to Do not import the driver.
Then you need to go to the properties of the boot image Boot image x64.wim and add drivers on the Drivers tab.
Preparing PXElinux
Next, we look for the latest archive on the website www.kernel.org. Download it to your computer and unpack it into a separate directory. We need several files from this archive. At first I thought about making my own archive so that people wouldn’t have to look for what they needed from the archive, but then I changed my mind, because in a few months or years a new version will be released, and mine will be hopelessly outdated. After copying the files, you will need to create a directory pxelinux.cfg
and it contains two empty files:
default
and
graphics.conf
. The result will be a structure like this.
- /pxelinux.cfg/
- /pxelinux.cfg/default
- /pxelinux.cfg/graphics.conf
- /ldlinux.c32
- /libcom32.c32
- /libutil.c32
- /pxelinux.0
- /vesamenu.c32
We create a main menu with a choice of actions. The menu consists of only two items. The first is responsible for loading the operating system from the first partition of the hard drive. The second one is responsible for loading the operating system installer, which we will prepare a little later. Booting from a local disk works after ten seconds of inactivity. This is done for computers that have forgotten to disable network loading and users are working on them.
File default
:
DEFAULT vesamenu.c32 PROMPT 0 MENU INCLUDE pxelinux.cfg/graphics.conf TIMEOUT 100 MENU TITLE WWW.ORCINUS.RU PXE Boot menu LABEL bootlocal menu label Boot Local HDD menu default localboot 0x80 LABEL wininstall64 menu label Installing MS Windows OS (x64) kernel pxeboot.0
The second file contains information about setting up the graphics mode. This happened historically due to the fact that on my “combat” server I use an extensive bootloader menu and this is quite justified. In small projects there is no need for nested menus, but if you have been following my articles, you have read the article about PXE booting computers. Perhaps this approach will become a necessary everyday tool for you.
graphics.conf file
:
MENU MARGIN 10 MENU ROWS 16 MENU TABMSGROW 21 MENU TIMEOUTROW 26 MENU COLOR BORDER 30;44 #00000000 #00000000 none MENU COLOR SCROLLBAR 30;44 #00000000 #00000000 none MENU COLOR TITLE 0 #ffffffff #000 00000 none MENU COLOR SEL 30;47 #40000000 #20ffffff MENU BACKGROUND background.png NOESCAPE 0 ALLOWOPTIONS 0
With this, the basis of the project has already been created. PXE boots, you can even make a menu, copy a couple of utilities and enjoy the benefits of remote boot. But our goal is to install Windows operating systems over the network. And here lies a very interesting system of pitfalls. In PXElinux, you can mount a disk image and boot from it. For example, this is how I load recovery discs and LiveCDs with antivirus programs. But TFTP has a huge problem with transferring large files. Additionally, everything is aggravated by the fact that before launching the image, the entire image file is copied into RAM. For the sake of experimentation, I ran the Windows 10 installation on several computers using the standard method. On one computer the download took about three hours, and on the others it crashed after about an hour. And this is only copying the image into memory. Also, the computer must have more memory installed than the image occupies. If you try to load a five gigabyte image, you'll need about six gigabytes of memory. And in office computers you rarely see more than four gigabytes. Naturally, this is not a working option at all.
Setting up PXE on computers
On computers that you want to deploy over the network, you need to enable network boot support in the BIOS. Different motherboard manufacturers will have these settings in different places and have different names. Most likely the name of the network boot parameter should be something like PXE Boot, Network Boot, Network Card.
For example, PXE activation in UEFI models HP Pro 3520 and HP Pro 6300 occurs in the Security -> Network Boot section by setting the Enable parameter.
Now everything is ready to start. When the PC boots up, its parameters are determined (POST). The DHCP server then assigns an IP address to the network card. To start the network installation of the OS, you need to press the F12 key for 5 seconds (means PXE connection), after which SCCM copies the boot files to the PC (in HP models you need to press F9, you can additionally select the Network Controller item to boot over the network).
Next, a window appears for selecting a task, after which the phased deployment of the operating system begins, that is, the execution of those actions that are specified in your Task Sequence. The installation progress is monitored using an indicator. In about 20 minutes, your Windows 10 reference image will be installed on your new PC and your computer will be joined to the domain. If you run a network installation of Windows with SCCM on 10-20 computers at the same time, the installation time may increase slightly.
Once the OS installation is complete, the computer is named by default MININT-<7characters>, for example, MININT-5EFG9DR. This can be seen in the SCCM console under Assets and Compliance -> Devices. You can change the computer name to something more memorable, such as BUH-OLGA. To do this, go to Computer Properties -> Change Settings -> Change, specify a new computer name and restart the PC. The changes will soon be reflected in both DNS and SCCM.
Personal blog of Tolik Pankov
Preamble I wrote a lot here about how to run various distributions over the network, however, I did not write how to actually set up a PXE server. I am correcting an annoying omission. The server was running on Slackware 14.2, on other Linux it should be about the same, except that some software will have to be installed. In Slackware, everything except TFTP was already out of the box; all that remained was to configure it.
Directory structure
The PXE server takes up quite a lot of space with all distributions, I had a fairly large /home partition, so in it I created the pxe subdirectory, in which I created two scripts subdirectories, for storing scripts, additional utilities and config backups, and tftp - the future the root of the TFTP server, where I created separate subdirectories for distribution kits (distrib), network loader modules (modules) and boot menu (pxelinux.cfg). In the distrib subdirectory, a separate subdirectory was created for each distribution, if possible. Example directory tree on PasteBin
TFTP
We install a TFTP server, I installed the same one as in the article on which I was based when setting up the server [1], atftp, namely atftp-0.7.1. Installed via sbopkg. A ready-made package just in case
Installed, now let’s create a file /etc/tftpd.rules and write one line in it:
rg\\/
A little explanation
: The network loader, which will be discussed below, contacts the TFTP server on the remote machine to load the main files - Linux distribution kernels, native modules, initialization RAM disk files (initrd[.gz]), ISO image files, floppy disks or hard drives. The /etc/tftpd.rules file and the rg \\ / rule are necessary for the TFTP server to recognize files requested by Windows boot loaders (since Windows uses \ as a path separator, while Linux uses /).
Command to start TFTP server:
in.tftpd -s /home/pxe/tftp —secure -l -v -r blksize -m /etc/tftpd.rules —blocksize 1456 Without the -r blksize parameter, my TFTP was buggy (about which there is a note in [1]) , --blocksize 1456 speeded up loading somewhat. The -s path parameter sets the root directory of the TFTP server (the network bootloader, additional modules and distributions themselves will be located there, so enough space will be required). -v — forces the server to write logs. The rest were taken from [1]
View logs:
TFTP writes logs to /var/log/messages and some messages to /var/log/syslog. Accordingly, the commands: grep tftp /var/log/messages and grep tftp /var/log/syslog
Server stop commands:
pkill in.tftpd sleep 5
Samba
The server itself was available out of the box. For Windows distributions, you need to install Samba. We make basic settings in the file /etc/samba/smb.conf
[global] workgroup = WORKGROUP netbios name = PXE server string = Local PXE interfaces = 10.10.0.120 map to guest = bad user security = USER unix extensions = no wide links = yes follow symlinks = yes log file = /var/log/samba /log.%m max log size = 50 dns proxy = No load printers = no show add printer wizard = no printcap name = /dev/NULL disable spoolss = Yes [printers] comment = All Printers path = /var/spool/samba printable = Yes browseable = No
workgroup - workgroup (change to your own) netbios name - computer name server string - description (visible in “Network Neighborhood” from Windows) interfaces - network interface that the Samba server will listen to. You can set the names of network devices (for example, eth0) or set IP We make access to directories opened in Samba anonymous (without login and password): map to guest = bad user security = USER
The next 3 lines are needed for Samba to support symbolic links. For example, I have Windows 7 and 10 distributions actually located in the FTP server directory, and in the distribution directory there are symbolic links created that are shared in Samba: unix extensions = no wide links = yes follow symlinks = yes
log file - where to write the log max log size - and its maximum size
By default, we disable DNS proxy and access to printers: dns proxy = No load printers = no show add printer wizard = no printcap name = /dev/NULL disable spoolss = Yes
We leave the [printers] section by default (all printer settings are disabled in [global] anyway, and I didn’t have any printers on this server).
To start Samba in Slackware, just give execution rights to the file /etc/rc.d/rc.samba and give the command to start: chmod 744 /etc/rc.d/rc.samba /etc/rc.d/rc.samba start
Stop: /etc/rc.d/rc.samba stopIf you don’t want the Samba server to start when the OS boots, take away execution rights: chmod 644 /etc/rc.d/rc.samba
The balls are described separately for specific distributions in the corresponding notes, a full example of the config on PasteBin
NFS
NFS is needed to run some Linux distributions on a remote machine. See details in the relevant sections dedicated to these distributions.
In Slackware it also came out of the box, and in the config it was necessary to register only specific directories open for access via NFS.
To run NFS, you need to grant execution rights to the following files:
/etc/rc.d/rc.nfsd /etc/rc.d/rc.rpc
chmod 744 /etc/rc.d/rc.nfsd chmod 744 /etc/rc.d/rc.rpc
and start the NFS server: /etc/rc.d/rc.nfsd start
Stopping the NFS server: /etc/rc.d/rc.nfsd stop
If you do not want NFS to automatically rise when the OS boots, take away execution rights: chmod 644 /etc/rc.d/rc.nfsd chmod 644 /etc/rc.d/rc.rpc
Full example NFS config
(changes are made to the /etc/exports file)
DHCP
Network booting is designed so that the BIOS (or EFI) of the target machine transfers control to a special boot loader firmware built into the network card chip. It tries to get an IP via DHCP, and then load the main network bootloader from the machine that issued the IP. In some cases, if there is already another DHCP on the network, this can cause glitches when loading (for more details, see [1], configurations for the server are described there if, for example, there is a CISCO router on the network that distributes IP via DHCP). So, DHCP needs to be configured. Again, I had no problems installing the appropriate software, the DHCP server came with the OS, I just had to configure it. Copy the old config somewhere, I didn’t have DHCP configured before, so the config was empty
Making a config for PXE
For the server to work correctly, it must be saved under the name /etc/dhcpd.conf.
If you do not need the DHCP server to start constantly, but, for example, only while PXE is running, then do this: Start the DHCP server:
echo "Copy DHCP daemon PXE config..." #pxe config must be in current dir. CURDIR=`pwd` cp "$CURDIR/dhcpd.conf" /etc/dhcpd.conf echo "Starting DHCP daemon..." dhcpd sleep 5
Stopping the DHCP server:
echo "Stopping DHCP daemon..." pkill dhcpd sleep 5
echo "Restore DHCP daemon original config file..." #original config must be in current dir. CURDIR=`pwd` cp "$CURDIR/dhcpd.conf.orig" /etc/dhcpd.conf
Useful scripts
Let's combine all the commands for starting the PXE server into one start-pxe script:
#!/bin/bash
echo "Starting TFTP server..." in.tftpd -s /home/pxe/tftp --secure -l -v -r blksize -m /etc/tftpd.rules --blocksize 1456 sleep 5
echo "Copy DHCP daemon PXE config..." #pxe config must be in current dir. CURDIR=`pwd` cp "$CURDIR/dhcpd.conf" /etc/dhcpd.conf echo "Starting DHCP daemon..." dhcpd sleep 5
#winxp samba echo "Starting samba server" chmod 744 /etc/rc.d/rc.samba /etc/rc.d/rc.samba start sleep 5
#NFS for live linux echo "Starting NFS..." chmod 744 /etc/rc.d/rc.nfsd chmod 744 /etc/rc.d/rc.rpc /etc/rc.d/rc.nfsd start sleep 5
echo "Complete!"
And for stop (stop-pxe):
#!/bin/bash
echo "Stopping TFTP server..." pkill in.tftpd sleep 5
echo "Stopping DHCP daemon..." pkill dhcpd sleep 5
echo "Restore DHCP daemon original config file..." #original config must be in current dir. CURDIR=`pwd` cp "$CURDIR/dhcpd.conf.orig" /etc/dhcpd.conf
echo "Stopping samba server" /etc/rc.d/rc.samba stop chmod 644 /etc/rc.d/rc.samba sleep 5
#stop NFS echo "Stopping NFS..." ip netns exec provns /etc/rc.d/rc.nfsd stop chmod 644 /etc/rc.d/rc.nfsd chmod 644 /etc/rc.d/rc.rpc sleep 5
echo "Complete!"
start-pxe
and
stop-pxe
on PasteBin.
SYSLINUX network bootloader
In fact, the SYSLINUX bootloader is a whole complex of bootloaders for all occasions, there is a network bootloader - PXELINUX, a bootloader for ISOLINUX ISO images, and just an OS bootloader from a hard drive. For now we only need the network one. SYSLINUX is a miniature operating system; the bootloader, using special commands written in the boot menu, can perform special functions stored in executable files of a special format - bootloader modules. They usually have a *.c32 extension, plus some special files, for example the memdisk module, which loads ISO, Floppy or HDD images into memory.
Getting the bootloader
: The easiest way to get it is from the official website by downloading a special script. The script will parse the received archive into parts and separately find *.32 modules, memdisk and the pxelinux.0 network loader in the downloaded archive.
#!/bin/bash
SYSLINUXNAME=”syslinux-4.02″ SYSLINUXADDR=”https://www.kernel.org/pub/linux/utils/boot/syslinux/4.xx/$SYSLINUXNAME.tar.gz” #we used this on Habré, let’s leave WORKDIR for now ="/tmp" SERVERDIR="/home/pxe/tftp"
cd $WORKDIR wget $SYSLINUXADDR tar -xf "$SYSLINUXNAME.tar.gz" cd "$SYSLINUXNAME/" find ./ -name "memdisk" -type f|xargs -I {} cp '{}' $SERVERDIR find ./ -name "pxelinux.0″|xargs -I {} cp '{}' $SERVERDIR find ./ -name "*.c32″|xargs -I {} cp '{}' $SERVERDIR
Script on PasteBin
In the original article [1], version 4.02 was used, if you think about using some other one, just change the data in the SYSLINUXNAME and/or SYSLINUXADDR line
Next, we’ll move all the *.c32 and memdisk files to the modules subdirectory (so as not to become an eyesore), and leave the pxelinux.0 network loader in the root directory of the TFTP server.
Test menu
Now we write a minimal test menu and check the system starts. Let's add boot from the first hard drive and reboot the machine to the menu:
The default menu is described in the default file, located in the pxelinux.cfg subdirectory of the PXE server; additional menus called from the main menu are also located there.
Example of a test menu on PasteBin
First, we load a special user interface module modules/menu.c32, which is responsible for loading the text menu interface (suitable for any computer, even the weakest) ui modules/menu.c32
PROMPT 0 - Disables the special command line prompt.
menu title ChaosServer PXE boot menu — menu title.
The following are descriptions of specific menu items:
LABEL bootlocal menu label Boot from first HDD kernel modules/chain.c32 append hd0 0 timeout 11120 LABEL reboot menu label Reboot kernel modules/reboot.c32
The timeout parameter enables the countdown of time until loading a specific menu item. 1 unit after the timeout parameter is 0.1 s.
Description of some SYSLINUX modules
chain.c32 - switches to the next bootloader (grldr, ntldr or simply to the bootloader installed on the HDD partition) reboot.c32 - reboots the computer menu.c32 - when used in the menu, can load additional menus (submenus), or go back/ between menus. Example of use: Loading a menu with Acronis utilities:
LABEL acronis menu label Acronis utilities kernel modules/menu.c32 append pxelinux.cfg/acr
Return to main menu:
LABEL back menu label Back to main menu kernel modules/menu.c32 append pxelinux.cfg/default
memdisk is a special module designed as a Linux pseudo-kernel that can load ISO, HDD or floppy disk images into RAM and transfer further loading to them. Usage example:
LABEL acronis2011 menu label Acronis True Image 2011 kernel modules/memdisk initrd distrib/acr/acronis2011/loader.iso append iso raw Main menu
On PasteBin
Additional utilities and scripts
- createiso - script for creating ISO images - mknetboot.sh (script for Puppy Slacko and preparation for PXE launch of this distribution) - syslinux-install.bash - script for downloading SYSLINUX
All that remains is to fill our PXE server
specific distributions of Windows, Linux and others
(
copy
)
Sources
1. Boot server - like a bootable flash drive, only server and over the network
Copy in PDF Copy in DOC
Download
— atftp 0.7.1 (ready package for Skackware)
—
Configs
—
Menu
—
Scripts
—
Additional utilities
—
PXELINUX modules, bootloader, directory structure
Installing applications on a new computer using SCCM
The next step is installing the necessary applications on the new computer. Programs can be installed as a package (Package) or as an application (Application). Applications are programs that have installation files with the extensions msi, appx, xap, ipa, apk, etc. Application has more possibilities, plus users can also take part in the work. A package is a special container (wrapper) that can include several files (distributions). exe-, vbs-, cmd-, cab-files and others are used. It's easier to configure.
We will not describe in detail the features of program deployments in SCCM, because... This will turn out to be a separate large article. For reference, you can see an example of deploying Office 2020 using SCCM.
After creating software installation packages, you can add them to the Windows 10 deployment task sequence (task sequence)
Here you create the Software Install group, in the Add -> Software -> Install Package menu, add the created software packages.
Loading PXE code
PXE code is a program that creates a pre-boot execution environment. Typically, PXE code starts from the ROM (read-only memory) of the network card. However, a PXE environment using a PXE boot loader
can be launched from any local media.
Running PXE code is the first step in booting a computer over the network
.
Note: Network cards, such as the 3COM 3C905C-TX-M
with built-in BootROM, are currently (almost) not commercially available. This may be due to the abundance of motherboards with built-in network cards and the presence of PXE code already flashed in them. Note: The PXE bootloader can be placed on any physical medium: floppy disk, CD/DVD disk, USB flash drive, hard disk. Please keep in mind that the motherboard's BIOS must support transferring boot control to the selected media with a PXE boot loader.
In general, after executing the PXE code, the operating environment loader is downloaded and control is transferred to it. But some PXE bootloader projects, such as iPXE/gPXE, provide the ability to load the operating environment kernel bypassing the stage of downloading the operating environment bootloader.
Note: Standard PXE firmware provides network boot from
a TFTP server
.
But some PXE boot loader projects. for example iPXE, they can connect and load menus and operating systems from an HTTP server
.
Therefore, TCP/IP, UDP, DHCP/BOOTP, and TFTP/HTTP protocols are used to obtain the bootloader and kernel operating environment, and DHCP and TFTP/HTTP servers must be configured.