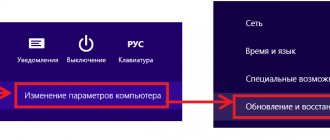
If you periodically install Windows 10 and Windows 7, then this video will be very useful to watch. Since we will consider the option of installing Windows OS without a flash drive and disk, no matter how strange it may sound.
Moreover, if during the installation process you encounter various errors, then this method will also allow you to bypass them.
Actually, the essence of the method is that we connect the user’s hard drive to our work or home computer, forward it to the virtual machine and perform all the necessary settings.
After that, we connect the disk back and the user can already work.
Now we will look at how to do this in practice.
To jump to a specific point in the video tutorial, use the links below:
- What is the essence of this Windows installation method?
- Advantages and disadvantages
- We save all user data
- Creating a new virtual machine
- Transferring a physical hard drive to a virtual machine
- Mounting the installation image
- Setting boot priorities via BIOS
- Installing Windows 10 or 7
- Starting the system in audit mode
- System Setup
- Setting up access to the host system via VMWare Tools
- Quitting audit mode
- What will ultimately happen on the client’s computer?
Advantages and disadvantages of this method:
+ you only need a hard drive , which you can pick up from the client or ask them to bring it to you. If we are talking about a new installation, let’s say it often happens to me when a user wants to upgrade to an SSD hard drive, then he simply transfers money to me, I buy the disk, set everything up, and then connect it to his computer and that’s all J
+ minimum time spent with the client
+ comfortable environment , you can set up in any place convenient for you in a familiar working environment
+ ease of setup , since there is no need to constantly be distracted by another device, everything is done in a separate window of the same operating system you are working on
+ everything you need is already on your work computer (images, software, instructions, tools, etc.), so there is no need to carry it all on a flash drive with limited space and keep them up to date
+ it’s convenient to backup the user’s data (if the work is done on his computer, then sometimes you need to use a flash drive to transfer part of the data, etc.) And here we can transfer everything to our computer and then return it back.
— you will have to activate the software again, or at least check whether the activation has failed. For example, activation of Windows and Office does not fail for me, but with Windows 7 this problem was relevant. Moreover, there are programs whose activation data is stored in the user profile and will have to be activated again. In general, the activation process itself can be performed on the client’s working hardware.
- and you will still have to perform minimal customization of the operating system for the user (setting the Temp folder, the amount of virtual memory, autostart of programs, etc., everything that you usually configure), i.e. It’s not possible to set everything up turnkey. However, if the user is not very wooden, you can ask him to connect the hard drive, create a user and simply send you the data for TeamViewer.
Further installation of Windows XP
So, the installer has started. The first thing it will ask you to do is configure regional settings. There is nothing complicated here. Just correctly determine the time zone in which you live.
After that, select the default language. In this tab, you can also add any other language and assign keys for switching input languages.
After selecting languages, the installer will ask you to enter your computer name, username and password, which you do not need to enter if this is your home computer. You will also need to enter your Windows XP license key, as well as your region and date.
Having completed all these simple steps, you will almost complete the reinstallation. As you can see, reinstalling Windows XP is not that difficult. The computer will restart again and you will be taken to the desktop. So, welcome to the new Windows XP. What to do next? Configure, install drivers and necessary programs. We will definitely talk about this in our other article.
How to reinstall Windows XP? This is exactly the question I was also interested in a few years ago! Most likely, every modern computer user sooner or later needs to reinstall Windows XP.
Constantly installing and uninstalling various programs, downloading new files, surfing the Internet - all this leads to the fact that soon the computer begins to work slowly, many files that we do not understand appear on it, and for some reason there is practically no space on the system disk. left. Constant errors, possibly also viruses, are just annoying!
All these reasons indicate that it is time to reinstall the system. In this lesson I will tell you and show you in pictures how to reinstall Windows XP.
In fact, this is not so difficult; many novice users are scared by the very phrase of reinstalling Windows XP yourself, but I assure you, after trying once, you will no longer have to ask anyone or call a wizard to reinstall the system for you!
Working with user data
If you do not have a new disk, then the task before us is to transfer data from the system partition, install the operating system on it and configure it by installing the latest updates and software.
If the user needs to copy some data from the previous Windows, then we can simply transfer either all the data to the data partition, or the desktop, my documents and downloads folder (usually all data is stored there). You can also ask the user to indicate exactly where the files that are important to him are located.
How to reinstall correctly - preparing to reinstall Windows XP
How to properly reinstall Windows XP on a computer, laptop or netbook? First of all, let's figure out why you need to reinstall Windows XP. This could be viruses, a slow operating system, or general clutter. If you don't have these factors, then perhaps an XP reshuffle is what you need.
But if you still decide to reinstall Windows XP, then we will start by preparing for this procedure. First, we need to decide what we want to get in the end. By the way, we already have a good review article. Again, if your computer was attacked by viruses and you were unable to cope with them, then in this case it makes sense to reinstall Windows XP. Where should you start to reinstall windows xp correctly and without losing important data? That's right, from saving this important data to another logical drive or media. To do this, go through all the system folders in which you have valuable information. This also applies to the desktop and the “My Documents” folder. We advise you to double-check everything, because if you decide to format your hard drive while installing the new Windows XP, then all your data will be lost. Usually this applies to the C drive.
Saved? Go ahead. To reinstall Windows XP, we need an installation disk with a copy of the Windows XP distribution or an installed image of this operating system on a flash drive. Actually, where to install the operating system from is up to you - do whatever is more convenient.
After reinstallation, you will also need your computer's device drivers. Therefore, we advise you to take care of this in advance and select the necessary drivers. Usually you can find them on the disk that comes with the motherboard or on the Internet, on the official websites of the manufacturers of your computer or laptop components.
Finally, we recommend reinstalling Windows XP SP3, since this is the latest edition from Microsoft and contains the maximum security patches. If you have Windows XP SP2, or even worse, SP1, then it is better to immediately reinstall it to SP3.
So, let's move on to reinstalling Windows XP. As we wrote earlier, there are two options from which you can reinstall the system:
- Reinstalling Windows XP from a USB flash drive
- Reinstalling Windows XP from disk
The first option provides the ability to reinstall windows xp without a disk, but from a flash drive on which the system image is recorded. Especially if you have a netbook or laptop without a DVD drive. Fortunately, it is always possible to download a program that writes an image to a flash drive. The second is less labor intensive if you already have a copy of the operating system on disk.
So, the following is a step-by-step reinstallation of windows xp in pictures. Insert a flash drive or disk. Reboot your laptop or computer and go into the BIOS. To do this, to get into the BIOS as soon as the computer starts to reboot, periodically press the Del
or
F1
(there is also
F2
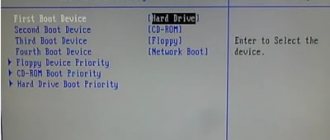
- everyone’s computers are different, and accordingly their BIOS is different). We look for the “First Boot Device” menu item and put the flash drive or DVD drive first in the boot.
Exit the BIOS saving the settings. This can be done by selecting “Save and Exit” in the appropriate tab or by pressing F10
, and then
Enter
.
If you have correctly selected the media from which you want to boot and saved the settings in the BIOS, then after closing it, the computer will reboot, the installation of Windows XP will begin, at the beginning of which you will need to accept the license agreement ( F8
).
The installer will then ask if you would like to restore your operating system. Here you need to press the Esc
and continue reinstalling Windows XP. The following screen will appear:
As you can see, you need to press the Enter
to continue with the installation.
After this, we get to the screen for working with hard disk partitions. Here you need to be very careful and delete exactly the partition on which you want to reinstall Windows XP. This is done with the
keys D
and
L. The main thing is not to delete another logical drive (for example, the one on which you saved your data).
Having finished (in a good way) with the partitions, we move on to the next stage of reinstallation. Division of a logical partition. In general, you can do it simpler and leave the amount of disk space that you had. But if for some reason you want to change the size of the logical disk, then it is not difficult to do. You can see everything in the picture:
After we have decided on the partition size for Windows XP, we move on to the next reinstallation point - formatting. Everything is simple here. Select “Quick format NTFS” and complete the installation of the operating system by rebooting the computer.
After rebooting, the Windows XP installer will start.
Creating a virtual machine to configure the system
When all the necessary data has been transferred, we can begin to reinstall the operating system. As I said, for this we will need a virtual machine, in my case it will be VMWare ( File \ New virtual machine \ Selective \ Next \ I will install the operating system later \ Windows 10 x 64 \ Any path, since this machine takes up a lot of space will not, since we will not use a hard disk file, but directly a physical hard disk to work \ BIOS \ Processors \ RAM \ Bridge, replication of the state of a physical network connection \ Next \ SATA \ Use a physical disk \ Select a physical disk) .
Programs for quickly creating a virtual drive
If you are using OS Windows XP/7, then you should select a program to work with virtual optical drives. The list below shows the most popular programs and their features:
- Daemon Tools. One of the very first and most popular programs on the market of similar software. The program is shareware - Lite and Premium versions are available to users. Working with existing virtual disks is organized in a very convenient way; the user can quickly create and delete disks. In the free version of the software, it is possible to create only 4 images at a time. The program supports iso, img, dmg, vdf, mds, mdf formats.
- The program is distinguished by its ability to create a large number of virtual disks simultaneously. There is also the ability to record to a removable CD. With this program, users will be able to store all their disks virtually in case the physical disk gets damaged. It is also possible to download images from the Internet and mount them for further installation using this program.
- Software that works exclusively with ISO images. Images are mounted quickly and execution time is kept to a minimum. It is possible to convert images of other formats directly to ISO.
- The utility is free and available for download. The function of creating disk images yourself is available.
- Virtual CloneDrive. A program with a minimum of settings, high speed of execution and disk reading. The OS recognizes the created disk as a physical CD/DVD-ROM.
Forwarding a physical disk to a virtual machine
And here we need to be very careful, since we need to select our drive ( This computer\RMB\Management\Disk Management\Look at the drive number\ PhysicalDriver 0\Use individual partitions to check whether that drive is actually selected or not \Back\Use the entire drive so that everything looks similar to the installation on a real machine \Next\Done )
Method No. 2: Reinstalling the system using the Recovery program
For those who are looking for a hint on the question of how to reinstall Windows without a disk if the system also does not boot, the long-awaited answer will be the Recovery utility built into the laptop software. It is presented on almost all modern laptops, although under different names. For example, Toshiba laptops have Recovery Wizard installed, Samsung laptops have Recovery Solution, Hewlett Packard laptops have HP Recovery Manager. However, regardless of the name, their purpose is the same - to help reinstall Windows without a disk, returning it to factory settings.
True, you can launch Recovery only on a laptop with an unformatted working hard drive on which Windows 7 was previously installed. To launch it, in particular, you will need to reboot the system and press the corresponding hotkey several times when starting Windows:
Further instructions will be determined by prompts from the utility itself. For example, on Samsung, the action plan will look like this:
Connecting the Windows installation image
Let's connect the image with the operating system to the virtual drive ( VM \ DVD \Image file\OK)
Install the OS ( Run\ F 2\ BIOS \Boot priority\Next\Install\I don’t have a key\ Windows 10 Pro \Custom setup, only for experienced ones\Format partition 1\Select it for installation\Next\Installation )
How to install Windows without a flash drive or disk: manipulating boot records.
- The new operating system is ready and more or less functional (there are no device drivers). However, when you reboot, you will not see the previous OS in the boot menu. What to do? That's right - you need to reactivate the disk with the previous system (C:) or mark the Reserved 100 MB partition active (this is exactly what I will do: I initially have it, and this is very good for security purposes). You already know how to do this in two ways (focus on the size of the volumes):
- more thorny - with the active drive_letter command from the running diskpart utility (see above in the article)
- faster - from the disk management console, marking the required disks as active. See:
or
Please note - the drive letters in this Windows are different
- we reboot and... What, again there is no Windows, but it has just been installed? Certainly. The boot record on the Reserved Disk knows nothing about it. This can be easily fixed and we will add it now. Open cmd again as administrator and enter a simple command, pointing to the new download source:
bcdboot F:\Windows
where F is the drive letter with the new Windows. That's all, you can reboot and check. You can do this without restarting Windows. You can find out about the list of systems available in the boot menu again from the console by entering:
bcdedit
Everything is in place. Now, with a little practice, you can install Windows without a flash drive or disk very quickly.
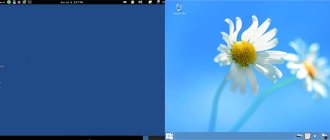
Launching in audit mode
When the dialog box appears, “Let's start with the region,” press Ctrl+ Shift + F 3 to get into audit mode, the virtual machine will reboot.
The audit mode allows you not to save any garbage in the system, and upon completion of work in this mode, the system is cleared of all data of the current user so that the system is clean, as if no user had ever been created in the current system. And also the binding to the equipment is removed, i.e. you won't have any problems running it on a computer with a different processor or motherboard.
There is no need to close the window that appears!
Installation instructions
Step 1.
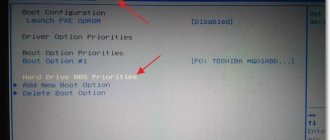
To install the system, you need to enable boot from disk. Enter BIOS.
Step 2.
Switch to the Boot tab.
Step 3.
Enter the “Boot Device Priority” menu.
Step 4.
Select the option that is responsible for your DVD drive.
Important!
Please note that the BIOS supports both built-in and external drives. In this case, an external (USB) DVD drive is used. It should be noted that the BIOS may give the wrong designation; in this case, DVD-RW is used, but the device itself is called CD.
Step 5.
Increase the boot device priority by pressing the F6 key.
Step 6.
Save the configuration changes and restart the computer (F10 key).
Step 7
Set the system language format and default keyboard layout, then proceed to the next page of the installation wizard.
On a note!
This article involves installing
Windows 7 enterprise, English version. However, at step 7 it is worth specifying the default Russian keyboard layout - otherwise, after installing the system, you will have to register an additional layout through the registry, or using third-party software.
Step 8
Click the "Install Now" button to go to the next screen.
Step 9
Please review the terms of the license agreement. If you agree, then proceed further.
Step 10
At this stage, it is recommended to use the “Custom” item (regular), even if you are installing Windows 7 on XP. If you intend to keep the data from the previous system, then do not format the drives and proceed to step 14.
Step 11
To format the hard drive, or divide it into logical volumes, expand the “Drive options (advanced)” menu.
Step 12
To format, use the appropriate command.
Step 13
When prompted by the installation wizard, confirm your consent to wipe the hard drive partition.
Step 14
Specify the hard disk volume intended for installing the operating system.
Step 15
Wait until the installation wizard finishes. It takes place in five stages:
- Copying system files to your hard drive (Copying Windows files).
- Unpacking these files (Expanding Windows files).
- Installing system services (Installing features).
- Installing updates.
- Cleaning up unnecessary files after installation (Completing installation).
Step 16
At this stage, the installation wizard will automatically restart your computer, after which the installation will continue.
Step 17
After the restart, preparations begin for the first login to the installed system.
Step 18
Enter your username and the name of your PC. Keep in mind that this user will have administrator rights.
On a note!
When working in a domain, it is recommended to use English-language names.
If your computer is not part of a domain ( stand- alone), then the language of the name does not matter.
Step 19
Set a password if desired. This option is recommended, but not required.
On a note!
If you use a password, it is advisable to leave yourself a hint. It is best to use the first character of the password as a hint.
Step 20.
Select operating system security settings. The “Use recommended setting” option implies the installation of all important and recommended updates, “Install important...” – only important ones, “Ask me later” – manual configuration after installing the system.
Step 21
Set your time zone.
On a note!
Some versions of operating systems still have daylight saving time switches. To disable them, you need to download the appropriate updates and install them. However, there is another way - you can specify the same time zone, but in a different country. In this case, instead of the Krasnoyarsk time zone, the Bangkok time zone is selected.
Step 22
Set the current date and time.
On a note!
Usually the date and time are set correctly initially. The data is taken by the system from the BIOS, so if you see an error, check its settings; perhaps the battery on the motherboard has run out of power, and the date has been reset to the period of the latest BIOS firmware.
Step 23
Wait until the settings are applied.
On a note!
When any user logs in for the first time,
Windows 7 selects screen resolution modes and scans publicly available documents to provide them to the user.
Step 24
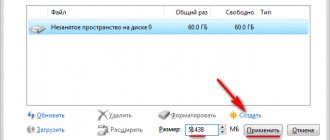
To Russify the system, use the “Windows update” function and start searching for updates.
Step 25
To install the desired interface language, check the optional update KB972813 and start the installation process.
Installing programs and setting up the system
Now we need to install all the required software and Windows updates if you need it.
Updates ( Windows Update \Check for Updates )
As for installing the software, here we need to access the host system files ( Virtual machine \ Install VMWare Tools \ Install \ Typical \ Reboot )
Now we can connect the folder with the software to the virtual machine ( Virtual\Settings\Options\Shared folders\Always on\Map as a network drive in Windows \ D :/Soft\Enable this shared resource\OK )
Now we can install the software we need ( This computer\ Shared Folders \Software\Install all the necessary programs )
We remove the VMWare Tools software, of course you can do without it, but then you will have to properly configure the network and network access, and this is not always convenient.
Programs for quickly creating a virtual drive
If you are using OS Windows XP/7, then you should select a program to work with virtual optical drives. The list below shows the most popular programs and their features:
- Daemon Tools. One of the very first and most popular programs on the market of similar software. The program is shareware - Lite and Premium versions are available to users. Working with existing virtual disks is organized in a very convenient way; the user can quickly create and delete disks. In the free version of the software, it is possible to create only 4 images at a time. The program supports iso, img, dmg, vdf, mds, mdf formats.
- The program is distinguished by its ability to create a large number of virtual disks simultaneously. There is also the ability to record to a removable CD. With this program, users will be able to store all their disks virtually in case the physical disk gets damaged. It is also possible to download images from the Internet and mount them for further installation using this program.
- Software that works exclusively with ISO images. Images are mounted quickly and execution time is kept to a minimum. It is possible to convert images of other formats directly to ISO.
- The utility is free and available for download. The function of creating disk images yourself is available.
- Virtual CloneDrive. A program with a minimum of settings, high speed of execution and disk reading. The OS recognizes the created disk as a physical CD/DVD-ROM.
Free OS updates
Microsoft regularly provides users of licensed versions of the OS with the opportunity to upgrade to newer versions of the software for free. Windows 7 Home Edition users can upgrade to the Professional or Premium version through the official Microsoft.com website or through the Update Center, which is located in the control panel of each computer. Installing new software is as easy as pressing a few buttons. Basically, installing a new system takes from half an hour to 120 minutes, depending on the speed of the computer or laptop's central processor.
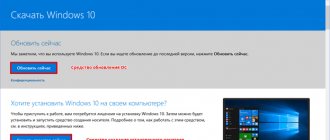
It is possible to replace Windows 7 with Windows 88.1 for free. Follow the instructions to find out about the possibility of updating the OS:
- Download the Update Assistant from Microsoft here
- Run it and wait for the installation to complete. This will take a few minutes.
- Follow the on-screen instructions to find out which new OS version your system is compatible with. Next, the program will offer to download new software and install it.
So, first you need to configure the BIOS
.
To do this, turn on the computer and immediately hold down the “Delete”
(on some keyboards it’s short “Del”) on the keyboard until we get into
the BIOS
(by the way, I almost forgot, your Windows XP boot disk should already be in the CD/DVD drive ).
Your BIOS may look different. It depends on the manufacturer and. But don't be afraid, the settings are basically the same. In BIOS we will work with the arrow keys ←→↓
.
So, we went into the BIOS, then go to the Advanced BIOS Features tab:
In your BIOS, the name of the tab may be different. If so, then go through the tabs and find which one contains device boot parameters
. In my case, this is what the device boot parameters look like:
Now our task is to make sure that the computer boots from the disk, i.e. to "First Boot Device"
we will supply
CDROM
.
We do it like this (select the option opposite First Boot Device
, press Enter on the keyboard and use the arrows to select CDROM)
:
It should look like this:
Maybe this confirmation will appear. Press "Y"
on the keyboard, which means
“Yes” (yes)
, and press Enter:
Next there will be a reboot. We are waiting for the following message to appear : “Press any key to boot from CD”
, which means
"press any key to boot from CD
. Press any key:
And the installation program will start. After checking your system configurations, you will be given the option to Restore your existing system or install a new OS. Select “ENTER=continue”
:
Then accept the license agreement by pressing the F8
:
Then select the partition on which Windows will be installed. This is usually section C
:
Don't be afraid, press C
:
Select “Format partition using NTFS”
:
Confirm with the F
:
File copying will then begin automatically:
After this, the computer will restart. Never click on "Enter - Restart Computer"
, otherwise the installation will be interrupted. Let the computer reboot itself:
After the reboot you will again be prompted to press any key, do not press
otherwise you will start the installation
again.
After the reboot, the installation will continue, but in a more attractive environment:
Set the time, date, time zone and move on:
If this message appears, click OK
:
ok again
:
Select “Snooze this action”
:
We write the account name. You can have up to five if there are several users:
That's it, the installation is complete!
I hope to install Windows XP
was successful. All that remains is to install the drivers for normal operation of the computer. Good luck!!!
In some situations, it becomes necessary to urgently reboot a personal computer based on Windows XP. But not everyone knows how to do it correctly. Even experienced users have no idea about all the ways to reboot a PC running under the guidance of this OS.
Regular method
It is most acceptable when all elements of the Windows XP operating system are functioning normally. Used to take effect of changes made before the reboot (installation of software, drivers, rollback of the OS state when restoring it). A typical reboot goes like this:
- Click the mouse to bring up the Start menu.
- At the bottom right we find the “Shutdown” button and click on it with the mouse.
- In the “Turn off computer” dialog box that appears, confirm your actions by clicking the “Restart” button.
- The Windows XP OS reboot procedure begins.
Reboot using keyboard shortcut
This method is convenient when the graphical user interface, which is controlled using the mouse, fails to function. This reboot of the operating system occurs by simultaneously pressing a certain key combination on the computer keyboard:
- "ALT"
and
"F4". - Or "CTRL"
,
"ALT"
and
"DEL"
. - After clicking them, a dialog box will appear on the monitor. On it, click the button with the inscription of the desired action.
- After which the operating system reboot procedure starts automatically.